A generator is an important part of any car, which is responsible for its power supply. With the help of this unit, it is possible to provide a continuous supply of electricity to all components, various systems and sensors, making its operation possible.
On the car, a unit with article number 9412.3701 is used as a standard generator. Such a generator can also be found on the injector of the VAZ-21214, VAZ-2131, VAZ-2123.
If the generator on a Chevrolet Niva fails, you can replace it with analogues, the most popular of which are presented in the table.
| Generator | vendor code | Cost, in rubles |
| VAZ-2123 (produced after 2003) | 5112.3771-30 T | 5370 |
| VAZ-2123 (produced after 2003) injector 14V 80A PRAMO | 5112.3771 | 4460 |
| VAZ-2123 (produced after 2003) | 9402.3701-04 | 4380 |
A generator for a Chevrolet Niva costs between 5,000 and 7,000 rubles. The price of the original unit depends on the region of purchase. Many owners prefer to use Start Volt at 120 amperes when the factory generator fails.
Does a Chevrolet Niva have an 80 amp generator?
Or is it still better to take a more powerful one - 100 amperes? I recently thought about this question, because either my gene has become quite worn out and can no longer produce the required voltage. That’s why my battery is almost always dead, so I almost have to immediately turn off the appliances, the stove, etc. In general, if the gene is bad, then you can’t even listen to music in nature for a couple of hours, the battery will die. And if the time has come to change it, then maybe immediately take a more powerful one?
I recently changed the alternator belt, there was a whole story about how it broke and I got home with grief in half. Be sure to read it, I think it will be useful to many. And take a second spare with you))
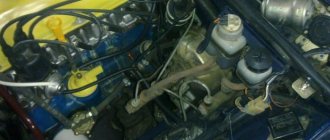
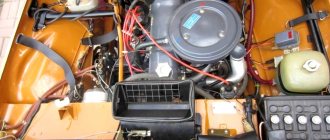
Also useful information for Shevik owners - cars before September 2003 have a lower-mounted generator, this is not a hum, when overcoming deep puddles and fords it usually floods and this situation is not a fountain, you understand. It’s not for nothing that many car enthusiasts carry genes that are much higher, both in Nivas and Cheviks.
But since September 2003, Sheviks have come with an overhead generator, this is already an excellent solution. The gene is located at the top right if you are facing the open hood. When overcoming puddles, it will be much more difficult to fill it than the lower ones.
So I started thinking, maybe I’ll install a more powerful generator, because I plan to install a trunk and, of course, a chandelier; I think 4 lamps from hella will fit in quite well. Plus I will also install a winch, and it also drains the battery pretty badly. And if the gene is weak, then when fighting off-road, we can get a situation where we are skidding in the dark, the chandelier is turned on, the engine is boiling - both fans are threshing at full strength, we are pulling with a winch - will the gene be enough for 80 amperes? Such energy consumption, of course, will not happen often, but when it happens, it’s better to be safe, isn’t it?
On the other hand, wouldn’t a 100 ampere battery drain the battery? After all, the battery is new and it would be wrong if it only lasts a year or two. As I read again on the forums, a more powerful gene shortens the life of the battery.
I read the reviews of Shnivovodov - the majority say that betting on a hundred is a good thing, but only when it is actually needed, in the sense of needing a gene of increased power. Because the staff is quite enough if it works as it should. But if the car has a winch and additional light, then it is better to install a 100-amp generator. We'll keep thinking ))
Who thinks what, share your thoughts in the comments.
Generator Chevrolet Niva
A generator is an important part of any car, which is responsible for its power supply. With the help of this unit, it is possible to provide a continuous supply of electricity to all components, various systems and sensors, making its operation possible.
On the car, a unit with article number 9412.3701 is used as a standard generator. Such a generator can also be found on the injector of the VAZ-21214, VAZ-2131, VAZ-2123.
https://www.youtube.com/watch?v=9UEaAp2zdd0
If the generator on a Chevrolet Niva fails, you can replace it with analogues, the most popular of which are presented in the table.
| Generator | vendor code | Cost, in rubles |
| VAZ-2123 (produced after 2003) | 5112.3771-30 T | 5370 |
| VAZ-2123 (produced after 2003) injector 14V 80A PRAMO | 5112.3771 | 4460 |
| VAZ-2123 (produced after 2003) | 9402.3701-04 | 4380 |
A generator for a Chevrolet Niva costs between 5,000 and 7,000 rubles. The price of the original unit depends on the region of purchase. Many owners prefer to use Start Volt at 120 amperes when the factory generator fails.
NOTE Chevrolet Niva, produced before the fall of 2003, was equipped with a generator type 9412.3701, which was also installed on the injection VAZ 21214, VAZ 2131, VAZ 2123 until the fall of 2003.
NOTE: The generator installed on the vehicle used for photography is driven by a V-belt. Repair work is shown using the example of a generator with a multi-belt pulley. All elements of both generators, except for the pulleys, are absolutely identical.
The generator armature is driven into rotation from the crankshaft pulley by a V-belt or (depending on the version) by a poly-V-belt.
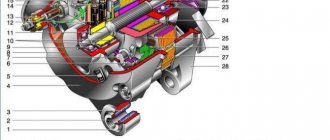
Rice. 9.3. Generator 9402.3701-01: 1 - rectifier unit; 2 — bearing sleeve; 3 — rear bearing of the rotor shaft; 4 — slip rings; 5 — protective sleeve; 6 — terminal “B” of the generator; 7 — gasket; 8 — casing; 9 — voltage regulator with brush holder; 10 - coupling screw; 11 — back cover; 12 - stator; 13 — front cover; 14 — spacer ring; 15 — front bearing; 16 - pulley; 17 — washer; 18 - rotor.
The three-phase alternating current induced in the stator winding is converted into direct current by a rectifier unit 1 attached to the cover 11. The electronic voltage regulator 9 is combined into one unit with a brush holder and is also attached to the cover 11.
Rice. 9.4. Generator system connection diagram: 1 - battery; 2 - generator; 3 - battery charge indicator lamp located in the instrument cluster; 4 — mounting block; 5 - ignition switch.
The generator connection diagram is shown in Fig. 9.4. The voltage to excite the generator when the ignition is turned on is supplied to terminal “D” of the regulator (terminal “D” of the generator) through indicator lamp 3 located in the instrument cluster. After starting the engine, the excitation winding is powered by three additional diodes installed on the generator rectifier block.
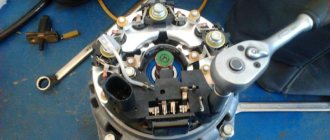
Removing the voltage regulator
If we consider the simplest closed circuit, which is placed in a time-varying magnetic field, then the induced emf in it is proportional to the rotation frequency of the electromagnet. Considering that a car engine operates at different frequencies, a device is needed to stabilize the output voltage. The role of this device is played by a voltage regulator located in the brush assembly.
The current flowing through the rotor winding is able to regulate the magnetic flux, hence the output voltage. When it exceeds 14.2 V, the transistor closes the excitation circuit. When the voltage drops to 13.5 V, the circuit is unlocked again.
The voltage regulator can be removed from the Niva Chevrolet for replacement using a flat-head screwdriver and a size 8 wrench. The procedure is as follows:
- This is worth doing if the voltage in the system does not correspond to the norm - less than 13.5 V.
- Disconnect the wire from the negative battery.
- Disconnect the generator block with terminal D. Turn the rubber boot to the side and unscrew the nut.
- Disconnect the wires from the stud.
- Unscrew the nut securing the generator excitation circuit terminal, and then remove the terminal itself.
- Loosen the 3 screw fastenings of the plastic casing of the generator set and remove the casing.
- Next are 2 more fastening nuts that secure the voltage regulator.
- We disconnect the screw securing the terminal to the D bus from the rectifier, after which you can finally remove the voltage regulator itself.
The generator on Niva works for a very long time and will remain in operation for several years without any problems. Over time, its power drops noticeably, then it is worth replacing several of its parts or the entire assembly. If after replacement the problem with a drop in power cannot be eliminated, you should go to a service center for diagnostics.
Features of the device and principle of operation
Generator type 37.3701 - alternating current, three-phase, with a built-in rectifier unit and electronic voltage regulator, right rotation (drive side), with a fan at the drive pulley and ventilation windows in the end part. To protect against dirt, the back cover of the generator is covered with a protective casing.
The operation of the generator is based on the effect of electromagnetic induction. If a coil, for example, made of copper wire, is penetrated by a magnetic flux, then when it changes, an alternating electrical voltage appears at the coil terminals. Such coils, placed in the grooves of the magnetic circuit (iron package), represent the stator windings - the most important stationary part of the generator - they are the ones that generate alternating electric current.
The magnetic flux in the generator is created by the rotor. It also represents a coil (excitation winding) through which a direct current (excitation current) is passed. This winding is laid in the grooves of its magnetic core (pole system). The rotor, the most important moving part of the generator, also includes a shaft and slip rings. When the rotor rotates opposite the stator winding coils, the “north” and “south” poles of the rotor appear alternately, i.e., the direction of the magnetic flux penetrating the stator windings changes, which causes the appearance of alternating voltage in them.
In order to obtain a constant voltage from an alternating voltage, six power semiconductor diodes are used, which together form a rectifier unit installed inside the generator housing.
The field winding is powered from the generator itself and is supplied to it through brushes and slip rings.
To ensure the initial excitation of the generator, after turning on the ignition, current is supplied to terminal “B” of the voltage regulator through two circuits.
- Plus battery – contact 30 of the generator – contacts 30/1 and 15 of the ignition switch – contact 86 and 85 of the ignition relay winding – minus the battery. The relay turned on and the current flowed through the second circuit:
- Battery plus – track 30 of the generator – tracks 30 and 87 of the ignition relay – fuse No. 2 in the fuse block – track 4 of the white connector in the instrument cluster – 36 Ohm resistor in the instrument cluster – battery charging warning lamp – track 12 of the white connector in the instrument cluster – track 61 – terminal “B” of the voltage regulator – excitation winding – terminal “W” of the voltage regulator – output transistor of the voltage regulator – minus battery.
After starting the engine, the excitation winding is powered from the common terminal of three additional diodes installed on the rectifier unit, and the voltage in the vehicle's electrical system is controlled by an LED or lamp in the instrument cluster. If the generator is working properly, after turning on the ignition, the LED or lamp should light up, and after starting the engine, it should go out. The voltage at the 30th pin and the common pin of 61 additional diodes becomes the same. Therefore, no current flows through the indicator lamp (LED) and it does not light up.
If the lamp (LED) lights up after starting the engine, this means that the generator set is faulty, that is, it does not produce voltage at all, or it is lower than the battery voltage. In this case, the voltage at pin 61 is lower than the voltage at pin 30. Therefore, current flows in the circuit between them, passing through the LED/lamp. It/she lights up, warning that the generator is faulty.
Principle of operation
The basis for obtaining electric current is the phenomenon of electromagnetic induction. It represents the occurrence of an induction current in a closed circuit under the condition of a change in the magnetic flux penetrating this circuit. There may be several ideas for implementing a generator set. It is enough to recall all the experiments on observing EMR.
But rational and technical components impose their limitations. It is irrational to use a permanent magnet as a source of magnetic field, since it will be impossible to regulate the magnetic flux. By changing the current strength in the electromagnet, you can ultimately influence the output parameters of the induction current.
The rotor includes not only the windings of the electromagnet, but also the shaft with slip rings. Thanks to the sliding contact of graphite brushes with slip rings, the movable winding is excited. Current is supplied to the voltage regulator through one of two circuits. Initially, when the engine is turned off, the winding is powered by the battery.
Also interesting: Polishing the Niva body
The operation of the generator is monitored by turning on the lamp on the instrument panel.
When the device is operating, the potential at the generator contact and at the output of the diode bridge is the same, therefore, current cannot flow through the lamp. If the light is on, this means low voltage at the diode connector, which indicates a faulty power source. The rectified current powers the on-board network and recharges the battery.
Checking the condition of the engine using the oil filler cap
Agree that when you come to inspect the car you like, you are unlikely to measure compression, oil pressure and timing chain tension on the spot. But checking in the service is not free, it takes time, and the owners (for obvious reasons) do not particularly like this procedure. However, you can roughly understand the condition of the piston without service, literally in the yard.
Verification procedure
Everything is elementary. Start the engine and unscrew the oil filler cap. And then there are possible options.
Option number one: nothing special happens.
And by placing a piece of paper on the oil filling hole, you can watch how it slightly sticks to it. This is a good sign. You can inspect the car further (you should prepare a list of items to check in advance). However, the probability of encountering such an idyllic picture on a middle-aged engine is approximately equal to the probability of encountering the crew of a flying saucer. But anything can happen, what if you are lucky?
Option number two: nothing special happens, but the leaf blows away.
It's already worse, but in general, it's expected.
Now we place the lid itself on the neck. Just put it on the hole as tightly as possible. The lid twitches, but does not fly off
. And this is the most likely outcome of events. In the absence of other negative factors (smoke or oil splashes), you can already put on a sad face and tell the seller that “the ventilation is all over, and maybe there’s no compression at all. "Remember this phrase - it will come in handy. Well, then - the classic auction and further inspection of the car with passion.
Option number three: something incomprehensible is happening.
Namely: smoke comes from the engine neck, or worse, oil splashes.
The attached cover comes off even at idle. And here there is nothing more to talk about. You screw it back in, shake the seller’s hand and leave. No options.
And what is the result?
Those who carefully read my blog can already guess. For those who don’t read carefully, I recommend reading this article
, where I described in detail the essence of the VKG system. Therefore, I’ll simply state: firstly, a strong “blowing” from the neck indicates a clogged crankcase ventilation. This may be bad, but it can be solved independently (see below). But what’s worse is that this is a symptom of an active breakthrough of gases into the crankcase itself. From there they are already rushing out with all their might through any hole, which you can observe with the oil filler cap removed. Needless to say, in this case, replacing the piston rings and disassembling the engine is the best option for further developments. And the worst is banal capital. Moreover, you will only find out the price during the process. And you shouldn’t be surprised that it can easily amount to up to a third of the price of a car purchased “without looking”.
Below is a personal example of how to clean the ventilation system built into the valve cover.
Source
Replacing the Chevrolet Niva generator
The generator is responsible for powering the vehicle while the engine is running. When diagnosing some malfunctions, it is necessary to replace the Chevrolet Niva generator, but you must first make sure that this procedure is appropriate.
Signs of a generator malfunction
As a consequence of the fact that the purpose of the generator is well defined, its failure is easy to diagnose. Whether the Chevrolet Niva generator can be repaired or not, it will definitely have to be removed from the car. There are several basic diagnostic procedures to make sure that repairs are necessary.
- The battery charge indicator light is on on the instrument panel.
- Excessively rapid battery discharge when the engine is running.
- Changes in light brightness as engine speed increases.
- All these signs indicate either a complete lack of charging or insufficient charging current, which leads to replacement of the unit.
- You can watch a video that describes the procedure for removing the generator.
- In order to carry out repair work with your own hands, you need to have a suitable tool, as well as know the algorithm for performing all the actions.
Tool for the job
To carry out work on replacing the device on a Niva Chevrolet car you will need:
- 8-open-end wrench;
- 10 open-end wrench;
- head for 10, knob
- 13 open-end wrench
- 17 open-end wrench
- poly V-belt (it is recommended to install a new one after removing the drive belt).
Generator replacement algorithm
The first thing you need to worry about is your own safety by removing the terminals from the battery. Depending on the type of terminals, you will need a 10 or 8 key.
Then, on the rear panel of the generator, the wire is unscrewed from the contact bolt and the block is removed from the brush assembly.
The generator belt is tensioned using a special plate - tensioner. It can be adjusted by first loosening the mounting bolts. You can find the tensioner plate in the area of the tension roller. This plate is secured with three bolts. It is more convenient to unscrew them with a 10 mm open-end wrench. However, only two bolts can be easily unscrewed with an open-end wrench.
For the third, a ratchet or crank is provided. The bolts are not completely unscrewed, but only slightly loosened. Right there, next to the plate, you can see the adjusting bolt. Using a 10mm wrench, it must be completely unscrewed, and the tensioner plate together with the current source will move to the side, loosening the belt.
You can read more about how to remove the belt here.
Replacing a Chevrolet Niva pump
All that remains is to dismantle the belt and unscrew the generator, which is attached by two bots, top and bottom. This procedure will require a 13 mm wrench, but if the bolts turn, you will have to hold them at the back with a 17 mm wrench.
Generator installation
Replacing a Chevrolet Niva generator comes down to the subsequent installation of the device. You must follow the same algorithm. Naturally, in this algorithm it is necessary to reverse the order of actions. First, the assembly is screwed to the engine using two bolts.
It is not recommended to tighten them completely, as the belt will still need to be tightened later. The new V-ribbed belt should fit onto the pulleys with little effort.
It is necessary to bypass the pulleys in the following sequence: hydraulic pump pulley, pulley (tensioner), crankshaft pulley, power steering pulley, roller (bypass), pulley of the device itself.
Using the adjustment bolt, we ensure that the belt in the upper free part, when applied with force, has a deflection of 15-16 mm. Only after this, tighten the three bolts of the tension plate, after which you should check the tightness of the bolts securing the power source.
Generator connection
In order to connect the source to the circuit, you must first complete the work on its rear panel, and then only connect the terminals to the battery. All contacts must be clean, so the wires should be cleaned of oxidized deposits and dirt.
The terminals on the battery must be tightened, otherwise they will quickly oxidize. When starting the engine with a working generator, the warning lamp should go out immediately after starting.
However, experts prefer to evaluate the operation of the generator by measuring the voltage at the terminals.
How to find out if the generator is faulty
When operating a Niva Chevrolet, certain difficulties and malfunctions sometimes arise. During a trip or long-term use of a car, various problems arise, and one of them is the failure of the generator.
Diagnosing a breakdown is quite simple. There are several manipulations that can be used to determine the need for repairs:
- The corresponding light on the dashboard lights up, indicating that the battery is constantly discharged.
- The battery drains quickly when the engine is running.
- The brightness of the light decreases as the engine speed increases. In this case, it is necessary to replace the generator brushes.
Also interesting: Engine tuning: Niva 4x4 - increasing power using common methods ||
Niva boost the engine All of the above signs indicate that the generator urgently needs to be replaced or repaired.
Installing a new generator
The algorithm for installing a new generator is practically no different from dismantling the old one, only all steps are performed in reverse order. So, the car owner will need:
Screw the assembly to the engine by turning and fixing two bolts - upper and lower. At the same time, there is no need to tighten them too much, since then the belt still needs to be tensioned.
Install a new V-ribbed repair on the pulleys. You need to put it on with a little effort and go around the pulleys in the following sequence: hydraulic pump pulley, roller, crankshaft pulley, power steering pulley, roller, generator pulley. Tension the belt by tightening the adjustment bolt and the special plate
It is important that the belt deflection in the upper free part does not exceed or be less than 15-16 mm.
Then all that remains is to tighten the three bolts of the bottom plate and check that the power source is secure.
Basic generator malfunctions
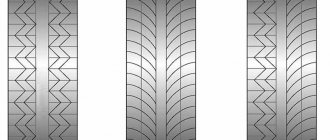
Mechanical problems include an insufficiently tensioned alternator belt or its breakage, bearing failure, wear or damage to the pulley. Diagnosing them is not so difficult, because the condition of the belt and pulley can be assessed visually. A failed bearing produces extraneous noise when the rotor rotates.
- Worn brushes or worn commutator. The condition is determined visually after dismantling the voltage regulator.
- Broken rotor winding. It is necessary to measure the winding resistance with an ohmmeter. If the value is “infinity”, the rotor should be replaced.
- Short circuit of the rotor winding to its body.
- Failed bearings can cause the armature to cling to the stator winding. Such a stator with traces of runout should be replaced.
- Broken stator winding. It is necessary to measure the resistance of each winding.
Generator malfunctions may not be accompanied by the warning lamp lighting up. You can notice this situation by the battery losing charge or by a change in the brightness of the headlight when the engine frequency changes. By contacting a qualified auto electrician, you can significantly save on repairs, because replacing a part is much cheaper than buying a new generator.
Read news about the new Niva
- Generator Niva Chevrolet - voltage, repair and maintenance
- Replacing the alternator belt tensioner pulley
- The modernized Lada Niva Legend (4x4) 2021 was shown on the Internet
- Lada 4×4 Bronto - sales stopped, new details » Lada.Online - all the most interesting and useful about LADA cars
- Description of the instrument panel Lada 4×4 (VAZ 2121, 2131) » Lada.Online - all the most interesting and useful about LADA cars
- Purpose of fuses, relays and their replacement Niva VAZ 21213, 21214, 2131 lada 4×4
- Chevrolet Niva gasoline consumption per 100 km
- Buy LADA (VAZ) 2131 (4×4) 2022 in Rostov-on-Don, low price for Lada 2131 (4×4) 2022 on the Avto.ru website
What to do if the generator breaks down on the road?
A breakdown entails not only loss of battery charge. If the generator jams, the forged belt may break. In this case, all attachments of the car will lose their functionality. Further movement will become impossible. If repair in the field is not possible, try to wait until the nearest service center on the battery. During the daytime, all lights must be turned off, including the DRL. The comfort units must be de-energized. Turn off one of the radiator cooling fans (unless it's too hot outside). With economical use of ampere-hours, you can drive up to 3 hours on one battery.
Stop over-tightening the oil filter.
Every time I buy another used car, I, like many of you, naturally immediately change all the fluids in the car, as well as all the filters. Including oil. In general, this is unnecessary maintenance, a guarantee that the car will last as long as possible. After all, you must agree that an honest car seller is a rarity these days. I have been convinced more than once that all owners need only one thing - to sell their car as quickly as possible. For this they are ready to do anything. So, “a big lie” about the last recent maintenance, in which all the fluids were allegedly changed, is a normal occurrence when communicating with a car owner.
You know, I bought a lot of cars on the secondary market. There were both good and bad. I admit, I have made the wrong choice more than once, buying outright rubbish. True, I was always lucky, I quickly got rid of unwanted cars. Moreover, I often gave away a car I didn’t need, even more expensive than I bought it for.
And you know what irritates me most about used cars during the first maintenance after purchase? Oil filters. You won't believe it, but every car I've ever purchased on the aftermarket had terribly tight oil filters, which caused me a lot of inconvenience. Yes, I understand that a loose filter can also turn into a whole problem. But this does not mean that when replacing it, the filter needs to be tightened as if it will remain in the engine forever.
Did you know that every part in a car must be tightened with a certain force? For this purpose, the automotive industry even has entire specifications that indicate the torque (force) required for reliable and correct fixation of parts, components and attachments of the car.
Of course, it is worth mentioning that it is not convenient to screw in oil filters on all cars. After all, it all depends on where its landing nest is located.
For example, on my 1992 Jeep Cherokee (photo above), the oil filter is in a very convenient location, allowing it to be easily accessed from above. It only takes a few minutes to unscrew the old filter and install the new one. The filter on this SUV screws in very easily.
But, for example, another one of my cars (Jeep Grand Wagoneer - pictured above) has a slightly different location of the oil filter. Therefore, if you screw the filter very tightly later, when replacing it with a new one, unscrewing the oil filter will not be so easy. Most likely, in this case, you will have to use a special tool for unscrewing oil filters to unscrew the filter, or adapt your home tool to a special filter puller. Agree, it is very inconvenient. This is what constantly irritates me when, after buying a used car, I change the engine oil along with the oil filter.
But that's only half the problem. In many cars, removing the oil filter can be a real hassle. Especially in those cars where the design of the engine compartment and engine does not provide easy access to the filter.
For example, the photo above is of the engine compartment of a 1995 Jeep Cherokee, which has an oil filter located very close to the engine.
Removing this filter from the engine is very difficult even with the help of tools, since the space between the filter is very small. The thing is that when you use a tool to unscrew the filter, you have virtually no room left to rotate the filter. In this case, many auto repairmen and car owners, when dismantling the old filter, get rid of it as best they can, using the dirty method that is so popular in our country: a flat screwdriver + a hammer.
For example, here's how to unscrew an old oil filter from a Nissan:
Why did I decide to raise this topic? As you can see, there are many cars in the automotive world that, due to their complex engine compartment design and engine features, have oil filters located in places that are inconvenient for replacement. That's why I urge anyone who changes their own oils and oil filters not to tighten them too tightly. Can you imagine what it will be like to unscrew a tightly screwed filter, if it is still located in a very inconvenient place. Then you yourself will suffer.
A simple way to diagnose an engine using the oil filler neck
Auto mechanics rightfully consider the oil filler neck to be the “mirror” of the entire engine. This part of the engine is as accessible as possible for a quick inspection and allows you to identify a number of faults without opening it. Fixing problems early allows you to save a lot on repairs later. That is why I decided to talk about how to diagnose an engine using the oil filler neck without using specialized equipment.
Many car owners use the oil filler neck exclusively to add engine oil. At the same time, auto mechanics recommend inspecting this area at least occasionally even if there are no noticeable problems with the engine
.
Early diagnosis of a malfunction will make it possible to get rid of it with a quick and inexpensive repair
, rather than having to overhaul the entire engine later.
First, you should inspect the oil filler cap. Many car enthusiasts notice a white emulsion
and they start sounding the alarm.
A similar liquid in color and consistency is formed inside the engine when antifreeze mixes with engine oil through a broken cylinder head gasket. However, a white coating on the oil filler cap does not indicate such a problem
.
As a rule, an emulsion is formed as a result of condensation. The oil filler cap is usually located at the top of the engine, so this is where the maximum amount of condensate accumulates
.
Now we look into the oil filler neck itself and evaluate the surfaces for the presence of deposits
.
Car owners often encounter the formation of dark, thick contaminants that look like fuel oil. A similar phenomenon is associated with the use of low-quality oil or its untimely replacement
. In such a situation, it is advisable to flush the engine with a good flushing oil the next time you change the engine oil.
Next, you need to tighten the oil filler cap and start the engine. With the engine warm, unscrew the cap again and observe unnatural phenomena. Worn out engines can usually be identified by smoke coming out of the oil filler neck.
.
This phenomenon is associated with incorrect operation of the crankcase gas exhaust system. The situation can be corrected by cleaning the valve or replacing structural components, but in practice, car owners forget about the problem and drive like this for a very long time. It is advisable to still think about troubleshooting, otherwise the engine life will gradually decrease
.
Smell of unburned gasoline from the oil filler neck
may indicate that the air-fuel mixture is too rich or the fuel pump is faulty.
In this case, it is advisable to carry out a full diagnosis of the car, since it is impossible to determine the exact cause of the phenomenon by smell
.
Source
Precautionary measures
The operation of a generator set requires compliance with certain rules, mainly related to the presence of electronic elements in them.
- The generator set must not be operated with the battery disconnected. Even a short-term disconnection of the battery while the generator is running can lead to failure of the voltage regulator elements.
If the battery is completely discharged, it is impossible to start the car, even if you tow it: the battery does not provide excitation current, and the voltage in the on-board network remains close to zero. It helps to install a properly charged battery, which is then replaced with the old, discharged one while the engine is running. To avoid failure of the voltage regulator elements (and connected consumers) due to increased voltage, it is necessary to turn on powerful electrical consumers, such as heated rear windows or headlights, while the batteries are being replaced. In the future, after half an hour or an hour of engine operation at 1500-2000 rpm, the discharged battery (if it is in good condition) will be charged enough to start the engine.
- It is not allowed to connect electrical sources of reverse polarity (plus to ground) to the on-board network, which can happen, for example, when starting the engine from an external battery.
- Any checks in the generator set circuit with the connection of high voltage sources (above 14 V) are not allowed.
- When carrying out electric welding work on a car, the ground terminal of the welding machine must be connected to the part being welded. The wires going to the generator and voltage regulator should be disconnected.
Nuances
To transfer, you will need a set of keys, a bracket, mounting bolts, and a V-belt. You can make a generator transfer bracket with your own hands according to the drawing below.
Drawing of a homemade bracket
Sequence of actions during transfer:
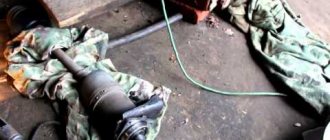
- We dismantle the propeller, pump and remove the belt.
- By unscrewing the standard bracket, you can remove the generator.
- We cut off the bead around the side of the cylinder head and on the cylinder block.
- Then you should unscrew the two bolts and two studs.
- Next, the assembly is installed on a new bracket and final assembly is performed.
Thus, moving the generator unit upstairs is not difficult.
When replacing a generator with a Niva 21213, 2121, 21214, a number of subtleties arise, and one of them is the location of the generator unit. It is located at the bottom of the engine compartment.
Actually, this is why problems arise with the operation of the structure: while driving, various contaminants get on the generator, and coolant drips. If you don’t want to constantly change the generator unit, it is recommended to move it upstairs.
To ensure that no problems arise during the operation of the car, it is important to monitor the condition of the car. First of all, it is recommended to regularly inspect the generator.
Timely inspection will help to avoid unpleasant situations in the form of breakdowns of the constituent elements of the generator, and as a result, failure of entire electrical systems.
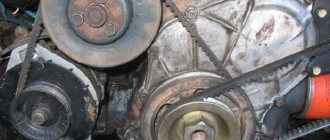
Generator drive and mounting it to the engine
The generator is driven from the crankshaft by a belt drive using a V-belt. Accordingly, for this belt the generator drive pulley is made with one groove.
To cool the generator, plates are spot welded on the back side of the pulley. On the pulley they are located almost perpendicularly and perform the function of a fan.
The lower mounting of the generator on the engine is made on two mounting legs, articulated with the engine bracket with one long bolt and nut. The top one is through the pin to the tension bar.
Transfer process for carburetor fields.
- Belt 6РК1290;
- Adjustment bar;
- Crankshaft pulley from tens.
In this option, you will need an upper adjustment bar. The author of the drawing decided to borrow
. The upper adjustment bar must be cut in place, and then a new hole for fasteners must be drilled, its diameter should be 8.5 mm.
Click to enlarge
Second option
Also interesting: VAZ 21213 transfer case device, diagram, alignment, removal of transfer case
This generator transfer drawing differs from the first one in that it uses a belt with a size of 1375 mm. There are fewer steps here, but you will have to work with a grinder - you need to reduce the plane on the head located in the area of the M8 bolt.
Checking and tensioning the drive belt
To check the tension, push the belt to the side. The belt tension is considered normal if the belt bends 10 mm when pressed firmly with the thumb. If the deflection is greater, loosen the nut 6 securing the generator 4 to the tension bar 5. Moving the generator away from the engine using a mounting blade, tighten the Chevrolet Niva generator belt and tighten the nut 6 again.
After 10 thousand km. mileage, and in some cases even earlier, it is recommended to check the tension of the drive belt and, if necessary, tighten it.
Average rating:
5.00 ( 1 out of 5)