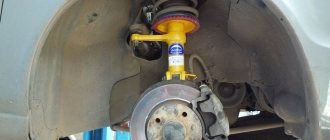
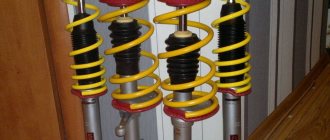
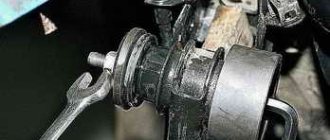
The support bearing is the main element of the upper support of the front shock absorber strut, which serves for its movable connection with the body. While the car is moving, it experiences enormous shock loads, a significant part of which is taken by the “support”, absorbing and distributing them.
The support bearing itself is a rubber cage of a certain diameter with steel balls placed around its circumference. It is protected from above and below by thick rubber gaskets.
Malfunctions
The main sign of a failed support bearing is a knocking sound (dull knocks) in the area of the shock absorber strut. It may indicate that:
- the rubber gasket is damaged or deformed;
- The bearing itself is damaged.
Failure of the support bearing may occur due to:
- resource spent;
- penetration of dirt and moisture;
- exceeding permissible loads;
- mechanical damage due to shock absorber malfunctions.
How to identify a malfunction
To diagnose a support bearing failure, open the hood and remove the “cup” cover. Place your palm on the shock absorber housing and rock the front of the car. If you hear a knock and feel the corresponding vibration with your hand, the bearing is clearly faulty.
When to change
The service life of the “supports” is on average 50-100 thousand km, depending on the conditions in which the car is operated. After this resource has expired, it is recommended to change them. Replacement is also necessary if any malfunctions are detected.
Late diagnosis, as well as ignoring bearing failure, threatens to destroy the shock absorber structure and other suspension elements.
Prices for support bearings for Lada Kalina start from 300 rubles. The shock absorber support assembly costs from 1200 to 3000 rubles. When choosing a support bearing or the entire support, give preference to either the original part or such proven brands as FENOX, TRACK, ASOMI or SS-20.
For the work of replacing one bearing at a service station, you will be asked for an average of 500 rubles. You will have to pay the same amount for adjusting the wheel alignment angle (wheel alignment).
Let's sum it up
Having completed the repair procedure, we go to the service station to adjust the wheel alignment. We “listen” to new supports (bearings) on the road, initially choosing those that best suit your car, making sure that there are no extraneous sounds.
Front support struts and support bearings are integral components of the chassis. Thanks to shock absorbers and struts, impacts coming from the wheels are softened, and vibration and swaying of the car body is also reduced. However, nothing lasts forever; unfortunately, due to constant high loads, the racks and support bearings fail. Delay or untimely detection of non-working struts or support bearings is fraught with serious consequences; if you do not replace failed parts in a timely manner, there is a possibility of complete destruction of the chassis. A faulty chassis increases the likelihood of an accident significantly, so do not delay repairs and regularly monitor the condition of the struts, suspension, silent blocks, and support bearings.
Before you start replacing, find out how to check the VAZ support frame.
Today we’ll talk about how to replace the support bearing of a Lada Kalina with your own hands.
Replacement
- jack;
- wheel wrench;
- open-end wrench 19;
- open-end wrench 17;
- socket wrench 13;
- pliers;
- ring wrench 22 and open-end wrench 9;
- special puller for tie rod ends;
- 2 special spring ties.
Execution order
- We park the car on a level surface and put it in gear.
- We jack up its front part on the desired side and remove the wheel.
- Using pliers, unscrew the nut securing the steering tip to the strut and unscrew it with a 19 mm wrench.
- Using a tip remover, remove the tip pin from the shock absorber strut. As a last resort, the finger can be knocked out by prying it up with a small pry bar and carefully tapping it from below.
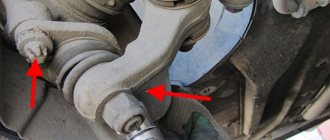
- Using a 19mm wrench, unscrew the 2 nuts securing the strut to the steering knuckle. If necessary, hold the bolt heads with a 17 wrench.
- Using a 13 mm socket wrench, unscrew the 3 nuts securing the support to the body.
- We remove the entire shock absorber.
- We install two ties on the shock absorber spring and compress it until the upper part of the shock absorber is released.
- Using wrenches 22 and 9, unscrew the upper support nut on the upper side of the shock absorber.
- We remove the support, disassemble it, and remove the worn support bearing.
- We install a new one in its place.
- We install the shock absorber in the reverse order.
SIGNS OF FRONT STRUT DAMAGES
- The appearance of knocking noises when driving over uneven surfaces in the area of the pillar. This happens when the thrust bearing has become disintegrated and is not performing its function properly. This also happens if the coil spring bursts.
- When hitting an obstacle, the car sways for some time due to the fact that the shock absorber itself does not dampen the vibrations.
- During a visual inspection, if you see that the strut is wet on a dry road, this means that the front shock absorber has lost its tightness. Oil leaks out of it.
REPLACING STRUTS ON KALINA VAZ 1117, 1118, 1119
Video: So: For any of the above reasons, it turned out that the shock absorber on Kalina needs to be changed! The first thing you need to replace struts on Kalina VAZ 1117, 1117, 1119 is to prepare the necessary tools...
- Wrenches for 17, 19 and 22, preferably ring ones. It is easier to remove old threads with box wrenches. You can, of course, use socket heads with similar parameters.
- A pry bar and a hammer will make it easier to separate the lower part of the shock absorber from the steering knuckle.
- Wheelbrace for removing and installing wheels.
- Pliers.
- An open-end wrench to hold the rod while unscrewing the top nut.
- A 13mm socket head with a wrench, or better yet, a ratchet (it makes it faster to unscrew and tighten the nuts).
- Spring ties.
It would be a good idea to prepare WD-40 lubricant or something similar, just in case the threads are too stuck and the nut or bolt cannot be unscrewed. You also need a jack, better than two, or some kind of reliable support, in case the car tilts and falls off the support. You will have to work hard with a hammer and a pry bar, the body will swing and therefore additional support is needed for insurance.
Video 2
In order to replace at least one of the elements that is part of the Kalina front strut, you need to remove the entire assembly from its seat. To do this, open the hood and use a 22 wrench to rip off the upper support nut, while holding the shock absorber rod with a 9 wrench. There is no need to unscrew the nut completely yet. We also use a wheel wrench to remove the wheel nuts and only then lift the car with a jack. Immediately you need to place a stop for belaying.
Now you can safely unscrew the wheel nuts and remove the wheel. The brake hose is attached to the strut, so it needs to be released from the mount so that it does not interfere when we remove the strut. Now we will need WD-40; we need to treat all the bolts and nuts that will have to be unscrewed. The main thing is to spray on the lower nuts and bolts of the shock absorber that secure the assembly to the steering knuckle.
We remove the steering tip nut and hit the eyelet into which the ball pin of the tip is inserted with strong blows, while inserting a pry bar between the steering tip and its mount on the rack. If you have a special puller, you can press out the finger using it. Unscrew the two self-locking nuts securing the shock absorber to the swing arm. To do this, we use keys 17 and 19. It is better to use similar heads and knobs.
After removing the nuts, it happens that the bolts do not come out. They have to be knocked out. You must first knock them out through a wooden block so as not to spoil the thread, and then, using a punch with a smaller diameter, knock out the bolt when it is already sunk into the steering knuckle.
Video 3
Having removed the bolts using a pry bar and a hammer, we separate the lower part of the shock absorber from the steering knuckle. Then you can start working on the nuts securing the support to the body in the engine compartment. We unscrew the nuts, holding the rack from below with the other hand, lower it down and remove it.
Selection of manufacturer
Below I will describe in more detail the agony of choice, since before purchasing I had to read probably more than 1000 posts on this topic on various forums and blogs, including lkforum and DRIVE2.
- SAAZ is a passed stage, to which you never want to return again. Of course, I understand that you need to save on the components that go on the assembly line, but not to the same extent? Take the same suspension, only on a VAZ 2110-2112, and I have never heard such symptoms there, including on my “twelfth”, which I drove for more than 3 years. I simply don’t understand why they couldn’t make a similar design on Kalina.
- Kayaba (KYB) is originally a Japanese brand that has a good position in this industry. But there is one important BUT - you will never get Japanese quality, since the lion's share of the goods that go to the domestic market from this manufacturer are produced in China. I'm not saying that the Chinese do their job poorly, but with a flow like theirs, the defect rate can be quite high. And the reviews online are quite mixed, so this confused me.
- ASOMI is our manufacturer that develops suspension parts for VAZ and GAZ cars. They make some pretty good components, but there is one significant drawback that put me off buying their parts. The fact is that this manufacturer provides a 12-month warranty, but only on the condition that you install the parts at a specialized service station. I don’t need this, I’ll do everything myself, and if something is wrong with the suspension, who will I complain to then?
- SS20 is a domestic manufacturer of suspension and steering parts. I think that 99% of all Kalina owners have heard about this company and a considerable part have experience in using components of this brand! Even here on the blog there are many positive reviews from many owners. As for personal experience, I rode on the SS20 suspension on some of my friends’ Kalinas, and compared to my car, this is heaven and earth! No knocks on the rebound, moderately stiff and at the same time excellent road holding, even with quite strong maneuvers at a decent speed (Comfort-Optima). In general, I was hooked on this particular suspension, especially since no manufacturer provides such a huge guarantee. For struts it is 2 years, for springs and supports 4 years. And the most important point is that you can install it yourself without fear of warranty problems! And one more thing - even if you don’t have a receipt or warranty card in your hands, the guarantee is still valid according to the number that is stamped on the parts!
Knock in the front suspension of Lada Kalina
Many motorists dread the day when strange knocking noises appear in the suspension, especially the front suspension, which increases with increasing speed. Of course, there is reason to worry, but at the same time, a car’s suspension is a strong and reliable unit that will clearly withstand a few more kilometers to a service station or garage, where it can be diagnosed.
There are four main reasons for the occurrence of knocks and squeaks in the front suspension of the Lada Kalina. Of the three possible causes of knocking, two of them can be eliminated independently.
So, the first reason why a knocking sound may occur in the suspension is the quality of the road surface. Yes, suspensions, even the most ideal and new ones, can squeak and knock on a bad road, even if this has not been observed before. To test this theory, you should drive onto a well-paved road and drive a few hundred meters; if there is no knocking, everything is fine with the suspension; if not, look at the second reason.
How to check support bearings on Kalina
Before replacing the support bearings on the Lada Kalina, you should make a diagnosis and make sure that the “support” has failed , so check out the signs of failure:
- Clicks, knocks of Kalina’s “supports” (audible under the hood, when the shock absorbers are operating);
- A cracking sound is heard from the front side under the hood (when turning);
- Handling deteriorates, play at the steering wheel increases;
- You can feel the bumps in the road through the steering wheel.
If such signs are present, then there is a 99% chance that replacing the support bearing of the Kalina front strut is inevitable, but first make a diagnosis. 1. Place the car on a flat surface and open the hood. 2. Find the upper support, press this place with your palm. 3. Rock the car from bottom to top so that the Kalina front strut supports and shock absorbers work. 4. If you feel or hear knocking noises, it means it's time to replace the support bearing. 5. Ask an assistant to rotate the steering wheel and listen to how the unit works; when in good condition, the “support” functions silently.
We change bearings correctly!
Actually, there are no difficulties in changing the bearing on Kalina. The main thing is to follow the step-by-step instructions that we will give below, and you will be able to deal with this trouble without any problems. So, to replace these components you need:
- Place the car on a flat surface and put it in gear.
- Remove the wheel from the side from which the bearing will be replaced.
- Remove the tie rod end nut. To do this, you will need a 19 mm wrench and pliers for removing the cotter pins.
- Use a special puller to remove the tip pin from the stand. If you don’t have a puller at hand, you can knock it out by prying it from below with a small crowbar.
- We tighten the nuts securing the strut to the steering knuckle. To do this we will need a 19mm wrench and possibly a 17mm wrench to support the bolt heads.
- Remove the nuts securing the shock absorber to the body. To do this, use a 13 mm socket wrench.
- We remove the shock absorber, install it on the tie spring and compress it until its upper part appears.
- Remove the nut of the upper shock absorber support. To do this you will need keys for 9 and 22.
- We are replacing the bearing.
- We assemble and install the shock absorber in the reverse order.
As you can see, the procedure is absolutely elementary and will not take much time; the most important thing is to do everything in accordance with the steps indicated above. If any points remain unclear to you, it is advisable to watch the video instructions for replacing the support bearing with and without removing the strut. Remember, you should not delay in eliminating malfunctions of this kind, because they can lead to more serious consequences, and you will need to spend a lot of money to eliminate them.
Replacing support bearings on Kalina
The support bearing is the main element of the upper support of the front shock absorber strut, which serves for its movable connection with the body. While the car is moving, it experiences large shock loads, a significant part of which is taken by the “support” itself, absorbing and distributing them.
The support bearing itself is a rubber cage of a certain diameter with iron balls placed around its circumference. Replacing lamps on a Suzuki Grand Vitara | video in Zaporozhye. Photo and video instructions for removing the front door trim. Here we show how to remove the driver's door speaker on an Octavia A5. It is protected from above and below by thick rubber gaskets.
Lada Kalina - replacing the support bearing with your own hands
Before disassembling and removing the Kalina front strut with upper supports, be sure to study the structure of the unit. The diagram shows the serial numbers (articles) of the front suspension components.
To remove the support bearings of the front struts of the Lada Kalina you will need a set of tools: 1. A set of open-end or ring wrenches: 9, 17, 19, 22. 2. A 13 socket with a ratchet. 3. Steering wheel end puller, vice, torque wrench (if possible). 4. Jack. 5. Shock absorber spring clamps. 6. Pliers. 7. Hammer. 8. WD-40 lubricant.
How to remove the support bearing on Kalina - step by step guide
Replacing the Kalina front strut supports begins preparing the car. Place the car on a flat surface, if there is a lift or pit available. Engage first gear and release the parking brake. Dismantling sequence in order:
- We unscrew the wheel bolts, then raise the car with a jack or a lift as in our case.
- We gain access to the brake disc, but you don’t need to remove it, nor do you need to unscrew the hub locknut.
Upper front strut support for Kalina - features of choice
As practice shows in most cases, the upper support assembly is replaced. There are three models of “supports” on sale, which you should pay attention to when purchasing.
The photo below shows original sets of supports from three companies: SEVI. SS20 (SS20), ASOMI (ASOMI). The cost of products varies from 2000 rubles. up to 4000 rub. depending on the configuration.
Watch the spare parts review video:
Comparison of Lada Granta support bearings with EUR
Replacement strut support for Lada Kalina
How to change a support bearing without a wheel alignment on a Lada Kalina
Replacing the support bearing on Kalina without removing the strut is impossible, or will not be correct, but replacing the part without further camber is still possible. In this case, the technology for removing the rack will change:
- After removing the wheel, unscrew the hub lock nut.
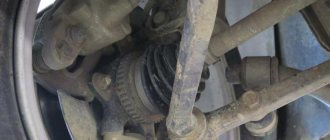
- Disconnect the steering knuckle from the ball joint and steering rods.
- Then we remove the steering knuckle from the CV joint with the strut and shock absorber spring, this way you will not break the camber bolts.
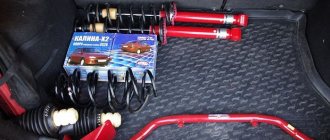
Instructions for installing new springs, struts, support bearings and the supports themselves
First of all, we put the bump stop and boot on the new rack:
Then we tighten the new springs to the required moment and put them on the rack. It is important that the lowestmost coil falls exactly into the recess on the rack, so to speak, in its home place:
When the spring is sufficiently compressed, we proceed to the supports and bearings. We take the new support, turn it over and insert the support bearing. Typically, the bearing is marked “TOP”, meaning that this side should be inserted into the support:
We put a cup on top of the support bearing, as shown in the picture:
And on top of this pancake we put an elastic band:
Now we carefully place this entire structure onto the stand rod and tighten the nut, keeping the rod from turning. It is important that the upper turn, upon final installation, lies exactly along the circle of the elastic so that there are no distortions. As a result, the entire SS20 front suspension module looks like this:
Then we remove the coupler, also checking that the spring is evenly seated at the bottom and top, and you can start replacing. If you are installing spacers, then on them, as well as on the supports, there is an arrow that should be directed in the direction of travel of the car. We put it on the support studs and install the module on the car:
We also insert the stand back to the top of the glass and immediately tighten the nuts. Well, then you will have to sweat a little to get the steering knuckle into the place where the rack is attached. To do this, I pressed the brake disc with my foot with great force, pointing it down, and tried to combine the whole thing with my hand. It didn’t work out right away, but after 10 minutes of effort everything worked out and the rack was installed on the car.
With the second side we perform the same operations and with it everything turns out much faster, since our hands are already full!
So far, no word about impressions of the new suspension, I will write a more detailed article about this tomorrow.
Lada Kalina - front strut support bearing: choice, price, characteristics
If you do change the support bearing individually by installing it in the old support, then you should buy from trusted manufacturers, a summary table of which and photographs are presented below. Catalog number (article) – 1118-2902840.
Table of recommended manufacturers
| No. | Manufacturer | Manufacturer's code | Price 2016, rub. | Equipment | ||
| Peculiarities | Retaining rings | Protective cap | ||||
| 1 | VBF Russia Analogue | 1118-2902840-01 | 700 | – Clip made of hardened steel; – Manufactured according to GOST; – Increased service life; – High-quality lubricant. | – | – |
| 2 | NPP "System Technologies" Russia Analogue | SS10113/11180-2902840-00 | 900 | – Silence; – Vibration damping; – Work at low temperatures; – Protection from dirt and dust. | – | – |
| 3 | AvtoVAZ Russia Original | 1118-2902840 | 750 | – Original product; – 1 year warranty; – Durability. | – | – |
Table of bearing sizes 8112Н and technical characteristics
| Characteristic | Unit | Value according to GOST (TU) |
| Inner diameter of the tight ring, d | mm | 60 |
| Outer diameter of the tight ring, d1 | mm | 85 |
| Free ring inner diameter, D1 | mm | 62 |
| External diameter of free ring, D | mm | 80 |
| Installation height | mm | 17 |
| Dynamic load capacity | kH | 41,5 |
| Static load capacity | kH | 95,0 |
| Nominal speed | rpm | 3600 |
| Axial clearance | mm | – |
| Steel type | – | SHH-15 |
| Hardness of steel and rollers | H.R.C. | 61-65 |
| Contact angle | hail | – |
| Torque | kN*M | 220 |
| Ring roughness | Ra | 0.32 |
| Number of balls | PC. | 24 |
| Ball diameter | mm | 8,731 |
| Mounting chamfer radius, r | mm | 1,5 |
| Weight | G. | 295 |
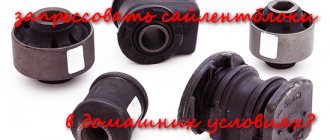
Replacing silent blocks on Kalina
Front suspension silent block close up
The silent blocks on the Lada Kalina car are located exactly the same as in the VAZs of previous years. These elements are located generally on or adjacent to the wishbone . You will have to change them either on the entire element at once, or by selecting the most damaged ones. Of course, if there is damage on one of them, the wishbone with rubber (stock – approx.) stabilizers must be removed and replaced with polyurethane analogues.
Removing the wishbone
- In order to begin work on replacing old silent blocks with new ones, you need to place the car on a viewing hole, a lift, or jack it up.
- Next, you need to remove the wheel and spray all the connections on the wishbone with WD-40.
- After the lubricant has penetrated into all hard-to-reach places, we begin to unscrew the bolts.
- First of all, we begin to dismantle the ball joint bolt, but before that we remove the cotter pin from the bolt.
- Then we unscrew the bolt securing the longitudinal tension hinge (where the “daisies” are attached - approx.) and remove it from the seat.
A generously lubricated bolt is a guarantee of success.
When dismantling this unit, there should be no problems.
For the best impact on the bolt, you can use a wrench extension.
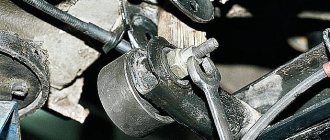
Rubber-metal longitudinal tension joint
The rubber-metal longitudinal tension joint, or popularly simply “daisy”, is designed to take the brunt of the impact from uneven road surfaces; despite the fact that this element is very important, it is very easy to dismantle.
- Having previously clamped the lever in a vice, we knock out the silent blocks one by one using a chisel or a thin flat screwdriver.
Punching out “daisies” is not an easy task.
This is what the old suspension elements look like
To cause the least damage to silent blocks, it is better to place pieces of wood between the vices.
Stabilizer strut and cushion
- The stabilizer bar, or simply “eggs,” and the cushion provide the stabilizer bar with stable operation while driving the car.
- It is very easy to dismantle the “eggs”, just unscrew the mounting bolt from the transverse arm, and simply release the other end from the anti-roll bar by simple rocking.
Sometimes it happens that they just break
After unscrewing the fastening, it is very easy to remove the pillow, but putting on a new one is much more difficult.
Cross Arm Bracket
- The largest silent block of the lever located at the very base, despite the fact that it has, among others, more impressive dimensions, is not difficult to dismantle.
- The easiest option to remove it is to set it on fire. When the rubber on it burns out, you just have to take it out and clean the seat. (Of course, you can press it out through a vice, but this will take time and may cause some inconvenience).
This way the old silent block is guaranteed to come out of its seat without any consequences.
Installing a new silent block may also take time.
Silent blocks are assembled on the lever...
...and so they are assembled on the car.