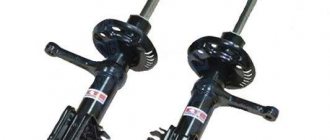
Shock absorber struts
This is the main element of the suspension, since it is with their help that vibrations are damped while driving on uneven roads. The struts on the Kalina consist of a metal body in which a telescopic shock absorber is located. The system is hydraulic and works in both directions. When repairing the Lada Kalina, special attention must be paid to the condition of the suspension elements. Not only comfort, but also safety depends on it.
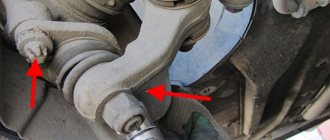
Between the strut and the body there is a coil spring and an upper support bearing. A bracket is welded to the body on the rack, with which the steering knuckle is attached. Approximately near the middle of the rack there is a swing arm that connects to the steering end. A little higher is the lower cup, into which the spring rests.
Signs of a support bearing failure
The first warning sign that something is wrong with the support bearing is most often a knocking sound coming from the area of the front right and left side members. Many suspension parts can creak and knock, but it is best to start checking with the support bearing. The most unpleasant sounds will appear when driving on uneven surfaces, when the car is heavily loaded, and also when making sharp turns. Also, the driver will probably notice a general drop in the car’s handling. Inertia occurs in the steering. The car may begin to “scour” along the road.
It is worth adding that most often manufacturers determine the service life of support bearings at 100 thousand kilometers. However, if the machine is operated in difficult conditions, parts may need to be replaced after 50 thousand. There are cases when the support bearing “flies” even after 10 thousand km.
Front pillar elements
On the Lada Kalina car, the struts can be equipped with conical or barrel springs. It all depends on what equipment the car has. The lower coil of the spring rests against the support cup, which is tightly welded to the rack. The upper coil rests on the cup, which is attached to the shock absorber rod.
The rod is secured to the upper support bearing, which, in turn, is screwed to the body using three studs. Thanks to the bearing, the shock absorber rod rotates inside the support. This allows the wheels of the car to turn. A boot must be installed on the shock absorber rod, which protects the inner surface of the element from contamination.
Analogs of rear shock absorbers Lada Kalina 1117, 1118, 1119
Many drivers use original domestic or imported spare parts to replace rear struts. As a rule, preference is given to SS-20 or Kayabe companies. Below is a list of spare parts from other popular companies among car enthusiasts.
| Manufacturer | vendor code | price, rub. |
| Rear shock absorbers for Lada "Kalina" 1117, 1118, 1119 | ||
| Finwhale | 120812 | 1400 |
| Finwhale | 120822 | 1400 |
| Hola | S432 | 1200 |
Shock absorber Finwhale 120812
Which shock absorbers are better for the Lada Kalina? As practice shows, they prefer to install Kayaba or SS-20, they have a good balance between rigidity and comfort, and are also distinguished by enviable reliability. For a softer ride, choose racks made by Acomi.
Rotary mechanisms
When repairing the Lada Kalina, it is necessary to take into account the fact that after intervention in the design of the front suspension, it will be necessary to adjust the camber and toe of the wheels. A swing arm is installed on the shock absorber strut. Moreover, on two identical racks its position will be different. This lever has a hole into which the tie rod end is installed. Its length can be changed using a specially designed coupling.
The steering knuckle is secured to the front strut bracket using two bolts and nuts. The upper bolt has an oval washer, with which the camber of the wheels is adjusted. By rotating the bolt, you move the steering knuckle relative to the front strut. At the bottom it is secured by a ball joint to the wishbone of the suspension.
Analogs of front shock absorbers Lada Kalina 1117, 1118, 1119
Original shock absorbers are in demand when replacing front struts, but increasingly, spare parts from other manufacturers are being supplied to the Russian market, which are not inferior, and in some cases, superior to original products. A list of the most popular shock absorbers is presented in the table.
| Manufacturer | vendor code | price, rub. |
| Front shock absorbers for Lada Kalina (1117, 1118) first modifications | ||
| At program | Right AT5002118SA Left AT5003118SA | 5000 (set, 2 pcs.) |
| At program | Right AT5002118SAG Left AT5003118SAG | 1800 |
| Pilenga | Right SHP2718O Left SHP2728O | 2200 |
| Front shock absorber struts for VAZ 1119 (entire model range) and 1117, 1118 later modifications | ||
| Kroner | Right K350319 Left K350419 | 5000 (set, 2 pcs.) |
| QML | Right SA1011 Left SA1010 | 1500 |
| QML | Right SA1013 Left SA1012 | 1500 |
Suspension arms
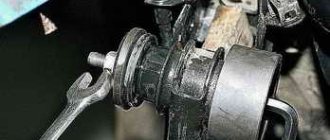
The Kalina front suspension arm is kept from moving by a stretcher. This extension is secured at the rear edge to the lever with rubber-metal hinges. The front edge of this stretch is secured with a cushion to a special bracket, which is screwed to the car body. You can change the number of washers that are located in the rear and front mounts of this extension. This way you can adjust the angle of inclination of the wheel axis in the longitudinal direction.
The stabilizer is connected to the front suspension arms. Its middle part is secured with brackets and rubber pads on the body. When one lever moves, movement is transmitted through the stabilizer to the second. This can significantly reduce the swaying of the car when driving on uneven roads, as well as reduce roll when cornering.
The new Lada Kalina practically does not need to be serviced; it is only advisable to occasionally check the alignment angles of the front wheels. It is also recommended to carry out suspension diagnostics from time to time in order to identify breakdowns in the early stages.
Rear shock absorbers for Lada Kalina 1117, 1118, 1119
The catalog number of the rear shock absorber for all Kalina models is 11182915004. In terms of technical properties, there will be practically no differences between the front and rear struts. In addition, this shock absorber is the same for both the right and left sides. Technical dimensions are presented in the table below.
| Rod diameter, mm | Case diameter, mm | Rod stroke, mm | Rack pipe height, mm |
| Dimensions of rear shock absorbers for Lada Kalina 1117, 1118, 1119 | |||
| 14 | 30 | 229 | 364,5 |
How to replace longitudinal tension
In order to adjust the longitudinal tilt angle of the axle, you must contact a service center. At the same time, they will definitely remove the stretch. Therefore, you should not change it yourself; it is better to do this immediately before adjustment. But, if you remove the old stretcher and install it in place, in order to minimize the error in adjusting the caster angles of the axle, you need to count and record the number of washers that were located on the rear and front edges of the stretcher before removal.
The replacement procedure is as follows:
- Remove the bracket that secures the suspension extension.
- Use a 24mm wrench to keep the extension from turning. And with the second key you need to unscrew the nut that secures the front end to the wishbone.
- Remove the washer from the brace and remove the rear edge from the hinge.
- Remove the adjustment washers completely.
Installation of the longitudinal extension is performed in exactly the reverse order. It is necessary that the chamfers on the adjusting washers face the extension. After replacement, it is necessary to adjust the wheel alignment angles. This is a mandatory condition if the Kalina suspension is being repaired.
Original spare parts
Most vehicle owners prefer to install only original parts from the manufacturer that were originally supplied with the car.
Factory spare parts for Lada Kalina Universal are marked with article number 2110-290540203. Their cost varies from 2200 to 2500 rubles. The racks are produced by the Skopinsky Automotive Aggregate Plant, that is, they are domestic. Owners of Lada cars note that it is better to immediately replace the original parts with foreign-made analogues immediately after purchasing the vehicle, as they are of much better quality. However, it all depends on you. Some people, on the contrary, only like racks from SAZ.
Parts are often counterfeited. In order not to stumble upon non-original spare parts, make sure of the quality of the product. Ask for accompanying sales certificates and carefully inspect the packaging.
All barcodes and names must be printed clearly. The presence of extraneous logos is unacceptable. The parts should be free of burrs, chips and cracks of paint, and other external defects. Unless, of course, you purchase used parts.
In general, models of the category “Standard 1118 (1119)”, “Sport 1119” and “Highway 1118”, “Optima 1119” are considered the standard choice. Highway and Sport are narrowly focused struts, so they are not practical for city driving. The most common option is the Optima category racks. Note: they are good both off-road and on high-quality trails.
Original parts are covered by a warranty; the kit must contain a coupon. Therefore, it is advisable to purchase them from an official dealer or trusted reseller.
You can save on consumables by purchasing non-original parts. They may be a little more expensive, but the quality will be much better than the factory ones. The following options for replacing front struts are in greatest demand among experienced drivers:
As you can see from the table, the price range is large. You should not think that similar options will fail faster - the reason for the low price is that they are produced by little-known brands. In general, all offered auto parts have decent, proven quality.
The situation is the same with the rear struts. It is advisable to order front and rear struts from the same manufacturer to minimize risks. It is also strictly forbidden to change only one rack, or use the right and left racks from different companies.
Models most suitable for Lada:
Of course, even parts from little-known companies can be counterfeited by Asian manufacturers. The safety rules when choosing are still the same - carefully examine the packaging and compare it with the original one. Check that the parts are in excellent condition - without visible external defects such as paint chips, cracks, scratches, or various damages.
How to replace the ball
The ball joint is one of the most important elements of the suspension of any car. It can be restored, but this is not recommended, since the quality of restored products is much worse than new ones. Even on the new Lada Kalina, the ball joint can fail.
In this case, it is necessary to repair the suspension. The following manipulations are performed for this:
- Completely remove the front wheel of the vehicle and raise the side to be repaired using a jack.
- Treat all threaded connections with penetrating lubricant.
- Unscrew the nut that is screwed onto the hinge pin.
- Remove the two bolts that secure the ball joint race to the steering knuckle.
- Install the puller.
- Tighten the puller bolt, thereby removing the pin from the hole in the lever.
Why did it happen so?
Perhaps the automatic requests do not belong to you, but to another user accessing the network from the same IP address as you. You need to enter the characters into the form once, after which we will remember you and be able to distinguish you from other users exiting from this IP. In this case, the page with the captcha will not bother you for quite a long time.
You may have add-ons installed in your browser that can make automatic search requests. In this case, we recommend that you disable them.
It is also possible that your computer is infected with a virus program that is using it to collect information. Maybe you should check your system for viruses.
If you have any problems or would like our support team, please use the feedback form.
WE ARE FINISHING the Lada-Kalina shock absorbers. Highway for enthusiasts
There they served almost without any complaints, but here they fail seemingly for no apparent reason. It seems that the plant significantly underestimated the time allotted for finishing this car. We got excited.
Our “berry” barely ran three thousand kilometers (not the worst roads!) - and now the front shock absorbers began to knock, and the steering mechanism began to speak unequivocally. By the way, with such a defect, technical inspection without a bribe is pure utopia. And recently the rear shock absorbers began to rattle.
Replacing the lever
In order to replace the front suspension arm on the Kalina, you must perform the following manipulations:
- Unscrew the bolts securing the wheel, first lifting the side to be repaired.
- Remove the engine protection.
- Remove the bolts that secure the ball joint to the knuckle.
- Remove the bolt that secures the stabilizer link to the arm.
- Unscrew the nut that secures the transverse arm of the bracket to the body, and then remove the bolt.
- Write down the number of washers.
- The extension must be kept from turning using a 24mm wrench. Using the same exact key, you need to unscrew the nut that secures the rear edge of the extension.
- Remove the support washers from the rear edge. After this, you can dismantle the lower arm along with the ball joint.
- Remove the adjusting and thrust washers from the brace.
If it is necessary to replace the ball joint, it must be removed from the lever using a vice. Reassembling the entire assembly is done in reverse order. Tightening the threaded connections should only be done after the vehicle is installed on the wheels.
Replacing silent blocks on Kalina step by step
First remove the wishbone:
- Remove the wheel and spray all the control arm joints with WD-40.
- When the lubricant penetrates into hard-to-reach places, start unscrewing the bolts.
- Remove the ball joint bolt, but first remove the cotter pin from the bolt.
- Next, unscrew the mounting bolt of the longitudinal tension joint and remove it.
- Then unscrew the bolt and nut securing the stabilizer link.
- The next step is the control arm bolt. After dismantling the bolt and nut, you can remove the lever.
Next we move on to the rubber-metal hinge of the longitudinal extension:
- Having previously clamped the lever in a vice, knock out the silent blocks one by one using a thin flat-head screwdriver or chisel.
- If during removal the metal base of the lever remains in the lever, you will also have to knock it out and clean the seat from dirt.
- Installation of new silent blocks is carried out by pressing them into the lever using a vice, with full fixation, striking the body with a hammer every 5-8 mm.
Cushion and stabilizer link:
- Removing the stabilizer link is very simple. It is enough to unscrew the fastening bolt from the transverse arm; we simply release the second end from the stabilizer by simple rocking.
- To release the pillow, take the key “13” and unscrew two mounting bolts of the bracket, then release it.
- When it is released, it can be removed by cutting it with a knife in the thinnest place, or removed from the stabilizer by lubricating it with WD-40 or a soap solution.
Cross Arm Bracket:
- The largest silent block of the lever is located at the very base.
- The easiest way to remove it is to set it on fire. When the rubber burns out on it, take it out and clean the seat. Of course, it can be pressed out through a vice, but this will take time.
- Lubricate the new silent blocks with WD-40 or soap solution and install them in place using a 30mm socket and a vice, pressing it in.
How to replace a rack
If there is a knock in the front suspension of the Kalina, then this may be the cause of failure of any element. Therefore, it is necessary to diagnose and check all components. If at least one shock-absorbing strut has become unusable, two need to be replaced at once. To do this, follow these steps:
- Raise the wheel using a jack and remove it.
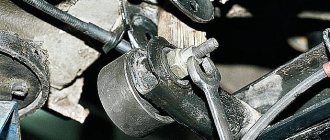
- Disconnect the tie rod end from the lever on the rack. To do this, use pliers to remove the cotter pin and unscrew the nut with a 19mm wrench. After this, install the puller and remove the hinge from the hole.
- If you plan to install a new rack assembly, then you do not need to perform any unnecessary actions. But if you need to remove the spring, you need to unscrew the nut that secures the shock absorber rod in the support bearing.
- Loosen the three nuts that secure the upper support to the body.
- When installing new shock absorber struts, the toe-in of the front wheels will be disrupted. The installation angles can be adjusted only by eye, so that after repair you can go to a service station for adjustments.
- Remove the bolts that secure the strut to the steering knuckle.
- Remove both bolts and washers.
- Move the brake hose aside.
- Use a pry bar to move the steering knuckle down.
- Finally unscrew all the nuts securing the support bearing to the body.
Installation of the shock absorber strut is carried out in the reverse order. If you are not changing the struts, but are repairing them (replacing the inner race, oil, seals), then it is best to outline the position of the strut relative to the steering knuckle. This will avoid the costly procedure of adjusting wheel camber angles.
Malfunctions
The main sign of a failed support bearing is a knocking sound (dull knocks) in the area of the shock absorber strut. It may indicate that:
- the rubber gasket is damaged or deformed;
- The bearing itself is damaged.
Failure of the support bearing may occur due to:
- resource spent;
- penetration of dirt and moisture;
- exceeding permissible loads;
- mechanical damage due to shock absorber malfunctions.
How to identify a malfunction
To diagnose a support bearing failure, open the hood and remove the “cup” cover. Place your palm on the shock absorber housing and rock the front of the car. If you hear a knock and feel the corresponding vibration with your hand, the bearing is clearly faulty.
When to change
The service life of the “supports” is on average 50-100 thousand km, depending on the conditions in which the car is operated. After this resource has expired, it is recommended to change them. Replacement is also necessary if any malfunctions are detected.
Late diagnosis, as well as ignoring bearing failure, threatens to destroy the shock absorber structure and other suspension elements.
Prices for support bearings for Lada Kalina start from 300 rubles. The shock absorber support assembly costs from 1200 to 3000 rubles. When choosing a support bearing or the entire support, give preference to either the original part or such proven brands as FENOX, TRACK, ASOMI or SS-20.
For the work of replacing one bearing at a service station, you will be asked for an average of 500 rubles. You will have to pay the same amount for adjusting the wheel alignment angle (wheel alignment).
Reference data
Front wheel alignment angles under a load of 320 kg
Front wheel camber, hail
Front wheel toe-in, mm
Longitudinal inclination of the wheel turning axis, degrees
Installation angles of the front wheels of the equipped vehicle
Front wheel camber, hail
Front wheel toe-in, mm
Longitudinal inclination of the wheel turning axis, degrees
Tightening torques for threaded connections
Name of units and parts
Tightening torque, Nm (kgf-m)
Wheel bolts
Front wheel bearing nut
Bolts securing the ball joint to the steering knuckle
Nut securing the ball pin to the lever
Adjusting bolt nut (with eccentric) of the front suspension strut
Nut of the bolt securing the front suspension strut to the steering knuckle
Nuts securing the front suspension strut rod to the upper support
Nuts securing the upper support of the front suspension strut to the body
Nut of the bolt securing the front suspension arm to the body
Front suspension extension nuts
Extension bracket mounting bolts
Nut of the bolt securing the stabilizer bar to the front suspension arm
Nuts securing the stabilizer bar to the body
Bolt nut for the lower shock absorber mounting to the rear suspension arm
Instructions for installing new springs, struts, support bearings and the supports themselves
First of all, we put the bump stop and boot on the new rack:
Then we tighten the new springs to the required moment and put them on the rack
It is important that the lowestmost coil falls exactly into the recess on the rack, so to speak, in its home place:
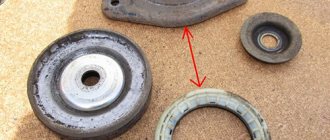
When the spring is sufficiently compressed, we proceed to the supports and bearings. We take the new support, turn it over and insert the support bearing. Typically, the bearing is marked “TOP”, meaning that this side should be inserted into the support:
We put a cup on top of the support bearing, as shown in the picture:
And on top of this pancake we put an elastic band:
Now we carefully place this entire structure on the stand rod and tighten the nut, holding the rod from turning
It is important that the upper turn, when finally installed, lies exactly along the circle of the elastic so that there are no distortions. As a result, the entire SS20 front suspension module looks like this:
Then we remove the coupler, also checking that the spring is evenly seated at the bottom and top, and you can start replacing. If you are installing spacers, then on them, as well as on the supports, there is an arrow that should be directed in the direction of travel of the car. We put it on the support studs and install the module on the car:
We also insert the stand back to the top of the glass and immediately tighten the nuts. Well, then you will have to sweat a little to get the steering knuckle into the place where the rack is attached. To do this, I pressed the brake disc with my foot with great force, pointing it down, and tried to combine the whole thing with my hand. It didn’t work out right away, but after 10 minutes of effort everything worked out and the rack was installed on the car.
With the second side we perform the same operations and with it everything turns out much faster, since our hands are already full!
It is imperative that after replacing the struts, supports and springs of the front suspension, it is necessary to have the wheel alignment done at a service station. It is advisable to do this immediately, otherwise you risk not only rapid wear of the tires, but also getting into an emergency situation, since the alignment angles of the front wheels will be grossly violated.
So far, no word about impressions of the new suspension, I will write a more detailed article about this tomorrow.
The article has been supplemented with new information, or rather, detailed video instructions have been made for replacing the front struts on front-wheel drive VAZ cars. Below you can read this material and subscribe to my channel. On the left side of the menu there is a banner with a link!
Description of design
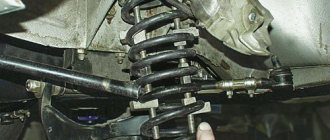
The front suspension is independent, with telescopic swivel struts, wishbones, longitudinal bracing arms and a torsion bar anti-roll bar.
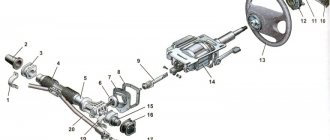
The suspension strut consists of a housing in which a hydraulic telescopic coil spring shock absorber and an upper support are installed. A bracket for attaching the steering knuckle, a swing arm and a lower spring support cup are welded to the outside of the strut body. Depending on the vehicle configuration, the strut may have a barrel-shaped or conical spring. The spring's lower coil rests against the lower support cup, and its upper coil rests against the upper support cup mounted on the shock absorber rod. Also installed on the shock absorber rod is the upper support of the strut, consisting of a housing, a rubber cushion and a bearing. The support body is attached to the car body with three studs and nuts. The bearing allows the shock absorber rod to rotate in the support when the strut is turned, and the rubber buffer prevents the transfer of vibrations to the car body. The shock absorber rod is protected from dirt and dust by a plastic casing. In the event of a suspension breakdown, the stroke of the rod is limited by the compression stroke buffer. The strut pivot arm is connected to the steering rod through a ball pin. Changing the length of the rod using its connecting coupling allows you to adjust the toe-in of the front wheels. Tie rod adjusting sleeve : 1 - tie rod end; 2 — adjusting sleeve; 3 — steering rod The steering knuckle is attached to the strut bracket with two bolts and nuts. The upper hole of the bracket is made oval, and the bolt installed in it has an eccentric collar and an eccentric washer. When this bolt rotates, the steering knuckle moves relative to the strut, turning on the lower mounting bolt as if on an axle. Thanks to this, the angle between the strut and the fist changes, which in turn allows you to adjust the camber of the front wheel. A double-row ball bearing is pressed into the hole of the steering knuckle and secured with two retaining rings. The wheel hub is pressed into the inner ring of the bearing. At the bottom, the steering knuckle is connected to the wishbone of the suspension using a ball joint. The transverse lever is kept from moving by a stretcher, which is attached with its rear end through a rubber-metal hinge to the lever, and with its front end through a cushion to a bracket fixed to the car body. By changing the number of washers in the front and rear brace mounts, you can change the position of the lever, thereby adjusting the longitudinal inclination of the wheel steering axis. Attaching the steering knuckle to the rack : 1 - bracket for mounting the steering knuckle; 2 — rack body; 3 — bolt (eccentric) of the upper fastening of the steering knuckle; 4 — bolt of the lower fastening of the steering knuckle; 5 — steering knuckle Attaching the longitudinal brace to the transverse arm : 1 — rear end of the longitudinal brace; 2 — adjusting washers; 3 - thrust washer; 4 — rubber-metal hinge; 5 - wishbone of the suspension The ends of the anti-roll bar are connected to the wishbones of the front suspension of the car using struts. The central part of the stabilizer is secured through rubber cushions to the body with brackets. The movement of one of the levers is transmitted through the stabilizer to the second. This allows you to partially synchronize the operation of both sides of the suspension and thereby reduce the sway of the car on uneven roads and roll in corners. Front suspension : 1 — stabilizer bar; 2 — bracket for fastening the stabilizer bar; 3 — transverse arm bracket; 4 - wishbone; 5 — stabilizer strut; 6 — telescopic stand; 7 — ball joint; 8 — steering knuckle; 9 — longitudinal stretch; 10 — extension bracket After repairing any suspension or steering elements, be sure to check the alignment angles of the front wheels. It is possible to properly check and adjust the alignment angles of the front wheels only in a service company that has a special stand for performing adjustment work.
Let's sum it up
The front suspension in LADA Kalina is quite simple and reliable. Its design was “worked out” on the previous generation of the model. The manufacturer met the customers halfway in this matter and made the chassis of the Russian car suitable for repairs.
Also, as we have seen, the option of tuning the suspension is possible, the main thing is to know the design of the front suspension, this will also be useful if replacing the silent blocks is necessary. This solution is popular among owners, because it allows you to improve and balance the chassis characteristics, which in turn gives comfort while driving.
Features of Kalina's suspension
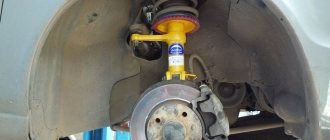
A detailed inspection of Kalina’s suspension reveals hydraulic shock-absorbing struts, which are attached to the steering knuckle in the lower part, being the basis of the entire structure of the unit. The bolt located in the upper part of the steering knuckle allows you to adjust the camber element.
In the assembly, the upper part passes through a hole that is located in the existing bracket. The body part is equipped with a mudguard, to which the top of the rack is fixed using three nuts. Due to the existing elasticity of this unit, high-frequency vibration is excellently damped. In this case, a characteristic swaying of the Kalina suspension strut occurs during the working stroke.
The front suspension of the Lada Kalina is telescopic and has complete independence.
Kalina's suspension, which is characterized by the presence of conical or coil springs, ensures a particularly smooth ride due to the presence of a stabilizer. This allows you to avoid compromising the lateral stability of the car. This function is also performed by levers that relate to transverse braces. The bearing for turning the strut must allow the wheels to turn.
Operating principle
On the Lada Kalina, MacPherson suspension has improved ride quality. Starting with Kalina, all new AvtoVAZ models began to be equipped with MacPherson strut suspension. When driving, the level of impact of a bad road on the body is much more effectively reduced, making driving a car much more comfortable than, for example, a VAZ 2109, where a similar type of suspension is installed.
Thus, the independent MacPherson suspension consists of two axle shafts, allowing the wheels to be practically independent of each other. This means that the wheels, when one of them hits a bump, a depression or something else, do not change the level of inclination, as is the norm in semi-independent and dependent suspensions.
Differences between the front suspension of Kalina and previously produced AvtoVAZ cars
All AvtoVAZ cars had a MacPherson strut suspension at the front, but it was significantly different from those used in the 70s, 80s and 90s by Ford, Fiat, Volkswagen, etc. So, the main differences between the MacPherson strut suspension and the suspensions of Lada models until 2004 are concluded as follows:
- Instead of a bearing, a bushing is mounted in the MacPherson.
- In MacPherson, the ball bearing has a larger radius, and the design also differs. Now it is located in the upper part between the support and the spring element in a compressed state, which perfectly helps to remove knocks when moving.
- When the wheels turn, the front suspension strut, or rather its body, rotates with the spring simultaneously. When this happens, the shock absorber rod remains motionless.
Causes of creaking and knocking car suspension
A creaking or knocking sound indicates malfunctions in the components of the Lada Kalina. The front suspension rattles more often. This is due to the fact that it is more susceptible to breakdowns than the rear one. Among the various components of the car, the malfunction of which can cause problems with the suspension and knocking in it are the following.
- CV joints.
- Shock absorbers.
- Bearings.
- Steering rod and reaction rod.
- Exhaust pipe.
- Rubber seal, etc.
Knocking can come from parts such as ball joints, silent blocks, front suspension arms, steering knuckle, mounting bolts. Without diagnostics, it is impossible to accurately determine the causes of creaking or knocking in the suspensions in order to effectively carry out repairs.
Only visual diagnostics of the Lada Kalina in the traditional way will help to identify why a knock is heard. A creaking or knocking sound from the suspension can only be associated with a broken rubber band, so there is no need to rush to use the services of a service station; this may take too much time and money.
If an independent visual inspection of the suspension did not reveal the real cause of the creaking or knocking noise, then the car must undergo a full diagnostic and subsequent repair. This will help identify the reasons why suspension knocking occurs.
It is important to know how you can independently diagnose all faults. It is easier to diagnose the rear rather than the front suspension, since the inspection is not complicated by the presence of a large number of complex controls.
Practical recommendations
It should be taken into account that the original suspension of the Kalina Sport car, compared to the base model, is lowered by 20 mm, which is important to take into account for those who like to travel, for example, to the country, taking into account the condition of the roads . Passability may also suffer in winter, especially when you have to overcome snowdrifts. But otherwise, the clear advantage of the sports suspension is clear. In most cases, replacing the standard Lada Kalina suspension with a sports version is a way to increase or improve the car’s handling, and not to achieve any sporting goals, including speed ones.
The most attractive aspect when replacing a conventional suspension with a sports one from Kalina Sport is that this is a serial factory model and, accordingly, no additional equipment with springs, supports or shock absorbers is required. That is, the Kalina sports front suspension can be purchased assembled, but if we are talking about the rear, then you will have to purchase it in parts. In this case, you can use the data on the catalog numbers of parts, select the necessary ones, and then either search at car dealerships and specialized stores, or place an order from a catalog.
A sports suspension will make the car more controllable and passable on different roads.
If we consider the differences, then in addition to some lowering of the height, which leads to a corresponding decrease in the length of the spring, and therefore the stroke of the rod, the sports suspension provides noticeably stiffer rebound damping. The supports themselves have a characteristic offset, due to which the castor can be increased to 3°, but for this, the brackets on the front braces will need to be replaced. The springs themselves of the sports suspension are stiffer, and the shock absorbers are nitrogen-filled.
But when buying racks, you should pay attention to one frequently encountered nuance: it may turn out that the springs will be of different stiffness, for example, the first with one point, and the second with two. And even if they convince you that this is normal and that many cars drive with strut springs of different stiffnesses, it is still worth choosing the option of installing parts with the same characteristics on the Lada. And for the rear suspension it is quite acceptable to use some parts from the original ones, except for the bolts, because they all must be new.
In order to achieve the desired result, you should replace not only the front struts, but also the rear ones.
After modernization, the car will sit down by 20 mm, but this is not so noticeable.
And the stiffness of the suspension can be felt immediately, but this is compensated by the absence of knocks, a more comfortable ride and better behavior on roads with different surfaces, as well as cornering: rolls practically disappear, and, what is important, they can be driven completely safely at higher speeds than on the original suspension.
If the Kalina suspension is being modernized, then it is recommended to think about replacing the rack from a sports model of the car. You can install a 3.1-turn rack complete with a reinforced front end shield. The brackets should also be replaced along with the extension, which has additional support.
Not only the driving performance of the car, but also the safety of the driver and his passengers depends on the condition of the front suspension, especially in the case of the Lada Kalina. Therefore, checking its condition should be carried out regularly at service centers or service stations. Although the driver himself can feel or detect the presence of a problem while driving: there should be no extraneous sounds, various creaks or knocks. Such diagnostics should be carried out by the driver at low speed. A test for overcoming a low obstacle can also be a characteristic sign: after passing it, the car must remain stable and not sway from side to side.
Signs of malfunction of the anti-roll bar LADA “Kalina”
Malfunctions of the suspension stabilizer appear when cornering and driving over uneven roads. The cause of the malfunction is broken bushings or poor tightening of the nuts of the clamps holding the stabilizer bar. This manifests itself as follows:
- there is a knocking noise under the hood when driving through potholes and potholes;
- the car begins to “go to the side” when driving in a straight line and you have to constantly adjust its trajectory (this is especially noticeable at speed);
- the car sways and rolls heavily when turning or braking;
- Excessive roll appears during maneuvering.
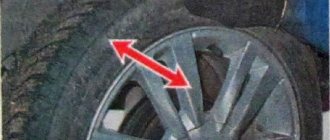
You can independently check the bushings and stabilizer mounts as follows:
- turn the wheels to the side until they stop, freeing up space in the wheel well;
- grab the Kalina stabilizer with your hand and pull strongly in different directions;
- If there is the slightest play, the stabilizer bushings must be replaced.
A more detailed analysis of the condition can be made by driving the car onto a pit or lift. This way you can determine exactly where the knocking is coming from and which part needs to be replaced.
What is needed to replace the Kalina stabilizer
To replace the anti-roll bar you will need:
- standard set of socket wrenches (socket wrenches can be used);
- WD-40 liquid;
- jack;
- special device (extension);
- hammer;
- stabilizer bushings “Kalina”;
- stabilizer's pole;
- stabilizer bar.
To access the mounts of the struts and stabilizer, you must place the car on a viewing hole or a lift.