Front suspension arm, ball joints
Removal
Place the car on a two-post lift, turn off the ignition, apply the parking brake and hang the car (electro-hydraulic lift, type PV-3-T-SP, with a lifting capacity of 3 tons).
Raise the car to a height convenient for work, remove the protective covers of the front fenders.
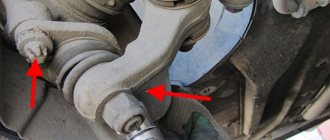
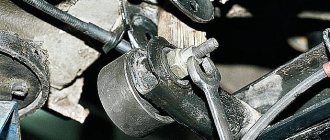
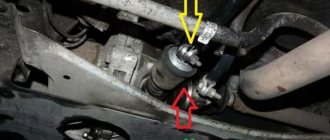
Figure 11 — Removing the front suspension arm:
- front suspension arm
- front suspension ball pin fastening nut
- front suspension ball pin with protective cover
- bolt
- left rotating fist
- lever stretch
- front stabilizer strut
- body bracket
- front stabilizer bar
Unscrew the eight self-tapping screws with washers securing the engine mudguard and remove the engine mudguard (replaceable head 8, wrench or ratchet wrench).
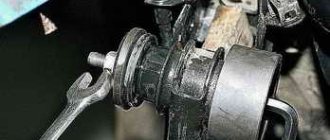
Unscrew the nut securing the brace 6, Figure 11, to arm 1 of the front suspension and remove the thrust washer (nut driver or wrench, replaceable head 24, ring wrench 24).
Unscrew the nut of the bolt securing the stabilizer strut 7 to arm 1 of the front suspension and remove the bolt (wrench or wrench, replaceable head 17, ring wrench 17).
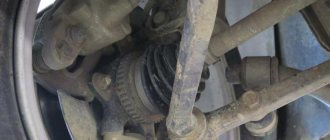
Unscrew the bolts securing the ball pin 3 to the steering knuckle 5 (knob, replaceable head 17).
Unscrew the nut of the bolt securing arm 1 of the front suspension to bracket 8 of the body (wrench or wrench, replaceable head 19, ring wrench 19).
Visually mark the number of adjusting washers between the extension and the lever, remove the bolt securing the lever to the body bracket and remove the lever assembly with the ball pin (hammer, firmware).
Installation
Install the front suspension arm assembly with the ball pin, maintaining the number and position of the adjusting washers, install the bolt securing the arm to the body bracket. The adjusting washers must be installed with chamfers towards the thrust end of the extension.
Screw the nut of the bolt securing the lever 1, Figure 11, to the body bracket 8 (wrench or wrench, replaceable head 19, ring wrench 19).
Note: Tightening torque of the nut securing the suspension arm to the body bracket: from 80 to 95 N m (8.0 to 9.5 kgf m) (torque wrench).
Tighten the bolts securing the ball pin 3, Figure 10, to the steering knuckle 5 (knob, replaceable head 17).
Note: Tightening torque of the bolts securing the ball pin to the steering knuckle: from 50 to 60 N m (5.0 to 6.0 kgf m) (torque wrench).
Install the bolt and tighten the nut of the bolt securing the strut 7 of the front stabilizer to lever 1 (wrench or wrench, replaceable head 17, ring wrench 17).
The front suspension arm in a Lada Kalina car is removed in case of body work, if the fastening on the body is torn or there is deformation. The lever is also removed in case of replacing silent blocks. It is worth noting that the lever on the Lada Kalina is similar to the front suspension lever of the tenth family. Work on removing the lever is best done on a lift or in a pit.
Let's sum it up
The front suspension in LADA Kalina is quite simple and reliable. Its design was “worked out” on the previous generation of the model. The manufacturer met the customers halfway in this matter and made the chassis of the Russian car suitable for repairs.
Also, as we have seen, the option of tuning the suspension is possible, the main thing is to know the design of the front suspension, this will also be useful if replacing the silent blocks is necessary. This solution is popular among owners, because it allows you to improve and balance the chassis characteristics, which in turn gives comfort while driving.
Replacing silent blocks in the front suspension arm of Lada Kalina
To replace the silent block for attaching the Lada Kalina lever, you will need a vice. We press out the silent block with a suitable piece of pipe. We moisten the new silent block with soapy water and press it into the lever, also using a piece of pipe of a suitable diameter.
We knock down the silent block of the extension installation with a chisel. There are two of them, on one side and the other.
Having removed from one side, remove in the same way from the second.
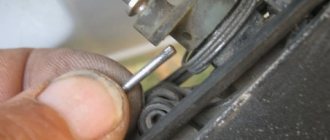
We press the new silent block in a vice...
...and finally press it, striking a punch with a diameter of 8 mm through three windows in the rubber layer. We carry out the assembly in the reverse order. Tightening the threaded connections of all rubber-to-metal hinges of the front suspension arm of the Lada Kalina must be done when the car is standing on its wheels, on a flat surface.
In this article I will tell you how to remove the front bumper of a Lada Kalina with your own hands quickly and efficiently.
To remove the Kalina bumper you will need:
So, we remove the front bumper of Lada Kalina - the sequence of actions:
2. Remove the radiator grille, now you have access to the mounting points of the front bumper, all of them - 2 bolts and 2 screws. Unscrew them.
5. Next, unscrew the 3 screws securing the bumper to the car body, they are located in the lower part, you can feel them by hand. In addition to these screws, you also need to unscrew 2 screws that secure the bumper to the fender liner.
6. In order to remove the front bumper of the Lada Kalina, you only have to unscrew 4 screws, 2 on each side of the bumper, they are located in the wheel arches, with them the bumper is attached to the fender liner. To make it more convenient to do this work, before unscrewing, turn the steering wheel as far as possible to the right or left.
Now that nothing is stopping you, you can remove the front bumper of the Lada Kalina; to do this, just pry it off with your hands on both sides. For greater clarity, the photo shows the places where the bumper is attached to the body.
Repair the bumper or completely replace it with a new one. Thank you for your attention.
The front suspension on Kalina and Grant is the same. The design is independent, telescopic rotary struts, levers, longitudinal braces and torsion stabilizer bars are installed. The comfort of driving a car depends on the condition of the front suspension. If at least one element is faulty, this will lead to extraneous sounds, unnecessary vibrations, and excessive loads on the body.
Signs of malfunction of the anti-roll bar LADA “Kalina”
Malfunctions of the suspension stabilizer appear when cornering and driving over uneven roads. The cause of the malfunction is broken bushings or poor tightening of the nuts of the clamps holding the stabilizer bar. This manifests itself as follows:
- there is a knocking noise under the hood when driving through potholes and potholes;
- the car begins to “go to the side” when driving in a straight line and you have to constantly adjust its trajectory (this is especially noticeable at speed);
- the car sways and rolls heavily when turning or braking;
- Excessive roll appears during maneuvering.
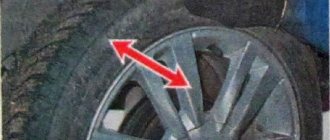
You can independently check the bushings and stabilizer mounts as follows:
- turn the wheels to the side until they stop, freeing up space in the wheel well;
- grab the Kalina stabilizer with your hand and pull strongly in different directions;
- If there is the slightest play, the stabilizer bushings must be replaced.
A more detailed analysis of the condition can be made by driving the car onto a pit or lift. This way you can determine exactly where the knocking is coming from and which part needs to be replaced.
What is needed to replace the Kalina stabilizer
To replace the anti-roll bar you will need:
- standard set of socket wrenches (socket wrenches can be used);
- WD-40 liquid;
- jack;
- special device (extension);
- hammer;
- stabilizer bushings “Kalina”;
- stabilizer's pole;
- stabilizer bar.
To access the mounts of the struts and stabilizer, you must place the car on a viewing hole or a lift.
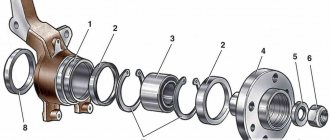
Shock absorber struts
This is the main element of the suspension, since it is with their help that vibrations are damped while driving on uneven roads. The struts on the Kalina consist of a metal body in which a telescopic shock absorber is located. The system is hydraulic and works in both directions. When repairing the Lada Kalina, special attention must be paid to the condition of the suspension elements. Not only comfort, but also safety depends on it.
Between the strut and the body there is a coil spring and an upper support bearing. A bracket is welded to the body on the rack, with which the steering knuckle is attached. Approximately near the middle of the rack there is a swing arm that connects to the steering end. A little higher is the lower cup, into which the spring rests.
Right choice
The choice is made after diagnosing the malfunction or during a planned replacement. It is necessary to understand what role the part plays in the suspension. Its task is to dampen vibrations that inevitably arise due to unevenness on the road.
Vibrations during movement are transmitted to the suspension springs, where they are partially damped by shock absorbers. The vibration then spreads to the frame through the connecting nodes. It is partially damped by silent blocks due to the presence of a soft base between the bushings. Therefore, the quality of the base must be of a high level. The factory version of the suspension is equipped with rubber-based silent blocks. This is a proven material, but there are better ones - for example, polyurethane.
- The service life is increased by 5 times. This allows replacements to be made after long mileage intervals and the suspension to be loaded more aggressively.
- Increased thermal stability. Polyurethane tolerates temperature changes well. The material works just as well in cold weather as at high temperatures.
- Thanks to the dense structure of the material, vehicle handling is improved.
Rubber and polyurethane are equally popular. Drivers themselves choose what to focus on. With rubber spacers you can get increased riding comfort, but improved handling can only be achieved with polyurethane. But in the latter case, comfort decreases, which is especially felt by passengers.
Front pillar elements
On the Lada Kalina car, the struts can be equipped with conical or barrel springs. It all depends on what equipment the car has. The lower coil of the spring rests against the support cup, which is tightly welded to the rack. The upper coil rests on the cup, which is attached to the shock absorber rod.
The rod is secured to the upper support bearing, which, in turn, is screwed to the body using three studs. Thanks to the bearing, the shock absorber rod rotates inside the support. This allows the wheels of the car to turn. A boot must be installed on the shock absorber rod, which protects the inner surface of the element from contamination.
Rotary mechanisms
When repairing the Lada Kalina, it is necessary to take into account the fact that after intervention in the design of the front suspension, it will be necessary to adjust the camber and toe of the wheels. A swing arm is installed on the shock absorber strut. Moreover, on two identical racks its position will be different. This lever has a hole into which the tie rod end is installed. Its length can be changed using a specially designed coupling.
The steering knuckle is secured to the front strut bracket using two bolts and nuts. The upper bolt has an oval washer, with which the camber of the wheels is adjusted. By rotating the bolt, you move the steering knuckle relative to the front strut. At the bottom it is secured by a ball joint to the wishbone of the suspension.
Causes of extraneous sounds in the chassis
Knocks and squeaks coming from the front suspension are direct evidence of damage to its elements. Note that the stern suspension makes itself known by malfunctions much less often. It is structurally simpler, and its main element is a torsion beam, which is held by longitudinal arms on the body and connected into one system with shock absorber struts.
To specify the malfunction, you should resort to a visual inspection of the suspension elements. In most cases, this practice bears fruit, and the identified worn part is replaced. There are cases where it is impossible to independently determine a breakdown visually. Here you will need to contact the service for a more thorough diagnosis. As an example, such a case may be a knocking rod inside the shock absorber strut.
Let's get back to the inspection. To do this, the Lada Kalina car should be hung with a lifting device or placed over a pit. In this case, you will need to stock up on a jack to hang each side of the car one by one. During diagnostics, each chassis element is checked individually. The rubber-metal bearings of the arms and stabilizer struts, the integrity of the boots of the ball joints and steering tips are inspected.
Attention is also paid to the racks. They are inspected for the absence of liquid leaks and the integrity of the anthers with bumpers
When there is a violation of the integrity of these components, and also if, when the ball joint of the lever or tip is impacted with a pry bar, they emit a characteristic metallic sound, then they urgently need replacement.
Diagnosing the rear suspension is much faster. It does not have as many articulated joints as compared to the chassis of the front end. The inspection consists of assessing the condition of the racks
Also during this event, it is recommended to pay attention to the condition of the muffler hangers. Sometimes a dangling exhaust system pipe can produce knocks on the body and suspension components, misleading the owner
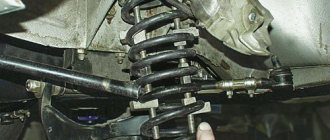
Suspension arms
The Kalina front suspension arm is kept from moving by a stretcher. This extension is secured at the rear edge to the lever with rubber-metal hinges. The front edge of this stretch is secured with a cushion to a special bracket, which is screwed to the car body. You can change the number of washers that are located in the rear and front mounts of this extension. This way you can adjust the angle of inclination of the wheel axis in the longitudinal direction.
The stabilizer is connected to the front suspension arms. Its middle part is secured with brackets and rubber pads on the body. When one lever moves, movement is transmitted through the stabilizer to the second. This can significantly reduce the swaying of the car when driving on uneven roads, as well as reduce roll when cornering.
The new Lada Kalina practically does not need to be serviced; it is only advisable to occasionally check the alignment angles of the front wheels. It is also recommended to carry out suspension diagnostics from time to time in order to identify breakdowns in the early stages.
How to replace longitudinal tension
In order to adjust the longitudinal tilt angle of the axle, you must contact a service center. At the same time, they will definitely remove the stretch. Therefore, you should not change it yourself; it is better to do this immediately before adjustment. But, if you remove the old stretcher and install it in place, in order to minimize the error in adjusting the caster angles of the axle, you need to count and record the number of washers that were located on the rear and front edges of the stretcher before removal.
The replacement procedure is as follows:
- Remove the bracket that secures the suspension extension.
- Use a 24mm wrench to keep the extension from turning. And with the second key you need to unscrew the nut that secures the front end to the wishbone.
- Remove the washer from the brace and remove the rear edge from the hinge.
- Remove the adjustment washers completely.
Installation of the longitudinal extension is performed in exactly the reverse order. It is necessary that the chamfers on the adjusting washers face the extension. After replacement, it is necessary to adjust the wheel alignment angles. This is a mandatory condition if the Kalina suspension is being repaired.
Practical recommendations
It should be taken into account that the original suspension of the Kalina Sport car, compared to the base model, is lowered by 20 mm, which is important to take into account for those who like to travel, for example, to the country, taking into account the condition of the roads. Passability may also suffer in winter, especially when you have to overcome snowdrifts. But otherwise the clear advantage of the sports suspension is clear
In most cases, replacing the standard Lada Kalina suspension with a sports version is a way to increase or improve the car’s handling, and not to achieve any sporting goals, including high-speed ones
But otherwise, the clear advantage of the sports suspension is clear. In most cases, replacing the standard Lada Kalina suspension with a sports version is a way to increase or improve the car’s handling, and not to achieve any sporting goals, including speed ones.
The most attractive aspect when replacing a conventional suspension with a sports one from Kalina Sport is that this is a serial factory model and, accordingly, no additional equipment with springs, supports or shock absorbers is required. That is, the Kalina sports front suspension can be purchased assembled, but if we are talking about the rear, then you will have to purchase it in parts. In this case, you can use the data on the catalog numbers of parts, select the necessary ones, and then either search at car dealerships and specialized stores, or place an order from a catalog.
A sports suspension will make the car more controllable and passable on different roads.
If we consider the differences, then in addition to some lowering of the height, which leads to a corresponding decrease in the length of the spring, and therefore the stroke of the rod, the sports suspension provides noticeably stiffer rebound damping. The supports themselves have a characteristic offset, due to which the castor can be increased to 3°, but for this, the brackets on the front braces will need to be replaced. The springs themselves of the sports suspension are stiffer, and the shock absorbers are nitrogen-filled.
But when buying racks, you should pay attention to one frequently encountered nuance: it may turn out that the springs will be of different stiffness, for example, the first with one point, and the second with two. And even if they convince you that this is normal and that many cars drive with strut springs of different stiffnesses, it is still worth choosing the option of installing parts with the same characteristics on the Lada
And for the rear suspension it is quite acceptable to use some parts from the original ones, except for the bolts, because they all must be new.
In order to achieve the desired result, you should replace not only the front struts, but also the rear ones.
After modernization, the car will sit down by 20 mm, but this is not so noticeable.
And the stiffness of the suspension can be felt immediately, but this is compensated by the absence of knocks, a more comfortable ride and better behavior on roads with different surfaces, as well as cornering: rolls practically disappear, and, what is important, they can be driven completely safely at higher speeds than on the original suspension. If the Kalina suspension is being modernized, then it is recommended to think about replacing the rack from a sports car model
You can install a 3.1-turn rack complete with a reinforced front end shield. The brackets should also be replaced along with the extension, which has additional support.
If the Kalina suspension is being modernized, then it is recommended to think about replacing the rack from a sports model of the car. You can install a 3.1-turn rack complete with a reinforced front end shield. The brackets should also be replaced along with the extension, which has additional support.
Not only the driving performance of the car, but also the safety of the driver and his passengers depends on the condition of the front suspension, especially in the case of the Lada Kalina. Therefore, checking its condition should be carried out regularly at service centers or service stations. Although the driver himself can feel or detect the presence of a problem while driving: there should be no extraneous sounds, various creaks or knocks. Such diagnostics should be carried out by the driver at low speed. A test for overcoming a low obstacle can also be a characteristic sign: after passing it, the car must remain stable and not sway from side to side.
Replacing the lever
In order to replace the front suspension arm on the Kalina, you must perform the following manipulations:
- Unscrew the bolts securing the wheel, first lifting the side to be repaired.
- Remove the engine protection.
- Remove the bolts that secure the ball joint to the knuckle.
- Remove the bolt that secures the stabilizer link to the arm.
- Unscrew the nut that secures the transverse arm of the bracket to the body, and then remove the bolt.
- Write down the number of washers.
- The extension must be kept from turning using a 24mm wrench. Using the same exact key, you need to unscrew the nut that secures the rear edge of the extension.
- Remove the support washers from the rear edge. After this, you can dismantle the lower arm along with the ball joint.
- Remove the adjusting and thrust washers from the brace.
If it is necessary to replace the ball joint, it must be removed from the lever using a vice. Reassembling the entire assembly is done in reverse order. Tightening the threaded connections should only be done after the vehicle is installed on the wheels.
Selection of parts and necessary tools
Before you start directly replacing silent blocks, it is important to properly prepare for it. There are few specific recommendations for choosing new parts. The auto parts market is simply filled with silent blocks from different manufacturers, basically they are all quite good
The only thing you can do to make a better choice of new parts is to consult with auto mechanics in your area. The main thing is that the new vibration isolators fit completely.
The auto parts market is simply filled with silent blocks from different manufacturers, mostly they are all quite good. The only thing you can do to make a better choice of new parts is to consult with auto mechanics in your area. The main thing is that the new vibration isolators fit completely.
For repair work you will need the following things:
- new silent blocks;
- a set of spanners and socket wrenches (required sizes 17, 19, 24);
- a hammer, a vice or a special puller (also known as a “press presser”) for vibration isolators;
- any lubricant, WD-40 is most convenient;
- inspection hole (lift);
- jack.
Important! Despite the complexity of replacing silent blocks, it is necessary to have at least basic repair skills. Therefore, objectively weigh your strengths before replacing and decide whether you can do it.
Replacing suspension silent blocks with your own hands
The suspension silent blocks on the VAZ-2112 are located in the arms of both the rear beam and the front one. It is advisable to replace them comprehensively. The replacement process is approximately the same on both the rear and front parts of the suspension. Below are instructions for both cases.
Front control arms
Replacing front control arm silent blocks on a VAZ-2112 is the following process:
- First of all, the car must be placed above the inspection hole or use a lift. Then remove the engine compartment protection represented by the casing.
- After this, the nuts securing the front arms are unscrewed, then the stabilizers, all this is done with a 17 wrench.
- After loosening the nuts securing the required wheel, you need to jack up the car and remove it completely.
- Use a 24mm wrench to unscrew the nut on the extension. Then unscrew the fastening bolts of the ball joint and dismantle it.
- Next, the suspension arm is completely released.
- It is necessary to remove the old silent blocks from the removed lever with a hammer or puller. After this, clean the seat from rust and dirt, lubricating the surface with a thin layer of lubricant. You can make your own puller. It will be especially useful when you want to replace the silent block without removing the lever.
- Having pressed the new silent blocks into the mounting groove with a vice or a puller, you need to assemble everything in the reverse order.
- Ready.
Important! Many car enthusiasts do not press out silent blocks, but burn them out, which is extremely wrong. During heat treatment, the quality of the metal from which the lever is made seriously changes for the worse.
Replacing silent blocks in the rear beam
Replacing the rear silent blocks is done as follows:
- Again, the car must be driven into a viewing hole or raised on a lift.
- Then, taking a 19mm wrench, you need to disconnect the rear beam from the bracket by unscrewing the nuts securing it.
- After this, the bolt freed from the nut should be removed, and a wooden beam the size of a brick should be inserted between the beam and the body.
- Then the silent block is knocked out with a hammer or puller, and the freed groove is cleaned and lubricated.
- Next, a new silent block is pressed into the mounting groove.
- The last step is to assemble the entire structure back.
Important! After carrying out measures to replace silent blocks (both front and rear), it is very important to do a wheel alignment.
How to replace a rack
If there is a knock in the front suspension of the Kalina, then this may be the cause of failure of any element. Therefore, it is necessary to diagnose and check all components. If at least one shock-absorbing strut has become unusable, two need to be replaced at once. To do this, follow these steps:
- Raise the wheel using a jack and remove it.
- Disconnect the tie rod end from the lever on the rack. To do this, use pliers to remove the cotter pin and unscrew the nut with a 19mm wrench. After this, install the puller and remove the hinge from the hole.
- If you plan to install a new rack assembly, then you do not need to perform any unnecessary actions. But if you need to remove the spring, you need to unscrew the nut that secures the shock absorber rod in the support bearing.
- Loosen the three nuts that secure the upper support to the body.
- When installing new shock absorber struts, the toe-in of the front wheels will be disrupted. The installation angles can be adjusted only by eye, so that after repair you can go to a service station for adjustments.
- Remove the bolts that secure the strut to the steering knuckle.
- Remove both bolts and washers.
- Move the brake hose aside.
- Use a pry bar to move the steering knuckle down.
- Finally unscrew all the nuts securing the support bearing to the body.
Installation of the shock absorber strut is carried out in the reverse order. If you are not changing the struts, but are repairing them (replacing the inner race, oil, seals), then it is best to outline the position of the strut relative to the steering knuckle. This will avoid the costly procedure of adjusting wheel camber angles.