Transfer case location and functions
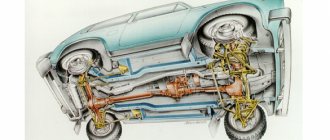
Location of the transfer case in the Niva 21213
The transfer case occupies an intermediate position in the vehicle transmission between the gearbox and the driveshaft. It has its own body in which its components are located.
The transfer case helps to implement such SUV capabilities as:
- Center differential lock.
- Disabling the drive axle.
- Increased torque of the drive wheels.
- Distribution of torque along the wheel axles.
Changing engine oil for VAZ 2108, VAZ 2109, VAZ 21099
Welcome! Motor oil - it is found in almost any car, because it lubricates system parts, thereby reducing friction and increasing engine life. But like any other substance, oil also requires periodic replacement, but unfortunately, not all people know how to change engine oil, and therefore, especially for such people, we wrote an interesting article in which everything is described in detail.
Note! To change the oil, you will need to stock up on: A basic set of wrenches, and you may also need a special wrench for unscrewing the oil filter, or instead of a special wrench you can use a thick screwdriver. Also, to change the oil, take with you a clean rag so you can wipe your hands from dirt and a funnel for more convenient pouring oil into the car engine! (You can see what a special wrench for unscrewing the oil filter looks like at the very bottom of the article, in the “For Beginners!” section)
Summary:
When should you change the engine oil?
- If you follow the manufacturer’s advice, then the engine oil needs to be changed every “10,000-15,000 thousand km”, or after “1-2 years” from the moment the oil is filled into the engine. (Whichever comes first)
Note! The frequency of replacement is also affected by: The condition of the engine, the brand of oil that was poured into the system, as well as the quality of the gasoline you fill the car with! (You can learn more about oil change intervals from the article entitled: “Oil change intervals and its selection”)
Understanding the terminology
Let's start by diving into the materiel. Transfer case (TC) is a separate unit of an all-wheel drive vehicle, which provides multi-mode power distribution from the engine to the front and rear axles.
Externally, this is a mechanism located under the bottom of the car, in the body of which a multiplier (divider) is placed in series to obtain an intermediate gear ratio in the transmission and a splitter of one power flow into two. It is with the help of this device and its controls (levers) that go into the vehicle interior that the LADA 4×4 driver selects the all-wheel drive operating mode.
The RK directly connects the front driveshaft and the intermediate shaft (shaft) with the vibration damper to the vehicle’s gearbox. As is probably already clear from the description, this element is connected to the rear axle of the car via a rear propeller shaft.
Transfer case 2123 (2-row bearing) Chevrolet Niva Art. 21230-1800020-0116500.00-+ Buy Transfer case 2123 Chevrolet Niva Art. 21230-1800020-0114500.00-+ Buy Transfer case (2-row bearing) 21213 Art. 21213-1800020-0115000.00-+ Buy
Overcoming a deep puddle
How ESP Works in a CarOften, a dispute arises between motorists about how best to cross a ford with a transfer case. Some people prefer to “fly” into a puddle from acceleration, others prefer to downshift. If you get into a mud pit, there is a high risk of water hammer - water enters the cylinders through the filter, and the engine “chokes.”
To exclude this, many install a special snorkel. But you can do without it. A deep puddle should be overcome in second low gear. This is done so that in case of trouble (when the car starts to fail) you can switch to first gear in time and not stall. If you enter the water from acceleration (which is a better decision), remember that the wheels may get stuck in the middle of the journey. The engine power is not enough to turn the wheels - the car stalls, and the engine experiences a hydraulic shock.
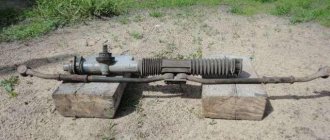
Centering method
To carry out this work you will need a lift, although with some skill you can get by with simple supports. First you need to prepare the car. If there is a lift, it is raised up. If supports are used, the corners of the machine are jacked up one by one and it is placed on them. Please note that all supports must be stable, otherwise the work will be unsafe. You should also prepare the tool in advance. If there are no plans to simultaneously replace other parts, then it is quite possible to get by with a ratchet and a “13” head. During operation, an assistant must be in the cabin.
Adjustments are made in the following order:
- To begin with, you should evaluate the condition of the splines on the cardans. If they are very worn, then most likely you will not be able to perform the alignment correctly. In case of significant wear, parts should be replaced;
- The transfer case mount is inspected. Often the displacement can be seen with the naked eye;
- Next, loosen the transfer case mount. Just don’t unscrew it completely;
- After this, start the engine and “accelerate” the car to a speed of 80-90 km/h. In this case, the transfer case will fall into place on its own;
- The crucial point is to consolidate the result obtained. This can be achieved in 2 ways. Mechanics argue which one is better, but both are used in everyday life. Most often, the engine is turned off, and with its help the transfer case and cardan shafts are stopped.
- All that remains is to quickly tighten the nuts. Disadvantage here 2. Stopping the box in this way can have a negative impact on its condition.
- Also, you need to tighten the fastener as quickly as possible, otherwise it will be of no use. A more reliable, but technically complex method is to tighten with the engine running;
- The car is lowered to the ground and testing is performed.
If the vibration persists, the procedure should be repeated.
How to remove a VAZ-2109 engine yourself (carburetor, injector)
The engine is often called the most important element of a car. There are situations when it needs to be replaced or repaired. For example, when replacing piston rings. This is a rather complex multi-step process. If desired, dismantling can be done independently. We recommend that you ask a friend for help. Working together is safer, easier and more fun. If you have ever replaced a windshield wiper motor, it will be easier for you to change the motor. Let's look at how to remove the VAZ-2109 engine yourself without turning to auto mechanics.
Preparation
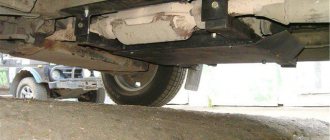
At the preparatory stage, short but very important, it is worth completely de-energizing the car by disconnecting the battery. You also need to remove all hoses, speed and clutch sensors. Be sure to drain the oil from the engine crankcase and the liquid that cools the radiator. Removing the engine without removing the gearbox:
- first of all, you need to put a reliable support under the car, preferably wooden stumps;
- unscrew the left crab, move the stretcher to the side;
- remove the generator from the engine;
- remove the tensioner pin, pump, distributor and receiving pipe;
- do not forget to remove the head if you are planning a major overhaul;
- the motor must be removed from the box and lowered to the floor;
- in order to get the engine, you need to raise the front part higher (this is done using a jack);
- you can also just pull everything through the top.
Using these instructions, you can quickly remove the engine without removing the box.
How to remove the engine from the gearbox:
- The first thing you need to do is turn off the power to the car. To do this, disconnect the battery. It’s easy to check the lack of current, try turning on the wipers;
- Drain the oil from the engine crankcase. A warm engine will speed up the process;
- drain the coolant from the cooling system, here you need a cold engine;
- get rid of the engine crankcase and exhaust pipe protection;
- carefully disconnect all hoses;
- Next, you need to unscrew the ground wire fastening nut. Next, you can safely turn off the thermostat;
- disconnect the central high voltage from the ignition distributor. To do this, you need to release the pad lock and remove it;
- remove the drive cable from the clutch lever;
- next, you should disconnect the starter supply wires;
- turn off the generator;
- disconnect the wires from the coolant temperature and oil pressure sensors;
- further work will take place under the car. To make it as comfortable and safe as possible, it is worth acquiring an overpass;
- At this stage, unscrew the drive rod mounting nuts. Disconnect the speedometer drive rod, disconnect the power wires;
- disconnect the two braces, tie rods and ball joint from the lever;
- Move the upper tail of the drive a little and push it out with a pry bar. Insert the technological plug into the vacant space;
- Next comes the stage of dismantling the engine. We fix it with a strong rope using the eyelets (rings). It doesn't hurt if you take the time to check their strength first;
- It is best to remove it through the top, but you can also get it through the bottom. Then lower the engine to the floor and lift the front of the car using a jack;
- After you have secured the engine with ropes, you can reach it through the top.
Remember that you need to act extremely carefully so as not to lose the motor, scratch the body, or damage parts. As you can see, the process is very complex. Successful dismantling is possible only if all points of the instructions are followed, you have deep knowledge, extreme caution and no haste.
Disassembly
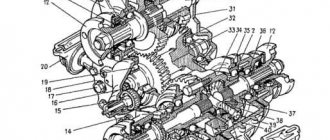
1 — front axle drive housing; 2 — crankcase cover; 3 — speedometer drive housing fig. 3-39fig. 3-38
rice. 3-38fig. 3-39
1- intermediate shaft; 2 - drive shaft; 3 — differential; 4 - front cover
1 - flange; 2 — oil seal; 3 — thrust ring of the bearing, 4 — front bearing; 5 - drive shaft; 6—high gear; 7 — hub; 8 - coupling; 9 — low gear; 10 — bushing: 11 — rear bearing; 12 — bearing installation ring; 13 — intermediate shaft bearing; 14 - intermediate shaft
- remove the lock ring 1 (Fig. 3-45) and spring washer 2 of the front bearing;
- remove the rear and front bearings from the differential housing (Fig. 3-46), using a universal puller and stop 67.7853.9559;
- by turning the bolts of the differential housing, separate the housing;
- remove the differential driven gear;
- remove retaining rings 8 (Fig. 3-45) and spring washer 14, then press out the pinion axis and remove the satellites and drive axle drive gears with support washers.
Also interesting: Adjusting VAZ 2114 and 2115 headlights: tips and tricks
1 - retaining ring; 2 - spring washer; 3 - bearing mounting ring; 4 — differential housing bearings; 5 — driven gear; 6 - front differential housing; 7 — front axle drive gear; 8 — retaining ring of the satellite axis; 9 — satellite; 10 — rear differential housing; 11, 15 — support washer; 12 — rear axle drive gear; 13 — satellite axis; 14 - spring washer
1 — puller A.40005/1/6; 2 — stop 67.7853.9559; 3 - bearing
- the axial clearance of each axle drive gear should be 0-0.10 mm, and the moment of resistance to rotation of the gears should not exceed 14.7 N m (1.5 kgf m). If the gap is increased, replace the support washers with others of greater thickness; if the specified gap cannot be obtained when installing support washers of the greatest thickness, replace the gears with new ones due to their excessive wear;
- The drive and intermediate shafts are installed in the transfer case housing simultaneously (see Fig. 3-47);
- Press the bearings onto the differential housing using mandrel 67.7853.9558 (see Fig. 3-48);
- Before installation in covers and crankcases, lubricate the working surfaces of the oil seals with LITOL-24 grease;
- Tighten threaded connections to the torques specified in Appendix 2;
- when compressing the transfer case shaft nuts, use mandrel 67.7820.9520 (see Fig. 3-49).
Tuning Niva 2121 doors
In addition to replacing the door trim, you can enhance the interior lighting, in particular the thresholds. To do this, it is necessary to install lamps. They will become a useful element and emphasize the high level of comfort of the tuning car. To make this improvement you will need:
- Ceiling lamps
- Edging for lampshades
- Switches, sensors
- Light bulbs. They can be of bright colors, which will make the car bright and respectable
- Wires
- Isolation
Also interesting: Making a disc for a low pressure wheel
Installing additional lighting will not take much time, but it will become a useful and stylish element of the interior.
Eliminating prerequisites
The misalignment of the transfer case occurs due to an undeveloped design. Therefore, many craftsmen strive to modify the fastening so as not to bother with alignment once a year. A special frame is used for this. In recent years, it can be purchased in stores, but you can also make it yourself. The advantages of this modification are the following:
- The transfer case is mounted on the rigid base of the subframe. The attachment to the body is made through a subframe, this allows to reduce the level of vibration transmitted to the body;
- It plays the role of a kind of protection for the crankcase;
- Also worth mentioning is adding additional rigidity to the side members.
- Among the disadvantages, we can mention a slight decrease in clearance. Although, in light of the advantages, this does not play a special role.
To assemble the subframe you will need a square pipe. Some people use a corner, but in this case the structure will be less durable. The support plates are made of sheet steel. Before assembly, you should cut off the old transfer case mounting bolts. Now it will be installed on the subframe. The pipe is cut to size and the frame is welded. After that, holes are drilled in the crossbars for fastening the transfer case. It is important not to make a mistake with the sizes. The next step will be assembling the mount to the body. Sheet steel support plates are welded to the subframe. Holes are drilled in it. After fitting, you need to drill holes in the floor of the car.
M12 bolts should be used for fastening
, as well as thick washers.
After installing the subframe, do not forget to treat it with an anti-corrosion compound. This will increase the service life of the part. This is how, through simple manipulations, you can get rid of one of Niva’s sores. Conclusion
. Even great cars have flaws. The domestic SUV Niva is no exception. During active use, vibrations emanating from the transmission may occur. That’s when the question arises of how to center the transfer case on the Niva. In fact, this work is not difficult, but there are some nuances that are better to know before starting work. Some people, knowing this feature of this car, install a subframe, this can significantly reduce the noise of the transmission.
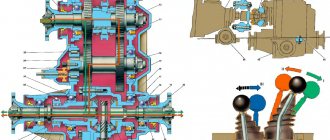
Tuning the Niva 2121 engine
Traditionally, upgrading the power unit of a domestic SUV should begin with reworking the carburetor. A simple solution would be to install an advanced modification with an enlarged diffuser, also called a throttle. This spare part can also be replaced on a standard injector model. If you completely change this unit, it is recommended to install an electronic ignition system.
Tuning the Niva 2121 carburetor will be most effective together with replacing the camshaft. This gives an impressive increase in power. And here, to avoid overheating, it is necessary to install a radiator with a larger surface area.
Tuning the Niva 2121 engine also includes correcting the engine geometry. This is done by increasing the diameter of the valves. About 10% of the power comes from sealing them. It wouldn't hurt to do the same with the intake and exhaust manifold pushers. To increase the power of the power unit at high speeds, a turbine should be installed. At the same time, it is advisable to replace the intake and exhaust manifolds with advanced modifications.
Useful advice If the car will be used in extreme off-road conditions, it is necessary to install a snorkel. It will allow you to overcome water obstacles without consequences for the engine.
Chip tuning of the Niva 2121 is ineffective, since the car is equipped with an atmospheric engine. There is no need to waste money on purchasing equipment or time on re-flashing. This will only give small improvements to the driving characteristics of the SUV.
Tuning the VAZ 2121 engine involves improving its parameters, in particular, increasing the power of the power plant.
There are two main ways to improve the unit:
- Chip tuning.
- Mechanical modification of the engine.
For injection engines, the first option is best suited. Reflashing the electronic control unit allows you to increase engine power by 8%, reduce fuel consumption and eliminate failures at low speeds. But this will require the help of specialists, because incorrect tuning can lead to a number of problems in engine operation. The second option is possible on any SUV, which determines its popularity.
Engine tuning using mechanical modification is carried out in several stages:
- Carburetor modernization. Here it is necessary to replace the pump accelerator and old jets with an indicator of 2 kam.
- Modification of the gas distribution system by increasing the diameter of the valves and sealing them.
- Installation of a crankshaft with increased stroke.
- Replacing the piston.
- Increasing the cylinder diameter (boring).
A high-quality exhaust system can also increase the efficiency of the power plant by optimizing the process of air supply and exhaust gas removal. To do this, it is recommended to replace the intake and exhaust manifolds with more modern options.
Installing a turbine is the most common way to increase power. It has a fairly simple structure, and its installation does not cause much difficulty. Therefore, such a tuning solution is far from uncommon.
The device of the VAZ Niva transfer case
The transfer case is not present in all VAZ passenger cars, but only on cars with two drive axles. In the transmission, the transfer case (TC) is installed at the rear of the gearbox; a rear driveshaft is attached to its shank, which connects the transfer case to the rear axle. The front axle is also driven by the steering wheel; it is connected to the transfer case by a front driveshaft.
The reduction gear in the Republic of Kazakhstan is designed to obtain high torque, it is used to overcome difficult sections of the road, and helps to cope with off-road conditions. The VAZ Niva transfer case contains the following main parts:
- the body itself;
- front axle drive shaft;
- intermediate shaft;
- drive shaft;
- gears;
- bearings;
- differential housing;
- satellites;
- differential lock clutch;
- gear shift clutch;
- flanges (for connection to cardan shafts);
- oil seals;
- control levers.
Niva transmission how to operate correctly: operating principle
The VAZ 2121, in other words, “Niva”, entered mass production in the 70s of the last century. This car belongs to the class of off-road passenger cars. In the history of the domestic automobile industry, Niva became the first car whose design used all-wheel drive. Let's take a closer look at the transmission device.
The transmission in the Niva family (2121, 2131) is designed in such a way that all-wheel drive is supplied to 4 wheels. Also characteristic is the presence of a center differential. The transmission includes a gearbox, a transfer mechanism, a pair of cardan shafts, and both axles. A characteristic feature of the 2131 model is its elongated body.
Then it goes through the cardan shafts to the gearboxes. The front gearbox transmits torque to the wheels through the differential and constant velocity joints. Likewise for the rear, also protruding, driving wheels. It is precisely because the torque is distributed to 4 wheels simultaneously that the drive is called full drive. The designation is as follows – 4WD. Another domestic car, designed on a similar principle to the Niva, is the UAZ.
Methodology for determining the causes of vibration of the transfer case and body floor in the area of the front seats
First, note at what speed the transfer case vibration occurs, then begin to determine the causes of the vibration.
Test 1
Place the transfer case and gearbox levers in neutral and start the engine.
Set the engine speed equal to the vehicle speed at which the vibration occurred.
If vibration persists when the vehicle is stationary, you should check the fastening and condition of the engine mounts, as they are the cause of the vibration.
Test 2
If vibration is not detected during test No. 1, then set the transfer case levers to the neutral position, start the engine, engage direct gear in the gearbox and set the engine speed corresponding to the vehicle speed at which the transfer case vibration occurred.
If vibration is observed with a stationary car at this crankshaft rotation speed, then its cause is a malfunction of the intermediate driveshaft (imbalance, bending of the fastening bolts or elastic coupling flange, jamming in the universal joint).
Test 3
If no vibration is detected in tests 1 and 2, proceed to test 3.
Accelerate the vehicle to a speed where vibration occurs and place the transfer case and gearbox levers in neutral.
If the vibration persists, it is caused by a malfunction of the front or rear driveshafts, imbalance, jamming of the universal joints or imbalance of the center differential.
Before centering the transfer case, we check the condition of the power unit supports and the correct installation (the centering washers of the engine mounts must fit into the corresponding holes in the side brackets).
We install the transfer case on the car without fully tightening the nuts securing the brackets for its suspension.
By moving the transfer case in the longitudinal, transverse and vertical directions (tightening or loosening the nuts of its fastening), we achieve a minimum and uniform gap between the flanges of the intermediate shaft and the drive shaft of the transfer case (the flanges must be at the same level and parallel to each other).
We fill the gap between the body floor and the supports with adjusting shims and align the centering belts of the flanges, slightly moving the transfer case forward (by the amount of the gap between the flanges).
Finally tighten the nuts securing the transfer case supports.
When replacing a transfer case or changing a four-speed gearbox to a five-speed one and vice versa, as well as when the rear engine mount settles, causing vibration of the transfer case, it is necessary to select and install a new thickness of gaskets 3 (Fig. 1).
Centering the transfer case VAZ-21213
Model VAZ-21213 is an all-terrain passenger car with permanent all-wheel drive and differential lock. Brand 21213 is a restyled version of the first VAZ SUV, VAZ-2121. RK Niva 21213 has three gears:
- the first - with a gear ratio of 1.2;
- the second, lowered – with the number 2.135;
- neutral
21213 is equipped with 4-speed and 5-speed gearboxes, and when the first speed of the transfer case is turned on, the car operates in standard mode, the gear ratios in the transmission are from 5-speed. The checkpoints are as follows:
- 1 – 4,4;
- 2 – 2,52;
- 3 – 1,63;
- 4 – 1,2;
- 5 – 0,98.
When you turn on the second position of the transfer case lever (reverse position), the gear ratios change (lower):
- 1 – 7,83;
- 2 –4,48;
- 3 – 2,90;
- 4 – 2,14;
- 5 – 1,75.
On ordinary roads, the transfer case is always in first gear, the transfer case control lever (reduction gear) is pushed forward. The neutral gear of the RK disconnects the transmission, and in this position the car does not drive; there is also a neutral in the gearbox.
Motorists often ask the question: why is neutral gear needed in a transfer case? The neutral is used when connecting additional units to the transmission, for example, a mechanical winch; in this case, a power take-off must also be installed.
| Centering the transfer case of VAZ-21213 Author ALER | GetPath(); Conference “Let's exchange experiences. Niva» NIVA-FAQ Equipment Transmission Transfer case |
The method of dynamic centering (balancing) of the VAZ-21213 transfer case is described here. The success of the operation (i.e., elimination of vibration and noise) depends not only on the transfer case itself, but also on the condition of the intermediate shaft and universal joints (and their crosspieces), since the complex of all of these components is balanced. It is recommended to carefully check and inject the splines and crosspieces of the universal joints. It also doesn't hurt to pre-balance the wheels.
Centering is performed by two people—let’s call the participants “driver” and “mechanic.” The car with the driver rises on a lift. Transfer case lever position: lock off, gear up. The gearbox engages fourth or fifth gear (see below about speed). The mechanic loosens the transfer case (4 nuts).
And the subtleties of the process are as follows.
1. The speed at which centering is performed may vary. One service recommended that I keep 60 km/h in fourth gear. This makes sense if the machine is used only in the city. In another - 90 km/h in fifth gear. I drive fast, so I prefer 100-110 km/h in fifth.
2. Loosening of the transfer case should be minimal, but sufficient for its mobility. The point of this subtlety is that the transfer case, when centered, is practically in the same horizontal plane as during operation.
3. Before centering, you need to place the transfer case supports so that the studs initially stand in the middle of the oval holes of the supports. This is possible due to the mobility of the splined joints of the cardan shafts. This installation provides maximum freedom for the transfer case to find the optimal position.
4. After gaining speed, the mechanic must push the transfer case several times from the side to the front, from the side to the back, or just from the side - to make it easier for it to find the optimum. But not forward or backward. This can be done, for example, with the handle of a hammer.
Advice - if centering is done at a service center in front of you, it is better not to get behind the wheel yourself, but to control the process from below, that is, to be, according to the role indicated at the beginning of the article, not a driver, but a mechanic or simply an “observer”.
Naturally, it is not at all necessary to have a lift. You can do this in a pit or just a flat area. The best result is obtained by exclusive centering - on stands under the suspension arms with the wheels removed. With this centering, the cardan shafts have the same angles as when the car is moving. Of course, the machine must be securely secured to avoid unnecessary risk. I know of a case where during centering they used stands made from stacks of bricks from which the car simply fell...
Also interesting: Removing and installing transfer case seals Niva 2121, Niva 2131
For the VAZ-2121, before dynamic centering, it is necessary to set the height of the transfer case by installing spacers under the transfer case supports. Gaskets are rectangular plates of different thicknesses. Their size corresponds to the dimensions of the transfer case supports, and instead of holes there are side cutouts so that the plates can be inserted under the supports without removing them from the studs. The use of washers instead of gaskets is strictly not recommended.
The method is well described in the Maintenance and Repair Manual. We can recommend the article in “Behind the Wheel”, which proposes an optical method (info provided by VadimM, TigerD and Vlad219i). At the end of the mentioned article there is a link to the article in ZR 1/98, where the method outlined in this article is briefly described, but in a more primitive form.
In the intermediate shaft of the VAZ-21213, a CV joint is used instead of a cardan, which allowed the plant to refuse to adjust the position of the transfer case in height. However, if there is noticeable deformation of the bottom in the area where the gearbox and/or transfer case is mounted, and also if the dynamic centering method does not give the desired result, you can try to adjust the position of the transfer case in height, and then repeat the dynamic centering.
I had to deal with another option for positioning the steering wheel - along the axis of the machine.
My 213 had the usual problem - the nut of the gearbox secondary shaft shank had come loose. I removed the boxes, went through the gearbox, then, when installing the boxes, I noticed that the studs on the CV joint of the drive shaft barely fit into the holes of the drive shaft flange when the gearbox was in the position closest to the gearbox. Everything came together due to the deformation of the elastic coupling.
I consulted with an authority on NIVAM in one service. He said approximately the following (he himself has a NIVA 2121): in his experience, the shaft with a CV joint is about 5 mm shorter than the shaft with a cardan joint, and the installation locations of the gearbox and gearbox on the 213th NIVA remained the same; axial stress during the assembly of the shaft and gearbox seems to be the cause of chronic problems with 5th gear and, in general, with the gearbox on many 213 NIVAHs.
1) elongated studs were installed on the shaft instead of the standard ones; 2) between the ends of the drive shaft and the flange of the primary shaft of the RK (on the studs of the drive shaft), an insert with a thickness of about 5 mm is mounted (the insert is simply made from the drive gear flange of the rear axle by cutting off the excess on a lathe from its end part, on which there are exactly the necessary holes).
As a result, the unit operates without unnecessary axial stress.
This is also done on my car. Now everything is assembled much easier, positioning the control unit is also easier (however, now it is necessary to remember when assembling that if the control unit is excessively shifted towards the gearbox, the blower shaft can seem to “sag” and give off its own vibrations).
vlavuk, 03.08.01.
I haven't encountered a similar problem. And on both my Nivkas, and on the cars of other Nivkas that I observed during centering, the transfer case, after its installation, stood up so that the studs ended up in the middle of the oval holes of the brackets. But this is not a reason to deny the situation described above.
Centering the Niva transfer case horizontally
Video: Aligning the Niva transfer case without a lift
Repair and alignment of the transfer unit must be carried out subject to the presence of experience and knowledge in the field of design and repair of the specific transmission of all-wheel drive vehicles. The range-multiplier needs to be centered after each reinstallation. The correct position of the box is judged by the presence of vibration.
- Do-it-yourself UAZ Patriot repair
Interior tuning
By upgrading the interior, many car owners try not only to increase the level of comfort of the vehicle, but also to emphasize their individuality. There are many options for improving the interior of your car.
This is the easiest way to tune the interior of a Niva 4×4. With prolonged use of the car, the seat upholstery becomes dirty, wears out and loses its aesthetic appearance. Reupholstery requires a lot of time, certain skills and considerable costs. Today, car shops offer a wide range of car covers made from high-quality materials in various shades, which greatly simplifies the selection of the necessary accessories.
Tuning the interior of the Niva 2121 is carried out according to the standard scheme. It is necessary to replace the interior trim and doors, as well as upgrade the seats. They can be replaced with new sports ones or improved upon the original ones. The second option is expensive and takes a lot of time, so a complete replacement of the seats would be a rational alternative.
To reupholster the interior, you can use your own materials or buy ready-made specialized kits. The interior of the SUV, made in light colors, looks great. It is recommended to do it yourself under the guidance of an experienced specialist. As a last resort, you should study some course or master class on this process.
Also an integral part of interior modernization is the installation of a new steering wheel. It is possible to improve the original one by reupholstering it with various materials and installing additional elements.
Is it really worth changing the transfer case?
I took a radical approach to the issue of eliminating excess noise in the Niva’s cabin. I often drive my family, so I simply installed a new small-module transfer case. The front and rear covers were equipped with 2-row bearings; this innovation was introduced at the Tolyatti plant back in 2010. Thus, the output shafts eliminated unnecessary vibrations, and in general, the service life and reliability of the entire RK mechanism increased.
I also simultaneously replaced the levers with ones that have anti-resonance bushings installed inside them. A lever of a similar design, by the way, was originally installed from the factory on the Chevy Niva (it has only 1 lever), which is why the howling and hum characteristic of the classic Niva were usually not noticed on the Shniva.
Tuning the trunk of Niva 2121
The Niva's extensive luggage compartment is an advantage only at first glance. The large volume provides absolutely no functionality, and the rib at the bottom of the trunk is a completely unnecessary element that interferes with loading. On later modifications it is missing. Also in the way is the folding shelf, which divides the trunk into two parts in the transverse plane.
It is best to remove these disturbing elements and install a box with pockets, drawers, compartments, which will allow you to organize the loaded items. It can be made from wood and metal. Corners or tubes should be used as a frame; it is subsequently sheathed with plywood or other material and trimmed with fabric. Before installing the box, it would not hurt to install noise and thermal insulation on the body.
You can also go the standard route and install a speaker system, LCD monitor or other fashionable gadget in the trunk. The latter option is impractical if the car is being tuned for difficult off-road conditions.
An expeditionary trunk for the Niva wouldn't hurt. It will allow you to take a lot of things and save internal space. It will also be a harmonious addition to off-road style. An alternative would be to install an arc with headlights. This will increase the driver's visibility. It is a useful element when driving in bad weather conditions.
Vibrations in the field, prologue
Introduction to history. In the team of people with whom I work, there are quite a lot of people with different characters, education and astrology)) What I mean is that “Virgo” is “VIRGO”. And either you understand this, or kill him right away. For example: when this person had problems with the gearbox and he decided to bring it “to mind” and go through it, he did it FIVE TIMES. Sometimes during disassembly, changing one bearing that he didn’t like, for one reason known to him))) And this person suggested that I look for vibrations, because the box had been rebuilt 5 times, the transfer case 10, and even the “hammer and sickle” CV joint driveshafts were taken for additional balancing.
Where to begin?
First, put on normal mud tires. At least 29″, no less. You can safely throw away the original tires from the factory, since you definitely won’t be able to drive them off-road. Yes, driving on asphalt with mud tires, to put it mildly, is not very popular - your ears are literally blocked from the noise (you can’t accelerate, alas), but as soon as you carry out such tuning of the Niva for off-road, you will be able to drive on quite serious roads with almost no problems. mud.
And everything would be fine, but this is where the manual work begins: the fact is that such wheels simply will not fit into standard arches, and therefore you will have to trim them. In principle, you can lift the car (or better yet, do both of these operations), but this is optional. If you decide to raise your “horse,” then the normal minimum is five centimeters. A lift kit will cost you about ten thousand.
Also interesting: Niva Chevrolet where is the starter relay located?
Vibration and how to deal with it.
The main reason for the occurrence of unnecessary sounds is multi-frequency vibrations of the components of the transmission. In general, the vibration of the transfer case on a Niva is one of the most common cornerstones that other car owners are forced to fight (or put up with) constantly.
Also interesting: Chevrolet Niva air conditioner repair at the best price!
- Check the cushions (supports) on which the power unit, gearbox and other parts are attached to the body, including the muffler. Any worn-out pad or rubber band can easily cause excessive shaking of the iron and accompanying rumble. It is better to replace worn silent blocks and pillows immediately.
- Be sure to pay attention to the intermediate shaft (inlet shaft). If you see signs of “fatigue” - change the elements that have become unusable, or the entire part!
- Examine the condition of the driveshafts. The “old” version of the cardan allows you to service (repair) the part, for example, by replacing broken crosspieces.
- In the case of CV joint driveshafts, you will have to replace a completely non-functional element.
- As for driveshafts on constant velocity joints (CV joints), this design is more expensive, but it has an undeniable advantage - it is easy to dismantle and install back, and this operation does not disturb the balancing of the driveshafts.
- It would be a good idea to pay attention to the placement of the transfer case. If an additional (third) RC mount is installed, unscrew it from the box; there is no need to unscrew it from the body. Set the transfer case to neutral, start the car and in fourth gear, rev it up to about 3-4 thousand revolutions. It must stabilize and, as they say, find its place. Turn off the car and secure the mechanism.
Perhaps this is the most complete set of measures that experienced auto mechanics advise when the transfer case on a Niva hums and vibrates!
Types of reduction gears
As you know, the main purpose of the transmission is to transmit torque from the engine to the drive wheels. At the same time, the transmission not only transmits, but also converts torque. Most drivers know that a manual transmission has low and high gears. Conventionally, 1,2 and 3 can be considered reduced, 4 is considered to be direct transmission, while 5 and 6 are increased.
https://www.youtube.com/watch?v=https:accounts.google.comServiceLogin
Let us immediately note that in relation to SUVs, trucks and various types of equipment, such a conditional division is not enough. The fact is that the gearboxes on such cars have not only “low” and “high” gears, but also so-called downshifts. Next, we'll look at why downshifting is needed, what it is and how it works, and how to use downshifting.
Read in this article
So, let's look at the example of an SUV. In this case, a reduction gear can significantly increase the vehicle's cross-country ability. In simple words, the presence of a downshift allows such a car to drive where cars with a conventional gearbox are not able to overcome the obstacle and continue driving.
To make it clearer, you need to pay attention to the following. Typically, a power unit produces maximum power at a certain number of revolutions. Also, at certain speeds, different from the speed of maximum power, the maximum torque is achieved, which is transmitted through the transmission to the drive wheels.
So, usually gearboxes are designed so that the engine delivers maximum torque and power fairly evenly at different speeds. The first gear allows you to move away, and in this gear the “emphasis” is on maximum torque, while in the 5th gear the car can move at high speed at maximum power speed.
The result is that when you press the gas pedal, the car “buries” its wheels in snow or mud, slips and cannot continue moving. If you switch to second speed or higher, the engine will simply stall, since it does not have enough revolutions and power to overcome the difficult section.
It turns out that in a situation where you need high engine power (high speeds), but also need a smooth ride at low speeds and low wheel speeds, a conventional gearbox is powerless. It is with these features in mind that SUVs receive a transfer case with a low gear.
So, active low gear has a high gear ratio. This allows you to reduce the wheel speed and at the same time spin the engine to maximum power speed. As a result, the car is able to move at low speeds at maximum power speeds. This feature is indispensable on off-road terrain, when driving uphill, on steep descents, etc.
Worm, less often cylindrical and planetary gears are used as reduction gears. The worm gear is one of the gearing gears with intersecting shaft axes. Movement in them is carried out according to the principle of a screw pair. Its main properties are low noise level due to the characteristics of the gearing, relatively low efficiency, small dimensions and large gear ratio.
Compared to a helical gearbox, a worm gear provides better running smoothness. This type of transmission has a much greater potential for increasing torque and reducing rotation speed than gearboxes with other types of gears. Spur gears are used in mechanisms with parallel shafts. This type requires increased accuracy due to design features.
Gear drives are distinguished by their reliability and durability while maintaining the permissible load level; the disadvantages include the fact that at high rotation speeds such a mechanism has a high noise level and also cannot flexibly respond to changing loads. Planetary gears are also a type of gear.
They have gears with movable axles. Such gears are lightweight, easy to assemble, produce less noise compared to conventional gears, and also have the ability to obtain large gear ratios. Disadvantages include a large number of parts, increased requirements for installation and manufacturing accuracy.
https://www.youtube.com/watch?v=ytdeven-GB
It is necessary to stop the car, after which the main gearbox lever is moved to the neutral position, and the additional gearbox lever is moved to the “low gear” position. Then we depress the clutch. Not all transmissions have a separate transfer case. In this case, a regular gearbox has a special lever with which this gear is engaged.
Removing the howl and hum
We will assume that we have dealt with the vibration, but an equally significant problem remains - how to remove the howling of the transfer case on the Niva. Vibrations of the mechanism are not always the only reason for the appearance of extraneous irritating sounds. And the characteristic noise of the transfer case, alas, is one of the “trademark” shortcomings of one of the best domestic SUVs.
- The first thing you should pay attention to is the levers. It is better to immediately replace them with silent ones - with anti-resonance bushings inside. They won’t eliminate all the noise, but they will definitely extinguish some of it.
Silent transfer case levers NIVA 2121 black Art. SV-21-18040401400.00-+ Buy
- The result will be even better if you install a small-module transfer case - with front and rear covers equipped with double-row bearings. In 2010, AVTOVAZ introduced new double-row bearings for output shafts in order to get rid of backlash and runout, as well as extend the life of the seals and, in general, increase the reliability of the mechanism. Here logic is man’s friend: less shaking and hesitation means higher service life and reliability.
Transfer case (2-row bearing) 21213 Art. 21213-1800020-0115000.00-+ Buy
DIY tuning of Niva 2121 for off-road
Initially, the Niva 2121 was created as a universal all-terrain vehicle that feels comfortable off-road and in the city. Therefore, it is logical that off-road tuning of the Niva 2121 is especially popular.
This is due to its relative simplicity. To create, or rather, enhance the image of an SUV, you need to install on your car:
- Larger diameter wheels with tires designed for extreme off-road use. It should be recalled that low-profile tires are not relevant in this case. It is also necessary to take into account that installing large-diameter disks requires impressive torque figures. Ignoring this rule will lead to premature wear of the power unit
- Installing arch extensions on a Niva will solve several problems at once: get rid of splashes of dirt on the wings and doors, expand the possibilities in terms of choosing the diameter of the disks, and complement the tuning composition
- Power kit. It consists of a powerful kenguryatnik. It is easy to make it yourself from pipes. A structure is installed on the rear door, onto which the spare tire is attached. It will also perform a protection function. A winch must be installed. It will help off-road and give the car an aggressive, masculine look.
This is all that is needed to create a car designed for participation in sports competitions or outdoor activities. This external tuning of the Niva 2121 combines aesthetic and practical functions. Therefore, the efforts and resources invested in it will quickly pay off.
You can do an easy tuning of the Niva 2121 - install new wheels and tires and apply stylish airbrushing with a 3D effect. To carry out the last operation, it is necessary to attract specialists.
Who is to blame and what to do?
I think that the first question is rhetorical))) But let’s try to answer at least “why this is so.” I am a mechanical engineer by education and work, production technology is at an average level, so I turned to a military plant technologist for advice. How it should be: the workpiece is made with a press, rough processing is carried out with allowances, a thermal treatment is made, the part is processed completely according to the “main and landing” dimensions. How it was done: the last stage was removed. After heat treatment, the part warps and does not come out clean. Or it is placed on a cylindrical mandrel during finishing processing, which cannot be done. Since with this design, everything is centered on the splines.
The answer to the second question. We buy a box at the factory containing 100 “semi-finished” flanges wrapped in oil paper, drag them to the lathe, set up the “finishing fixture” and finish the entire batch.
Tuning headlights of Niva 2121
Tuning the optics of the Niva 2121 sets the tone for the overall modernization concept. For example, installing headlights from Mercedes Gelandewagen will create the ambience of a powerful, aggressive SUV. Sports modifications of the headlights will add dynamics to the appearance and emphasize the streamlined shape. High power LED headlights can be installed to increase visibility. Another good option is to install lensed, crystal or bi-xenon headlights.
Helpful advice Standard models have virtually no potential for modernization, so it is better to replace them with new ones.
Tuning the rear lights of the Niva 2121 is carried out according to the same scheme as upgrading the optics. It is easier and more efficient to replace standard lights with new modifications.
We study problems and repair methods.
Any car owner definitely doesn’t need to be told why howling and humming are bad. Vibration of the transfer case on a Niva at low speed is quite common. The driver, of course, gradually gets used to many extraneous sounds in the car, but the noise level is high enough to make it impossible to carry on a conversation with passengers while traveling. Due to excessive noise pollution, you will inevitably have to deal with the problem.
Sources
- https://motorltd.ru/snyatie-i-tsentrirovanie-razdatochnoy-korobki-vaz/
- https://sv-parts.ru/blog/detail/vibracii-voi-razdatki-niva-kak-ubrat/
- https://AutoFlit.ru/2260-kak-otcentrovat-razdatku-na-nive-sposob-dlya-korotysha-i-shevrole.html
- https://NewNiva.ru/samodelka-razdatka-niva.html
- https://avto-idea.ru/remont/remont-razdatki-na-nive-21213-kak-ottsentrovat/
- https://avtomechanic.ru/niva-vaz-21213/transmisiya-vaz-21213/kak-ustranit-vibratsiyu-razdatochnoj-korobki-vaz-21213
- https://zen.yandex.ru/media/id/5f2ae91f66ca0e557c7aba7d/nadoel-voi-razdatki-na-nive-rasskazyvaiu-kak-ia-ot-nego-izbavilsia-5f2c55c38fa8d55d29d4d8dc
- https://niva-fr.ru/tyuning-osnovnaya-statya/vibratsii/
- https://NewNiva.ru/kak-ustranit-vibratsiyu-na-nive-21214.html
[collapse]
About overcoming water obstacles
A snorkel is another integral part of a car that will overcome water obstacles. Without it, the engine will probably drink water, and your car will turn into real estate for a long time. What other elements are installed when tuning the Niva for off-road use? An expedition-type trunk and an overhead light are something you definitely won’t be able to do without. Why are the light and trunk together? Yes, because the lighting fixtures are placed precisely on the “chest”.
We think that there is no need to talk at length about the benefits of an additional trunk (and even above the expected flood level) in a car in which you are going to tackle serious off-road conditions. This is especially important if you are tuning the Niva 2121 for off-road use with your own hands. This model is “nice” precisely for its tiny trunk, the volume of which is only enough for very moderate people.
Overhead headlights are sometimes the only way to cross a ford normally in the twilight or darkness. No one guarantees that standard lighting that is flooded with water will remain operational!
About the device
Despite the difference in varieties, the structure and operating principle of these boxes are the same. How does the transfer case (Niva Chevrolet) work? This node includes several elements:
- Drive shaft.
- Center differential locking mechanism.
- The differential itself.
- Chain or gear transmission.
- Drive shaft of the rear and front axle.
- Downshift.
All this is controlled from the interior. There is a transfer lever for this. "Niva Chevrolet" has both locking and downshifting. The torque that goes from the main transmission to the transfer case is transmitted through the drive shaft.
- Asymmetrical (distributes torque in different ratios).
- Symmetrical (distributes forces equally).
How to use?
By switching the operating modes of the transfer case, you can adjust the behavior of the car in accordance with road conditions.
Low gear is used in two cases:
- It is necessary to ensure low speed. For example, if you need to drive onto a curb or other obstacle, you can engage a lower gear so as not to burn the clutch.
- Need high torque. A lower gear is engaged before overcoming steep inclines.
The differential lock is activated when driving off-road, where there is a high risk of slipping.
At the same time, it must be turned on before entering a difficult area.
In general, you need to use the transfer case like this:
- Driving on the highway. The differential is unlocked, the first speed of the RK is turned on.
- Overcoming climbs and obstacles on hard surfaces. The differential is unlocked and the reduced speed is engaged.
- Overcoming difficult snowy areas, mud, slippery climbs. Locking and reduced speed enabled.
Common faults
Car owners most often note the following problems with the Republic of Kazakhstan:
- Difficulty shifting gears.
- Inability to engage differential lock.
- Increased vibration when starting or driving the car.
- Oil leak.
If any of these problems are identified, you must contact a service station or repair the transfer case yourself. In some cases, it is enough to adjust the steering wheel or treat the control drive joint with WD-40.
Without removing the gearbox
In short, it is quite possible to remove the engine from your “nine” without removing the gearbox. To do this you will have to follow these steps:
- Place bricks or other reliable supports under the gearbox;
- Unscrew the left crab, move the stretcher aside;
- Remove the generator, crankshaft pulley, and camshaft gear from the engine;
- The pump, tensioner pin, distributor, and exhaust pipe are also dismantled;
- If a major overhaul is planned, then you can also remove the head;
- Then the engine mount is removed;
- The motor is moved from the box and lowered to the floor. To remove the engine, the front part is raised higher using a jack and the volume is removed;
- Or you can pull it out through the top using a winch.
In practice, all experts recommend dismantling the engine along with the gearbox. Especially if you plan to replace the engine or increase the power of the standard engine. In this situation, the box itself is often changed so that it can clearly interact with the new motor.
Gearbox from nine