The VAZ 2110 steering rack is one of the most important parts of the car’s chassis. It connects the wheels and steering wheel through a special mechanism into a single whole. The vehicle's controllability, people's lives and traffic safety depend on its serviceability. Therefore, it is important to maintain the functionality of this unit and be able to quickly diagnose problems, given that rack faults can easily be confused with other faults. Knowing the structure of the mechanism and signs of malfunctions will help to simplify their identification.
In today's article we will talk to you about the main faults of the VAZ 2110 steering rack and how to repair them yourself.
How to check the steering rack of a VAZ 2110
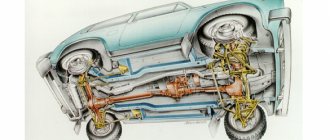
The vehicle control system is responsible for the direction of its movement, as well as, to a large extent, for the safety of the driver and passengers. One of the most important elements of this system is the steering rack. Its role is to transfer force from the steering wheel to the rods, which, in turn, force the steered wheels to turn in one direction or another.
With the exception of the latest versions in VAZ-2110 cars, the steering rack is not equipped with a power amplifier, but this does not mean that its mechanical design will last forever. Like any other moving mechanism, it sometimes fails. We will talk about what the VAZ-2110 steering rack is and what problems happen with it in this article. In addition, we will figure out how to repair or replace it yourself.
Dismantling, diagnostics and installation of the steering rack
Regardless of whether the rack is being repaired or replaced, it must be properly removed and reinstalled.
Replacing the steering wheel on a “classic” is not at all difficult if you have the proper desire. Information on dismantling can be obtained from this material:
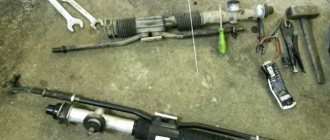
List of DIY tools
For dismantling and repair you will need the following tools:
- flat screwdrivers of different sizes;
- pry bar or mounting blade;
- small hammer;
- pliers;
- torque wrench;
- a set of socket and ring wrenches ranging in size from 10 to 27;
- open-end wrenches for 10, 13, 15;
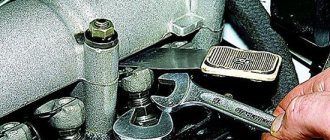
- special key for adjusting the steering rack. Such a key can be purchased at a car dealership or made independently.
Example of a wrench for tightening a steering rack
How to remove a part from a car for inspection
You need to know the location of the parts in the rack in order to carry out diagnostics carefully and scrupulously
Removal sequence for the rack:
- We unscrew the fastening of the steering cardan to the steering rack shaft in the cabin.
Remove all mounting bolts - Unscrew the fastener and remove the steering gear boot.
- We lift the front part of the car and install it on supports.
- Remove the front wheels and left fender liner.
- The steering rack can be removed with or without rods.
- To remove the rack without rods, you need to unscrew the locking plate and the bolts securing the rods to the rack. Then we move the rods to the side.
- If the mechanism is dismantled with rods, they are first disconnected from the swing arms.
- When pressing out ball pins, a puller is used.
- When unscrewing the steering end from the rod, it is necessary to fix the number of turns of the adjusting bolt. This will make it easier to set the wheel alignment during reassembly.
- Using a pry bar, we move the entire mechanism forward until the steering rack shaft completely exits the hole in the engine shield.
- The entire mechanism is removed through the wheel arch.
Removing the dismantled part
The need to replace the steering rack: diagnostics
To restore the performance of the steering rack, it is not always necessary to replace it; often the problem can be solved by carrying out maintenance with the replacement of tips, covers and bushings. Beginners should not service the steering wheel on their own. The design of this mechanism has many springs and pressing washers, and not everyone can disassemble the mechanism, sort through the parts and correctly replace them with new ones. Unprofessional installation of these parts will lead to incorrect functioning of the mechanism. The same applies if you need to loosen the mechanism or tighten it. It is also necessary to remember that repair work may well be more expensive than replacement, so the choice is sometimes obvious.
Steering rack repair kits of different compositions are produced for VAZ 2110 vehicles. They also differ in the year of manufacture and the presence of an amplifier.
Experienced car owners restore the slats themselves, but this is not always possible
The steering wheels of VAZ 2113-2115 cars do not have an outstanding design, so many car enthusiasts prefer to replace them. To carry out the replacement procedure yourself, it is recommended that you read this article:
It is necessary to change the part in the following cases:
- a crack in the rack body or the threads for fastening the tips are broken;
- very strong knocking in the rack, increased play in the steering mechanism;
- corrosion of the internal parts of the steering rack caused by rupture of the rubber boot;
- the rack was deformed after the accident.
In the above cases, restoring the removed part does not make sense. Restoration by professional craftsmen will cost a lot of money. Therefore, it would be more expedient to change the entire rail, which will require less time and financial costs. It will be much easier to purchase a new one in the store and install it assembled in place of the old one, ensuring excellent operation of the steering mechanism for several years to come.
In order to do a wheel alignment in a VAZ 2110 car, it is not at all necessary to contact a car service center. Details of the procedure:
Design and role of the steering rack in the control system
The VAZ-2110 steering rack is a steel form, one side of which has teeth that mesh with the teeth of the drive gear. The latter is driven by the steering wheel through the shaft and its cardan. In VAZ-2110 cars, the steering rack is located in a column, which is mounted on the partition between the engine compartment and the passenger compartment.
Its upper part has a mount for two rods, which are connected to the shock absorber struts through the tips and their fingers.
When you turn the steering wheel, its shaft rotates and transmits force through the cardan to the drive gear. As it rotates, it moves the rack along with the rods in the desired direction. This is how the car is controlled in such a simple way.
Naturally, to ensure normal operation of the rack, the design of the steering mechanism includes a number of other parts:
- column housing (case);
- protective casing (corrugation) with clamps;
- two drive gear bearings (ball and needle);
- support sleeve (fluoroplastic);
- emphasis;
- thrust nut;
- anthers, plugs, washers, etc.
Steering VAZ 2110. Device
- October 2, 2009
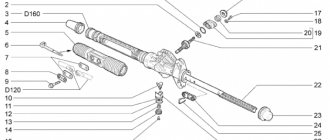
Steering mechanism assembly with drive
| 1 – tie rod end; 2 – ball joint of the tip; 3 – rotary lever; 4 – adjusting rod; 5 and 7 – inner tie rod ends; 6 – bolts securing the steering rods to the rack; 8 – steering gear mounting bracket; 9 – steering gear support; 10 – protective cover; 11 – locking plate; 12 – connecting plate; 13 – rubber-metal hinge; 14 – damping rings; 15 – rack support sleeve; 16 – rack; 17 – steering gear housing; 18 – coupling bolt; 19 – elastic coupling flange; 20 – roller bearing; 21 – drive gear; 22 – ball bearing; | 23 – retaining ring; 24 – protective washer; 25 – sealing ring; 26 – bearing nut; 27 – intermediate steering shaft; 28 – boot; 29 – protective cap; 30 – sealing ring of the stop; 31 – rack stop; 32 – spring; 33 – stop nut; 34 – retaining ring of the stop nut; 35 – plug; 36 – liner spring; 37 – ball pin insert; 38 – ball pin; 39 – protective cap; A, B – marks on the boot and crankcase; C, D – surfaces on the ball joint and swing arm |
Steering column
| 1 – intermediate steering shaft; 2 – coupling; 3 – steering shaft mounting bracket; 4 – cardan joint; 5 – spacer sleeve; 6 – bushing of the support plate; 7 – universal joint crosspiece; 8 – needle bearing of the crosspiece; 9 – support plate; 10 – pipe of the steering shaft bracket; 11 – fixing plate; 12 – welded body bracket; 13 – steering shaft bearing; | 14 – upper part of the facing casing; 15 – upper steering shaft; 16 – contact plate holder; 17 – steering wheel fastening nut; 18 – steering wheel; 19 – lower part of the facing casing; 20 – steering column position adjustment lever; 21 – retaining ring; 22 – tension spring; 23 – lever adjusting sleeve; 24 – coupling bolt; 25 – spacer sleeve |
Steering parts
| 1 – inner tie rod ends; 2 – steering gear mounting bracket; 3 – steering gear support; 4 – spacer ring; 5 – steering mechanism; 6 – sealing gasket; 7 – thrust plate of the seal; 8 – seal; 9 – lower flange of the elastic coupling; 10 – intermediate steering shaft; 11 – coupling bolt; 12 – spacer sleeve; 13 – facing casing (upper part); 14 – upper steering shaft; 15 – steering wheel; 16 – signal switch cover; | 17 – adjusting sleeve; 18 – steering column position adjustment lever; 19 – retaining ring; 20 – facing casing (lower part); 21 – steering shaft mounting bracket; 22 – steering shaft bearing; 23 – adjusting rod; 24 – outer tie rod end; 25 – spring ring; 26 – protective cover; 27 – sealing ring |
The steering is injury-proof, with a height-adjustable (tilt-angle) steering column and a rack-and-pinion steering mechanism.
The steering mechanism assembly with steering rods is attached in the engine compartment to the front panel of the body on its two brackets using brackets 8 (Fig. Steering mechanism assembly with drive ). Fastening is carried out through rubber cushions (supports) with 9 nuts on welded bolts.
In the steering gear housing 17, a drive gear 21 is installed on roller bearings 20 and ball bearings 22, which meshes with rack 16. The inner race of the ball bearing is fixed on the gear shaft with a retaining ring 23, and the outer race is pressed with a nut 26 to the end of the bearing seat in the steering housing mechanism. There is a sealing ring 25 in the recess of the nut. A protective washer 24 is installed between the nut and the locking ring 23.
The nut is locked in the crankcase with a washer and covered with boot 28, mounted on the drive gear shaft. Marks A and B are made on the boot and on the steering gear housing to ensure that the steering gear rack is installed in the middle position.
The rack 16 is pressed against the teeth of the drive gear by a spring 32 through a metal-ceramic stop 31, which is sealed in the crankcase with a rubber ring 30. The spring is pressed by a nut 33 with a locking ring 34, which creates resistance to unscrewing the nut.
A protective cap 29 is put on the steering gear housing on the left side, and a pipe with a longitudinal groove is pressed onto the right side. The spacer bushings of the rubber-metal hinges 13 of the internal tips 5 and 7 of the steering rods pass through the groove of the pipe and the holes in the protective cover 10. The steering rods are attached to the rack with bolts 6, which pass through the connecting plate 12 and the spacer bushings of the rubber-metal hinges 13. The bolts are secured with a locking plate 11.
The steering shaft consists of an upper 15 (Fig. Steering column ) and an intermediate 1 shaft, connected to each other by a universal joint 4. The intermediate shaft is connected to the drive gear by a flange 9 (Fig. Steering parts ) through an elastic coupling. The upper shaft is located in pipe 10 of bracket 3 (see Fig. Steering column ) on two ball bearings 13, which have elastic bushings on the inner landing diameter.
Bracket 3 for fastening the steering shaft is attached at four points to the welded bracket 12 of the body, and the front part of the bracket is secured through two fixing plates 11 with bolts with tear-off heads.
The rear part of the steering shaft bracket 3 is secured with welded bolts using nuts with or without spring washers and self-locking nuts.
The steering shaft mounting bracket 3 and its pipe 10 are hingedly connected to each other by two plates 9 using four bolts with plastic 6 and metal 5 bushings. With this connection, the pipe together with the upper steering shaft has both angular and axial movement relative to bracket 3. The angular movement is carried out by the amount of the slot P in the angular adjustment guide plate, which is welded to the pipe, and the axial movement is carried out by the amount of the slot C in the axial guide adjustment of bracket 3. Thus, you can change the angle of inclination of the steering column and move it along the axis within the length of grooves C and P.
To fix the pipe 10 relative to the bracket 3, there is a lever 20 for adjusting the position of the steering column. In its hub, splines are cut, with the help of which it is connected to the adjusting sleeve 23 and fixed on its splines with a locking ring 21. The sleeve 23 is screwed onto the coupling bolt 24, which passes through the slots of the guide plates of the pipe 10 and bracket 3. A spacer sleeve 25 is installed on the bolt A rectangular protrusion is made under the head of bolt 24 or a welded part with protrusions is installed, as a result of which the bolt is fixed from turning. When turning the lever 20 down, the force of fastening the guide plates is reduced, which allows you to manually change the angle of the steering column. After installing the steering column in the required position in the axial direction, the tightening bolt on the gear shaft is tightened, and the adjusting lever 20 is raised up and the column is fixed in the installed position.
Springs 22 of bracket 3 for fastening the steering shaft pull the bracket pipe to the upper position, preventing the free movement of the bracket pipe downward when the lever 20 is in the lower position.
The steering drive consists of two composite steering rods and rotary arms 3 (see Fig. Steering gear assembly with drive ) telescopic struts of the front suspension. The length of each tie rod is adjusted by rod 4, which is screwed into the rod ends 5 and 1. There should be a distance between the ends of the rod ends and the hexagon of the tie rod 4: on the inside within 10.8–14.2 mm, on the outside – 10, 6–16.3 mm. This is necessary for reliable connection of the rod with the tips along the length of the threaded sections. At the junction of the tie rod ends with the threaded sections of the adjusting rod, the tips are tightened with bolts.
In the head of the outer rod end there are parts of the ball joint: liner 37, pin 38 and liner spring 36. Swivel arm 3 is welded to the telescopic strut of the front suspension.
- tags:
- Cars
How to eliminate backlash?
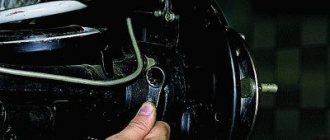
If you identify signs of a malfunction, do not despair; perhaps everything will cost you with minor repairs, especially since the rack itself very rarely fails. First, let's figure out whether there is play in the steering wheel and how to tighten the steering rack on a VAZ-2110 to get rid of it. First of all, open the hood and find the location of the column. We dismantle the engine elements that interfere with free access to it (air filter, air duct). Holding the steering rods with both hands, try to move the rack left and right. If play is detected, we get rid of it by adjusting the thrust nut.
Adjusting the VAZ-2110 steering rack is a fairly simple process, but this will require a special 17mm wrench with an octagonal head. Without this tool, work can not begin. If the key is at hand, go under the car and remove the engine protection. After this, move under the front of the car and find the location of the column. Remove the plastic plug from the thrust nut. Further adjustment of the VAZ-2110 steering rack is carried out by tightening this nut inside the column body. Rotate it 10-15 degrees, then check the amount of play. If necessary, repeat the procedure. It is important not to overtighten the thrust nut, otherwise the steering shaft will be difficult to rotate.
In addition, check the reliability of the tie rods. If necessary, tighten their fastening bolts.
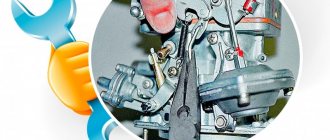
How to make repairs
Using the steering mechanism, the driver determines the direction of movement of the car. The steering rack plays an important role in the reliable functionality of the system. It is she who transmits the force that the driver applies to the steering wheel through the tips, rods, and to the turning levers connected to the wheels via a pin.
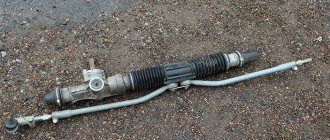
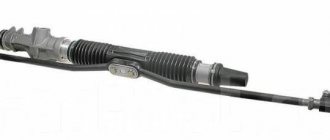
Photo of the steering rack for VAZ 2110
To be sure that the car is safe to drive, you should make sure that the steering rack is in good condition. If problems are found, they should be corrected immediately. It is quite possible to replace the steering rack on a VAZ 2110 with your own hands. In most cases, it is enough to tighten it.
If such a DIY repair of the steering rack on a VAZ 2110 does not give the desired result, simply replace the element. You have already become familiar with the process of dismantling the rail. Having taken out the old unit, put a new one in its place, following a strict sequence of steps.
To illustrate the repair of the steering rack on a VAZ 2110, we recommend watching the video. With their help, the process will not seem as complicated as described above. The work will take some time, but you won't have to hang around in the garage all day.
Photo of the steering rack for VAZ 2110
Dear Drivers, any mechanism in a car does not last forever, so when driving on an uneven road, at one point a knock may appear that sounds in the steering wheel. Or, standing still, there may be a knock when turning the steering wheel. These are the first signs that it is time to repair the steering rack.
The following signs will help you determine the condition of the steering rack: 1. Grasp the steering shaft in the area where it meets the rack and move it up and down. If it knocks, then repair the rack housing (most often the reason is that the needle bearing is running without lubrication). 2. You can check the play of the bushing and the contact of the rack with the steering gear by grasping the joint of the steering rods from under the hood.
It’s good if the reason turns out to be poor tightening of the components, but if there is knocking in the rack, then you can do the following: 1. buy a new steering rack 2. restore the steering rack at a service station 3. repair the steering rack yourself
If the price of a new rack does not bother you, then of course it is better to install a new unit. Restoring it at a service station will also cost a pretty penny. Well, the cheapest way to get rid of knocking is to do everything yourself.
In addition, depending on the year of manufacture of the car, the rack may be old (VAZ 2108) or new (VAZ 2110-12). In the latter case, the difference is that you do not need to disassemble the entire mechanism to replace the bushing. It is enough to tighten the corrugation, then unscrew the nut in the middle and the rack is disassembled into two parts (one part is the entire rack mechanism, the second part is where the bushing is located).
Removing the steering column
If after adjustment the problem with the rack does not disappear, you will have to disassemble and repair it. But to do this it needs to be removed. There are two methods of dismantling: with and without tie rods. The latter method is preferable as it requires much less time. Before removing the steering rack on a VAZ-2110, the front part of the car needs to be jacked up on both sides. This is necessary in order to unload the traction.
In the cabin, in the area of the pedal block, you need to unscrew the steering shaft cardan bolt. After this, we go to the engine compartment and unscrew the 2 bolts securing the rods, having previously bent the locking plate. Then you need to unscrew the 4 bolts securing the steering column to the car body. When this is done, remove the column and remove it through the opening of the left wheel arch.
What is a do-it-yourself VAZ-2110 steering rack repair?
Take care of your tools in advance. Here you will need two special keys: a 17 octagon and a 24 octagon, as well as bearing pullers. It is worth noting that repairing the VAZ-2110 steering rack involves replacing parts that are most susceptible to wear. These are bearings and a drive gear boot, a stop, retaining rings, a support sleeve, and seals. All these elements can be purchased as a set. There are three types of repair kits on sale:
- minimal, including a support sleeve, boot, retaining rings and seals;
- standard, which in addition to the listed parts includes bearings;
- complete, which also includes a new rack.
It is recommended to buy a repair kit only after you remove the column, write down its markings (different versions of the VAZ-2110 may have different configurations) and disassemble it, identifying the spare parts that need to be replaced.
Repair
The first thing you will need to carry out your own repairs is a repair kit. They are available at almost any auto parts store. However, we strongly recommend that you buy only high-quality kits so that the result of your DIY repair lasts as long as possible.
What you need for work
The proposed kits are incomplete and complete. You will definitely need the following kit components:
- Needle bearing;
- A pair of rubber seals for the bushing;
- Support sleeve made of plastic;
- Set of gaskets;
- Spring;
- Retaining rings;
- Support bearing;
- Drive gear;
- Boot cover;
- Rail;
- Set of ties for the boot.
Repair kit Now that the kit is ready, the tools are available, and there is enough free time, you can get to work.
- First, remove the boot, end caps and stops. As you disassemble elements, even the smallest and insignificant at first glance, be sure to evaluate their current condition. If necessary, all worn-out elements will be replaced with new ones taken from the repair kit.
- Using an octagon, unscrew the screw plugs, which will allow you to remove the springs, retaining rings, and thrust bushings.
- Remove the bearing and check if it has any play. The repair kit includes a new bearing, so if the old component is in satisfactory condition, it is better to replace it immediately. It’s not for nothing that you took on such a complex process to get everything done 50%.
- Remove and inspect the drive gear. Next, you can completely remove the rail itself.
- Be sure to replace the support shaft bushing, not forgetting about the rubber bands. They are also included in the kit.
- Take your time to remove the rubber bands from the sleeve. First, insert the element into the crankcase, after which you can cut off the elastic with scissors or a sharp knife.
- The most difficult step is replacing the needle bearing. To remove it, you will need a special key. But you can do without it. In this case, arm yourself with a 1.5 mm drill bit and a drill. Using a drill, make a hole in such a way as to loosen the end of the bearing. Use a punch to knock out the old bearing from the crankcase.
- Before installing the new needle bearing, be sure to thoroughly clean the steering rack housing of accumulated debris and steel shavings from drilling.
- The hole made cannot be left. To eliminate it, you can mix metal filings with superglue. This mixture will harden quickly and give an excellent result.
- Lubricate literally everything that can be lubricated in the steering rack assembly. Experts advise using Litol 24 or other lubricants of similar quality. It wouldn't hurt to lubricate the CV joints.
- Reassemble the unit by following the reverse sequence of dismantling.
If you don’t have a key to remove the needle, repairing the steering rack yourself allows you to significantly save on replacement, plus gain a lot of experience in performing far from the simplest work related to your VAZ 2109. But you can do it easier, without taking any risks, by contacting a trusted car service center.
Unit in a vice
Checking status
Having completed the repair, you should not think that now the steering rack will serve tens of thousands of kilometers and will no longer cause you trouble. Like many other components, the condition of the rack must be periodically monitored.
What to look for
Your actions
Mounting nuts and bolts
These fasteners are subject to vibration after repair as they are used. Therefore, it is recommended to check and tighten them every 250-300 kilometers.
You can check it a little less often, approximately every 500-1000 kilometers, depending on the operating conditions of your car. Due to different quality, some anthers can last quite a long time, while others will require replacement after 10 thousand kilometers. The choice is yours which parts to use
The rack itself should be constantly monitored
Listen to the behavior of the steering mechanism, pay attention to the above signs of malfunction. As part of a scheduled technical inspection, be sure to include a check of the steering racks in the list of activities.
The repair cannot be called complicated, but it takes a lot of time
Plus, it is extremely important to perform all operations as carefully and efficiently as possible. Otherwise, the result will not last long and you will soon have to interfere with the design of the VAZ 2109 steering unit again
Disassembling the steering column
We begin disassembling the control unit by removing the protective casing by cutting the plastic clamps. After this, use a special key of 17 to unscrew the thrust nut, take out the retaining ring, the spring and knock out the rack stop. Next, remove the boot and drive gear seal, remove the lock washer, and then use a 24mm wrench to unscrew the nut securing the ball bearing. We remove the gear. Now that there is nothing holding the rail in the case, we remove it through the right side of the case. We remove the needle bearing of the drive gear from its seat. To do this you will need a special puller. Check the drive gear bearings for play. If present, the bearings will have to be replaced.
The support sleeve must also be replaced. It has a cylindrical shape and is located inside the steering housing. The bushing is removed by prying it off with a screwdriver.
Repair kit for rack 2110
The whole problem is in the repair kits. Here you need to keep your ears open, since the repair kit may be either incomplete or of poor quality. It is inexpensive, but the very fact of buying a low-quality spare part that you are counting on is unpleasant. Small repair kit includes:
- rack bushing;
- emphasis;
- o-ring, three pieces;
- thrust nut.
This set costs about 300 rubles. But it’s best to pay another 250 and take the full set, which includes boots and bellows. No matter what condition the old ones are in, it is better to replace them, and here's why.
The fact is that on average, at 120 thousand, depending on operating conditions, subtle cracks and breaks may appear on the stockings and corrugations. It is quite difficult to notice them, and water inevitably gets through them. It will not escape from the rack body and will do its wet job - rust cannot be avoided. Any source of corrosion on the rack is a minus to the service life of both the rack itself and the seal. The chain reaction causes the rack to eventually wear too much and repair may not be possible. Don't skimp on a good repair kit.
Assembly procedure
We begin repairing the VAZ-2110 steering rack by installing the needle bearing of the drive gear. The seat is first generously lubricated with a special lubricant such as “Fiol-1”. After this, we press a new ball bearing onto the drive gear shaft. Next, install the support sleeve from the repair kit inside the control unit housing. Now we fill the inner cavity of the column with lubricant and insert the steering rack into it.
We mount the drive gear and secure it with a locking ring and nut. We put a new boot on its shaft.
We install the stop with the seal in place, secure it with a stopper and a thrust nut. That's basically it. Now you need to adjust the control unit and put the protective cover on it.
Steering elements
The drive gear is mounted on the crankcase bearings. It engages with the rail. The metal-ceramic stop is sealed in the crankcase using a rubber ring and presses the rack with a special spring to the gear.
Steering rack diagram
Due to the work of the locking ring, the unwinding nut is fixed. There are marks on the boot and crankcase that make it easy and quick to assemble the entire assembly.
Steering rack diagram
Steering rack diagram
Replacing the steering rack of a VAZ-2110
It is rare, but it happens that replacing consumables is not enough. The steering rack, although made of steel, is still subject to wear. Most often, the reason for this is the negligence of car owners who do not monitor the condition of the steering mechanism. In addition, the rack may also be damaged as a result of a traffic accident. But there is no need to despair here either. The VAZ-2110 steering rack is replaced according to the scheme described above. The only thing you need is to purchase a complete repair kit, which costs on average about 1,500 rubles.
Steering system diagnostics
Suppose you notice an uncharacteristic rattling sound in your car when driving? How do you still understand that it is time to repair the rack? There are not so many diagnostic methods; they are extremely simple and do not require any special sophistication from you:
- 1. Check the steering mechanism at the point where the steering shaft and rack combine. If it gives in to force and a characteristic knock is heard, most likely the problem is the lack of lubrication of the needle bearing;
- 2. The presence of play due to a worn bushing or a banal insufficient tightening of the main components can be concluded by grasping the joint of the steering rod under the hood of your car.
If we have already decided on the need to restore the rack, it’s time to decide on the method of repairing it.
It’s worth immediately making a reservation about repairing the steering rack from a VAZ 2110 with your own hands - the process is very labor-intensive, nervous and thankless. It is recommended to decide what is easier for you: perhaps spend the whole day doing hard and painstaking work, buy a new rail, or pay about 3,000 rubles. for repairs at a service center?
In defense of do-it-yourself repairs, we note that only you yourself are capable of performing the work with due seriousness and responsibility, dictated by the love for your own car. Repairing the VAZ steering rack on your own will be much cheaper, but it is advisable to enlist the help of a friend when reinstalling the rack and pinion mechanism in its place under the hood - doing this alone is absolutely impractical.
Necessary tools and spare parts for self-repair:
Steering rack repair kit for VAZ 2112
The cheapest repair kit for repairing the steering rack from a VAZ 2110 with your own hands will cost around 200-250 rubles. A more complete and universal set of spare parts will cost us about 500 rubles. It is also recommended to definitely replace the central corrugation (its price is approximately 250 rubles).
In total, it turns out to be at least 500 rubles. At the same time, buying a completely new rack and pinion mechanism will cost about 1,100 rubles. The tools we will definitely need are:
- special key 2110, which is a hollow octagon;
- wrench with long handle and octagonal socket 15 mm;
- ratchet with 10 and 13 mm heads;
- a set of metalwork tools;
- mount;
- jack.
And the following materials:
- penetrating lubricant for rusted bolts or kerosene (in the second case you will also need a syringe);
- diesel fuel, gasoline or other means for washing parts;
- Litol-24 lubricant, ideally FIOL.
Useful tips
Finally, here are some useful tips that will extend the life of the steering rack and other elements included in the control unit:
- At least once a quarter, check the condition of the steering at a service station or yourself.
- Pay attention to the condition of the steering column protective cover.
- Try to limit driving on uneven surfaces, especially at high speeds.
- Do not test the strength of the steering rack and the entire mechanism by moving away with the steering wheel turned all the way to the side.
- If play or other signs of steering rack malfunction are detected, repair or replace it.
The steering mechanism of dozens has undergone several ongoing improvements throughout the entire production period of the car, but in general, the steering system is not far removed in design from the VAZ 2108-09 design. Perhaps that is why almost everyone who operates a ten repairs and adjusts the steering rack with their own hands. There is nothing complicated about this and now we will see it.
Conclusions and recommendations for repairs
Particular attention should be paid to the condition of the support bushing and the worm gear mechanism. Damage to the anthers causes excessive corrosion of the rack, destruction of the gear teeth, destruction of the locking spring and clogging of all parts with dirt.
The parts need to be washed, bearing play checked, and cleaned. Also generously lubricate all mating surfaces. The rack stop and retaining ring must be replaced, as the parts most susceptible to friction and wear.
The design of the steering rack on the VAZ-2110
First, let's decide what we will regulate. The design of the rack is extremely simple. The hydraulic booster is not provided, so even with dismantling (which is not at all necessary), all the work will take an hour or an hour and a half.
Scheme and design
The steering mechanism of the VAZ-2110 is a rack and pinion gearbox that converts the rotation of the steering shaft 27 into the movement of the rack 16 itself. Steering rods 5 and 7 are attached to the rack with bolts 6, which turn the racks with the steering knuckle. The contact point between the drive gear 21 and the rack 16 is most subject to load and, accordingly, wear.
When adjustment is necessary
Over time, a gap forms between these parts, which leads to the appearance of symptoms indicating the need for adjustment:
- knocking in the steering rack when driving over bumps;
- increased steering wheel play;
- the steering wheel is too tight, the wheels do not align after turning;
- the rack “bites” periodically, this indicates critical wear of the rack or drive gear 21.
Clearances and adjustment
In these cases, it makes sense to try to adjust the gap between the rack and pinion in order to delay a major overhaul of the entire mechanism. And we will adjust the gap by pressing the adjusting nut 33 through the spring 32 and the rack stop 31, the rack to the gear.
To do this, we will need a special octagonal wrench for 17, which is sold at any auto store. You will also need several screwdrivers and a standard set of tools if we do not remove the rail from the car. Let's start making adjustments.
A key for tightening the steering rack on a VAZ-2110 car.
Symptoms of a problem
Without proper care, such as lubricating bearings and checking play, the steering rack can quickly fail. Signs of malfunction that indicate that the mechanism should already be changed:
- A noticeable knock when driving over bumps, which is transmitted to the steering wheel. If a knocking noise is heard when turning the steering wheel, it is unsafe to drive such a car; it is necessary to urgently diagnose the mechanism.
- Strong play in the steering wheel indicates loose fasteners or wear of the rack-and-pinion joint.
- The effort when turning the wheels has increased.
- You can hear noise from the hydraulic booster (if equipped).
- The cause of the knocking noise may be an insufficiently lubricated bearing or wear of the gear-rack pair. If, when rocking the steering shaft, there is noticeable play at the junction with the rack, repair is necessary. If not, just check and tighten the joints between the bushing and the steering shaft gear.
A powerful vice is used to fasten the rail
Video: How to tighten a loose mechanism
We tighten the rail ourselves
We will carry out the work from under the car, so it is advisable to use an inspection hole or overpass. You can tighten the nut from under the hood, but this is extremely inconvenient and will take more time, we checked.
We install the car and secure it with the handbrake; just in case, we put wheel chocks under the rear wheels. Next we do this:
- Remove the engine protection.
We extend the carrier so that it can be seen better.
This is the same nut.
This is what the plastic plug looks like.
You will have to try a little to get the wrench into the nut.
Selection of repair kit
Before starting repair and restoration work, you should decide on the choice of repair kit.
- Minimum set. This set includes the necessary list of fastening and sealing elements: washers, bearings, nuts and fluoroplastic bushings.
- The basic set has bearings and shafts in addition to the minimum set, but its cost can be twice as high as the first option.
conclusions
Dismantling the rack for adjustment will be necessary only in case of critical wear of the bushings, anthers, rack, gear, and in cases where the adjustment did not lead to the desired result. Good luck to everyone, obedient steering wheel and smooth roads!
Video about adjusting the rack on a VAZ-2110 from under the hood
- How to check the steering wheels of a VAZ 2110
- How to adjust the steering column
- How to choose a VAZ 2110
Checking the steering play
To perform a play test, place the front wheels of your vehicle in a straight-ahead (straight-ahead) position. Take a long-blade slotted screwdriver and tape it to the dashboard with the blade facing the steering wheel. Now carefully turn the steering wheel in one direction and the other until the wheels begin to turn.
When the wheels begin to turn, use chalk or thread to mark the limits of its free play on the steering wheel rim. Measure the distance between the marks and determine the free play of the steering wheel, which should not exceed 15 mm. If the free play of the steering wheel exceeds 15 mm, you need to check the condition of the steering rack, tie rods and ends, front wheel hub bearings and strut swing arms.
After this, sharply jerk the steering wheel from side to side at a small angle. Make sure there is no knocking noise in the steering column universal joints or steering gear. If necessary, tighten loose fasteners or replace faulty parts with new ones.
Diagnostics
First you need to make sure there is a problem. To do this, you need to turn off the engine, having first placed the car on the inspection hole. Then you need to turn the steering wheel several times until it stops in one direction and the other.
At the same time, at least two people are needed to determine the malfunction. One will turn the steering wheel, the other will evaluate the work of the rack from below. This will allow you to check for any gaps in the hinges. If the knocking noise remains even after disconnecting the rods and levers, the unit will have to be replaced.
There can be many reasons why the steering rack knocks. Therefore, diagnostics plays a huge role in repairs. The most common knocking noises are the tie rod ends and rods. The main sign of a torn tip is a damaged boot. It is because of this that the ball joint becomes unusable. Diagnosing a broken rod is much more difficult.
Unfortunately, it is difficult to verify that the steering rack is knocking precisely because of traction, because if the car was purchased with mileage, then the previous owner could easily replace the torn spare part without bothering with more serious repairs.
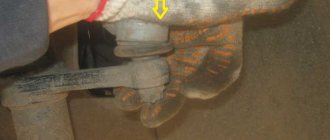
Important! To understand that the steering rack is knocking precisely because of the traction, you need to remove the boot and check the traction for any play
In most cases, the reason why the steering rack knocks is the bushing. This is part number 7 in the picture. It does not have a rigid fixation and is pushed forward by a spring, which is adjusted by a bolt with a lock nut.
Important! Most service centers, instead of replacing only the bushing, offer to install a new unit. Most often, such a policy of service centers is associated with a banal desire to make money from a motorist
Indeed, there are parts that change only during assembly. But this is not the case. The bushing for Honda cars is available for public sale. Moreover, you can do it yourself if you have the drawings.
Most often, such a policy of service centers is associated with a banal desire to make money from the motorist. Indeed, there are parts that change only during assembly. But this is not the case. The bushing for Honda cars is available for public sale. Moreover, you can do it yourself if you have the drawings.
Noise when turning
If you hear a hum when the steering wheel is turned to its extreme (or close to it) position, it means that you need to check the condition of the hydraulic or electric booster and the components of its working system. In this case, a hum may occur even if the fluid level is normal. You need to check the condition of the pump blades (often, over time, the pump’s performance decreases), the condition of its bearings, and the tension of the drive belt.
Power steering fluid leak
Regular leakage is a reason to check the power steering system and its seals. In particular, if the car owner is forced to frequently add fluid to the system’s expansion tank. In this case, a concomitant symptom of a faulty steering rack will be a fluid leak from the line. It can drain directly onto the ground under the car (usually right under the expansion tank) or streaks can be seen on the steering linkage boots.
Often, when a liquid leaks, air enters the system (the system is “aired”). It can be seen by the bubbling liquid in the expansion tank. As stated above, the cause of the leak may be rust on the rack. To get rid of it in the future, it is advisable to use non-standard plastic clamps to tighten the anthers, and their metal counterparts, which provide a higher level of tightness.
Knock when driving in the front axle
In fact, such a knock may also indicate a malfunction in the vehicle’s chassis, so additional diagnostics must be performed. The knock can be either in the center or on the left or right side. In the best case, a knock may indicate a torn traction boot; in the worst case, it can indicate problems with the rods, levers or other elements.
To understand exactly why such a malfunction occurred, it is better to remove and disassemble the rack. After all, the most harmless thing may be a loose adjusting nut or wear of the bushing (when there is a knock on the right), but a more serious problem is wear of the worm pair.
Torn boot on traction
When checking the performance of the rack, it is necessary to pay attention to the integrity of the traction boot. Ideally, it should be intact and the rubber should be elastic
If it is torn and dirt has gotten inside, it must be replaced, lubricant must be added after removing dirt, moisture, and debris from the mechanisms.
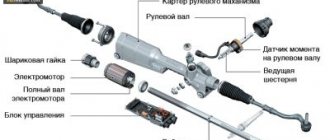
Electric power steering rack
To localize faults in the electric steering rack, it is necessary to check the following elements.
Checking the condition of the tie rod ends
You will need an assistant to perform this test. Take 2 jacks and lift the front of the car. Secure the machine to support stands. If you have a lift at your disposal, use it.
Ask an assistant to grab the wheel and jerk it sharply in a horizontal plane, i.e. pull the rear part of the wheel toward you and the front part away from you. During this, you place your hand on the body of the ball joint of the steering tip and the swing arm and evaluate their mutual movement relative to each other. If you feel the ball joint move freely, replace the tie rod end immediately.
In addition, change the steering tip if, during the inspection, you notice that the ball joint boot is torn.