Selecting heated seats
In order to choose heated seats, you need to decide what kind of heating you need. There are several types of seat heating for Lada Priora: Cover, Standard heating, Emelya heating
Heated seats from the cigarette lighter (cape)
This type of heating has a wide area of application and is quite easy to install. To install heated seats from the cigarette lighter, you do not need any auto electrician skills. To install such heating, you just need to insert the heating plug into the cigarette lighter and select the heating position. It should be noted that the reliability of such heating leaves much to be desired. Filaments are used as a heating element, but since the cape is poorly attached to the seat and is often subject to creases, which leads to the breakage of the filament and, consequently, failure of the entire heating.
Heated seats standard
The standard heating for Lada Priora is a very reliable device that can be bought at any auto parts store at a price of 1000 rubles. Standard heating has only one heating position and does not regulate the heating temperature, i.e. The seat will heat up until you turn it off. This is its only drawback. The advantage of this heating is that there is no need to use additional intermediate relays to unload the contacts. Since the relay itself is already built into the button. The standard heating has heating elements for the seat and lower back.
Heated seats Emelya
Emelya's heated seats have proven themselves quite well on the market. The cost of such a heating kit is not cheap, starting from 2000 rubles. This heating is installed in the same way as standard heating. However, a significant difference from standard heating is the ability to regulate seat heating. But it is also worth noting that installing the seat heating button in the standard place will be difficult; you will have to cut out and trim the standard place. This type of heating has heating elements for the seat and lower back.
Popular
Since the relay is open, turning the ignition on again leaves the heating off and you must press the button again to turn it on. I didn’t take photographs of this process - everything is done locally anyway.
When they are inserted, a toothed metal plate is clamped on top with pliers and cuts through the insulation.
How to install heated seats in a car yourself? By the way, don’t be lazy and install other heating units.
Now you can put the rear trim element on the hooks. In this case, the on-board network will not be affected if the heating fails. Experts recommend choosing the standard ones provided for the VAZ. The connection of control, indication and button illumination was carried out with a two-core wire.
We recommend: Pue frequency of grounding checks
Simple universal heated seats and a diagram of connecting it to the car
I plopped down on the icy seat for a couple of seconds, started the car, pressed the heating button, and within a couple of minutes the seat was already warm. Element Explanation Heating elements These are required for the backrests and seats.
Do you use heated seats? This arrangement of switches will be the most successful from the point of view of ergonomics and comfort. The best opportunity for self-installation of heating elements remains in cars that already have a system installed, but not installed by the manufacturer.
With a correctly assembled circuit, the heating will function only when the ignition is on. Didn't find the information you are looking for?
Bend back the cover at the passenger's feet and remove the cover of the ECU box. The ideal option is either the center console if there is space for installing buttons, or in the space between the gearbox rocker and the handbrake. This option is quite rare on budget class cars. Unclip the trim on the dashboard where the various buttons are located. ✅ INSTALLING HEATED SEATS ON A CHEVROLET NIVA WITH YOUR OWN HANDS. HOW TO CONNECT SEAT HEATING.
Types of heating elements
The domestic market today offers a huge selection of various devices and devices to increase the comfort of machine control. And seat heating in this case is no exception. First, let's look at the types of systems.
Cases and capes
The heated seat cover can be made in the form of a cover. It should be noted that this version of heating systems is characterized by ease of installation, as well as an affordable price. Installing heated seats in this case comes down to installing a cape and connecting it to the cigarette lighter.
It should be noted that a heated cape for a car is an option that has many disadvantages:
- wires that will constantly get tangled;
- too low level of electrical protection and fire safety;
- heating of the entire area of the cape will be uneven;
- car covers do not always fit successfully into the interior of the car;
- heated rear seats will not be possible.
It should also be noted that installing seat heating in this case requires a free cigarette lighter socket. And since today this socket is universal, since DVRs, radar detectors, GPS navigators and other devices can be powered from it, installing the system will be problematic. You can use a splitter, but due to the large number of consumers, the safety elements may also fail.
Built-in models
If you decide to install heated seats in your car and want to use a built-in type, then you need to take into account that this method is difficult to install. However, you can still install an embedded system yourself.
It should also be noted that built-in heated front seats have certain advantages:
- you can equip not only the front but also the rear seats with a heater;
- such a system should be installed under the seat trim, and the wiring should be laid under the interior upholstery;
- to activate the system, use the seat heating button, and the system itself is connected to the on-board network, accordingly, the cigarette lighter socket will be free;
- the use of such a system will not affect the interior of the cabin.
Featured Posts
You can post now and register later. If you have an account, log in to write on your behalf.
Related publications
I'll create a new topic to collect everything in one place. Here I sincerely ask for help from my teammates in order to understand the schemes. I'll install it myself.
I figured out the front seat connectors thanks to experience and diagrams taken from here https://mondeoclub.ru/forum/topic/124553/
But since my car is empty, I need to install the most important thing first: the blue chips for the heater and ventilation control buttons
At this stage, we really need help with the diagram and coloring (pinout) of these chips: which wire should be connected to which contact of which chip of the car?
Fire protection for heating
Since heated seats are a rather dangerous thing, it must be equipped with overheating protection. The standard heating and the Emel heating have such protection. The protective function is performed by a thermostat, which automatically turns off if the thermoelement heats up above 25 degrees. This feature allows you to safely use heated seats.
This is what can happen if you use heated seats without protection.
Preparation for installation of heating elements
Before connecting the heated seats on the Grant, you need to secure the heaters under the upholstery of the seats. Of course, it is more convenient to do this on dismantled “seats”, previously disassembled into two parts: the back and the support. Creating acceptable conditions for installing heating elements is the goal of the preparatory stage. By the way, when determining the reasons for the knocking of hydraulic compensators, there is a slightly different logic.
Preliminary activities are carried out according to the following scenario:
- Disconnect the power supply to the seat belt sensor located under the seat. In many trim levels, this option is available only to the driver.
- Using an E10 head mounted on the knob, unscrew the four bolts connecting the base of the seat frame to the body and remove the seat. For ease of access to fastening elements, move the seat to the farthest or closest position. Similarly, remove and pull out the second front “seat” from the passenger compartment.
- Remove the backrest angle adjustment knob by prying it off with two flat-head screwdrivers.
- At the junction of the backrest and seat, remove the plastic covers on the left and right sides by unscrewing one screw each.
- Unscrew 2 bolts on each side securing the backrest frame to the metal base.
- Detach the backrest from the seat.
- Repeat steps 3-6 for the second chair.
Factory covers are attached to the frame with four clips. On the reverse side, the fixing elements are clamped with wires. Having untwisted the latter, we tighten the fabric. Before removing the backrest cover, disconnect the plastic lock at the bottom of the structure. When assembling, it is advisable to replace the wire with plastic clamps.
Installation of heaters
The purpose of preliminary positioning is to achieve such an arrangement of the heaters that the wires exit into the joint of the backrest and seat. You won't be able to play with the longitudinal base - the standard kit is designed strictly according to the dimensions of the depressions. After removing the protective tape, glue the element to the frame. If necessary, the foam is trimmed to allow the wire to exit unnoticed.
Installation algorithm
- Installing heated seats on a Lada Granta may take you at least 3 hours
, so calculate your schedule. Especially when the weather is frosty outside. - We drive the car into the garage, if in the summer, then it can be on any flat and clean surface;
- We turn off the engine, squeeze the handbrake, put it in gear or wedge the wheels with shoes;
- We are interested in the central part of the dashboard, called the beard, and the front driver's seat. By analogy, you can install it on all the others or leave it on one;
We took it off, and in front of us is a picture of a tunnel niche. On the sides at the front it is secured with two screws on each side and one at the back. Unscrew them using a screwdriver. Please note right away that the rear screws cannot be unscrewed without lifting the handbrake handle and removing the pressure sensor and casing. Otherwise, you won't be able to access it with a screwdriver.
Let's move on to the seat
. Place it on a clean and flat surface. Use pliers to remove the fasteners from the bottom. We do this carefully, as everything is fragile and delicate. Remove the top part of the casing.
We unpack our heater and check its integrity. On the bottom of the seat you will see a pre-installation in the form of a through hole, and stretch the wires from the pad there. And secure the heater itself to the foam rubber using double-sided tape, which is installed there by default, so that it does not fidget.
After checking the tightness of the fit and the exit of the wires from the hole, we cover the foam rubber with sheathing and fasten the brackets back
. If their further installation is not possible, you can use ordinary wire as a replacement, if it is not important to you.
We're done with the seat, let's return to the interior of our car. We run wiring under the rugs. We connect the ground to the handbrake sensor on the body, and plus the developers clearly indicate the “emergency light”. I don’t know why I went there, they probably know better.
The keys themselves (depending on the configuration) are located in the backstage area and have a greenish LED backlight. If the circuit is correct they will light up.
After the electric hoses are laid, we install the seat itself and connect the chips. We test the heating; it should be felt in four squares at once, evenly over the entire area.
We put everything back together in reverse order.
This completes the installation of heated seats on the Lada Granta. Enjoy the warmth while the thermometer outside the window shows minus. Good luck to you.
Power supply or how to connect the heated front seats on the Lada Granta correctly
The cost of installation work at an unofficial service station is at least 2,500 rubles. For this money, already purchased heating elements will be installed in the car seat and the circuit will be connected according to the manual. All that remains is to make an anti-freeze product according to a home recipe and hit the road. This is for the quick ones. Painful owners will probably not like the electrical part of the integration.
Disadvantages of the standard kit
The instructions indicate how to install heated seats on the Grant and connect it to the on-board network. According to what is written, the electrics connect and function like this:
- The permanent plus is taken from the hazard warning button.
- The ground is connected to the bracket for fastening the standard wires of the negative pole.
- The standard fuse is replaced with a more powerful one.
- The heating is turned on/off using the buttons directly.
Only one function is correctly implemented - turning off the heating when the ignition is turned off. Otherwise, the connection scheme is not entirely successful:
- The positive wire that goes to the emergency light is thin and will probably work at the limit.
- The contact group of buttons operates in a dangerous mode, since it is not intended for power loads.
For your information. The kit offers simplified buttons for installation - they do not have a power indicator in the form of a yellow lamp (as on the rear window heating control).
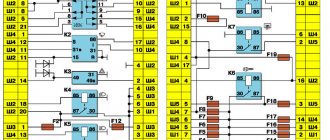
Competent connection diagram
An unfortunate result of the standard connection algorithm is a melted fuse. Such a reaction indicates that the circuit is operating at its limit. An alternative scheme for connecting heated seats will help to avoid this. It involves the use of two four-pin relays and powering them from switch K4, which supplies the output “+” after turning on the ignition.
Additional items
It is advisable to carry out installation work after purchasing an additional mounting block of reduced size. You will also need regular contacts for connecting two relays and two Lyra contact elements linking a 10A fuse. We also add additional wires with a cross-section of 4 and 1.5 mm2 to the shopping list.
Search "+"
So, in order to connect the heated front seats on the Grant, you need to find out the number of the output plus of relay K4, which appears after turning on the ignition. This can be either the 87th or the 30th contact.
Usually this is contact element No. 30, but it doesn’t hurt to make sure once again. We remove the relay and diagnose. The test is carried out by connecting a 12V lamp to the 30th contact of the mounting block and ground. After activating the ignition, the lamp should light up.
Connecting elements
It is convenient to disassemble the connection map of the key components of the circuit in the figure. The sequence of actions when assembling the chain is as follows:
- Pull out the “+” terminal, found during the K4 relay test, and connect two wires to it: one (4 mm2) - to the fuse and then to the 87th contact, the second - the control plus from the heating button (pin No. 1). Make a jumper and integrate it back.
- On the “+” route to the seat heating relay, install a 10A fuse by integrating the “Lira” contacts.
- At the second end of the received “+”, make branches for the second switch and control button, connect them to the 87th and 1st contacts.
- Make two ground wires with jumpers that will be attached to the 85th, A and C terminals.
- Route the control wiring and the backlight wire from the buttons to the mounting block. Connect 2nd contacts to 86th; B – with fuse fastening element F9 or F10.
- Connect your “+” heating elements to the 30th contacts of each relay.
It is convenient to make jumpers or branches using male-female contact pairs. It is better to avoid “twists” by connecting the wires directly in the block and making bends.
Installation of standard seat heating from VAZ 2115 in Lada Granta
Installation of heated seats on Granta heating elements. Implementation directly into the seats of the Lada Grant. This is a standard heater from a VAZ-2115 (Identified by serial number). It doesn’t quite fit, but I’ll tell you in detail exactly how to fit this kit to the Lada Granta.
To install heated seats we will need: 1. A key or socket with an E10 wrench. (as in the photo) 2. Double-sided fabric tape. Buy in advance so you don't have to go shopping later. 3. Plastic ties (clamps) with a length of at least 250 mm.
Must be prepared in advance
4. Insulating tape (electrical tape). 5. Wiring kit for connecting heating (I had one with heating pads) 6. A Phillips screwdriver and two flathead ones. 7. A key or socket with a 13 mm wrench.
If everything is prepared, you can start.
1. First of all, you need to remove the front seats. Everything is simple here. Just before unscrewing the driver's seat, look under it and pull out the seat belt indicator connector. To do this, press the connector latch and pull it towards you.
Removing the connector
The seats are attached to the body in Grant with four bolts. The head of the bolts is a so-called “euro” head (E10). Unscrew these bolts and remove the seats. For convenience, we bring them home and start working with them.
Unscrew the front bolts
Unscrew the rear bolts
2. We begin to disassemble the seats in the Lada Granta interior. We need to remove the backrest. To do this, turn the chair on its side. Take two flat screwdrivers. We insert them on both sides under the backrest angle adjustment knob and remove it by prying it up.
Removing the backrest angle adjustment knob
Unscrew one self-tapping screw with a Phillips screwdriver.
Unscrew the self-tapping screw
After that, using a flat screwdriver, we separate the two halves of the plastic caps. We do this very carefully, because you can accidentally break the pins.
Pry it off with a flat screwdriver
Take a 13 mm wrench. and unscrew the two M8 mm bolts securing the seat back to the base.
Unscrew two bolts
After this, we do the same on the opposite side. Then we separate the halves of the chairs.
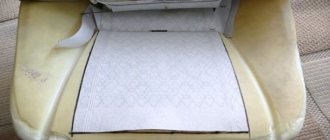
2. Now you need to remove the factory seat covers. Let's start with the lower frame of the chair. We turn it upside down. The cover is attached to the frame with factory fasteners made of rigid wire.
Factory settings
They are easily released with pliers. To unclamp, you need to pinch the edge of the wire with pliers and twist it in a circular motion. The photo shows the places where you need to disconnect these same clamps.
Places for attaching the cover to the frame in the interior of the Lada Granta
After all the latches marked in the photo are released, we move the cover to the side and see the foam casting.
Factory foam casting for Granta fret
2.Now you need to release the seat back cover. There is a plastic lock at the bottom of the backrest. We disconnect it along the perimeter and lift up part of the cover. Turn the back over to the back side up. Under the cover you will see the same latches. It is necessary to remove four pieces, as in the photo.
Fasteners for fastening the cover on the back of the Granta fret chair
3. After the foam casting is exposed, we take our warmers, try them on and fasten them. Let's start from the back. The backrest heating pad has a trapezoidal shape, just like the space on the backrest for heating our chair. But it matches the chair only upside down, with the wire facing up. I had to attach this heating pad with the wire facing down, otherwise there wouldn’t be enough wire. But that’s okay, because it doesn’t interfere with anything. Take fabric tape and tape the heating pad around the perimeter something like this:
Cover the backrest with fabric tape
We tear off the protective layer of tape and glue the heating pad onto the foam casting.
Finished chair back
Now let's try on the bottom part. There are some pitfalls here too. Everything seems to fit, but the wires come out of the edge. And they should be in the middle in the section. Well, there's nothing wrong with that. To prevent the wires from sticking out through the upholstery, they need to be recessed a little. We take a sharp utility knife and make a groove for the wire in the foam, as in the photo:
We embed the wire in the foam casting
Now, just like on the back, we cover the heating pad with tape.
Cover the heating pad on the bottom of the chair
Next, glue the heating pad to the foam casting. There are a few things to note here. At the place where the heating pad is cut, you need to glue it with a fold. If you do not make this reserve, the wire that is in the case will pull on the heating element. And it may break over time due to this. And one more thing, you need to trim the two edges of the heating pad as in the photo.
Fitting the heating pad in place
We do this very carefully. We probe the heating element with our fingers and under no circumstances damage it with scissors. This is necessary in order for the two cover fastening clamps to fit at the edges. We pass the power input wire into the central hole of the foam molding, and pass the connection wire to the back through the back.
4. After gluing the heating, we begin to pull the seat covers back on. To secure the cover to the frame, we use plastic clamps instead of the factory wire fasteners. First we thread the clamp into the case. Then we thread the two ends of the clamp into the foam and close the clamp to the fastener.
We use plastic clamps instead of wire clamps
After securing the covers and connecting the two heating pads, we get approximately the following picture:
Assembled lower part of the chair
Assembled chair back
5. Next, twist everything in the reverse order.
Well, the introduction of heating elements into our chairs can be considered complete.
Connecting the heating elements of the wiring to the on-board network in the interior of the Lada Granta.
Many connect heating through one or two relays. I had a small diagram included with the wiring harness for connecting the heating. There were no relays marked on it, just as there were no relays in the wiring itself. And the power was taken from the alarm connector. It was also indicated there that it is necessary to replace the original 5 A fuse of this circuit with a more powerful one - 10 A. Let's check if such a connection is safe: After installing the heaters in the chairs, I connected them to a powerful 12 V power supply to check their functionality . At the same time, I decided to understand the connection in more detail and make sure that this circuit is reliable and correct. I connected an ammeter to the circuit and measured the amperage under load. You can see the results in the photo:
Single seat heating circuit load
As you can see above, with a heating power supply load for one seat, the current consumption is in the range of 2.4-2.5 A. We look at the maximum load current of our heating button - it is equal to 5A (Stamped on the button itself). That is, the current reserve for our button is quite large. The conclusion that follows is that the buttons can be freely used without a relay.
Next, you need to find out the total amperage of heating consumption on two chairs. Turn it on and measure it.
Total heating load for two seats.
We see that the amperage did not go beyond 5 A. It follows that the recommendation in the wiring diagram is correct. That is, you can take the plus (with the ignition on) from the alarm connector and increase the fuse rating of this circuit by 5A. But I decided not to pull the wires so far, and took the plus from the connector for adjusting the heater blowing speed. There is a wire with a thicker cross-section than on the emergency gang, and there is no need to pull it through the entire panel.
Now after the theoretical part, let's get down to business:
It is most convenient to connect the wiring with the seats removed. First of all, we need to remove the plastic floor tunnel. It is secured with five self-tapping screws. To begin, unscrew two screws on the right and left of the tunnel. Their location can be seen from the photographs:
Right side of the tunnel
Left side of the tunnel
Next you need to unscrew the fifth screw. It has a very unfortunate location. To access it you need to remove the handbrake cover. Unscrew the 3 screws, remove it and put it aside.
Handbrake housing
You also need to unscrew the head by 13 mm. one handbrake bracket bolt. And move it to the side.
Unscrew the handbrake bracket bolt
Now there is access to the fifth bolt of the floor tunnel. We unscrew it.
Fifth floor tunnel mounting bolt
Now, after we have unscrewed all five bolts, we need to remove the decorative silver gear selector trim. You can carefully pry it off with a flat screwdriver, push the latches aside, and pull it out. But I didn’t take any risks so as not to accidentally break the latches and scratch the overlay. I simply lifted the tunnel up a little, put my hand under it and unscrewed the latches by feel. To visualize the location of the latches, here is a photo of this socket from the back side:
Location of latches on the automatic transmission gear selection panel
After removing this panel, you need to pull the boot out of it. To do this, carefully bend the four latches on the inside.
Removing the automatic transmission selector panel boot
When you snap off the boot, you need to remove this panel from the lever. Then you need to disconnect the overdrive connector and cut off the plastic clamp holding the wire. Now you can finally put this panel aside.
Overdrive connector
Now, you need to pull the floor tunnel out of its place. To do this, you need to move the gear selector lever to its extreme position “L”. And release the handbrake. Since we unlock the front wheels by moving the selector lever from the “P” position, the car can roll. It is imperative to place wheel chocks or bricks under the wheels. To unlock the lever, you need to turn on the ignition, press the brake, press the button on the selector, and only after that the lever will obediently move to the lower position. And only after all these manipulations can the floor tunnel be pulled out. After removing the tunnel we see this picture:
Automatic transmission selector
Next we take the wiring kit. The connectors that connect to the seats must be inserted under the seat slide into the hole in the body. To do this, we pull out the “mother” from the chip, because with the chip the connector will not fit into the holes.
Taking it out of the chip
Next we insert the wires into the holes. You can clearly see where the wires are laid in the photo:
Holes in the body
Already laid wire ends
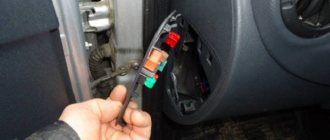
Now you need to remove the center console of the instrument panel. Next, we roughly place the heating buttons in their future location in the floor tunnel.
Heating buttons
Connect the ground. I took the most reliable mass from the regular place here:
Ground connection
Next, we lay the rest of the wiring under the panel along with the original harness.
Wiring harness
We carry the wires together with the standard harness. You can tape the wires to the harness with electrical tape. But I used plastic zip ties. This way, in my opinion, it’s more convenient.
We route the power wires along the standard wiring harness
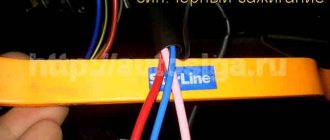
We connect the power wires to the connector of the heater handle. The blue wire in the center is the positive wire from the ignition. The white thin wire is a plus when the dimensions are on. We isolate everything carefully.
Connecting the heating power wires to the heater connector
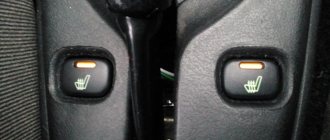
That's all. The wires are pulled and connected. Before assembly, be sure to check that the connection is correct. If everything is correct, when the ignition is turned on, when you press the heating button, the orange indicator light in it should light up. And when the dimensions are turned on, the buttons should be illuminated with a greenish backlight.
Assembly is carried out in reverse order.
Heating on
Work on installing heated seats for the Lada Granta has been completed
Installation of heated seats from Astra-N in Lada Granta
In general, after installing the seats from Astra, I wanted to add heating. There is little information on the Internet about connecting wisely... so I did it the old fashioned way. I bought a button from Granta, a regular two-pin relay. Power was supplied to the seat through a relay directly from the battery, and the control wire was from the ignition, so that it would not turn on without the ignition.
the scythe itself, relay + button...
there was only one place... so the second signal will have to be connected to one button
For those who will also install heating... the seat has a heating unit... if you connect it directly not to the standard Astra button, then you need two wires, red + and brown -... that's all...
I’ll say right away that the heating works 500%. Much better than standard heating on basins... it heats up in one fell swoop and bakes so you can fry the pies! In general, it’s a necessary thing.
Installation of heated seats on the Lada Granta with your own hands
Unpacking the kit here - 7% .
Seat heating kit for Lada Granta
Standard seat heating
Granta
car .
The kit is completely ready for installation
, has.
Now you need to release the seat back cover. There is a plastic lock at the bottom of the backrest. We disconnect it along the perimeter and lift up part of the cover. Turn the back over to the back side up. Under the cover you will see the same latches. It is necessary to remove four pieces, as in the photo.
After the foam casting is exposed, we take our warmers, try them on and attach them. Let's start from the back. The backrest heating pad has a trapezoidal shape, just like the space on the backrest for heating our chair. But it matches the chair only upside down, with the wire facing up.
I had to attach this heating pad with the wire facing down, otherwise there wouldn’t be enough wire. The price of the issue is “0” rubles or installing heated seats on installing on heating,. But that’s okay, because it doesn’t interfere with anything. Take some fabric tape and tape the heating pad around the perimeter like this.
- We tear off the protective layer of tape and glue the heating pad onto the foam casting.
Now we try on the lower part, that is, on the seats. There are some pitfalls here too. Everything seems to fit, but the wires come out of the edge.
And they should be in the middle in the section. Well, there's nothing wrong with that. To prevent the wires from sticking out through the upholstery, they need to be recessed a little.
We take a sharp utility knife and make a groove for the wire in the foam, as in the photo.
Now, just like on the back, we cover the heating pad with tape. Next, glue the heating pad to the foam casting. There are a few things to note here.
note
At the place where the heating pad is cut, you need to glue it with a fold. If you do not make this reserve, the wire located in the case will pull on the heating element. And it may break over time due to this.
And one more thing, you need to trim the two edges of the heating pad as in the photo.
We do this very carefully. We probe the heating element with our fingers and under no circumstances damage it with scissors. This is necessary so that the two fasteners for fastening the cover fit at the edges. We thread the power input wire into the central hole of the foam molding, and pass the connection wire to the back through the back.
After gluing the heating, we begin to pull the seat covers back on. To secure the cover to the frame, we use plastic clamps instead of the factory wire fasteners.
The best built-in systems
To choose high-quality seat heating, you should pay attention to the following brands:
| Model name | Peculiarities | Cost, rub |
| Waeco MSH-300 | Heating is carried out by carbon elements. An electronic power supply is installed that allows the system to operate in 3 modes. | 16 000 |
| "Emelya UK2" | Wire type heaters. There are 8 working modes. Equipped with a spark protection system. | 4 000 |
| "Emelya UK" | The most budget option. 2 heating modes. | 1 4000 |
There are no permanent systems for child seats, since such installation of heated seats will be fraught with many difficulties. However, if necessary, you can make a heater for any type of seat yourself.
Installation of heated rear seats on LADA cars
The option “Heated rear seats of a car” is no longer uncommon; it can be found in the list of equipment even for budget foreign cars. AvtoVAZ is constantly improving its LADA models, but the turn has not yet come to heating the rear sofa. Let's figure out how to equip your car with this useful function with your own hands.
Installation and connection of heated rear seats for all LADA cars (XRAY, Vesta, Largus, Granta, Kalina, Priora and Niva 4x4) is carried out in the same way. There are no fundamental differences. In this example, the modification process is shown on a Lada Priora car.
Installation
Required:
- kit “heated front seats”, for example, from a VAZ 2110 or Priora (article 2170-6513010-03);
- seat heating control buttons (for example, those from the VAZ 2110 have article number 2110-3709710);
- relay 4-pin (1119-3747210-10);
- wires.
Installation of heating mats
:
- Remove the rear sofa and rear seat backs (instructions for XRAY, Vesta, Granta/Kalina).
- I removed the trim from the seats (held on by rings).
- Insert heating into the backrest and sofa.
- Install the seat trim in the reverse order.
Installing buttons for heated rear seats
in a place convenient for you. For example, in a floor tunnel.
Connection
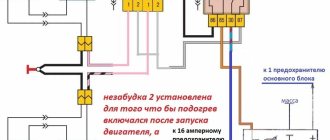
Rear seat heating connection diagram:
It is better to take contact “B” from a protected high-current circuit with a fuse. Contacts “A” and “C” can be found in the ERA-GLONASS lighting lamp, in the ISO radio or cigarette lighter connector. Before starting the connection, do not forget to disconnect the negative terminal of the battery.
Installation and connection of heated rear seats on a Lada Vesta on video in several episodes:
Let us remind you that we previously told you how to connect heated windows/mirrors to an additional alarm channel on Lada Vesta and XRAY, as well as how to turn on the heated windshield through a separate button.
Summary
The technology for installing heated front seats on the Lada Granta consists of two stages: installing heating elements under the factory seat covers and connecting them to the on-board electrical network. The proposed electrical circuit organization scheme raises doubts.
The manufacturer of the branded kit suggests connecting the heaters directly to the buttons, and powering them from the alarm control button. Since the circuit is quite loaded, it is better to organize the heating power through two relays with a separate fuse. It is also advisable to replace the buttons - they do not indicate the operating mode.
Homemade engine heater with pump
When making a homemade internal combustion engine heater with a pump, you need to take into account the following nuances:
- The heater and pump can be installed anywhere in the cooling system. The pump creates the necessary pressure, allowing the consumable to circulate forcibly.
- To ensure good heating of the soldering area, it is better to use gas or spot welding.
What will be needed for production?
To create such a heater, you will need:
- a piece of thick-walled pipe 80 mm long;
- pump (in the example a pump from Gazelle is used);
- two 20 mm hoses;
- metal plate;
- nichrome thread.
Manufacturing stages
Step-by-step assembly instructions:
- First, the thick-walled tube is processed. It is necessary to ensure that its appearance and diameter correspond to the required dimensions.
- Two disks are cut from a metal plate. The dimensions of these components must correspond to the diameters of the pipes.
- One additional plate is welded or soldered to each disk. This will ensure better heat transfer and efficient heating.
- To create a heat exchanger, you can process the seams of the device with a soldering iron or welding equipment. At this stage, it is important to make sure there is a good seal and no gaps to prevent liquid leakage in the future. High-quality electrical insulation can be achieved by using asbestos sheets.
- The nichrome spiral is attached to a sheet of paronite; the fixation is carried out in special holes. To ensure better performance, the resistance of the spiral should be in the range of 2.5-4 Ohms.
- Heating elements must be laid in spirals downwards. To ensure maximum insulation, the device must be wrapped in thermal insulation material, for example, foam film.
Installing a homemade heater
Installation of the heating system is performed as follows:
- The lower hose for supplying antifreeze to the stove is cut.
- A heat exchanger equipped with a water pump is inserted into the gap formed. The pump is necessary to circulate the refrigerant through a small circle of the cooling system.
- The heating system is connected to the wiring using a separate toggle switch with an executive relay. If the device turns off over time, the circuit must be equipped with an additional relay.
- All contact components are connected.
- The heater installed in the car, all hoses and pipes are visually checked for lack of sealing. If any area is suspected, it is recommended to immediately replace the clamps. The initial start-up of the heater is carried out and the operation of the system is checked.
Video: DIY installation of a heater with a pump
The Do-It-Yourself Auto Service channel published a video showing the process of installing an engine heater with a pump yourself.
Door pinout for first generation Kalina
In all versions of the first generation Lada Kalina, the cable routing is the same.
Driver's door
- Output to the rear harness.
- A bundle of wires for connecting the speaker.
- Locking device.
- Driver's door control switch pinout element.
- Voltage to switch harnesses.
- Connection of the harness line to the mounting unit.
- Same as 5.
- Same as 6.
- Window regulator.
For front passenger
- Exit to the stern beam.
- Output to the appropriate speaker.
- Door lock drive.
- Electric window lift key.
- Power window control unit terminal harness.
- To the switch key of the corresponding node.
- Gearbox of the above device.
Rear doors
On the rear doors, the terminals are similar for both sides. Only two terminals are used here, where the first serves to connect to the rear electrical harness. The second is designed to supply an impulse and power to lock the doors.
Instructions for making stationary heating
How to make heated seats with your own hands and how to connect the system you have made? It is quite possible to build such a device at home; for this you will need nichrome wire and fabric. The wire itself can be sewn into a chair or into fabric; we will consider the second option.
- So, you will need three meters of wire; this piece should be divided into two equal parts. One one and a half meter piece will be needed for the seat itself, and the second for the back.
- The wire should be sewn to a piece of fabric; any material can be used for this. To make heating more efficient, you need to sew the wire in a zigzag manner.
- After this, the wire can be connected directly to the battery - it should heat up slowly and after a few minutes the chair will be warm.
The connection diagram for seat heating itself is quite simple, and most importantly, inexpensive to implement. To connect, it is recommended to use special buttons with thermostats, this will allow you to adjust the degree of heating if necessary. Otherwise, overheating may cause the seat to catch fire.
Convenient alternative: replacing the car seat
The most convenient - but also the most expensive - option for installing a seat heater in a car is to replace the entire seat with an analog one, but with a heating function.
Suitable car seats with heated seats can be purchased at a salvage yard. Depending on the time of year, a set of two seats will cost from 5 to 30, 60 thousand rubles or even more: baza.drom.ru
The following rule also applies here: if the seat is fitted with a side airbag, removal and installation must only be carried out by a specialist. The price is usually negotiable.
Sources
- https://enginehack.ru/ustanovka-podogreva-sidenij/
- https://o-ladagranta.ru/kak-samomu-ustanovit-podogrev-sidenij/
- https://AVSU-pitanie.ru/info/podkljuchenie-podogreva-sidenij-lada-granta/
- https://avto-ritet.ru/remont/ustanovka-podogreva-sidenij-na-lada-granta-3-chasa-na-vse-pro-vse.html
- https://www.spike.su/index.php/%D0%A3%D1%81%D1%82%D0%B0%D0%BD%D0%BE%D0%B2%D0%BA%D0%B0 -%D0%BF%D0%BE%D0%B4%D0%BE%D0%B3%D1%80%D0%B5%D0%B2%D0%B0-%D1%81%D0%B8%D0%B4 %D0%B5%D0%BD%D0%B8%D0%B9-%D0%BD%D0%B0-%D0%93%D1%80%D0%B0%D0%BD%D1%82%D1%83 .html
- https://prometey96.ru/obsluzhivanie/shema-podklyucheniya-podogreva-sidenij.html