AVTOVAZ first began installing side mirrors of the new SE model (with heating, electric drive and turn signal indicators) on the Lada Granta liftback. Then they began to be equipped with Luxe trim levels of the sedan. The following describes how to install and connect standard liftback mirrors with your own hands to simpler versions of the Lada Granta sedan, as well as to the Lada Kalina station wagon and hatchback.
Lada Granta do-it-yourself heated mirrors
Hi all!
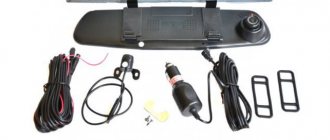
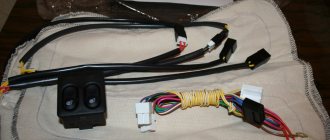
Now my hands have come to such a necessary improvement in the car as the installation of heated mirror elements, for this purpose, heated mirror elements for liftback mirrors were ordered and additionally purchased: a relay with a chip, fuse holders (3 pieces), wires, heat shrink. I started working while at home, soldered a wire to one of the fuse holders, I will need it for power, and soldered the other two holders together to the mother contact, which I also purchased in the store (through this design, power will go to the mirrors themselves).
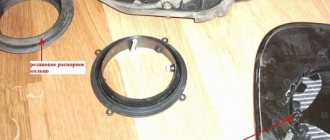
Then I began to work in the car itself, removed the door cards, after which I moved on to dismantling the mirrors, initially I removed the mirror element, moving it to one side as much as possible, releasing the clamps on the element, looking ahead, I will say that I was not able to save one element, it was cracked in the middle. The picture with the element removed looks like this:
For ease of wiring installation, I decided to remove the mirror completely; to do this, you need to unscrew three screws and remove the bracket from the adjustment lever. In addition, I removed the mirror coverings; with the element removed, it is not difficult to release the clamps.
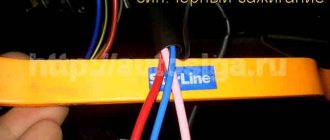
We insert two wires through the mirror, one short for ground and a long one for plus; I measured the wires for ease of installation in advance with a small margin. Then we pull the wires through the hole into the door and, in principle, the mirror can be put in place
When installing the mirrors in place, I took the ground for the heated element from one of the screws securing the mirror to the body
Mom soldered two small contacts onto the ends of the wires and placed them in heat shrink. I left the wires with a small margin and hid them behind the mirror trim
After working with all the wires, you can completely finish with the mirror, install the trim and install the mirror element. By the way, since the case came up with disassembling the mirrors, I decided to put the trim in the body color, I ordered everything there, at Avtostolitsa63, the quality of the painting was a little disappointing, there were some smudges on the edges, but overall everything was good
Then I inserted the remaining positive wire through the corrugation into the car and brought it out to the driver's side toredo and began drawing the power wire that I had prepared at home. The place from the fuse to the passenger compartment was seated in a corrugation, and the rest of the part was temporarily left open. The short end of the wire was crimped onto a round terminal for attachment to the (+) battery. The wire enters the interior through the rubber plug of the headlight range control.
This is what my wire looks like already connected to the battery
Then I applied power from this wire to pin 30 of the relay (I think many already know how to connect a relay). From contact 87 through fuses (a blank that I made at home, connected the power wires for the mirrors, it turns out that each circuit is protected separately and has common protection on the wire itself that supplies power
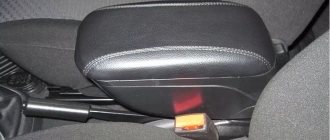
Let's move on to installing the button, the wire for closing the cut comes to contact 85 from the button, plus for the backlight I took it from the installed PTF button, both of them are located in the seat heating area, I took the ground from the tunnel mounting bolt. Now it was necessary to solve the problem so that the heating would only work with the ignition on; it was necessary to find such a plus in order to avoid the problem of the heating being forgotten and the battery being discharged. And I found such a plus on the white-black wire of the chip from the emergency light button; I was too lazy to remove the beard, so I had to suffer, I removed the passenger airbag cover and somehow disconnected the chip from the emergency light button, in principle, the length of the wires from the button is enough to insert the wire to power the button heating the mirrors into the chip and drip solder on top so that everything holds tightly. But in order to put the chip back on the emergency light button, I had to suffer, I had to feel the contacts by touch and make sure they coincided with the chip. So whoever will take the plus from the ignition from there, don’t worry - take the time and remove the central trim, this is what it looks like
This concludes my work. I installed a 15A fuse on the wire coming from the battery; this wire is also used to illuminate the doors and it becomes possible to install heated glass. And I installed 5A fuses on the wires going to the mirrors. I hid all the wires and relays in a corner under the driver’s left foot.
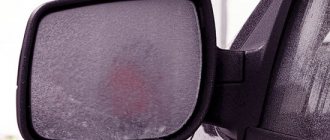
In the video I wanted to show that the mirrors only work with the ignition on, which will protect against current leakage. The mirrors warm up quickly, a very useful modification, in general, you’ll see everything for yourself
Thank you for your attention, I hope my post will be useful!
To work you need to have:
- Heated mirror kit. In my case, these are heating elements made by Salina;
- Copper wire 0.75-1 mm long 8-10 m;
- Small female terminal (2 pcs.);
- Terminal-ring “ground for screw” (2 pcs.);
- Clamp terminal (1 pc.);
- Fuse holder (1 piece);
- Soldering iron, probe, several screwdrivers, needle file;
- Heat shrink, electrical tape.
Note: The above components may differ depending on the connection scheme you choose. In my case, the connection will be made by connecting the heated mirrors to the heated rear window. Below I will provide three alternative connection methods that can also be used.
To enlarge the image click on it!
Preparing for work
To design heated mirrors with your own hands, you need to select suitable materials and tools.
What is needed for work:
- heating elements for each mirror;
- hot water, hair dryer for heating the surface;
- scissors or a knife for cutting the heater according to the shape and dimensions of the mirror itself;
- drill with an attachment for making holes;
- to connect the system you will need wiring, bolt terminals, electrical tape;
- a button that allows you to start the device;
- fuse, relay.
When choosing a heater, you should choose the most reliable film models. Here, double-sided adhesive tape is used, where a conductive layer is provided. The advantage of this option is uniform heating and quick cleaning of the surface.
Is it possible to install heated mirrors yourself?
When thinking about how to make heated mirrors with your own hands, you should start by dismantling the existing mirror.
Each driver can remove it himself:
- The adjustment moves downwards, which allows you to pry off the structure with plastic protection. If you need to remove the system assembly, unscrew the fastening screws located under the casing.
- Next, you need to disconnect the mirror element itself. Under the influence of high temperatures, the adhesive base will become softer, making it possible to pry off the protection without damaging the device.
- If the glass is covered with paper tape, remove it. This procedure is not carried out on all machines, but extreme care is required, as it is easy to damage the coating.
- Using a universal heating element, you need to give it the required shape. And, applying it to the plastic part, determine the location of the holes for subsequent connection. Sometimes the plastic has to be cut and additional holes made to route the wires.
- Then the heating element itself is glued to the degreased surface. To do this, the protection is removed and the film is applied to the mirror. Having removed the top protective layer, we apply the plastic part. It is important here to prevent the formation of air bubbles.
- Having glued the heater to one side element, we proceed to the other, after which we insert the structure into the body and proceed to connecting wires and contacts.
It is noteworthy that self-adhesive heating of rear-view mirrors on film is not the only option. It is allowed to use one or two weaker car bulbs that can quickly heat the structure.
Do-it-yourself installation of heated mirrors on a Lada Granta - step-by-step instructions
1. First of all, you need to remove the rear view mirror. To do this, bend the mirror and unscrew the latches located in a circle.
2. Next we dismantle the mirror covers. The latches are clearly visible from the side of the removed mirror.
3. After this, we proceed to removing the door card. Everything is simple here, I think you’ll figure it out. For those who still need instructions, read this article, which describes everything in detail.
4. We insert the power wires of the heating element into the hole in which the wiring is laid.
5. Next, you need to disassemble the connecting block; I’ll tell you right away - it’s not an easy task. Pushing the wiring through the block, as well as the rubber corrugation into the interior, is quite difficult. True, if you know certain secrets, you can make your life much easier. To do this, you will need a thin round file, which is very convenient for drilling a hole in the block, into which the “-” power wire for the heated mirrors will then fit perfectly. We do the same with the “+” wire.
Connection
Connecting the central lock
. We use a circuit of two relays so as not to go under the panel to the central locking unit:
Connecting heated mirrors
(to the wiring harness under the driver's threshold)
Connecting mirror turn signals
:
- Option 1: Pull the wire from the direction indicator on the fender.
- Option 2: To the wiring harness under the driver's threshold (blue - left turn signal; blue-white - right).
Product delivery options
Note! Below are the shipping methods available specifically for this product. Payment options may vary depending on the shipping method. Detailed information can be found on the “Delivery and Payment” page.
Parcel by Russian Post
Available payment methods:
- Cash on delivery (payment upon receipt)
- Using cards Sberbank, VTB, Post Bank, Tinkoff
- Yandex money
- QIWI
- ROBOKASSA
Shipping throughout Russia. Delivery time is from 5 to 12 days.
Parcel by Russian Post 1st class
Available payment methods:
- Cash on delivery (payment upon receipt)
- Using cards Sberbank, VTB, Post Bank, Tinkoff
- Yandex money
- QIWI
- ROBOKASSA
Shipping throughout Russia. Delivery time is from 2 to 5 days. More expensive than regular delivery by Russian Post, approximately 50%. Parcel weight up to 2.5 kg
Express Parcel EMS
Available payment methods:
- Cash on delivery (payment upon receipt)
- Using cards Sberbank, VTB, Post Bank, Tinkoff
- Yandex money
- QIWI
- ROBOKASSA
Shipping throughout Russia. Delivery time is from 3 to 7 days. More expensive than regular delivery by Russian Post, approximately 100%.
Transport companies
Available payment methods:
- Using cards Sberbank, VTB, Post Bank, Tinkoff
- Yandex money
- QIWI
- ROBOKASSA
Delivery is possible to any locality where there is a representative office of the transport company. Delivery time is from 2 to 10 days. Sending large parcels is approximately 50% more profitable than by Russian Post.
Through any other bank according to the issued invoice (non-cash payment)
ONLY for legal entities
Payment is made by transferring funds to a current account.
Payment on an invoice for LLCs and individual entrepreneurs (RF)
Note ! we work “without VAT”
Buy Mirrors Lada Kalina, Granta in a new model case from Lada Priora (“ANS”, electric drive, heating, repeater)
The final cost of some products may differ; it will be announced by the manager when confirming the order. We apologize for any inconvenience caused.
We accept payment
We deliver using
delivery throughout Russia and the CIS
Reviews
Delivery of goods is carried out throughout Russia and the CIS:
1. Russian Post (from 350 rubles and above)
Delivery to all regions of the Russian Federation and CIS countries
2. Transport Companies (from 350 rubles and above)
Delivery throughout Russia and the Republic of Kazakhstan
- TK Energy (nrg-tk.ru)
- TC Business Lines (dellin.ru)
- TC SDEK (www.cdek.ru)
- TK PEK (pecom.ru)
- TK KIT (tk-kit.ru)
3. Pickup
The order can be picked up at the office at Tolyatti, 40 Let Pobedy 38, TD “Malachite”, 1st floor.
The waiting time for sending an order in our online store is approximately 2-7 working days, large orders 7-14 working days. days; color of bumpers, mirrors, body parts, spoilers, etc. 7-14 work. days; sewing covers, upholstery, steering wheels, gear knobs, EVA mats, etc. 7-14 work. days.
During this period, we will send you a tracking number by email. email to track the parcel en route.
Payment can be made in the following ways:
1. Payment to a Sberbank card
You can pay using the SBERBANK-Online application and other Bank applications.
After placing an order, making payment, do not indicate comments , we ourselves will understand by the amount of the order and the name of the sender. After receiving the funds, the status of your order will be changed to paid until 17.00 of the current day, or from 9.00 of the next Moscow time.
2. By bank card
Automatic acceptance of payments using MIR Bank cards, VISA International, Mastercard.
You can also pay with credit cards with a grace period.
To select payment for goods using a bank card, on the corresponding page you must click the “Pay for order by bank card” button.
2. Payment to QIWI wallet 89272115207
3. Payment on Yandex.Money 410013993950891
5. Payment to a bank account for legal entities and individual entrepreneurs (commission 6%)
Send your organization's details to [email protected] for invoicing. After paying the bill, be sure to send a payment order.
4. Cash on delivery of Russian Post (commission from 4%)
IMPORTANT! When sending by cash on delivery, RUSSIAN POST will take a commission for providing the cash on delivery service of 150-300 rubles, and the delivery cost also increases due to the evaluation of the goods.
Cash on delivery delivery is possible only within Russia.
ATTENTION! When choosing cash on delivery, the delivery cost is paid in advance before shipment, for the product itself upon receipt.
The amount of the order by cash on delivery should not exceed 5000 rubles; also, painted parts, goods made to order, covers, upholstery, door inserts, EVA mats, steering wheels, etc. are not sent by cash on delivery. (minimum 50% prepayment).
Be sure to save the payment receipt or a screenshot of the transfer.
The best guarantee of order fulfillment and quality is the feedback from our customers.
Reviews of our work can be found in our VKontakte group https://vk.com/topic-136384247_36675422?offset=180
We guarantee product quality, integrity and timely fulfillment of all requirements for the shipment of goods.
- home
- About Us
- Catalog
- Shipping and payment
- Reviews
- News and Promotions
- Personal Area
- Site Map
- Tuning Lada Largus
- Tuning VAZ 2113, 2114, 2115
- Tuning VAZ 2110, 2111, 2112
- Tuning VAZ 2108, 2109, 21099
- Tuning VAZ 2101, 2105, 2106, 2107
- Tuning for foreign cars
Tolyatti, 40 Let Pobedy 38 (Malachite)
Popular on the site
Currently on the forum:
This page is searched for: Heated mirrors. How to connect?.
Currently commenting:
Jet black or grey-black
I would like to know the model of injectors, the type of internal combustion engine, the power supply system of the internal combustion engine..
Dimensions and tidy do not light up. CHY, all relays and presets are in order! New button! Backlight on p
On my smartphone it freezes every once in a while, then crashes, it says the pages could not be loaded
Thanks, I think so too
Often, when opening a page, it says that there is no such page, although a few minutes ago someone
Hello! I can’t find the lower rubber bands for the injectors, I found the upper ones, they fit from ten
Do not bother. Xenon in a headlight not intended for it is definitely already a collective farm. And St.
Mine doesn't understand. Is this the end of the update or what?
Wroom.ru
Media registration certificate No. FS 77-76203 16+
Solina. You can buy car mirrors and mirror elements from us
Types of heated mirrors: what to look for
Design features of housings
The housings differ in connection and overall dimensions, as well as the shape and area of the reflective surface. They can be classified as follows:
- standard - factory equipment;
- model, intended for installation on certain models;
- universal.
The latter, in turn, differ depending on the purpose of the vehicle on which they are installed:
- passenger car;
- cargo;
- special equipment.
Heating elements
Low-cost options use heaters of simple design. Conducting tracks of small width are applied to a flexible dielectric base, usually a heat-resistant film, the reverse side of which is covered with a self-adhesive compound. They are arranged in such a way that they form a peculiar geometric pattern, reminiscent of a classic labyrinth. A snake made of nichrome wire is also used, placed between glued layers of insulating material or filled with silicone. The sticky side of the device is glued to the opaque side of the mirror element. When voltage is applied, current flows through the tracks, gradually heating them.
The advantage of such heaters is their low cost, as a result of their ease of manufacture.
Disadvantages include longer heating time to operating temperature and lower reliability compared to more “advanced” models.
The most common failure is a rupture of the track due to corrosion from moisture penetrating through cracks or peeling of the protective film.
Premium models use heated monoblock mirror elements. Layers are successively applied to the glass base:
- reflecting;
- insulating;
- conductive;
- heat insulating;
- waterproof.
The material of the conductive layer tends to change its electrical resistance depending on temperature. The colder it is, the lower its resistance and the greater the power released for heating. The glass heats up intensely, but it is saved from cracking as a result of thermal expansion by the fact that the entire area, evenly covered with a conductive layer, is heated at the same time.
Next comes the process of self-regulation. As the temperature rises, the resistance increases and the power output decreases. As a result, there is a balance between consumed and dissipated power, overheating does not threaten to melt the plastic parts of the product, and the energy consumed from the on-board network to maintain the glass in a heated state is insignificant.
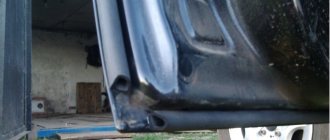
Sequence of actions when replacing a side view mirror yourself
- We install the car on a level area, ensuring unobstructed access to the front door from the side where the replacement will be.
- We unscrew the two screws securing the door panel trim and pry up the plastic clips around the perimeter.
- From the rear side, disconnect the block with wires from the electric drive control unit, disconnect the speaker terminals and remove the board.
- Using a Phillips screwdriver, unscrew the three screws and remove the side mirror from the seat.
- We replace the block with a new one and screw it into place with self-tapping screws. We lay out the block with wires and connect it to the sockets. We assemble the structure.
Reviews
| № | Positive |
| 1. | Vitaly: There were no problems connecting the reflector. I installed it myself, the scheme is quite simple and intuitive. |
| 2. | Kirill: in winter the mirror on the left side cracked, I replaced it myself with a new one. There were no difficulties with disassembly, the design is quite simple, the connection diagram consists of two blocks. |
| 3. | Vasily: after a side impact, the right side mirror cracked. I had plenty of free time, so I installed the new one myself. At the same time, I replaced the rubber seal; it was deformed and moisture penetrated inside. |
| 4. | Alexander: after two years of operation of the Lada Granta Liftback, the insulation in the doorway on the wiring was worn out. Replaced the entire block with wires. Now the line is completely new. |
| 5. | Konstantin: when the reflector burst, I didn’t contact the experts, I installed a new one myself. The procedure is simple, the case is held on by three screws, the block with wires is connected to the standard connector. |
| 6. | Victor: the housing on the left mirror was cracked, I bought a new one at the car market. I transferred the filling myself, it turned out to be very simple. I didn’t contact the specialists at the service station, I did everything with my own hands and I advise you. |
| 7. | Gennady: the right turn signal suddenly stopped working, so I disassembled the reflector myself. The reason was poor contact at the terminal. I pressed it with pliers and everything works fine. |
| Negative | |
| 1. | Ignat: the design of the side reflectors is not perfect; they do not fit tightly, despite the presence of a rubber seal. I decided to buy a reflector block from Renault Logan, it has an identical mount. |
| 2. | Vasily: the quality of the wire insulation is poor; after two years of use, Granta replaced it with new wiring. Insulation cannot withstand freezing temperatures. |
| 3. | Sergey: I changed the left side mirror adjustment cables for the second time in a year. Low quality components. |
Conclusion The process of independently replacing side-view mirrors on the Lada Grante Liftback is not at all difficult. The design is fixed with three screws, connection to the power circuit is carried out by two blocks with wires. Following the recommendations given in this manual, replacing a new mirror will take no more than 10 minutes. Negative reviews from some owners are unfounded and are caused by violation of the operating conditions of the technical equipment and failure to comply with maintenance schedules.
vote
Article rating
Required
| Name | vendor code | Price, r |
| Heated, electrically adjustable exterior mirrors with turn signals (LED) | 4 500 | |
| Joystick/control unit from Lada Kalina (with central locking) | 11180-3709810 | 850 |
| Connector - electric mirror block (female) | CB-00090291 | 150 |
| Block for power window control unit 1118 | CB-00039007 | 50 |
| Connection block to power window button | CB-00033485 | 50 |
| 10 PIN connector with contacts for mirror control | 170 | |
| Wing turn signal plug | 21700-8212104 | 150 |
| Door card blank | 83191 3K030 | 30 |
Video
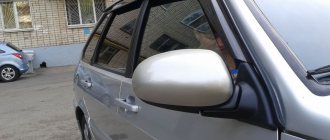
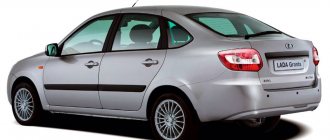
The exterior of the car with such a body turned out to be very stylish. In the car, the developers changed the front bumper, slightly enlarged the air intake, and also changed the appearance of the niches for the fog lights. They did a good job on the interior too. New functionality has been added; the seats and sides in luxury trim levels are covered with more wear-resistant leatherette. The mirror covers of the Lada Granta were also replaced. They are manually adjusted in this car. Granta is available in three trim levels:
Although it is made on the basis of Kalina, it still has its own individuality. Nevertheless, Lada Granta owners often think about various modifications.
The process of changing the appearance of a car can take place in different ways. Car owners go to various lengths to make the car stand out among other similar ones. You can change cars beyond recognition. There are special bumpers on sale; you can do airbrushing on the entire body. You can change the interior of the cabin or make changes to the design of the engines. And that is not all.
The side mirror cover can significantly improve the car's aerodynamic capabilities. When the speed is more than 80 km/h, mirrors with overlays will not whistle, since their shape is more streamlined. Another benefit of these accessories is improved appearance. You can experiment with different trims without damaging the body.
You can buy trims with the option of an LED turn signal repeater. This allows for additional safety while operating the machine. The turn signal repeater on the side mirror improves the visibility of the flashing light. This will avoid accidents and other problems. You can buy pads with electrical adjustment and heating. Most side mirror covers are made in Togliatti.
It all depends on the colors, shapes, and fastening capabilities. Overlays that are not painted in any color can be purchased for pennies. Analogues that are made in China can be purchased for 100 rubles. However, they are unreliable. Overlays with a repeater option, adjustment, and heating cost about 2,000 rubles. Mirror covers are one of the simplest, but very noticeable types of tuning!
As for installation, anyone can handle it. However, in case of even minimal doubts, it is better to contact the nearest car service center. This way you can avoid the risk of damaging the paintwork of the body or trim. Usually the linings are equipped with everything necessary for convenient mounting on a car. Using an example, we will describe the installation of an overlay using hermetic glue or silicone.