Lada Granta door seals provide sealing to the car, but when the part wears out, it requires replacement. The fact that air is getting into the cabin, and the gasket is leaking, is reported by fogged windows and discomfort in the winter. In stores, rubber elements are sold as a set, but you can also purchase an incomplete set for partial replacement.
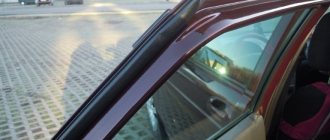
Additional seal on the car door
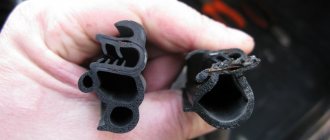
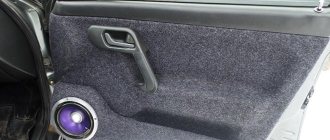
The Grant door seal is installed around the perimeter of the rear and front structures. An additional fragment is mounted in the glass. The rubber band allows the doors to close tightly, and installation in the upper part of the car guarantees silent opening of the windows. Drivers also perform installation of additional elements and preventive seasonal maintenance. It is necessary to dismantle the seal if there is a whistle while driving, the door closes with a whipping sound, or the heating system works but does not heat the interior.
Sealing tape – internal automotive protection. The hose that provides the seal is rubberized. There is a metal tube inside. Craftsmen recommend purchasing seals with a diameter of 14*12 mm. The price of the product depends on the size of the package. Manufacturers create twisted tape on a reel. The cost of 1 m is from 120 rubles.
An alternative to the factory gasket is flex material. They can seal doors using double-sided tape.
How to install the seal?
Before installing door seals you will need:
- make sure that the appropriate temperature parameter is present, which should not be lower than 15 degrees Celsius;
- resort to heating the material for 3 minutes in order to give it the required elasticity;
- follow the algorithm, which implies an installation process in a top-down direction.
Now we move on to the following sequence of manipulations:
- carefully degrease the corresponding surface on the stern door where the sealing component will be installed and wait until it dries completely;
- Initially peel off the protective tape on one side to a length of 5-8 cm.
- At the top point of the door flange, we fix the upper edge of the seal;
- We gradually periodically peel off the indicated tape by an insignificant amount equal to 5-10 mm, and immediately apply the seal sticker at similar intervals (we proceed in this way to the bottom edge of the door).
Having completed the installation procedure with the seal, we make sure:
- in reliable fixation of the sealing component on the surface of the curved section of the door panel;
- there is a sufficient level of compression of the seal along the contour of the LADA Granta door;
- in the maximum density of the glued material in relation to the end of the flange.
Advantages of seals:
- providing improved sound insulation by reducing the level of noise penetrating into the interior of the LADA Granta;
- increasing the protective properties against dirt in the area of the rear door hinges and the lock area of the front door;
- the ability for additional sealing, which increases the thermal insulation properties of the interior.
No defects in the material were identified.
Lada Granta operating instructions
Repair of door seals and installation of additional rubber bands on Granta
If microcracks or a small tear appear on the elastic, you can repair the hose using sealant or liquid nails. It is important to understand that this procedure will only temporarily improve the seal. The best option is to stick an additional protective fragment. For this work, the thinnest tape is purchased. Before installation, the product is heated with a regular or construction hairdryer. This action will give elasticity to the rubber. Heat for no more than 2–3 minutes. Next you should follow the instructions:
- The surface is wiped from dirt and dust, degreased and dried. The hose should fit well into the opening.
- The gluing area is treated with an anti-corrosion substance. The substance is given a few minutes to dry.
- Measurements are taken of the prepared surface, and the material is cut off with an allowance of 1 cm.
- The protective film is removed halfway along the entire length of the cut piece of tape. One end is fixed at the top, the other at the bottom.
- The entire hose is gradually, with pressure, pressed against the body part, and the film is simultaneously removed.
If everything is done correctly, there will be a reduction in aerodynamic noise in the cabin.
Vertical door seal
To install it, any suitable material is usually used, the same flex, for example, used as a seal on the VAZ 2110.
This material can be secured with double-sided tape. But still, the best option would be to buy a vertical door seal RKI-19, which is also suitable for Chevrolet Niva and Kalina. This type of seal is also compatible with the Lada Granta.
Recommendations for modifying seals
The rear door seals on the Lada Granta require special care. It is recommended to treat rubber with protective substances at least twice a year: before the start of winter and in the spring. Other tips:
- Do not pull the seal or press hard on them. The installation is carried out strictly close to the end part.
- Requires periodic cleaning to remove contamination. After this procedure, you need to dry the wet elements. If water remains, then in the future it will contribute to the tearing of the rubber from the metal of the body. When washing the car, it is important to wipe the rubber bands with a dry cloth.
- Do not use aggressive agents for treatment.
- After installation, you should inspect the edges on all sides to make sure that the hose fits snugly along its entire length.
Peculiarities
To install the specified product, they resort to the use of any applicable material, for example “flex”. This option is used as a sealant for the VAZ 2110. The component must be fixed using double-sided tape.
The most appropriate action would be to purchase and install a sealing agent referred to as “RKI-19”. The product has proven itself well on Kalina and Niva Chevrolets. The Lada Granta is undoubtedly suitable for the model considered here!
What is the best way to install an additional seal on the Lada Granta?
Experts recommend using a universal method. After taking measurements and cutting the tape to the required length, installation is carried out:
- The old seal is removed.
- Remains of the previous gasket are removed from the surface. Then degreasing, anti-corrosion treatment, and drying are performed.
- The film hiding the adhesive side is removed as it is glued.
- Every centimeter is ironed with a piece of rags, without pressing hard on the material. It is important that the ends fit tightly against the joints.
Additional rubber seal
In conclusion, I would like to say a few words about the rubber seal. They say that door seals of this type are installed standardly on the Luxury Lada Granta model directly from the assembly line. The budget versions Norma and Standard leave only holes in the doors for their fastening.
All this does not mean at all that we will not be able to separately purchase such seals and install them on the Granta with our own hands. The main thing is to know the catalog numbers. Plastic pistons are included with rubber seals. With their help, we install the seal in no more than 5-10 minutes.
Lada Granta 2349 2011 - 2016
High quality Lada Granta glass seals Original and branded spare parts are always available in warehouses at reasonable prices.
However, speaking of repairs, even more important for driving safety is regular maintenance and timely repairs, subject to vehicle maintenance regulations:
- works well,
- does not lose its performance over long runs,
- more reliable and safer to operate
We make it easy to keep your car in good condition and provide great deals on our entire range of parts. Everything you need for service and repair can be found right here in our digital warehouses. Instead of endlessly searching for a retail auto parts store near you that doesn't necessarily have the parts you need, just pick up the phone and we'll deliver the auto parts you need to your door.
The main emphasis when selecting spare parts is based on the company’s experience.
It is profitable and safe to buy from us for a number of main reasons:
- Autocompas.ru is one of the leading online stores of auto parts, with daily traffic on the site of more than 30,000 people,
- Certified and reliable suppliers provide a full range of auto parts within access to their warehouses,
- The system has more than 500 suppliers and manufacturers who regulate prices with an eye on competitors and strive to make their goods more profitable to purchase.
Why look for the Lada Granta glass seal somewhere else, wasting time? We have competent staff, payment, delivery and support services.
Sometimes a car owner is faced with the problem of loose glass installation. Lada Granta glass rattling must be eliminated, and this becomes an urgent task for the car enthusiast. It happens that on large bumps the rear windows begin to drop a little, and the rattling sound becomes unpleasant.
To prevent the wind from blowing and dirt from flying, we install additional door seals. Kalina, Granta, Priora
Greetings, All readers.
Today I want to tell you how a friend bought a Priora and decided to install additional door seals on it, they are also suitable for Grant and Chevrolet Niva cars, and some people also install them on foreign cars.
I called for help, I’ll go around the room and write to you how it happened.
They are useful in that they will reduce noise transmission from the doors, cold air will blow less, dust and dirt remain on the thresholds, but all this should not happen.
Before installation, we need to degrease the surface of the places where we will glue the seals, take a rag, wet it and go ahead
We will need the seals themselves; we will attach them to the bottom of the doors.
We will also need RKI 19 four sets, two in each package.
Lada Granta door seals: installation recommendations
Car owners often face the problem of dirt getting into the car interior. As soon as it rains outside, a huge amount of dirt begins to accumulate on the thresholds, which gets inside the car and stains the driver and passengers. To solve this problem, you can install additional Lada Granta door seals yourself.
This car model has another problem: when driving, noise appears in the door area. It is created by a stream of air flying towards it. Of course, the interior is perfectly ventilated. But not everyone is satisfied with such a soundtrack: the noise begins to irritate and distract the driver’s attention. But in Russia the roads leave much to be desired. In addition, with the onset of cold weather, the temperature in the Lada’s interior begins to rapidly decrease. This is why there is a need to improve door seals.
Recommendations for modifying seals
To do this work, you need to prepare in advance:
You can use rubber that is used to cover apartment windows. First, the material is inserted into the gap between the guide and the windshield rubber. The operation starts at the top of the windshield and ends at the bottom of the hood. The inserted part needs to be glued. Gluing is done from top to bottom. The work begins at the junction of the car's roof and its frame. This place has a small recess, which makes it possible to hide the new seal.
Very often its edges do not look very impressive; they spoil the appearance of the Lada Granta car. They need to be trimmed with a utility knife. Then a dropper is installed in the gap. It is advisable to use silicone. This modification makes the seal much more reliable. For a better design, the installed sealing rubber bands can be supplemented with special seals. After installing them, Lada doors will close much softer.
You can also use a very ordinary dropper. To carry out the work, the standard seal remains in place. If you don't have a dripper, you can use a watering hose. A total of three meters of material will be required. If the work is done carefully, the door noise will be reduced by approximately 40%. This will be immediately noticeable: the door will make a dull sound when closing.
The quality of the seal made on a Lada Granta car is easy to check. You need to accelerate the car, light the lighter and hold it near the door. A calm flame indicates a correctly installed seal, which blocked the flow of wind from entering the interior.
Repair of door seals and installation of additional ones on Granta
AvtoVAZ produces many good cars. However, the door seals on them fail very quickly. We have to repair them. To do this, first clean the seal. The surface is degreased, for which you can use:
That part of the area that needs to be glued is coated with glue, for example, universal “88”. Sometimes the tire manufacturer specifies the exact brand. There should be several layers of glue. The first is considered preparatory. It prepares the surface for future gluing. The initial layer should dry. This will take 15 minutes.
Moreover, during drying, the surface must be protected from dust or dirt. There should be no mechanical damage present. Then the operation is repeated. A layer of glue is applied again and left for another 15 minutes. After this, the third, main adhesive layer is applied. It will hold the seal, which must be pressed firmly to the surface and wait 12 hours.
To install additional seals on the Lada door, you first need to remove the pistons covering the factory seal holes. Sometimes they are not there because they were removed by the dealer when additional anti-corrosion work was carried out. In order to remove the plugs, you will need a self-tapping screw. It is screwed into the plug and then pulled out.
As a result, the door remains scratch-free. The seals are mounted in finished holes using pistons installed on them. The seal is placed with the wide side towards the interior. If it is laid the other way around, no effect will occur. To install the RKI-19 brand seal on a Lada Granta car, you need to cover the end of the rear door with double-sided tape. After the operations and test, you can notice:
- The noise in the cabin has decreased by about half;
- the door closes very quietly.
As they say, the effect is obvious. In addition to the method described above, you can use another one - install seals taken from a GAZ car. To work, you will need a polyurethane sealant. There is an opinion that installing additional seals can cause corrosion on the doors. Car enthusiasts believe that moisture accumulates under the rubber. This is what causes rust. Of course, this is quite possible, but only if the rubber was poorly glued and the connection was loose.
For higher reliability, these places should be coated with an anti-corrosion compound. It won't require a lot of time or money. After installing additional seals, a very noticeable effect appears. There is complete silence in the cabin, no moisture gets inside the car. If wet areas are suddenly noticed, it means the job was done poorly. Everything needs to be redone. Another advantage of additional seals is significant insulation of the interior. This is noticeably felt in severe frosts.
Carrying out such a modification may be the beginning of other work, the purpose of which will be increased noise insulation of the interior and its thermal insulation. Naturally, this cannot be done without financial investments. However, after all such work has been carried out, the Lada Granta acquires new properties. The quality of the car increases several times.
Share on social networks:
Let's get down to business
So, the hood buffer in our case will consist of a regular seal, glued in the required places. If you already have the sealant in hand, you can begin work, here is a brief sequence of actions:
- First of all, open the hood, then carefully tighten all the bolts and connections that are on it.
- Now you can glue the seal. First we apply it to the hood trim. Don't forget to first disconnect the plastic clips (there should be 4 of them).
- Afterwards, attach the seal to the headlights, top and radiator grille. (the seal on the grille and hood should overlap each other).
That's all, but for greater reliability, the seal can also be glued in the area of the compartment in which the wiper motor is located. The principle of operation is similar, and the process itself will take no more than 5 minutes.
Door seals. Installation, finishing with a file.
I’m slowly starting to add things to my car that, for some reason, were forgotten at the factory. I bought door seals. I couldn’t find a vertical seal on sale, so as an experiment I took the best friend of grant makers - a D-shaped door seal.
I have read the concerns of many grant providers that the rubber profile will block the drainage holes in the doors, resulting in sudden rot. I decided to prevent this from happening and cut holes in the rubber seals to drain water from the drainage. First, of course, you need to try it on and figure out exactly where to cut.
There were no cap pistons on the front doors at all; on the rear doors there were only on the sides. Pulled it out using the proven “self-tapping” method
10 minutes and the horizontal seal is installed, you can move on to the vertical one
A D-shaped 12 mm rubber self-adhesive door profile was used as a vertical seal. It took 1.5 meters.
The doors began to close tighter, but the closing sound changed, it became duller and more solid) Dust protection has not yet been tested, but time will tell
Source
Installation
There is nothing complicated here either - the emphasis is installed within half an hour. The first step is to use a level to select the optimal angle at which your emphasis will be located. Well, then, based on the result, secure the brackets yourself in the required places. Next, focus on them, and the job is done.
In the future, according to experienced drivers, you will never regret installing a stop under the hood. Firstly, the stop ideally withstands the weight of the hood, and secondly, during car repairs you don’t have to worry about getting hit in the neck by the hood.