July 29, 2015 Lada.Online 205 460 21
Some owners of modern Lada cars (Priors, Grants or Kalinas) experience a whistling sound in the door area when driving at speeds above 80 km/h. Others complain about water and dust getting into the cabin. All these shortcomings can be eliminated with the help of modifications, which involve installing an additional door seal.
You will need: D-profile seal with dimensions 14*12 mm, degreaser, RKI-19 (article 000017504293020), RGI-135 (1118-6107028).
Suitable
So which ones to put? In no case should you buy the first copy you come across, since each car model is suitable for a certain sealing rubber. Let's summarize the reviews from Priora drivers:
- Standard ones from VAZ-2110. They have hard rubber, so the door with such a seal closes tightly. Its U-shaped profile allows dirt to accumulate in it. Plugs on drainage holes make it difficult for moisture to drain away.
- Brands RKI-19 for VAZ-1117 (Kalina). Despite the assurances of the sellers, it is not suitable for installation on Priora. First, it is smaller in size, so it only covers part of the gap at the front of the door. Secondly, it is also made of fairly hard rubber.
- The best recommendations were received by foreign kits (K-FLEX and others) that have a tubular (or double-tubular), trapezoidal or Z-shaped profile. They are made of soft rubber, which ensures their tight fit to parts of the car.
What is noteworthy is that owners of Daewoo Nexia cars tune their car with seals from VAZ Priora.
Example of a seal
Let's look at the rubber door seals in the headlines of car service centers, and also find out their design numbers from the trunk lid catalogue, for which VAZ cars they are suitable and what they are used for.
So here is a photo of a rubber door seal for a VAZ Kalina-1118 car. The red circle shows the complex cross-section of the seal, which can be used to determine which vehicle it is intended for. We won't go into detail in this section, so everything is clear in the photo, but let's look at the design catalog number and the length itself to help make your choice. The same door seal is suitable in cross-section and length for VAZ 2170 Priora and VAZ 2110 cars.
Repair kit design number:
- 1118-6107018-10 length for entrance doors 3 meters 11 cm measurement error (+ -) 5 cm
- 2170-6107018-10 length for entrance doors 3 meters 11 cm measurement error (+ -) 5 cm
Door seals for VAZ 1118 and VAZ 2170 must be measured on site at the time of purchase. Sometimes door seals on sale have the same shape and cut as Kalinovsky and Priorovsky, but longer.
Later, see the second photo of the rubber car door seal of the Dozen 2110 key family, since here you can see a completely different cut shape, a less complex design compared to the Kalina car door seal.
- 2110-6107018 for the front door length 3 meters 17 cm, and for the back door 3 meters 4 cm, the measurement error (+ -) is 2 cm.
In the third photo we have the door opening seal of the “nine” of the best Lada 2109 car. On the “eight” with two doors, such seals are installed only in the form of a longer cut, if they are not there about 15 centimeters. The cars are from VAZ 2109 “nine” to 2115 “fourteenth” family.”
- 2109-6107018 for the length of the “nine” for all four doors 3 meters 42 cm Measurement error (+ -) 2 cm
- 2108-6107018 for figure eight length for two doors 3 meters 71 cm Measurement error (+ -) 2 cm
And now we come to sealing the rubber doors of cars of the “classic” VAZ 2101-2107 family. The cross section, as seen in the photo of the early cars, has a more or less simple shape compared to other gaskets shown on this rubber industry blog page.
- 2107-6107018 for all classic models length 3 meters 46 cm Measurement error (+ -) 2 cm.
In general terms, everything is clear with the side doors; next, let’s look at the trunk lid seals and the trunk lid opening for VAZ cars. Cross section of the trunk lid seal as we see the intricate design of the 2170 Priora key.
Repair kit design number:
- 2170-6307024 length 3 meters 36 cm measurement error (+ -) 2 cm
The rubber seal on the trunk lid of the VAZ 2112 car also applies to the Lada 2111 station wagon.
Repair kit design number:
- 2112-6307024 length 3 meters 87 cm measurement error (+ -) 2 cm
The rubber seal of the trunk lid of a VAZ 2110 car, compared to the previous one, seems less complex in section (see photo).
- 2110-6307024 length 4 meters 9 cm measurement error (+ -) 2 cm
So, let's move on to the final part. Before our eyes, the rubber trunk seal of a VAZ 2105 from the “classic” family. Being long from the “five”, it can be installed on all Lada cars, just by adjusting the length on site. It is this stamp that is approximately 35 centimeters more authentic than the Chevrolet Niva SUV.
- 2105-5604040 length 3 meters 46 cm measurement error (+ -) 2 cm
- 21213-6307024 length 4 meters 36 cm measurement error (+ -) 2 cm
Installation
And now about what Lada Priora door seals are and their installation. Installation options can be very different:
- putting on the bottom of the door;
- installation with double-sided tape;
- gluing with sealant or glue.
Before gluing, the surfaces must be degreased. Usually the footage of the kit is enough to glue the door openings and the gaps between them and the wings.
As a conclusion, I would like to recommend washing the areas behind the rubber seals from dirt more often (and checking for rust). The lower parts require special attention.
So, Lada Priora door seals: which ones are better, installation and recommendations.
Suitable
So which ones to put? In no case should you buy the first copy you come across, since each car model is suitable for a certain sealing rubber. Let's summarize the reviews from Priora drivers:
- Standard ones from VAZ-2110. They have hard rubber, so the door with such a seal closes tightly. Its U-shaped profile allows dirt to accumulate in it. Plugs on drainage holes make it difficult for moisture to drain away.
- Brands RKI-19 for VAZ-1117 (Kalina). Despite the assurances of the sellers, it is not suitable for installation on Priora. First, it is smaller in size, so it only covers part of the gap at the front of the door. Secondly, it is also made of fairly hard rubber.
- The best recommendations were received by foreign kits (K-FLEX and others) that have a tubular (or double-tubular), trapezoidal or Z-shaped profile. They are made of soft rubber, which ensures their tight fit to parts of the car.
What is noteworthy is that owners of Daewoo Nexia cars tune their car with seals from VAZ Priora.
Installation
And now about what Lada Priora door seals are and their installation. Installation options can be very different:
- putting on the bottom of the door;
- installation with double-sided tape;
- gluing with sealant or glue.
Before gluing, the surfaces must be degreased. Usually the footage of the kit is enough to glue the door openings and the gaps between them and the wings.
As a conclusion, I would like to recommend washing the areas behind the rubber seals from dirt more often (and checking for rust). The lower parts require special attention.
Every car enthusiast knows what sound insulation is and why it is needed. When you sit in your car, you probably hear extraneous sounds that sometimes interrupt the music playing in the cabin. To rid yourself of this, additional sound insulation is installed on the car.
But such a pleasure is not considered cheap, so not all car enthusiasts can afford it for themselves and their cars. However, there are alternative ways to make seals. Let's determine why and how additional door seals are installed on Priora.
If you compare the sound insulation of a foreign car and a Lada Priora, you will notice significant differences, which are primarily due to the fact that the foreign car has a more competently designed body and better located seals. Thus, in order to achieve the maximum effect of isolating extraneous noise, it is necessary to install additional seals in the right places on the car body and doors.
How is a car seal replaced?
You must purchase the product before replacing it. Extreme care is required here. The fact is that for each car model, seals are made individually, which means that you cannot use a rubber band from another car. It is important to remember this when purchasing new seals!
A very important point concerns the thickness of the seals. To improve tightness, their thickness can be increased. It is worth considering here that the higher the thickness of the seal, the harder it is to close the car door. If the seal is too thick, then more force will have to be applied to close the door, and this increases the load on the lock mechanism. Remember that when the door is closed strongly, the wear of the lock increases significantly.
To change the seals, you need to remove the old ones. To do this, find the end of the tape, and if there is one, simply pull it so that it comes off the body or door. If there is no such end, then it can be created. To do this, the seal is cut in any place with a knife, and the resulting end is pulled by hand in the direction opposite to the body. Thus, we get rid of the old product.
Installing a new seal is much more difficult. The fact is that its shape is adjusted to the shape of the doorway and does not allow any other installation, and as you know, rubber is soft and does not allow the seal to take the correct shape, which makes it difficult to choose a place to start installation. Therefore, first apply the seal to the opening with the help of a partner, and then put on the approximate part of the seal. As soon as it is in place, gradually put the seal on the entire door opening. Try not to put on everything at once; gradualness is important here. Improper installation of the seal can lead to it simply stretching or tearing, and then you will have to buy another product.
If the other ends of the seal do not match the geometry of the body, then you are putting it on incorrectly. To do this, remove it in reverse order and try installing it again. This cycle can be repeated until the seal sits evenly along the entire length of the door. If this cannot be done, then the car has probably already been involved in an accident and the geometry of its body is seriously damaged, which creates big problems for installing the seal.
Doors Lada Priora
If we talk about Priora doors, it is worth noting that the doors have a rather problematic design. First of all, this relates directly to the door fastening itself, which becomes loose during operation, and an unpleasant sound appears when it is closed. To fix these problems, the Priora needs to remove the trim and double the clips installed on the door.
A common problem is an unpleasant sound when the door lock is activated. To eliminate it, you will need to put special rubber pads on the lock levers.
Main functions of seals
The main functions of conventional sealing material are:
| № | Function |
| 1 | increasing the level of sound insulation |
| 2 | increasing the level of thermal insulation |
| 3 | increasing vehicle protection from moisture |
| 4 | Reducing the sound that occurs when closing doors |
Thanks to the installation of an additional seal, the operating comfort of the vehicle increases.
Selecting a seal, correct fastening of the material
Having decided to install a certain sealing layer of material on the door of your car, in no case should you buy the first suitable material you come across, since only a certain additional door seal is suitable for each car.
Therefore, you need to familiarize yourself with all the information regarding the material used to seal car doors, and only then can you purchase components. For the Lada Kalina, material of the RKI-19 brand is suitable, but this sealing material is absolutely not suitable for installation on the Lada Priora. To install it on Priora you will need a little more material than RKI-19.
The right choice allows you to increase the life of the car and significantly reduce the level of noise entering the Priora’s interior. Installing additional seals on the doors allows you to carry out a kind of “sealing” of the car interior and protect the door locks and hinges from a variety of contaminants that can easily get through the door gap.
Additional seal on the car door
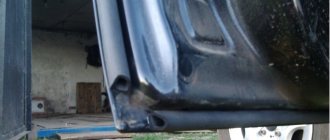
We remove dirt and then degrease the edge of the car door. We glue the seal along the edge of the door, as shown in the photo.
All that remains is to close the gap with the seal between the doors (front and rear). Owners of Lada Granta/Kalina install additional seals of the RKI-19 type:
RKI-19 is not suitable for Lada Priora, because... the distance from the body to the doors on the Priora is significantly greater. It would be more correct to use a Z-shaped seal and install it on the edge of the rear door as follows:
Seal fastening methods and their alternatives
As practice shows, additional door seals can be easily replaced by a regular rubber tube. For installation you will need superglue or double-sided tape and a surface degreasing agent. First you need to cut the tube into several parts. After that, the first part is taken, degreased and fixed with superglue in the right place.
Next, the tube is glued on top, they begin fastening the tube from the side of the windshield, then pull it in the direction of the rear door. Installing an additional seal may make it more difficult to close and open, so additional door adjustments will be required.
Installation of the seal takes about two to three hours. Additional seals are an excellent solution for getting rid of noise and moisture in the Priora’s interior.
In some cases, a special sealant can be used as glue; it is better suited for installation than glue. With its help, you can not only securely attach the seal, but also protect the car from rust. The first changes in the interior are noticeable immediately after attaching the seal to the car. After installation, the cabin becomes quiet and warm, and street noise practically does not penetrate. In rainy weather, the seal prevents moisture from penetrating into the interior.
The second, more acceptable seal option for most car enthusiasts is the K-FLEX seal tube, which can be purchased at a technical service center. Its fastening is carried out by analogy with fastening a conventional rubber tube. After its installation, the doors will close tightly, but over time the tube will become more pliable, and the doors will close easily again, and the interior, thanks to the seal, will be warm, dry and quiet.
When do you need to replace seals?
The seal is a rubber band that is placed on the edge of the door or on the edges of the body in the place where the door is pressed against the opening. This tape may not be one, sometimes it is part of two seals at once to enhance the sealing properties.
The role of seals in the automotive industry is as follows: they provide sealing of the interior and create a certain climate in the vehicle interior. For example, when using a heater in winter, the heat should not be allowed to escape outside the cabin.
This often happens if one of the seals fails - the cabin immediately becomes cold. The problem of two seals instantly creates a draft in the cabin, which has a detrimental effect on the health of everyone in the car. The same can be said about the use of seals during hot periods. When operating a car in the summer, we often use air conditioning, which makes it necessary to keep cool air inside the car. To prevent it from leaving, it is necessary to maintain the seals in good condition.
Seals should be replaced in two cases: when they fail and during seasonal maintenance. In the first case, the failure of the seals can be determined both visually and by the effect of its poor performance: when using a heater, the car interior practically does not warm up, the same can be said when using an air conditioner.
The condition of the seal can be determined by its appearance. If there are cracks or torn spots in the rubber, the seal must be urgently replaced. It happens that the rubber deforms over time and is squeezed out of its seat: the seal sags and is not fastened effectively enough. Thus, it does not perform its functions properly and urgently needs to be replaced.
