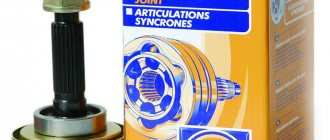
The CV joint (in common parlance a “grenade”) is the most important component of a car’s chassis, but its service life, like any other part, sooner or later ends. Naturally, timely replacement of the CV joint is a necessary procedure that can be entrusted to car service specialists, or you can try to do it yourself. Well, to be sure that it is the grenade that needs replacing, you just need to turn the steering wheel left and right. If, during such turns, a distinct crunch and crack is heard, then the unit is out of order, and the grenade needs to be replaced - there are no options. Watch the video below: “Replacing a grenade on a VAZ 2110, 2112, Kalina, Granta, Priora, 2109, 2114”
Why does a grenade fail?
As a rule, grenade failure occurs due to damage to its boot. A leaky boot allows dust and dirt to penetrate into the CV joint separator, which causes rapid wear of the joints. How to replace a CV joint boot
In addition, the time for the end of operation of a grenade, which has already completely exhausted its resource, may simply be approaching.
Another reason that leads to grenade failure is damage to the locking ring. Because of this damage, the axle shaft can partially fly out of the cage during sharp turns, gradually breaking the entire CV joint.
Grenade replacement process
To replace a grenade with a new unit, you will need the following tools and equipment:
- Three socket heads (“13”, “17” and “30”);
- One wrench (“17”);
- One mounting blade;
- A driver with a long handle;
- Wheel bolt wrench.
- Flat head screwdriver;
- Mallet;
- Jack;
- New grenade;
- New boot;
- A set of new rings for the shaft.
REMOVAL OF AN OLD GRENADE:
- We tighten the handbrake;
- We lock the rear wheels with clamps;
- Using a screwdriver, remove the cap located above the hub nut and loosen it slightly;
- Using a jack, we lift the side of the car on which the CV joint will be replaced;
- We dismantle the wheel;
- Remove the thrust washer from the hub.
- Unscrew the fastening bolts holding the lower ball joint;
- Using a wrench, move the steering knuckle to remove the ball pin;
- We continue to shift the steering knuckle and the strut, and dismantle the splined component of the outer CV joint;
- We remove the clamps from the outer grenade (this is done by fixing the drive shaft).
- We remove or simply cut off the old boot;
- We knock the grenade out of its mounting location with the shaft using a drift.
Installation of a new grenade and boot is preceded by thorough lubrication of these parts. This procedure is done only with the help of a special graphite lubricant. The main thing here is not to overdo it, since excess lubrication can harm the elasticity of the boot, but for a grenade, abundant lubrication will only be beneficial.
INSTALLING A NEW GRENADE looks like this:
- We install a new boot;
- We put the rings on the shaft (in the reverse order of their removal);
- After thoroughly lubricating the grant, we join it with the shaft splines and hammer it onto it using a mallet;
- We fix the assembled structure with clamps;
- We mount the drive on its seat (first we screw the hub, then we install the ball pin, after which we tighten all the fastening bolts and nuts).
As you can see, after spending about half an hour, you can replace the grenade yourself, even without having previously had experience in such work.
Video: Replacing a grenade on a VAZ 2110, 2112, Kalina, Granta, Priora, 2109, 2114
If the video doesn't show, refresh the page or click here
Grant grenade with abs
In a car with front-wheel drive, it is not the driveshaft with the main gear and axle shafts that is responsible for transmitting torque from the gearbox to the wheels, but special parts - CV joints, they are also constant velocity joints, in common parlance - a “grenade”. They consist of a drive and a CV joint itself; there are 2 of them on each drive. – external (closer to the wheel) and internal (closer to the gearbox). The “Grenade” is very durable, and with constant maintenance the car can withstand 100,000 km. and more. However, it does not last forever, and one day it may fail. In this article we will talk about how to independently diagnose and replace an external CV joint using the example of the popular Russian car Lada Granta.
Causes of grenade malfunctions and its diagnosis
Usually the CV joint does not break right away.
You will feel the car accelerate jerkily and hear a knocking sound from somewhere in the front suspension. Over time, symptoms worsen. Diagnostics is very simple: put the car on a jack and swing the CV joint of the suspended wheel. Do you feel any play? It's time to change the part. There are 4 main reasons why CV joints fail prematurely:
1) The part itself is of low quality or defective;
2) The vehicle is used off-road;
3) The boot broke and dust and abrasive particles got inside;
4) Aggressive driving style.
If you turn to specialists for help, you will have to fork out money. Replacement service costs an average of 1,500 rubles. for 1 CV joint.
You can save money by doing your own repairs: the cost of a spare part in auto shops starts from 1000 – 1500 rubles. for 1 “grenade”, complete with drive components cost about 3000 – 4000 rubles. There are a lot of manufacturers, but it is better to take the original from AvtoVAZ.
Tools and materials
- new CV joint (the grenade itself, without the drive) and lubricant for it;
- jack, hammer;
- wheel wrench, mounting, pipe of suitable diameter;
- a set of wrenches and sockets, a screwdriver;
- graphite lubricant.
Replacing the “grenade” with the Lada Granta
1) First, you need to place the car on a hard, level surface so that you can jack it up.
2) Remove the wheel using a wheel wrench.
3) Loosen the hub nut with a 30mm socket. If it is difficult to turn, use an iron pipe as a lever.
4) Remove the brake caliper.
5) Remove the 2 bolts from the ball joint.
6) Unscrew the hub nut completely, take the mounting tool and remove the hub from the CV joint (and from the ball joint).
7) Pull off the boot and remove the grease, otherwise there will be a lot of dirt.
 Using a hammer, carefully knock out the “grenade”.
9) Don't forget to remove the retaining ring with a screwdriver.
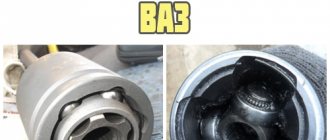
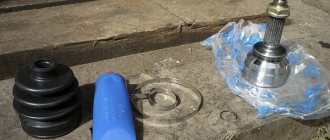
10) On the left in the photo is a CV joint made by AvtoVAZ, and on the right is Belmag. As you can see, of these particular samples, the VAZ one is preferable, since it has better calcination.
11) Take the grease and fill the entire grenade bearing with it.
12) Put on a new boot and put lubricant in it. Then install a new retaining ring.
13) Screw the hub nut onto the CV joint.
14) Hitting the nut with a hammer, hammer the “grenade” into place. During the process, it is extremely important to keep the CV joint straight in relation to the drive.
15) Tighten the boot clamps.
16) Unscrew the nut, then reassemble everything in the reverse order of removal. We recommend coating all bolts with graphite to prevent them from souring.
17) Do not forget to move the ABS ring from the old CV joint if it is not on the new one, otherwise problems with its operation may arise.
Replacing a CV joint is a difficult and quite responsible undertaking, since if you do something wrong, there is a risk of damaging other components and assemblies.
The scheme described above is valid only for an external “grenade”. To get to the inside, it is advisable to put the car on a lift, drain the oil from the gearbox, perform a series of manipulations to remove the hub from the CV joint, and then, using a mounting tool, carefully, trying not to damage the protective ring, pull the drive out of the gearbox.
After that, holding it in a vice, you can comfortably begin replacing it. That's all for today, good luck on the roads!
Boot replacement and repair
The boot can be changed without removing the grenade if you have special equipment. His work is demonstrated on video. » alt=»»> If you do not have such a device, to remove and replace it, you must perform the above-described procedure for removing the drive and dismantling the hinge. The procedure is necessary if there is even minor through damage on the boot.
Temporary repairs to the CV joint boot can be made without removing it from the vehicle. To do this, you need to thoroughly clean and degrease the damage, then seal it with a piece of rubber and cyanoacrylate-based glue (superglue).
An alternative repair method is to seal the holes with silicone caulk. It should be remembered that it takes a day to completely polymerize.
Note: express repair is a temporary measure. Replacing the inner joint boot may be delayed for a short time, but not completely cancelled. Typically, these types of repair methods are used to get to the point of repair.
Replacing the outer CV joint of a Lada Granta yourself
The expression “replacing a constant velocity joint” will probably cause confusion among most of you. But if you paraphrase and say - replacing a CV joint or a “grenade”, almost everyone will understand what we are talking about. But this is exactly what the abbreviation CV joint stands for.
Today I will share another excellent photo report on how to replace a CV joint at home, this time on a Lada Granta. The work has already been described several times on the pages of our website, but so that Grant drivers are not offended, we will tell you how to replace the outer CV joint on a Grant.
Replacing CV joints (constant velocity joints) on a Lada Granta VAZ 2190
- Pliers
- Large flat screwdriver
- Small hammer
- Soft metal drift
- Vice with soft metal jaws
- Jack
Parts and consumables:
- CV joint grease-4
- Wood spacer
- Constant velocity joints
- Front wheel drive shaft valve
- Rags
- Gloves
Replacing a CV joint or repairing it is a fairly common occurrence, the harbingers of which are knocking, crunching and crackling noises when turning the car’s wheels.
Work order:
1. Remove the front wheel drive from the vehicle as described here or here.
2. Clamp the drive shaft in a vice with soft metal jaws.
3. Squeeze the bent antennae of the inner collar of the inner CV joint boot with pliers.
4. Squeeze the clamp lock of the inner CV joint boot with pliers.
When to change the CV joint, signs of malfunction
As was said, the external grenade fails after about 40 thousand mileage. This is evidenced by crunching, creaking and knocking sounds in the area of the drive shafts. To determine which side of the CV joint requires replacement, you need to turn the steering wheel all the way and drive off. In 90% of cases, a worn drive will manifest itself as a crunching sound. For control, you can turn it first in one direction, and then in the other direction, and turn it back. If the CV joint is worn out, a crunching sound will be heard immediately.
New and worn CV joint
This is the case when there are no visual signs of wear:
- Lubricant leaks near the outer joint.
- Cracks, tears on the boot.
- Lost or misaligned clamps.
- There is obvious play when turning the suspended wheel.
If there are visual signs of wear, we replace the CV joint on the Grant as soon as possible.
How to check the CV joint for serviceability yourself
If any part changes its properties: color, size, etc., then this indicates a malfunction. With the CV joint everything is exactly the same, it is a hinge (a mechanism consisting of two parts that rub against each other), and if there is no lubrication, then wear will occur very quickly. This is what the hinge looks like:
In a CV joint, several elements work at once that interact under load; it resembles a bearing, but with certain features. This is what the CV joint looks like when disassembled:
In order for the car to move, the hinge must transmit a sufficiently large force to the wheels, and the angle between the axle shafts changes. After a certain period of time, the gap in these rubbing parts may become larger, which will lead to play and additional noise.
The main signs of a VAZ CV joint malfunction are the characteristic crunch that the balls make when they roll along the grooves because they already have a lot of wear. This applies not only to VAZs, but also to other cars. Usually this crunch is heard clearly when turning the steering wheel, when accelerating sharply, and also when driving along gullies. But there are other ways to identify signs of wear on the inner CV joint.
To be sure to identify a malfunction of the internal CV joint, you need to pay attention to whether jerks have appeared during acceleration or starting from a standstill, and whether there has been any play. If these signs appear, it means that the CV joint is already faulty and it is necessary to change it before it is too late.
Choosing an outer CV joint for the Lada Granta
There are enough hinges from different manufacturers on sale, it’s bad that sellers treat them like all Zhiguli spare parts - everything is the same. In practice, for the first generation Grants there are two types of external (and internal) CV joints - for cars with manual transmission and for Grants with automatic transmission. In a word, grenade 2215012-00 (21 teeth) .
For Lada Granta with a manual transmission there is a CV joint with catalog number 2215012-86 . In order not to be confused with numbers, let’s look at the differences between CV joints for Grants with automatic transmission and manual transmission:
- The spline connection in the outer hinge has changed in size, the number of teeth is 21 . A CV joint with 22 splines is suitable for a manual transmission.
- The geometric dimensions of the body have also been changed.
- The length of the outer spline part for manual transmission is 76.5 mm , for automatic transmission - 77 mm .
- height (without spline) 55 mm for automatic and 52.2 mm for manual .
- The number of teeth for the ABS ring does not change and remains 43.
Therefore, before purchasing an outer CV joint, we first look at the number of splines on the inside of the joint body. Among the manufacturers on the market, AvtoVAZ, Belmag and Triall dominate. The price of an outer CV joint on a Lada Granta is around $20.
It is important that the kit includes a locking ring, molybdenum disulfide-based lubricant and a neoprene boot. It should not be too hard, but a boot that is too thin will not last long.
We change the outer CV joint of the Lada Granta with our own hands
There shouldn’t be any difficulties when replacing the CV joint yourself if you use simple instructions and have a basic set of tools. It’s also a good idea to have a puller on hand for side dishes of equal angular velocities. It doesn't seem to have an article number, but that's what it looks like.
Alternatively, you can use a simple impact puller with a welded hub nut, but any extra shock loads on the transmission will not be very useful for it.
- While the car is on the ground, unscrew the hub nut using a 30mm socket with a long wrench.
- Raise the car, remove the wheel and unscrew the hub nut.
- We unscrew the caliper without disassembling it.
- Unscrew the ball joint bolts.
- We remove the hub from the CV joint and at the same time from the ball joint, and move it to the side.
- We loosen the clamps and move the boot further along the drive, closer to the gearbox.
- Using a puller or hammer, we ask the CV joint to leave its location.
- Remove the retaining ring.
- We fill the internal cavity of the CV joint with the lubricant that comes with the kit.
- We put the remaining grease into a new boot and put it in place.
- Screw the nut onto the new CV joint and install it in place.
- With light blows of a hammer on the nut, we move the hinge all the way until the stopper snaps into place.
- We install the boot, check that it is without distortions and tighten the clamps.
We put everything back together in reverse order, core the hub nut and do a test drive.
Grant grenade with abs
(closer to the checkpoint). The “Grenade” is very durable, and with constant maintenance the car can withstand 100,000 km. and more. However, it does not last forever, and one day it may fail. In this article we will talk about how to independently diagnose and replace an external CV joint using the example of the popular Russian car Lada Granta.
Causes of grenade malfunctions and its diagnosis
Usually the CV joint does not break right away. You will feel the car accelerate jerkily and hear a knocking sound from somewhere in the front suspension. Over time, symptoms worsen. Diagnostics is very simple: put the car on a jack and swing the CV joint of the suspended wheel. Do you feel any play? It's time to change the part.
There are 4 main reasons why CV joints fail prematurely:
1) The part itself is of low quality or defective;
2) The vehicle is used off-road;
3) The boot broke and dust and abrasive particles got inside;
4) Aggressive driving style.
If you turn to specialists for help, you will have to fork out money. Replacement service costs an average of 1,500 rubles. for 1 CV joint.
You can save money by doing your own repairs: the cost of a spare part in auto shops starts from 1000 – 1500 rubles. for 1 “grenade”, complete with drive components cost about 3000 – 4000 rubles. There are a lot of manufacturers, but it is better to take the original from AvtoVAZ.
Tools and materials
- new CV joint (the grenade itself, without the drive) and lubricant for it;
- jack, hammer;
- wheel wrench, mounting, pipe of suitable diameter;
- a set of wrenches and sockets, a screwdriver;
- graphite lubricant.
Replacing a faulty CV joint
Since repairing a worn CV joint, apart from replacing the boot and lubricant, is practically impossible, we are almost always talking about replacing it. And as we have already said, replacing a grenade is a rather complex and time-consuming task, and therefore it is better to entrust it to a professional. This requires special pullers, keys, as well as skills and abilities. You will have to remove the hub, which in itself is not an easy task. As for replacing the inner CV joint, it is even more difficult. Therefore, amateur activity in such matters is absolutely not welcome. It will be better if you check the condition of the anthers more often. In general, even replacing the boot is not a five-minute procedure.
Replacing the “grenade” with the Lada Granta
1) First, you need to place the car on a hard, level surface so that you can jack it up.
2) Remove the wheel using a wheel wrench.
3) Loosen the hub nut with a 30mm socket. If it is difficult to turn, use an iron pipe as a lever.
4) Remove the brake caliper.
5) Remove the 2 bolts from the ball joint.
6) Unscrew the hub nut completely, take the mounting tool and remove the hub from the CV joint (and from the ball joint).
7) Pull off the boot and remove the grease, otherwise there will be a lot of dirt.
Using a hammer, carefully knock out the “grenade”.
9) Don't forget to remove the retaining ring with a screwdriver.
10) On the left in the photo is a CV joint made by AvtoVAZ, and on the right is Belmag. As you can see, of these particular samples, the VAZ one is preferable, since it has better calcination.
11) Take the grease and fill the entire grenade bearing with it.
12) Put on a new boot and put lubricant in it. Then install a new retaining ring.
13) Screw the hub nut onto the CV joint.
14) Hitting the nut with a hammer, hammer the “grenade” into place. During the process, it is extremely important to keep the CV joint straight in relation to the drive.
15) Tighten the boot clamps.
16) Unscrew the nut, then reassemble everything in the reverse order of removal. We recommend coating all bolts with graphite to prevent them from souring.
17) Do not forget to move the ABS ring from the old CV joint if it is not on the new one, otherwise problems with its operation may arise.
Replacing a CV joint is a difficult and quite responsible undertaking, since if you do something wrong, there is a risk of damaging other components and assemblies.
The scheme described above is valid only for an external “grenade”. To get to the inside, it is advisable to put the car on a lift, drain the oil from the gearbox, perform a series of manipulations to remove the hub from the CV joint, and then, using a mounting tool, carefully, trying not to damage the protective ring, pull the drive out of the gearbox.
After that, holding it in a vice, you can comfortably begin replacing it. That's all for today, good luck on the roads!
Replacing the outer CV joint boot without removing it
This option eliminates the separation of the hinge and the shaft (if dismantling is not provided for by the design or there is a risk of destruction of parts). To carry out the procedure, you will need a special device that stretches the anther.
The time spent on repairs in this case is minimal, but be careful - there is a risk of damaging the elastic element.
The most difficult thing in such work is filling the internal cavity with lubricant.
Often car owners are faced with “sticking” to the hinge shaft. If the hub is held in place by a bolt, tighten it as much as possible to separate the parts. When the part rests against the axial end, make 3 additional turns (use a wrench). When fastening with nuts, you need to remove the axle shaft and clamp the drive in a vice. This fixation allows you to knock down the part with a chisel. If this fails, the not most convenient “home” option remains - cutting the ring with a grinder.
Do-it-yourself CV joint replacement on a grant
We will show you how to replace a grenade (CV joint) in a Lada Granta car with your own hands. The grenade drove only 15 thousand km on this car. and crackled. First of all, we rip off the hub nut, to do this we remove the protective cap (boot), we see that the nut is locked. Immediately after this, we tear off the wheel bolts, raise the car and remove the wheel. Now we unscrew the ball, you can knock it down, but it will be easier to unscrew the two side bolts. We remove the CV joint from the hub, sometimes it comes out easily with the help of your hands, sometimes it is necessary to knock a little with a hammer. We turn the steering wheel all the way to the left so that there is easy access to the grenade. Remove the clamps and boot from the CV joint. Next, be careful, when knocking down a grenade, you can pull the drive out of the box, and oil will leak out of the box. In our case, the grenade is removed using a homemade device, such as a reverse hammer; if desired, you can only use a hammer, knocking the sharp end on the separator, but this is not very convenient.
Video of replacing a grenade in a Lada Granta:
Backup video of replacing a CV joint in a Lada Granta:
Tools:
- 17 mm straight box spanner
- Driver for socket attachment
- Extension for the end attachment on the wrench
- 8mm wrench attachment
- 10mm wrench attachment
- High nozzle on the wrench 13 mm
- 17mm wrench attachment
- 19mm wrench attachment
- 30mm wrench attachment
- Torx wrench attachment E12
- Large flat screwdriver or spatula
- Large hammer
- Kerner
- Funnel
- Hose
- Technological capacity
- Metal brush
- Jack or ditch lift
- Stand
- Adjustable stop
- Wheel key
Parts and consumables:
- Right front wheel drive (replacement if necessary)
- Boot of the outer drive joint (replacement if necessary)
- Boot of the internal drive joint (replacement if necessary)
- Inner joint shank retaining ring
- Wood block
- Grease
- Rags
Notes:
Front wheel drives (CV joints) are often sold complete with boots and a retaining ring.
Carry out the work on an inspection ditch or overpass.
Carry out the work to replace the external and internal joints of the wheel drives, their dirt-proof covers, drive seals, as well as when dismantling the gearbox or power unit.
2. Drain the gearbox oil.
3. Lift the front of the car from the right side and remove the wheel.
4. Unscrew the right front wheel hub bearing nut.
5. Remove the two screws securing the ball joint to the steering knuckle.
Note:
Turn the steering wheel to the extreme left position so that the steering rod output is at its maximum value. This will allow the outer joint housing shank to be removed from the wheel hub without disconnecting the tie rod end from the steering knuckle.
6. Using a 10 mm wrench or socket, unscrew the nut and two bolts securing the heat shield of the inner CV joint protective boot to the rear support bracket of the power unit and remove the shield.
7. Move the steering knuckle with the shock absorber strut to the side and remove the splined shank of the outer joint housing from the wheel hub.
8. Place the drive on the guy wire.
9. Install an adjustable stop under the transmission housing by placing a block of wood under the housing.
10. Using a 19 mm socket, unscrew the three bolts securing the rear power unit support bracket to the clutch housing.
11. Push the rear powertrain mount bracket down, insert a spatula or large screwdriver between the drive inner joint housing and the clutch housing, and push the joint housing shank out of the drive gear spline.
Note:
Do not damage the protective ring of the drive oil seal located on the inner joint housing.
12. Remove the right drive, being careful not to damage the oil seal.
Note:
When removing both drives, after dismantling the first one, it is necessary to insert a clamp, for example, a wooden or soft metal roller with a diameter of 20 mm and a length of 150 mm, into the hole of the drive gear. Otherwise, the differential drive gears may become misaligned and the drives may not be able to be installed.
13. Before installing the drive, use a screwdriver to pry up the retaining ring of the inner joint housing shank, which secures the drive in the gearbox.
14. Remove the retaining ring.
15. Install a new ring into the groove of the inner joint housing shank. Reuse of retaining rings is not permitted.
16. Before installing the drive, center the retaining ring in the groove of the shank using grease.
17. Insert the splined shank of the outer joint housing into the hole in the wheel hub, install the washer and tighten (do not tighten) the hub bearing nut.
18. Insert the shank of the inner joint housing through the hole in the drive oil seal and, by turning the shaft, align the splines of the shank with the splines of the drive gear.
19. Move the suspension arm down and with a sharp movement of the rack with the steering knuckle towards the gearbox, install the drive in place.
20. By pulling the inner joint housing towards you or prying it with a mounting blade, we make sure that the housing shank is fixed in the drive gear.
21. Carry out further assembly in reverse order.
The article is missing:
- Photo of the instrument
- High-quality photos of repairs
The expression “replacing a constant velocity joint” will probably cause confusion among most of you. But if you paraphrase and say - replacing a CV joint or a “grenade”, almost everyone will understand what we are talking about. But this is exactly what the abbreviation CV joint stands for.
Today I will share another excellent photo report on how to replace a CV joint at home, this time on a Lada Granta. The work has already been described several times on the pages of our website, but so that Grant drivers are not offended, we will tell you how to replace the outer CV joint on a Grant.
Tool:
A set of wrenches, a 30mm socket, a hammer and a mounting blade or pry bar.
Step-by-step algorithm for replacing a CV joint
The process should be started if there is complete confidence in the failure of the specified unit. Replacing the outer CV joint step by step if you do it yourself.
- We loosen the tightening of the wheel fasteners and the hub nut (first remove the cotter pin) on one of the sides of the car.
- We hang up this side with a jack and install stops under the wheels of the stern, and a safety support under the body.
- We completely remove the wheel.
- Unscrew the two bolts holding the ball joint to the steering knuckle bracket and the hub nut.
- We turn the steering wheel of the Lada Kalina as far as possible to the side, move the axle and remove the axle shaft from the splined engagement of the hinge and the hub. If there are difficulties with the free exit of the axle shaft, then use a hammer, applying impact forces to the shaft through a drift.
- When the axle shaft is released, we begin to dismantle the outer joint boot in combination with the clamps. These items must be replaced.
- Now we move on to removing the CV joint. To do this you will need a special puller. If it is missing, then use the hammer again. It is forbidden to apply an impact load to the separator, so we apply gentle blows to the body in an outward direction. The joint will come off if the retaining ring compresses, allowing the cage to slide off the axle shaft.
- When it is necessary to dismantle the entire axle shaft, the algorithm of actions up to point No. 7 is similar, and then, using a mount, we remove the shaft of the designated CV joint from engagement with the side gear in the transmission differential. Before such manipulation, drain the oil from the box. We take out the axle shaft as an assembly, after which we perform the necessary disassembly steps, etc.
- Removing the internal hinge involves the identical procedure given in point No. 7. To make disassembly easier, we use a vice in which we place and fix the structure.