I went after the first Russian electric car with the obsession of the Argonauts, who once dared to travel for the Golden Fleece. The crush on the tram, the sea of people in the metro - and here it is, the cherished island of those. But, like the ancient Greek navigators, with the achievement of my goal, my adventures had only just begun.
“IF THE SAIL FALLS, WE WILL STRIKE WITH OARS...”
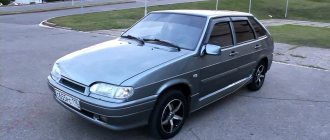
Externally, the electric Kalina is an ordinary station wagon (only the front bumper is different). Everything inside is also familiar, so no special emotions arise at first.
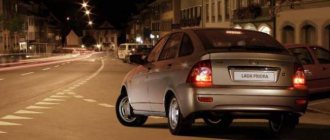
I turn the key in the lock. There is a second pause, and a small green car appears on the instrument panel. Selector in “drive” - the car moves silently under the rustling of the tires.
The sensitive gas pedal takes some getting used to. He touched it and the electric car jumped forward! For traditional Kalinas, such acceleration is the ultimate dream. I have never seen such dynamics in AvtoVAZ cars before. But the excitement was cooled by the on-board computer: the color display showed a verdict - 13 km before recharging. And this is with fully charged batteries... I immediately remembered the winter test of the Mitsubishi-iMiEV (ZR, 2012, No. 6), in which we never made it to the editorial office. I called my colleagues: they say, stretch Ariadne’s thread in the form of a towing sling, otherwise, I’m afraid I won’t make it to the outlet. It’s good that it’s -1ºС outside, and not -20º, as it was then.
I turn off the headlights and heater and drive calmly, no faster than 50 km/h. On the descent from the bridge, I press the brake and feel how at the end of the pedal stroke the force increases, and the arrow in the left saucer of the instrument panel drops into the blue zone - regenerative braking encourages the on-board computer, it mercifully shows 14 km. This is already better, but this does not make the left pedal any more informative. The deceleration is indistinct, and at a snail’s speed, it’s as if someone is grabbing the wheels with tongs. The iMiEV and Renault Zoe have much better brake settings.
There's almost nothing new inside. The only thing that catches your eye is the direction switch with familiar letter designations - D, N and R.
There's almost nothing new inside. The only thing that catches your eye is the direction switch with familiar letter designations - D, N and R.
There's almost nothing new inside. The only thing that catches your eye is the direction switch with familiar letter designations - D, N and R.
Lada Ellada: legends of “Ellada” based on “Kalina”
What is better power steering or power steering?
The times when the driver was forced to turn the steering wheel with enormous effort even in a passenger car are long gone.
Now every more or less high-quality car is equipped with power steering. But drivers often don’t know what kind of amplifier their car has and what advantages and disadvantages it has. The car may have hydraulic or electric power steering, power steering or power steering, respectively. The first type of amplifier is powered by a special pump, which is driven by an engine and maintains operating pressure in the system. As soon as the driver begins to turn the steering wheel, a special hydraulic drive begins to help him in this. When the steering wheel is in the zero position, the system does not press anywhere and the steering wheel is at “zero” without any problems.
An electric booster is an ordinary electric motor that is located on the steering shaft and, according to automatic signals, turns the entire shaft in one direction or another. Structurally, power steering and electric power steering are completely different mechanisms, but they have the same function, so many drivers even think about what type of amplifier is on their car.
Meanwhile, the systems differ both in the nature of driver assistance and in maintainability. Power steering is a more powerful unit that is well suited for powerful SUVs and trucks. A more complex device makes the power steering a little less reliable, but in the event of a breakdown, repairing the power steering pump will cost significantly less than in the case of a breakdown of the power steering pump.
Electric power steering is more compact and cheaper, but sometimes it does not have enough power, and in the event of a breakdown, it is necessary to completely change the power steering assembly, which is more expensive than replacing any component of the power steering.
From the driver's point of view, the EUR is a more responsive system; it instantly responds to the slightest driver actions. At the same time, the electrical system can be individually configured both on individual models and its operation can be adjusted to a specific driver. In power steering, you can’t expect this, unless you are ready to modify the unit yourself.
By the way, only ESD is installed on unmanned vehicles, so in the future this system will have an absolute advantage in the market. But power steering can provide the driver with more sensitive and “natural” feedback; it also significantly compensates for vibrations and shocks from a bad road; it also does not mind harsh operating conditions. But the EUR can fail at the most inopportune moment.
Source
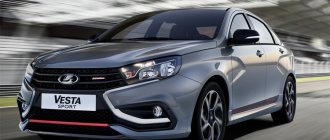
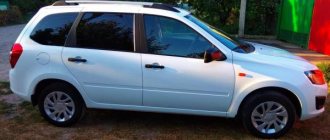
Exterior design
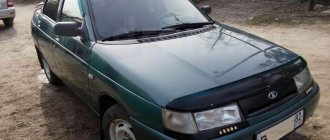
At first glance at the El Lada, it becomes clear that the model received its external body design from the Lada Kalina. Most of the exterior and interior design details remain unchanged, but there are some differences.
Body types
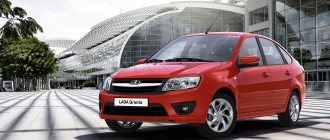
The electric car differs from its gasoline counterpart by the presence of a nameplate with the “El Lada” logo on the tailgate, as well as a front bumper that it received from Kalina Sport. The rest of the body parts remained the same relatively outdated as those of Kalina.
Color spectrum
Since very few copies of El lada came off the assembly line, the color variety of the car is practically absent. Most often the car can be seen in a white or light green color scheme.
What malfunctions threaten the EUR on Kalina and what are the ways to eliminate them?
Electric power steering is a component used to provide more comfortable driving. Not so long ago, domestically produced cars began to be equipped with EUR, in particular, in this article we will talk about Lada Kalinas. What malfunctions can occur with the Kalina EUR and what troubleshooting methods are there? Find answers to these and other questions below.
How did the experiment end?
AvtoVAZ employees decided to conduct practical tests of electric vehicles in Kislovodsk, since here is the most suitable landscape with descents, ascents and mountain serpentine roads. Five vehicles arrived from Stavropol under their own power, covering 230 km.
At first, the mayor's office placed an order for a thousand domestic electric cars, with the intention of using them as taxis. AvtoVAZ completed the order in two years. But when the cars were ready, it turned out that there was no money. Apparently, the price of 1.25 million rubles turned out to be unaffordable for the city budget. And the lack of electric filling stations does not allow taxi drivers to work normally. And the Ellada simply won’t last an entire shift without recharging.
Factory workers, hoping to get rid of the manufactured products, reduced the price to 960 thousand rubles. But the new product did not cause much excitement among buyers. We managed to sell only a little more than fifty eco-cars. The rest were stuck in the factory.
Causes of EUR failure
Why does the electric power steering on the Lada Kalina not work, turns off and refuses to work, what are the signs of a steering wheel with power steering knocking, jamming, biting or squeaking? To repair the system yourself, you need to know how diagnostics are carried out and what causes precede the breakdown. Most often, the failure of the amplifier is caused by a breakdown of the unit itself and the amplifier fails. Problems of this type are resolved by thoroughly checking the system to identify the exact problem.
As practice shows, often the inoperability of the electric amplifier (failure) is associated with a breakdown of the speed controller.
- the steering wheel is jammed,
- jams
- becomes tight
- and others
Because the speed controller sensor ensures activation and deactivation of the electric power steering under different driving modes. The amplifier on Kalina works if the car is moving at low speed. When the speed begins to increase, the booster automatically turns off, allowing for safer machine control when driving at high speeds.
So, briefly about the reasons for the inoperability of the EUR:
- The speed controller has failed or the control unit does not receive or disappears a signal from it. In this case, the reason may lie in either a breakdown of the sensor, damaged wiring, or poor contact of the controller with the on-board network.
- The voltage in the vehicle's electrical network has decreased. The reasons can be different, ranging from a dead battery and an inoperative generator to the use of inappropriate electrical equipment in the car.
- The permissible crankshaft speed has been exceeded.
- Incorrect operation or failure of the control module. Depending on the cause, the control unit may need to be repaired; more detailed diagnostics need to be done.
Detailed electrical diagrams of car components
Instrument panel wiring harness wiring diagram
1,2,3,4 blocks of the instrument panel wiring harness to the rear wiring harness blocks; 5,6 blocks of the instrument panel wiring harness to the blocks of the front wiring harness; 7 block of the instrument panel wiring harness to the block of the wiring harness of the air supply box; 8 block of the instrument panel wiring harness to the block of the front wiring harness; 9 lighting control module; 10 ignition switch; 11 on-board computer mode switch; 12 windshield wiper switch; 13 horn switch; 14 light signaling switch; 15 instrument cluster; 16 evaporator temperature sensor; 17 interior air temperature sensor; 18 air conditioner switch; 19 controller of the automatic climate control system; 20 heater damper gearmotor; 21 rear window heating switches; 22 alarm switch; 23 brake signal switch; 24 cigarette lighter; 25 electric power steering control unit; 26,27 connectors for the instrument panel wiring harness to the radio; 28 backlight lamp for the heater control panel; 29 lighting Lada Kalina; 30 mounting block: K3 additional starter relay; K4 additional relay; K5 relay breaker for direction indicators and hazard warning lights; K6 wiper relay; K7 relay for high beam headlights; K8 horn relay; K9 relay for turning on fog lights; K10 relay for turning on the heated rear window; K11 electric seat heating relay; K12 air conditioning compressor clutch activation relay; 31 heater motor switch; 32 electric heater motor; 33 additional resistance of the heater electric motor; 34 glove box lighting; 35 glove box lighting switch; 36 control unit of the automobile anti-theft system APS6; 37 driver airbag module; 38 passenger airbag module; 39,40 the instrument panel wiring harness blocks to the ignition system wiring harness blocks.
Electrical connection diagram for the wiring harness of the ignition system Lada Kalina 11174, 11184, 11194
1 oil pressure warning light sensor; 2 coolant temperature indicator sensor; 3 additional fuse box; 4 fuses for the electric fan of the engine cooling system; 5 electric fuel pump relays; 6 relays for the electric fan of the engine cooling system; 7 ignition relay; 8 relays 2 of the electric fan of the engine cooling system; 9 relay 3 of the electric fan of the engine cooling system; 10 electric fan of the engine cooling system; 11 throttle position sensor; 12 idle speed controller; 13 coolant temperature sensor; 14 diagnostic block; 15 ignition system harness block to the instrument panel harness block; 16 solenoid valve for purge the adsorber; 17 speed sensor; 18 ignition system harness block to instrument panel harness block 2; 19 mass air flow sensor; 20 crankshaft position sensor; 21 oxygen sensors; 22 controller; 23 rough road sensor; 24 diagnostic oxygen sensor; 25 ignition coil harness block to the ignition system harness block; 26 ignition coils; 27 ignition system harness block to ignition coil harness block; 28 spark plugs; 29 nozzles; 30 resistor; 31 air conditioning pressure sensors; 32 blocks of the ignition system harness and injector wiring harness; 33 phase sensor; 34 knock sensor.
Electrical connection diagram of the front VAZ-11184 wiring harness
1 headlight right; 2 right fog lamp; 3 speed sensor right front; 4 speed sensor left front; 5 air temperature sensor; 6 VAZ starter; 7 rechargeable battery; 8 generator; 9 blocks of the battery and starter harness and the front harness; 10 ABS hydraulic unit; 11 reverse light switch; 12 reverse lock; 13, 14, 15, 16 blocks of the front wiring harness to the blocks of the instrument panel wiring harness; 17 front wiring harness block to rear wiring harness block; 18 left headlight 11184; 19 left fog lamp; 20 electric washer motor; 21 beeps; 22 air conditioning compressor; 23 air conditioning fan electric motor.
Electrical connection diagram for rear wiring harness VAZ-11184
1 – 4 blocks of the rear wiring harness to the blocks of the instrument panel wiring harness; 5 rear wiring harness block to front wiring harness block; 6 side direction indicator, right; 7 left side direction indicator; 8 handbrake sensor; 9 blocks of the rear wiring harness to the rear right loudspeaker; 10 interior lamp; 11 reverse lock switch; 12 trunk light; 13 additional brake signal; 14 electric fuel pump module; 15 right lamp; 16 blocks of the rear wiring harness to the rear left loudspeaker; 17 rear window heating element; 18 rear wiring harness block to additional wiring harness block 3 (trunk lid); 19 rear wiring harness block to additional wiring harness block 2 (left rear door); 20 block of the rear wiring harness to the block of the additional wiring harness (right rear door); 21 left lamp 11184; 22 electrical package controller; 23 block of the rear wiring harness to the block of the rear additional wiring harness (left front door); 24 rear wiring harness block to rear additional wiring harness block 2 (right front door); 25 airbag control unit; 26 driver's seat belt pretensioner; 27 passenger seat belt pretensioner; 28 interior air temperature sensor; 29 right rear speed sensor; 30 left rear speed sensor; 31 electric heater for the right seat; 32 right seat electric heater switch; 33 left seat electric heater switch; 34 electric heater of the left seat.
Useful: Lada X-Ray diagram (Lada XRAY)
Diagram of electrical connections of the additional rear wiring harness (tailgate wiring harness) and the wiring harness of the license plate lights of the LADA KALINA 11174 car.
1 rear window wiper motor; 2 additional brake signal; 3, 4 blocks of the rear wiring harness, additional to the blocks of the rear wiring harness; 5 block to the trunk lock electric motor; 6 trunk lock; 7 rear window heating element; 8 block of the rear wiring harness, additional to the block of the wiring harness of the license plate lights; 9 block of the wiring harness for the license plate lights to the block of the rear additional wiring harness; 10, 11 license plate lights.
Electrical connection diagram for rear wiring harness VAZ-11174
1 – 4 blocks of the rear wiring harness to the blocks of the instrument panel wiring harness; 5 rear wiring harness block to front wiring harness block; 6 side direction indicator, right; 7 left side direction indicator; 8 handbrake sensor; 9 blocks of the rear wiring harness to the rear right loudspeaker; 10 interior lamp; 11 reverse lock switch; 12 trunk light; 13 block of the rear wiring harness to the block of the additional wiring harness; 14 electric fuel pump module; 15 right lamp VAZ-1174; 16 blocks of the rear wiring harness to the rear left loudspeaker; 17 rear wiring harness block to additional wiring harness block 3; 18 rear wiring harness block to additional wiring harness block 2 (left rear door); 19 block of the rear wiring harness to the block of the additional wiring harness (right rear door); 20 left lamp; 21 electrical package controllers; 22 block of the rear wiring harness to the block of the rear additional wiring harness (left front door); 23 rear wiring harness block to rear additional wiring harness block 2 (right front door); 24 airbag control unit; 25 driver's seat belt pretensioner; 26 passenger seat belt pretensioner; 27 interior air temperature sensor; 28 right rear speed sensor; 29 left rear speed sensor 1174; 30 electric heater of the right seat; 31 right seat electric heater switch; 32 left seat electric heater switch; 33 electric heater of the left seat.
Electrical connection diagram of the front VAZ-11174 wiring harness
1 headlight right; 2 right fog lamp; 3 speed sensor right front; 4 speed sensor left front; 5 air temperature sensor; 6 starter VAZ-1174; 7 rechargeable battery; 8 generator; 9 blocks of the battery and starter harness and the front harness; 10 ABS hydraulic unit; 11 reverse light switch; 12 reverse lock; 13, 14, 15, 16 blocks of the front wiring harness to the blocks of the instrument panel wiring harness; 17 front wiring harness block to rear wiring harness block; 18 left headlight Lada Kalina; 19 left fog lamp; 20 electric washer motor; 21 beeps; 22 compressor; 23 air conditioning fan electric motor; 24 rear window washer motor.
Electrical connection diagram for rear wiring harness VAZ-11194
1 – 4 blocks of the rear wiring harness to the blocks of the instrument panel wiring harness; 5 rear wiring harness block to front wiring harness block; 6 side direction indicator, right; 7 left side direction indicator; 8 hand brake sensor Lada Kalina; 9 block of the rear wiring harness to the block of the additional wiring harness; 10 interior lamp; 11 reverse lock switch; 12 trunk light; 13 electric fuel pump module; 14 right lamp VAZ; 15 rear wiring harness block to additional wiring harness block 3 (trunk lid); 16 rear wiring harness block to additional wiring harness block 2 (left rear door); 17 block of the rear wiring harness to the block of the additional wiring harness (right rear door); 18 left lamp 1194; 19 electrical package controller; 20 block of the rear wiring harness to the block of the rear additional wiring harness (left front door); 21 rear wiring harness block to rear additional wiring harness block 2 (right front door); 22 airbag control unit; 23 driver's seat belt pretensioner; 24 passenger seat belt pretensioner; 25 interior air temperature sensor; 26 speed sensor right rear; 27 left rear speed sensor; 28 electric heater of the right seat; 29 right seat electric heater switch; 30 left seat electric heater switch; 31 left seat electric heater.
Wiring diagram for fog lights
1 - fuse in the assembly block; 2 — immobilizer output; 4 — rear fog lights; 4— external optics control unit; 5 — ignition switch; A - to power supplies.
Diagnostics
To check the amplifier in a car, you need to remove the plastic trim on the steering column; to do this, unscrew the bolts securing it from the bottom.
Then you will need to get to the 8-pin plug, its pinout is as follows:
- The blue contact is connected to the ignition switch, this is 12 volt power;
- the red-brown contact is the connection cable to the tachometer;
- the gray contact goes to the car speed controller;
- white and pink wire - amplifier control indicator;
- black-yellow contact is a diagnostic line;
- the next contact is empty, the wire is not connected to it;
- brown contact is ground;
- empty.
More accurate results will be obtained by checking the amplifier using a scanner. But since such equipment can usually only be found at service stations, you can try to check the operation of the system with a paper clip.
To check you need to do the following:
- First the ignition is turned off.
- Then, using a paper clip, you need to close contacts numbered 6 and 7 of this plug, while the plug itself does not need to be removed.
- Next, the ignition must be turned on.
- After completing these steps, the EUR failure indicator located in the dashboard will begin to blink; by the number of blinks, you can determine whether the system is broken (the author of the video is Gosha Vakhromeev).
How to understand where to look for the cause by the blinking indicator icons:
- one long signal and one short signal - the electric amplifier is working;
- one long and two short - no engine speed signal;
- one long and three short - the torque controller is out of order or there is no power supply;
- one long and four short blinks—problems in the operation of the electric power steering motor;
- one long and five short - the steering shaft position controller has failed;
- one long and six short - the motor rotor position controller has failed;
- one long and seven short - problems with the electrical network - the voltage is either too high or very low;
- one long and eight short - the control module of the electric amplifier has failed;
- one long and nine short - the speed controller is broken.
Error codes
c1044 - incorrect sequence of the rotor position sensor (RPS)
c1621 - incorrect voltage 5V
c1622 - speed signal circuit failure
c1011 - car engine speed signal circuit, no signal - the signal from the idle sensor (or the standard tachometer through a voltage limiter) is divided by 4 and applied to the tachometer input,
c1022 - error, voltage of the main output of the torque sensor - it is possible that the shaft cover has rubbed the insulation and the middle, green wire shorts to ground
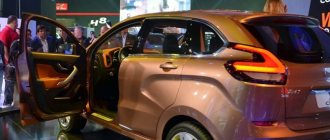
Salon
Externally, the interior is very similar to the “first” Lada Kalina standard, but differs in some details.
Features of the Lada Hellas interior:
- The transmission control lever looks completely different and has only three letter designations: D, N, R - normal driving, neutral and reverse respectively.
- On the dashboard, instead of a tachometer, there is a device that shows the driver the rate of energy consumption.
- The speedometer marking was reduced to 160 km/h.
When decorating the interior, ordinary plastic was used, and the passenger seats were covered with ordinary fabric. The interior has rounded shapes, which are usually found in cars that rolled off the assembly line back in the nineties.
Dismantling and disassembling the electric amplifier
Before removing the amplifier, you need to remove all the steering column switches. Remove the steering rack cover and dismantle the devices, remembering to disconnect the connectors from the power supply.
How to remove the EUR with your own hands:
- After removing the switches, you will need to dismantle the lower cross member of the dashboard. To do this, you need to press the fasteners that secure the connector with wires, and then disconnect the wiring from the control module. Once these steps are completed, you can disconnect the connector from the switches.
- The system bracket is secured with nuts; you will need to unscrew them with a wrench.
- After this, the steering rack will need to be carefully lowered down. To do this, you will need to find the bolt that secures the driveshaft to the booster shaft. This bolt must be unscrewed, but when unscrewing, you will need to fix the nut, this will prevent it from turning. When the bolt is removed, the fastening will need to be loosened, after which the intermediate shaft will be carefully removed. At this stage, we recommend marking the position of the shaft and gears; you can use a marker for this. This step is very important because doing it will prevent possible installation problems in the future. If the marks on the shafts do not match, this may cause problems with the amplifier. When dismantling, be careful not to damage the wiring, as this will also lead to the inoperability of the ESD.
- When the unit is dismantled, it will need to be disassembled and the failed elements replaced. Further editing is done in reverse order (the author of the video is Murzik Bely).
FIVE FACTS ABOUT ELECTRIC CARS
The first Russian electric car was built in 1899 in St. Petersburg.
In 1917, Woods Motor Vehicle showed the first hybrid.
In 1971, an electric car visited the Moon as part of the Apollo 16 expedition.
By 2011, almost half of European countries had introduced incentives for the purchase of cars with zero CO 2 emissions.
At the beginning of 2014, Russia abolished customs duties on electric vehicles for legal entities for two years. Previously it was 19%.
How to tighten the electric power steering rack?
The appearance of a knocking sound in the operation of the electric power steering is associated with the need to tighten the steering rack.
How to do it right:
- First you need to disconnect the battery; to do this, disconnect the terminals from it. Unscrew the battery mount; to do this, you need to unscrew two more nuts located at the edges. After this, the battery is removed and put aside.
- Then you need to lift the plastic stand, there are four more screws under it, they can also be unscrewed.
- Having done this, it is necessary to move this stand forward until the platform is disconnected from the air filter housing retainer pad. After this, the trim can be moved back, this will provide freer access to the rail itself.
- At the next stage, you will need to crawl your hand under the rail. Directly below it, as shown in the photo, there is a rubberized cap; it will need to be removed, this will allow the key to access the adjusting nut.
- To perform adjustment work, you will need a special wrench to tighten the rack; without it, the adjustment procedure will not be possible. Using this wrench, you need to crawl under the car rail to install the tool in the required hole.
- When adjusting, be careful not to overtighten the rack. If its tightening is very strong, then when cornering the rack will bite, and this, in turn, may affect the safety of movement. The angle of adjustment is always different, it depends on how much the nut is loose, but usually when performing such work the nut is tightened by approximately 30 degrees. This should be enough to get everything right. After the adjustment is completed, it will be necessary to check that this task was performed correctly. That is, you will need to make sure that the steering wheel turns normally to any position all the way and there is no knocking. If the knock remains, then the adjustment continues.
Source
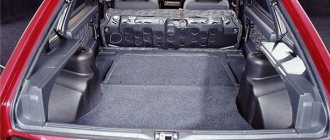
additional characteristics
Hellas' trunk volume is 350 liters, but it can be increased by folding the rear seats. After this, the volume almost doubles - up to 650 liters. Ground clearance is 160 mm. Braking is provided by disc brakes on the front wheels and drum brakes on the rear.
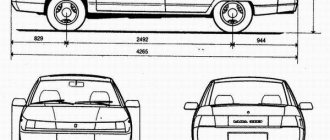
Characteristics of vehicle dimensions and weight:
- length – 4040 mm;
- body part width – 1700 mm;
- height – 1500 mm;
- wheelbase – 2470 mm;
- curb weight – 1200 kilograms.