Product added to bookmarks!
- Description
- Reviews
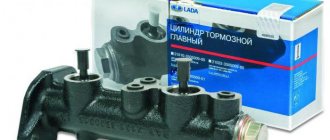
APPLICABILITY: VAZ 2101, 2102, 2103, 2104, 2105, 2106, 2107, VAZ 2121, 21213, 21214, 2131 (Niva).
The largest manufacturer of automotive security systems in the world!
The company's work is divided into 2 areas: Continental Temic - electronic components and Continental Teves - one of the world-famous manufacturers of electronic and hydraulic brake systems, chassis control systems, electronic air suspension systems, sensors.
Continental Teves works closely with Continental Temic as part of the joint operation of Continental Automotive Systems (CAS), which allows them to jointly create unique solutions.
ATE Products:
— Brake discs — Sports brake discs (Power Disc) — Motorsports brake pads (Power Pad) — Brake pad kits — Repair kits — Brake master and slave cylinders — Clutch master and slave cylinders — Brake calipers — Handbrake and clutch cables — Brake hoses
ATE supplies its products to all major car manufacturers, including VAG (VW, AUDI, SKODA), FORD, GM, BMW, TOYOTA, etc.
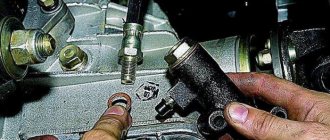
replacing the Niva clutch slave cylinder
The clutch master and slave cylinders can also cause big problems. I had a leaky clutch giving the effect of the clutch sticking. Sometimes it was impossible to turn off the transmission, sometimes to turn it on. We remove the front cardan, we have already removed it. The flange of the front gearbox is visible, i.e. if the cardan was in place, it would be impossible to unscrew the rcs. Bolts 13, two pieces. It is advisable to photograph the mount itself as it stood. And then (six hours later) I twist it in my hands and can’t remember how it stood.
The cylinder is covered in snot, it’s obvious that it’s dead. Code for purchasing a new one 2101-1602515
That's it, the cylinder is removed, the new one is installed in the reverse order. But first I also changed the main one, it goes higher up the hose.
Pull the clutch cable
On Niva I try to buy everything from the factory, from Lada-Image in blue and white boxes. New slave and master cylinders.
Bleeding and adjusting the Chevrolet Niva clutch: step-by-step instructions
At the same time, breakdowns of the first category tend to quickly develop into the second.
Parts of an untimely adjusted clutch wear out quickly and require replacement. An unadjusted clutch drive causes inconvenience when driving a car - difficulties appear when changing gears or jerks when the car starts moving.
When should it be adjusted?
It is necessary to adjust the pedal free play and pump the hydraulic drive in the following cases:
- Pedal travel is too long. In this case, the clutch does not disengage completely (“drives”). This leads to difficult gear shifting and intense wear of the friction lining on the driven disk.
- Small clutch travel. In this case, the disc slips, especially under heavy load on the transmission (driving uphill, in high gear).
- Jerking, knocking or squeaking noises when changing gears or when the car starts moving.
Important: operating a car with an incorrectly adjusted or “aired” clutch drive leads to accelerated wear of gearbox parts. The design of the Chevrolet Niva clutch coincides with a similar unit of the “classic” AvtoVAZ
The only difference is in the other dimensions of the working cylinder and, accordingly, in a larger and easier pedal stroke
The design of the Chevrolet Niva clutch coincides with a similar unit of the “classic” AvtoVAZ. The only difference is in the different dimensions of the working cylinder and, accordingly, in a larger and easier pedal stroke.
How to upgrade?
Before adjusting the mechanism, you need to bleed the hydraulic drive. To do this, you will need brake fluid, a container and a flexible tube whose internal diameter corresponds to the size of the fitting and a 10mm spanner.
The bleeding process is similar to removing air from the brake system. As with the brakes, the work is done with an assistant.
One person must press and release the pedal on command, and the second must open and close the fitting.
How to adjust it yourself?
To adjust the mechanism you will need keys 10, 13 and 17, pliers and a pencil. The operation is performed on a lift or inspection pit. The work order is as follows:
- Using a 10mm wrench, unscrew the locknut of the pedal travel limiter.
- By rotating the nut, set the free play within 0.4-2 mm.
- Tighten the locknut.
Then you need to go down under the car and adjust the free play of the pusher within 4-5 mm (to unscrew the nuts, you need wrenches 13 and 17). The check is performed as follows:
- Using pliers, remove the clutch fork release spring.
- Place a pencil against the boss of the lower mounting of the working cylinder.
- Make two marks: opposite the fork and 5 millimeters to the right.
- Pull the fork all the way back, selecting the free stroke of the pusher.
- The fork should stop exactly opposite the mark on the pencil.
If the gap does not correspond to the nominal one, you need to loosen the lock nut and rotate the nut to achieve the required parameters.
The final check is performed with the engine running. If everything is done correctly, the gears change easily, and the car starts to move if the pedal is released approximately ⅓ - ⅔ of the stroke.
What's better here?
For the first time, the Niva VAZ-2121 was modernized in its fifteenth year of life.
Then, in 1993, it was replaced by the carburetor model 21213, which soon turned into the injection model 21214. In August 2009, production of the third generation Niva began (trademark - Lada 4x4). Now we have before us “Lada 4×4 21214-046”. Outwardly, it is the same as its predecessor, but there are a lot of technical differences. It was possible to improve driving performance, higher comfort, reliability, some components and parts were unified with the Chevrolet Niva.
We talked about preliminary plans for modernization a year ago, in ZR, 2008, No. 9 - now let’s see what of the plans was embodied in the hardware.
Let us remind you that the engine, which now complies with Euro III or Euro IV standards (depending on the configuration), remained without major changes - reliable gaskets with silicone rollers and a water pump with an improved oil seal were used.
The fuel filter has been moved under the body - there are fewer pipes, reducing the likelihood of a fire in the engine compartment. The flywheel, as planned, has a diameter increased to 215 mm. And, of course, the Valeo clutch along with the slave cylinder and automatic freewheel adjustment. As a result, pedal force is reduced by 40% and free play adjustment is no longer necessary as wear occurs.
Particular attention was paid to coordinating the characteristics of the front and rear suspensions. The energy intensity and service life of the front suspension have been increased. The lower ball joints are 2123, the upper ones are 21214, they have a forged body and a larger pin swing angle.
The consequence of the changes was the track widened to 1440 mm. To “expand” the dynamic suspension travel, the compression and rebound buffers were shortened by 10 mm.
Modernization of the chassis made it possible to improve handling, smoothness and stability - in fact, the entire range of driving qualities of the Niva.
At the next stage (in six months to a year) there will be new door trim and body side panels, a redesigned rear seat with an ISOFIX child seat mounting system, CV joints in the driveshafts and improved interior sound insulation.
How to change the clutch: frequency and replacement order
With careful use and careful driving, you do not have to change the clutch often.
What can become an alarm bell and a signal for diagnosis - this is discussed in our article. Here you will learn how to replace a clutch and will be able to supervise the service center technicians.
When driving with a worn clutch, fuel consumption increases and the power of the internal combustion engine is significantly “lost.”
How long does the clutch last?
It is impossible to name a specific mileage after which it is time to change the clutch. Too many factors influence its service life:
- driving style - a sharp start and frequent slipping, and even more so, participation in races significantly reduces the period of operation;
- quality of the unit - original parts are always more durable than inexpensive analogues;
- foreign liquids or small solid objects can damage even a new unit;
- errors during installation and adjustment inevitably lead to reduced performance.
Wear of linings due to incorrect clutch settings
How do you know when it's time to replace the clutch?
Reasons and consequences that you will avoid if you go to the service station on time:
- Do you hear a loud noise when you depress the clutch pedal? there is a possibility that the release bearing is worn out;
- the smell of burning in the cabin indicates that the clutch discs are slipping relative to each other, so that the friction linings on them burn;
How to replace the clutch on a Chevrolet Niva yourself
Every motorist who has a manual transmission knows what a clutch is, and sooner or later is faced with the fact that it simply disappears, and when it starts to move, it does not disengage, thereby creating some kind of inconvenience. The only option in such a situation is to contact the nearest car service center, where the clutch on your Chevrolet Niva will be replaced within two to three hours. This option is not cheap, so if your budget does not allow this replacement procedure, you can do it yourself in the wild.
You will learn from this article how replacement, adjustment, and repairs occur, and you will also find out which one is best to install.
What is clutch
Thanks to it, torque is transmitted from the engine to the gearbox itself, making it possible to change gears on the gearbox. If this work is not done properly, it will negatively affect other mechanical components. This drive is hydraulic, there are no gaps in it, and has automated compensation, so there is no wear on the functional linings. This drive is one of the important parts, as it sends a signal to the working elements to the driver himself.
What kind of malfunctions are there?
This is a whole mechanism, and there can be a lot of reasons why it fails. Let's look at the most common ones:
When you press the clutch pedal on a Niva Chevrolet, slipping occurs, that is, the engagement is not complete, this can be caused by:
- If the friction linings are worn out or they are burnt out, this problem can be solved by completely replacing the disc.
- Oil appears on the surface of the driven disk, which indicates that the parts have faulty seals. You can fix the problem by washing the discs, removing the causes of the leak.
It happens that, on the contrary, it does not turn off completely; it starts to behave, this could be for the following reasons:
- Warping or beating occurs on the driven disk; this problem can be solved by repair, unless, of course, it has minor damage. But as a rule, if this malfunction occurs, it can be solved only by completely replacing the disk.
- The rivets on the fixed pads have become loose. The driven disk set will need to be replaced
- The presence of air in the system itself. This can be solved by bleeding the system.
- Warping and distortion of the disk. You can solve it by replacing this part.
A malfunction may occur where some parts need to be replaced. This is determined by the following characteristics:
- Noises are heard when pressing the clutch
- The same noise is heard when the pedal is released
This suggests that it is necessary to remove and disassemble this system, and eliminate the damage that has appeared.
How to make a replacement
When the cause of the breakdown is clear, you need to move on to eliminating it. The replacement process is very long and labor-intensive, so you need to be patient and follow everything strictly according to the instructions, which includes the following steps:
- Installing the car in the pit
- Prepare the necessary tools
- We remove the gearbox, this is necessary to have access to the device
- After the box is removed, you need to mark with marks where the flywheel and housing are located.
- Using an eight-mm wrench, we unscrew several mounting bolts; they secure the clutch disc itself to the flywheel.
- We remove two disks, pressure and driven
- We inspect them and if there are various chips and cracks, then it must be urgently changed.
- Check the condition of the release spring
- After inspection and elimination of all faults, installation occurs in the reverse order in which removal was carried out.
At this point, all stages of replacing the clutch on a Niva Chevrolet car are completed. During the replacement process, it is very important to look at the condition of the release bearing, and if it is in a worn state, it is better to replace it with a new one, since in a couple of months if you do not replace it, you will have to disassemble the device again. Now you have an idea of how to remove and replace the disk yourself, and you can carry out the entire procedure yourself at any time, without contacting a specialist.
Modernization of Lada 4x4 (Lada 4x4) - wheels.ru
The nivovods took all this seriously! Why! VAZ itself was interested in our opinion! And we know our Nyvka inside and out, inside and out! Not only do we know its advantages (there are countless of them!), but we are also well aware of its disadvantages! And the proposal itself is just a fairy tale, how flattering and interesting! By the end of March last year, the Niva 4x4 club prepared two reports of fifty pages each - on the current Niva and on the one that was “either”... On the current Niva it was written... Guess how many comments, wishes and suggestions? Ten? Twenty? Fifty? You didn’t guess: there were exactly 209 points!
The reports were sent to VAZ, and the plant invited the club administrator to Togliatti, where they showed him everything, told him everything and listened to him attentively at a specially convened meeting. And then it turned out that, on the one hand, many of our important wishes correspond to the plans of the plant.
They know, for example, about the Niva’s weak engine - a wasteful copy of the same one that was sold for a penny half a century ago. And the plant has plans to supply the Niva with a more powerful, modern domestic engine. And two options have even been thought out - a volume of 1.6 liters 21116 from Kalina and a volume of 1.8 liters, a completely new one...
And the factory workers know about the problem of the front hub assembly, and even there is already a solution. Looking ahead, I will say that during the second trip to Togliatti in May last year, the club administrator saw with his own eyes (the eyes of a consumer!) two Nivas on which these new hub units were tested. That is, everything is ready, all that remains is to implement it!
But on the other hand, some of our proposals and wishes were a revelation for VAZ. For example, you can’t drive out of the garage door at all on the tires that the plant puts on all Nivas in winter. Although they say “MS”, which means “mud{amp}amp;snow” - “mud and snow”. It’s written, it’s written, but the breeders have been warning on their website for a long time: no-no! It’s very easy to kill yourself...
The factory workers also learned that cars with injection engines simply need to display controller fault codes. Niva specificity: the service can be several hundred kilometers from the forest village where Niva lives. How do you get there if the check engine light is on?
In May of the same last year, the club administrator was invited to the plant again. We drove around the test site, discussed tires and the indication of fault codes at two meetings. We made positive decisions on both counts...
“The fairy tale is told soon, but the deed is not done soon” is an immutable truth, gleaned from Russian folk tales in childhood. But still, by the beginning of summer, several of those 209 points were completed. And their implementation was supervised by Vice President for Technical Development Evgeny Nikolaevich Shmelev.”
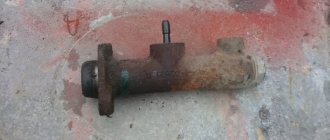
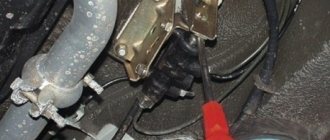
Chevrolet Niva clutch release master cylinder
/ Chevrolet/ chevrolet-niva/ Vehicle options/ Clutch release master cylinder
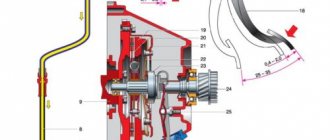
| Rice. 11.1. Master cylinder parts: 1 – hydraulic reservoir; 2 – tank clamp; 3 – plug; 4 – body; 5 – protective cover; 6 – piston pusher; 7 – retaining ring; 8 – support sleeve; 9 – piston; 10 – piston cuff; 11 – clamp; 12 – spring; 13 – valve cage; 14 – valve spring; 15 – valve |
The main difference between the master cylinder described in this section and the version discussed in section. 5 “Transmission”, in which the reservoir is installed directly on the cylinder. The reservoir of another version of the master cylinder is installed separately and connected to the cylinder with a flexible hose. In addition, many of the incoming parts are different ( ).
Removing and installing the clutch master cylinder
The master cylinder is removed from the vehicle for replacement or repair. However, if the contractor does not have the skills to perform disassembly and assembly work, we recommend replacing the faulty cylinder assembly.
| USEFUL ADVICE When removing the clutch master cylinder, the hydraulic fluid does not need to be drained from the hydraulic drive. A small amount of air remaining at the top of the actuator line will be removed when it is bled. |
| Rice. 5.2. Clutch release drive: 1 – tube; 2 – main cylinder; 3 – master cylinder fastening nut; 4 – pedal bracket; 5 – clutch release clutch; 6 – ball joint; 7 – clutch release fork; 8 – clutch release fork cover; 9 – bracket fastening bolt; 10 – bracket; 11 – working cylinder; 12 – valve for removing air; 13 – clutch pedal axis; 14 – clutch pedal; 15 – locking bracket; 16 – master cylinder pusher; 17 – bushing; 18 – locking bracket; 19 – bushing |
| 1. Disconnect tube 1 from the master cylinder (see ). Take measures to prevent fluid from leaking out of the master cylinder hole (for example, plug the hole with a piece of rags or a suitable rubber or plastic plug). |
| 2. Disconnect the pusher 16 from the pedal pin by removing the locking bracket 15 from the pin. |
| 3. Unscrew two nuts 3 and remove the master cylinder from the pedal bracket studs. |
| 4. Remove the plug (see ) of tank 1 and pour the liquid into a container. |
| 5. Install the master cylinder in the reverse order of removal. |
| 6. Remove air from the hydraulic drive (see section 5 “Transmission” , “Bleeding the clutch hydraulic drive”). |
| HELPFUL ADVICE To reduce the need to bleed the hydraulic drive to a minimum, after attaching the connecting tube to the cylinder, do not fully tighten the connecting nut. Pour liquid into the tank and finally tighten the tube nut only after liquid begins to flow out from under it without air bubbles. Often, with this method, pumping the hydraulic drive is not required. |
Dismantling and assembling the master cylinder
| 1. Loosen the clamp 2 (see ) and remove the tank 1 from the main cylinder body 4. |
| 2. Remove the protective cover 5 together with the pusher 6. |
| 3. Using special pliers or round nose pliers with long jaws, remove retaining ring 7. |
| 4. Remove support sleeve 8, piston 9, piston collar 10, retainer 11, spring 12, valve cage 13, valve spring 14 and valve 15 from the cylinder body. |
| 5. Wash the parts with fresh brake fluid. |
| NOTE The use of gasoline, kerosene, diesel fuel or mineral oils is unacceptable, as these substances cause swelling of rubber parts. |
| 6. Check the technical condition of the cylinder parts. The cylinder bore and the outer surface of the pistons must be free of damage and corrosion. If any small scuffs or pitting corrosion are found, remove them with a fine-grained sanding block. Replace the piston return spring if it is cracked. We recommend replacing the O-rings regardless of their condition. Check the protective cap; if it is damaged, replace it with a new one. |
| 7. Assemble the master cylinder in the reverse order of disassembly. |
| NOTE Before assembly, lubricate all parts with fresh brake fluid and the spherical surface of the piston in contact with the pusher with grease. |
Lada 4×4 3D IROQUOIZ › Logbook › Replacing the clutch drive (MCC, tube, hose, RCSC)
While changing the oil in the transmission after drowning,
I glanced at the RCS - the boot was in ruins and brake fluid was also dripping from it.
I thought about leaving it until spring, but damn, this brake fluid was dripping right onto the crosspiece of the new cardan
, so I had to do it.
I tried to make it out, but that was not the case, everything had turned sour and the edges had been licked off everywhere, the “specialists” had tried their best before me. Well, it’s not a tricky thing, it’s not new, I bit the pipe and figured it all out, in a vice with the help of a gas gun. The tube is already due for replacement, the hose turned out to be slightly cracked - that's it.
Well, I think I’ll now buy a repair kit for the RCS, there’s only one cuff inside, and it’ll be as good as new. I already have an RCS type 2123, it can be easily disassembled with the help of one retaining ring.
The piston is scratched - not good. Well, how is the cylinder mirror? And there is no mirror, there is rust and cylinder craters...
I didn’t dare to polish this thing, because I can spend a lot of effort and time, and in the end I’ll go to the store for a new one, so it’s better to get a new one right away. Then it’s up to the GCS, there are no complaints about it, but without it it’s more convenient to remove the tube, and the rod in the cabin needs to be lubricated - it creaks, so I removed it. Well, if you took it off, why not look inside, and it’s not difficult to replace the rubber bands. I took it apart, the mirror was good, a couple of scratches in the non-working area, I was glad, I washed everything, inside instead of clean brake fluid there was a thick black slurry.
Replace the rubber bands and reassemble, it will be better than new. But my gaze caught on the spring, why is it bent? I took a closer look and they arrived...
Buy rubber bands, find a spring, let it roll, the GCS will also be new!
I started purchasing spare parts, well, these are basic things, but no... There is no tube curved exactly like mine, but there is “NIVA” and “SHNIVA” and emptiness in the eyes of the seller. Then I dug through the catalogs, it turns out there are not 2 types of these pipes, but: 2121-21213 – 2121-1602602, what the seller called “NIVA”; 2123 (GCS with a built-in tank) - 2123-1602692, what the seller called “SHNIVA”; 2123 (GCS classic) - 2123-1602692-10, sellers, and many stores, seem to be unaware of this; 21214M (GTS classic, RTS 2123) — 21214-1602602-00
, this is what I needed, but this article is in trouble, and few would understand what I was looking for.
Well, in the end I bought the look: “SHNIVA” 2123-1602692
, it’s longer than the NIVA, and it seems to suit me.
In the photo I have already started to straighten it, and straightened it completely. Then he bent it, slowly, by hand, 1 in 1 like a factory one. At such moments, I miss the copper Volga tubes... The ShNIVA turned out to be 10-15 mm shorter than my factory one, but this is not critical for this unit.
RCS bought, according to the seller, an original VAZ 21230-1602510-01
. Well, so-so, of course, a spare part. The only identifying marks are a number on the boot, some kind of stamp, and an indelible “MADE IN RUSSIA” sticker.
Well, the design itself is radically different from what I had. One-piece plastic piston with cuff, spring and that's it.
Hmm, the price has gone down to nothing, or I bought something outright from China, which is unlikely, everything is done well, the cylinder mirror is good, the piston is made smoothly, the boot has markings. Although, in fact, it doesn’t matter what the piston is made of, the service life of the unit directly depends on the boot. The boot is torn, there is sand on the piston, the cylinder needs to be replaced... Well, I assembled the cylinder with SEIKEN CF301 lubricant, which I used to assemble calipers on Toyota
.
I also applied it to the end with all my heart.
RCS is ready for installation, but new hose 21010-1602590-00
I decided to screw it in on a workbench so that I could do a minimum of operations while lying under the machine.
Copper ring 21010-1602596-00
annealed.
And I assembled the RCS with a hose.
GCS new 21210-1602610-00
I didn’t take it apart; there seemed to be no doubts or questions about it. I just removed some strange grease from the end of the straps.
And generously lubricated everything with the same SEIKEN.
There were no problems with the assembly, except that I did everything lying under the car and not from a pit. I bent the tube perfectly, both fittings immediately fell into place, I assembled each threaded connection with graphite lubricant, now nothing will stick, I also lubricated the contact point between the rod and the fork.
Everything came together well on top, but I forgot to replace the hose, well, that’s something next time.
From the GCS factory, the pedal assembly itself was sealed with some kind of rubber daub, like plasticine, but like rubber, does anyone know what it is? I carefully assembled this thing, degreased the landing area, heated it, kneaded it and coated it around the perimeter, maybe it will help in some way, well, when washing under the hood for sure, otherwise it sticks beautifully when heated to a clean surface, for the Niva, with its cracks and gaps, current thing.
Well, I finished it in the cabin, the rod no longer creaks.
Finally, I pumped the ROSDOT 4 430101Н02
, I hope now I won’t get into the clutch drive for a long time.
Expenses:
Clutch master cylinder - 750 rubles; Clutch tube – 117 rubles; Clutch hose PJSC “BRT” – 282 rubles; Copper ring – 7 rubles; Clutch slave cylinder – RUB 780; Brake fluid (455 g) – 160 rub.
Source
VAZ 21213 | Clutch replacement
12.15. Clutch replacement
| GENERAL INFORMATION |
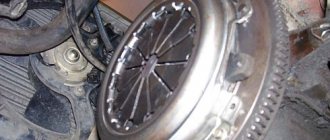
| Disassembled clutch: 1 – pressure plate2 – clutch housing3 – diaphragm spring4 – driven disc |
Remove the gearbox (see subsection 12.2.).
Note 1
When removing the clutch housing mounting bolts, block the flywheel using a screwdriver. Install a bolt to stop the screwdriver.
Note 2
You can remove the clutch without a mandrel, but you must hold the driven disk - it may fall out of the clutch housing. The mandrel can be made to fit the input shaft, or you can use an old input shaft instead.
| Flywheel friction working surface. |
| EXECUTION ORDER | ||
| 1. Insert the mandrel into the pressure plate hole and remove the six bolts securing the clutch housing to the flywheel (see notes 1 and 2). | 2. Carefully remove the clutch cover from the driven disc. | 3. Inspect the driven disk. There should be no cracks on the driven disk parts. Check the wear of the friction linings. Replace the friction linings or the driven disk in the following cases: a) the rivet heads are recessed to a distance of less than 0.2 mm; b) the surface of the friction linings is oily; c) rivet joints are loose. |
| 4. Check the reliability of the damper springs in the driven disk hub sockets. If the springs are broken, the disc must be replaced. If warping of the disk is detected during a visual inspection, check its runout. If the runout value exceeds 0.5 mm, replace the disc. | 5. Inspect the working friction surfaces of the flywheel and pressure plate: they should not have deep marks, scuffs, nicks, obvious signs of wear and overheating. It is unacceptable to loosen the rivet connections of the pressure plate parts. If defects are found on the flywheel or pressure plate, we recommend replacing them. | 6. Carefully inspect and evaluate the condition of the support rings and the pressure plate diaphragm spring. The support rings must not have cracks or signs of wear. Cracks on the diaphragm spring are unacceptable. The contact points between the spring petals and the clutch release bearing must be in the same plane and have no obvious signs of wear. |
| 7. Install the driven disk into the pressure plate housing so that the less protruding part of the hub is directed towards the flywheel. | 8. Insert the centering mandrel into the splines of the driven disk from the diaphragm spring side. | 9. Install the clutch on the flywheel and tighten the six bolts securing the clutch to the flywheel evenly diagonally to a torque of 19-31 Nm (1.9-3.1 kgfm). After this, remove the centering mandrel. |
Characteristics of motor 21213
The requirements for an SUV engine at the time of design were:
- increase power and torque, at least at medium speeds;
- ensure acceptable fuel consumption within 12 l/100 km;
- provide a basis for injection modification in the future.
The engine uses a crankshaft with a “long” crank radius and 82 mm cylinders. If the gas distribution mechanism drive breaks, it bends the valves, but at 3000 rpm the torque is 126 Nm, and the power is increased to 81 hp. With. Factory tuning used a modernized attachment - a Solex carburetor, and increased volumes of combustion chambers.
| Manufacturer | AvtoVAZ |
| Engine brand | 21213 |
| Years of production | 1994 – … |
| Volume | 1690 cm 3 (1.7 l) |
| Power | 61 kW (82 hp) |
| Torque moment | 126 Nm (at 3000 rpm) |
| Weight | 117 kg |
| Compression ratio | 9,3 |
| Nutrition | Solex carburetor |
| Motor type | in-line |
| Ignition | distributor |
| Number of cylinders | 4 |
| Location of the first cylinder | TVE |
| Number of valves on each cylinder | 2 |
| Cylinder head material | aluminum alloy |
| Intake manifold | duralumin |
| An exhaust manifold | cast iron |
| Camshaft | original cam profile |
| Cylinder block material | cast iron |
| Cylinder diameter | 82 mm |
| Pistons | original |
| from 2103 | |
| Piston stroke | 80 mm |
| Fuel | AI-92 |
| Environmental standards | Euro-0 |
| Fuel consumption | highway – 8.3 l/100 km mixed cycle 10.5 l/100 km city – 11.5 l/100 km |
| Oil consumption | maximum 0.7 l/1000 km |
| What kind of oil to pour into the engine by viscosity | 5W30, 5W40, 10W40, 15W40 |
| Which engine oil is best by manufacturer | Liqui Moly, LukOil, Rosneft |
| Oil for 21213 according to composition | synthetic in winter, semi-synthetic in summer |
| Engine oil volume | 3.75 l |
| Operating temperature | 95° |
| ICE resource | declared 80,000 km actual 160,000 km |
| Adjustment of valves | nuts |
| Cooling system | forced, antifreeze |
| Coolant volume | 10.7 l |
| water pump | with plastic impeller |
| Candles for 21213 | BCPR6ES from NGK or domestic AU17DVRM |
| Spark plug gap | 1.1 mm |
| Valve train chain | double-row, from 2103 with a new tensioner shoe design |
| Cylinder operating order | 1-3-4-2 |
| Air filter | Nitto, Knecht, Fram, WIX, Hengst |
| Oil filter | with check valve |
| Flywheel | with clutch landing diameter 200 mm or 215 mm |
| Flywheel mounting bolts | M12x1.25 mm, length 26 mm |
| Valve stem seals | manufacturer Goetze, inlet light, exhaust dark |
| Compression | from 10 bar, difference in adjacent cylinders maximum 1 bar |
| XX speed | 750 – 800 min -1 |
| Tightening force of threaded connections | spark plug – 31 – 39 Nm flywheel – 62 – 87 Nm clutch bolt – 19 – 30 Nm bearing cap – 68 – 84 Nm (main) and 43 – 53 (rod) cylinder head – three stages 20 Nm, 69 – 85 Nm 90° 90° |
Also interesting: Choosing oil for a Chevrolet Niva engine
Taking into account the year of manufacture (1994) and the low compression ratio (9.3 units), users filled in 92 gasoline, and the engine manufacturer recommended AI 91 - 93. Compliance with the environmental protocol has not yet been discussed, so the engine is considered Euro-0.
Read news about the new Niva
- Front axle. VAZ 21213, 21214 (Niva)
- Replacing the drive gear oil seal of the front axle VAZ 2121 Niva 2131
- Installation and reviews of Euro handles for Niva 4x4 (VAZ 2121, 2131) » Lada.Online - all the most interesting and useful about LADA cars
- How to bleed the brakes on a Niva yourself? "
- Interior heater valve VAZ 2121 Niva 2131
- Do-it-yourself Niva 2121 elevator: drawings, dimensions
- How to remove injectors from the fuel rail of a VAZ 2121 Niva 2131
- Engine VAZ 21213 Niva
Downloading a book
After successfully completing the payment (by any method) and returning to the KrutilVertel store from the payment system website, you will be taken to the successful payment page:
The book you purchased will be in your personal account, from where you can always download it.
Please note that after making the payment, you need to return back from the payment system website to the KrutilVertel website. If for some reason you did not return back to the site and closed the payment system tab with a message about the successful completion of the payment, please let us know - we will send you a letter indicating access to download the book
If for some reason you did not return back to the site and closed the payment system tab with a message about the successful completion of the payment, please let us know - we will send you a letter indicating access to download the book.
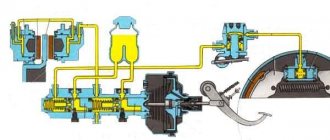
How does the device function?
To understand the issue of assignment in more detail, let’s consider how work
product process. So, when you press the main control lever (i.e. the clutch pedal), the pusher moves, which acts on the piston and it moves forward. When the piston moves under the influence of mechanical force, the pressure in the housing begins to increase. This is a process that occurs in the clutch master cylinder. After increasing the pressure, the liquid begins to be squeezed out through the discharge channel and enters the working cylinder. The article discusses in detail the process of removing and replacing the hydraulic clutch slave cylinder on the Niva 2121 and 2131. It has a piston with a fork, which, under the influence of pressure, presses the release bearing, thereby separating the engine and gearbox. At this moment, the corresponding gear is engaged, and then the driver releases the clutch pedal. After releasing the pedal, a return to its original position is observed: the engine engages with the transmission, which is due to the action of the pushing spring in the cylinder.
How to determine the need to bleed the clutch
This can be determined because when you engage any gear, you will hear a grinding noise in the box.
This situation may indicate that air has appeared in the system. This can happen as a result of replacing both the fluid itself and system parts.
To do this work yourself, you should have a set of tools, replacement fluid, an empty container and a tube. It will be convenient to carry out the work with an assistant. Pumping should be done on an inspection hole or overpass.
Useful tips
You should not constantly keep your foot on the clutch pedal while the car is moving.
In this case, the disc will slip and wear out faster. And also the release bearing will work under load, as a result of which its life will be reduced. For the same reason, you should not keep the clutch pedal depressed for a long time. This can happen, for example, in a traffic jam.
When does it make sense to repair and when to replace?
If the release bearing, as well as the main and working cylinders are faulty, the system is repaired. If noise occurs, the release bearing must be replaced. This part and the release fork are disengaged. The fork is moved to the side and the bearing is removed. Before installing a new bearing, it is recommended to clean the installation site. Before installation, the bearing and seat are lubricated with a special compound called Litol-24. Assembly is carried out in reverse order. Changing the bearing will ensure good clutch travel.
The purpose of the master cylinder is to transmit impulses from the pedal to the working parts of the clutch. If it does not turn on and off completely or fluid leaks out, then the cylinder must be repaired or replaced. Before repair, the part is removed and inspected. In the absence of major signs of wear and mechanical damage, the part is repaired. To do this, you need to flush the part with brake fluid. When cylinder components wear out, they are replaced with new parts.
The functionality of the clutch drive is ensured by the slave cylinder. To connect the master and working cylinders, a steel tube is used, on the lower edge of which a rubber hose is placed. Liquid periodically leaks through the rubber connection. After removing and repairing the part, bleeding is carried out. The clutch also needs to be adjusted.
To bleed the drive, put a hose on the working cylinder. One of the ends is placed on the valve of the part, and the second is lowered into the liquid. Depress and hold the clutch pedal. The procedure is carried out more than five times. After this, the valve is opened to release the air. The actuator adjustment will be successful if there is fluid leakage without air after opening the valve.
If the fork breaks, you do not need to remove the gearbox to replace it. Replacement is done using pliers, a carrier or flashlight, a hammer, a sharpener and a screwdriver. Pliers are used to remove the return spring.
The bolts on the clutch slave cylinder are unscrewed and the rod is uncoiled, which needs to be pulled out of the fork. After removing the protective glass, the plug is removed. Using a sharpener, the new fork is refined. The ends are chamfered and the rivets are ground down to a height of 0.5 millimeters. The release bearing is rotated in the hatch. In this case, make sure that the edges of the coupling are in a horizontal position.
The tips of the spring are directed towards the hole and the fork is inserted
She is carefully driven into the hatch using a hammer. It is recommended to check whether the spare part is adjacent to the ball joint
The antennae of the support are directed so that they cover the support. All other manipulations are performed in reverse order.
conclusions
Knowing these points, you can independently determine the quality of the clutch and, if necessary, pump it.
Tools:
Parts and consumables:
Note:
According to the manufacturer's recommendation, the working fluid in the clutch release hydraulic drive must be replaced after 2 years.
If, when the pedal is pressed all the way, the clutch does not disengage completely (“drives”), which is accompanied by a characteristic grinding of gears when engaging reverse gear, there may be air in the clutch hydraulic drive. Remove it by bleeding the drive.
In addition, pumping is performed when the hydraulic drive is filled with fluid after its replacement or after repair of system components associated with its depressurization.
Carry out the work with an assistant in the inspection ditch.
1. Remove the protective cap from the clutch slave cylinder bleed valve.