Finally, I solved the problem that was half a year old (www.drive2.ru/l/460455954454937999/) The panel backlight stopped working, although all the turn indicators, hazard lights, check, battery, etc. work. The backlight rheostat is covered
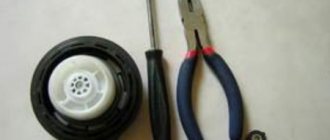
Remove the regulator handle by pulling it towards you, then unscrew the nut (I unscrewed it by hand)
We remove the rheostat from the side of the ignition switch. We see that the contact has been unsoldered
The problem arose that the connector on the new rheostat turned out to be much smaller, so I had to transfer it from the old one to the new one
Priora instrument panel backlight disappeared
Yesterday the dashboard went out in the part where the speedometer was... a month ago the 0-40km/h light stopped flashing (I thought one light was on, I didn’t even pay attention)... yesterday the whole place where the speedometer went out ((
tell me what could have happened
and also why the yellow light on the panel on the left
Comments 27
change the light bulbs to regular ones. There are two screws on top and two on the sides. You unscrew it and take out the device. just be careful, don’t tear the cable, disconnect it carefully. You unscrew the sockets and take out the bulbs... as for the bulb on the left, it has something to do with the muffler. Probably the sensor came off. Where did the muffler come off? under the hood and at the level of the steering wheel (I’m talking about two oxygen sensors.
It’s probably no secret to anyone that the reliability of VAZ “ten” leaves much to be desired. Often, the owners of these cars have to deal with certain malfunctions. One of these problems is the lack of dashboard lighting. It is clear that the breakdown should be corrected as soon as possible. After all, going somewhere at night will be quite problematic - few people will like to move, essentially, blindly, without seeing either the current speed or other, no less important indicators.
Let's sum it up
The lack of lighting on the heater control panel does not affect the technical characteristics of the car, however, it causes significant inconvenience for the driver. Searching for an unlit heater switch at night distracts the driver's attention from the road and can become an indirect cause of an emergency.
If the backlight of the stove regulator does not work, it is necessary to replace the bulbs. Even a novice driver can cope with this task. To improve the appearance of the heater controls, use LED elements instead of conventional light bulbs, and the appearance of the device will delight you with warmth and comfort in the car interior.
Source
How to improve the backlight of a VAZ watch dial with your own hands
A watch is a necessary thing, and the designers did not ignore this detail of the interior of the tenth generation VAZs. The fact is that the lighting of the dial is not uniform, only certain parts are illuminated, and the hands are difficult to see. In this article we will describe how you can modify the backlight of a VAZ watch with your own hands.
The easiest way to make the backlight even is to change the light bulbs in the clock to LEDs
If instead of two light bulbs you put LEDs in standard sockets, the illumination will become uniform. It would be better if instead of 2 LEDs you put 1 and place it in the center. The top photo shows the standard clock backlight, the bottom photo shows the clock backlight with an LED in the center.
By the way, you can abandon the standard sockets and install LEDs at your own discretion. To do this, you need to disassemble the clock and glue the required number of diodes with superglue. When connecting them together, do not forget about resistors. If desired, you can remove the filter or paint it a different color.
The second way to improve the brightness of the backlight is to install an LED strip in the clock
You can place the LED strip behind the dial:
Or along the edges of the watch cover:
We connect the diodes to the wires from the lamp sockets.
Assembly
When you have made sure that all the light bulbs on the VAZ 2114 are working correctly, you can begin assembling the panel. To do this, all the backlight wires are brought out onto the board and carefully attached using a soldering iron. They should also be attached to the board in a certain sequence, otherwise the backlight may not work. If the wires are too long, they should be shortened so that they do not bend and do not fall into the grooves of the latches between the dashboard and the dashboard during installation. Otherwise, the wires will easily get damaged. When connecting the pointer drive, also make sure that they are not deformed. Now, the instrument panel can be inserted back into the grooves and fixed with screws. The indicator arrows must be set with the ignition off, at the zero mark. Next, the last check: turn the ignition key, and if everything works, then the replacement procedure was completed correctly, and the new backlight will please the eye. Well, if something doesn’t work, then most likely you damaged the wires when installing the panel on the dashboard. In this case, disassemble everything again and check the integrity of the wires.
Possible reasons
What to do in a situation where the instrument panel backlight on a VAZ-2110 car has disappeared?
First of all, you should look for the reason why this malfunction occurred. Sometimes it can be identified immediately, but in some cases this process takes some time. In fact, there may be several reasons, so you will need to check everything methodically. The most banal and simplest option is that someone turned the rheostat knob, which is responsible for the amount of light flux, all the way to the left.
This, by the way, is often the sin of children who are placed in the front seat. “Young drivers” love to turn all sorts of knobs, press buttons and switch levers. Perhaps the adults overlooked it, and the child “corrected” the dashboard lighting. The problem, as you understand, is solved by simply returning the rheostat knob to its previous position. Therefore, before you start looking for possible reasons for the sudden disappearance of the backlight, check this particular point.
I would like to remind you of one simple rule. In a situation where there may be several possible causes of failure, when searching you need to follow the path of least resistance. In other words, test the simplest assumptions first. You may be lucky and find the problem with minimal time and effort.
If the reason is not in the position of the rheostat handle, you need to proceed to further search for the causes of the breakdown. Possible sources of problems here could be:
- fuse;
- instrument panel circuit board;
- contacts;
- wiring;
- failure of light bulbs due to short circuit.
So, let's look at some of the above reasons in more detail. After the rheostat handle, you should check the integrity of the 5-amp fuse F1. You can also usually turn on the side lights and see if they work on the left side. Everything is explained here simply. The lamps that illuminate the instrument panel, the left side lights, as well as the trunk lighting operate through this fuse. The dimensions located on the right side of the car receive power through F11, that is, they are not of interest to us in this particular case.
You may see the following situation. The left side parking lights, or trunk light, work, but the instrument panel light does not. This means that the problem is not in fuse F1. Therefore, you need to continue searching for the possible cause of the malfunction. In particular, it is necessary to check the contacts of the rheostat that illuminates the dashboard lighting. It is not uncommon for plugs to fall off. Accordingly, the lighting of the shield disappears due to lack of contact.
However, the rheostat itself can also fail. It is quite easy to check this assumption. To do this, you must first remove the rheostat, and then directly connect its contacts. If after this manipulation the instrument panel lights come to life, it means that the problem has been found, and you just need to replace the failed part. If not, then you need to continue searching further.
The most serious problem due to which the instrument panel lighting disappears is damage to the printed circuit board of the dashboard itself. In particular, there are often situations when the track on it that supplies power to the lamps burns out. One point worth noting here. The instrument panel in such a situation cannot be repaired, which means there is only one way out - replacement with a new one.
There are cases when, due to a short circuit, all the lamps illuminating the instrument panel burn out. However, this happens quite rarely. Much more often, one lamp may fail. As you can see, there are several reasons why the instrument panel lighting may disappear. Accordingly, the search will take some time. However, in the vast majority of cases, eliminating the malfunction that has arisen will not be so difficult, and many people can easily do this with their own hands.
Replacing lamps
Choice
The process of replacing lamps on a VAZ 2110 is extremely simple. However, before you begin this operation, you must purchase new lighting elements.
This vehicle is factory equipped with H7 standard halogen bulbs. Today there is a large selection of lamps on sale, not only halogen, but also other types - xenon and LED.
The photo shows a H7 standard halogen lamp
Their features, advantages and disadvantages have been discussed many times on car enthusiast forums, so below we provide only a comparative table with the main characteristics of these lamps:
| LED | Xenon | Halogen | |
| Brightness | Up to 2000 lm | Up to 3300 | Until 1550 |
| Durability | 50,000 hours | 3000 hours | 1500 hours |
| Colorful temperature | 4300-8500 K | 4300-8500 K | 3300 K |
| Lamp price | From 10 USD | From 30-40 USD | From 20-30 USD |
Note! The most optimal color temperature of the light flux is in the range of 4300 – 5000 K.
It must be said that in addition to the data from the table, when choosing, you should also take into account the penetrating ability of the light flux. Halogen lamps are the leaders in this parameter - they illuminate the road much better in rain, fog or snow.
In addition, installing xenon or LEDs in the fog lights of the VAZ 2110 will require electrical intervention, in particular the installation of additional equipment (ignition units). Therefore, it will not be possible to perform their high-quality and safe installation with your own hands.
Note! Experts recommend changing light bulbs in pairs so that both headlights shine equally. In addition, their service life is approximately the same, so if one of them burns out, the second one will soon fail.
Each car owner must choose for himself which light for the VAZ 2110 will be better based on his own financial capabilities, weather conditions of the car, etc.
Removing the plug
How to replace the lamp
Instructions for replacing light bulbs look like this:
- First of all, you need to open the hood and disconnect the terminal from the battery.
- Then you need to remove the plug located closer to the wing.
- Next, you need to unfasten the spring clip that presses the light bulb to the headlight housing.
Disconnecting the block from the contacts
- After this, you should carefully disconnect the block from the contacts and remove the light bulb itself, since nothing else interferes with it.
- Now you need to insert new light bulbs in the same position in which the old ones were located, connect the block to the contacts and secure everything with a bracket.
- At the end of the work, you should install the plug in place.
Note! When replacing lamps, it is important not to touch the glass with your fingers. Otherwise, grease stains will remain on the surface, which will lead to overheating and failure of the lighting element.
The lamp replacement is now complete. As a rule, this operation takes several minutes even for beginners.
Advice! Many car owners are interested in how to improve headlights? The easiest way is to disassemble the headlights, wash them, replace the glass if necessary and adjust the light beams. As a rule, these simple procedures give good results.
How to remove the backlight rheostat of a VAZ 2110
Re: Modification of the LED lighting control for the instrument
Unread message from Olezhek » Tue Dec 02, 2014 13:59:32
People believe nothing so firmly as what they know least about, and no one speaks with such self-confidence as writers of all sorts of fables - for example, astrologers, fortune tellers, palmists. Religion, superstitions. Michel Montaigne
Re: Modification of the LED lighting control for the instrument
Re: Modification of the LED lighting control for the instrument
Unread message from Olezhek » Tue Dec 02, 2014 15:36:00
measure them on them.
in short, the two extreme ones are a total resistance that does not change, like a regular constant resistance, the engine bites off a piece of resistance from the total value, if it is in the first half relative to the middle and left contacts, then the resistance will increase as it turns. If at the same time we measure relative to the middle and right, then it decreases, we look at the resistance slider at the same time. I think it's clear
Added after 1 minute 7 seconds: Re: Improvement of the LED lighting control for devices
People believe nothing so firmly as what they know least about, and no one speaks with such self-confidence as writers of all sorts of fables - for example, astrologers, fortune tellers, palmists. Religion, superstitions. Michel Montaigne
Re: Modification of the LED lighting control for the instrument
Unread message Meart » Tue Dec 02, 2014 15:37:17
The variable resistors you buy will not withstand the current of the LEDs.
At first it will still work, but then it will quickly start to glitch, the backlight will come on and then go out.
Re: Modification of the LED lighting control for the instrument
Meart wrote: The variable resistors you buy will not withstand the current of the LEDs.
At first it will still work, but then it will quickly start to glitch, the backlight will come on and then go out.
Re: Modification of the LED lighting control for the instrument
Unread message Meart » Tue Dec 02, 2014 15:47:31
Depending on what kind of LEDs you have and how many of them.
I would look for a 5 Watt variable.
And those, SP3, showed either 0.25W or 0.5W, depending on the model.
Added after 6 minutes 46 seconds: Re: Improvement of the lighting control for LED instrument lighting By the way, question, do you have light bulbs in the cigarette lighter illumination and in the rear window heating button, or are they also LEDs?
Re: Modification of the LED lighting control for the instrument
SPZ-0.5 W. SMD 5050 diodes - 8 pcs.
Added after 2 minutes 4 seconds: Re: Modifying the lighting control for LED instrument lighting I haven’t connected the cigarette lighter yet, I don’t know what wires go there, there’s a standard lamp in the heating button, I want to change it to an LED, but I haven’t looked at the diagram yet. I also want to put an LED on the generator lamp, but it needs some modification)
Re: Modification of the LED lighting control for the instrument
Unread message Meart » Tue Dec 02, 2014 16:06:05
If the wiring is standard, then both the cigarette lighter light and the light in the button are powered along with the instrument light after the regulator. I have 15 SMD5050 in the dash, a light bulb in the cigarette lighter, and an LED in the stove fan button (I hung the backlight wires from the heating button on the backlight of the fan button 2121).
The standard regulator does not reduce the brightness much, but does reduce it.
As for the generator lamp, why do you need these problems?
I tried putting an LED in the cigarette lighter instead of a light bulb - nonsense. There is almost no light at all.
Re: Modification of the LED lighting control for the instrument
I want diodes everywhere)
And yet, my cigarette lighter (and light bulb) is not connected, and I removed the light bulb from the glove box. As a result, I have one free + and two negative wires. Can you tell me where to put them correctly)
What light and power diodes do you have? I have blue ones, I want white ones - to make it easier on the eyes.
Re: Modification of the LED lighting control for the instrument
Unread message Meart » Tue Dec 02, 2014 16:37:52
Who comes from whom is where to look. The global essence is that after the regulator the wires go to the instrument panel, the button and to the light.
How about making the light turn on for heating? It's very simple, can be done in a couple of minutes, without a screwdriver. But is it necessary? There is a special light bulb on the dashboard, which is nice and beautiful. I completely removed these two wires from the backlight from this button. I bought a fan button 2121 (its fan icon lights up). And these wires removed from the glass heating button will reach the stove button without modifications.
I don’t know what kind of wires you have hanging there, you need to watch this live, and not parse it from the text.
I have white LEDs. With a base for a regular light bulb, and each with 5 SMD5050. I stuck one of these in each device instead of a standard light bulb. It turned out very well, I didn’t even expect it.
The culprit is the cigarette lighter
In some cars, the cause of loss of performance is hidden behind a breakdown of the passenger compartment cigarette lighter. In “tens” and other models of VAZ and foreign cars, this socket is used to connect all kinds of electrical devices, for example, for phones, tablets, laptops. During the process, large currents flow, which leads to fuse F6 blowing.
If the fuse link turns out to be operational, we recommend removing the cigarette lighter connector and checking the contacts behind it. We also monitor the wires behind the panel using a multimeter. There the values should be close to 12 V, and the white wire going to ground on block X1 should be well secured.
When testing a dismantled panel, we recommend monitoring each device separately with a multimeter after checking the overall current supply. In some cases, complete replacement of individual devices or the panel as a whole will be required.
ONE OR MORE LIGHTS ARE NOT BURNING
In this case, there can be two situations:
- The backlight of the VAZ 2114 instrument panel does not light up;
- One or more warning lamps are not working.
Let's consider the first variant of malfunctions, when the backlight of the VAZ 2114 instrument panel does not work. You must begin checking the functionality of the backlight by checking the serviceability of the fuse in this circuit. This only applies when all the backlights are off.
The fuse box on this model, as well as on the VAZ 2113 and VAZ 2115, is located in the engine compartment on the driver's side. You need to remove its cover and find the fuse responsible for the backlight, this is F10. It is designed for a current of 7.5 A. If it burns out, replace it with a new one and check the operation of the backlight paws.
Why change the ground clearance of the VAZ 2114
The once popular Audi 80 has a very modest ground clearance of 119 mm, the Ford Escort - only 140 mm, the Chevrolet Lacetti - a little more: 145 mm. Many popular VAZ 2114 classmates have a similar ground clearance: Kia Rio and Hyundai Solaris are raised above the ground by 160 mm, Nissan Note by 165 mm, and Volkswagen Polo by 170 mm.
This level of ground clearance allows you to drive quite confidently in any weather not only on paved roads, but also on country roads. Of course, on the “fourteenth” you won’t be able to make your way through the fields in the autumn mud, but without all-wheel drive, without inter-wheel and inter-axle locking, without off-road tires, even with the ground clearance increased by half a meter, you won’t be able to travel much through the November arable land. So it makes no sense to try to give the fourteenth Lada real off-road properties by increasing the ground clearance. To drive on Russian off-road you need a real SUV.
Domestic car enthusiasts often increase the ground clearance or lower their cars in order to give their car a brutal look and show off in front of their friends.
Possible reasons
What to do in a situation where the instrument panel backlight on a VAZ-2110 car has disappeared? First of all, you should look for the reason why this malfunction occurred. Sometimes it can be identified immediately, but in some cases this process takes some time. In fact, there may be several reasons, so you will need to check everything methodically.
The most banal and simplest option is that someone turned the rheostat knob, which is responsible for the amount of light flux, all the way to the left.
This, by the way, is often the sin of children who are placed in the front seat. “Young drivers” love to turn all sorts of knobs, press buttons and switch levers. Perhaps the adults overlooked it, and the child “corrected” the dashboard lighting. The problem, as you understand, is solved by simply returning the rheostat knob to its previous position. Therefore, before you start looking for possible reasons for the sudden disappearance of the backlight, check this particular point.
I would like to remind you of one simple rule. In a situation where there may be several possible causes of failure, when searching you need to follow the path of least resistance. In other words, test the simplest assumptions first. You may be lucky and find the problem with minimal time and effort.
If the reason is not in the position of the rheostat handle, you need to proceed to further search for the causes of the breakdown. Possible sources of problems here could be:
- fuse;
- instrument panel circuit board;
- contacts;
- wiring;
- failure of light bulbs due to short circuit.
So, let's look at some of the above reasons in more detail. After the rheostat handle, you should check the integrity of the 5-amp fuse F1. You can also usually turn on the side lights and see if they work on the left side. Everything is explained here simply. The lamps that illuminate the instrument panel, the left side lights, as well as the trunk lighting operate through this fuse. The dimensions located on the right side of the car receive power through F11, that is, they are not of interest to us in this particular case.
You may see the following situation. The left side parking lights, or trunk light, work, but the instrument panel light does not. This means that the problem is not in fuse F1. Therefore, you need to continue searching for the possible cause of the malfunction. In particular, it is necessary to check the contacts of the rheostat that illuminates the dashboard lighting. It is not uncommon for plugs to fall off. Accordingly, the lighting of the shield disappears due to lack of contact.
However, the rheostat itself can also fail. It is quite easy to check this assumption. To do this, you must first remove the rheostat, and then directly connect its contacts. If after this manipulation the instrument panel lights come to life, it means that the problem has been found, and you just need to replace the failed part. If not, then you need to continue searching further.
The most serious problem due to which the instrument panel lighting disappears is damage to the printed circuit board of the dashboard itself. In particular, there are often situations when the track on it that supplies power to the lamps burns out. One point worth noting here. The instrument panel in such a situation cannot be repaired, which means there is only one way out - replacement with a new one.
Force majeure with shield
The abundance of all kinds of indications often leads to the fact that at some point the driver notices that the backlight of the VAZ 2110 instrument panel does not work. Further safe operation of the vehicle in such a case will be impossible, so it will be necessary to restore the unit’s functionality before the next departure.
It is not recommended to drive a car with a non-functional instrument panel, since the current engine parameters are not available to the driver, which can lead to serious, expensive engine damage or an accident.
Experienced drivers can correct some faults even in field conditions. Beginners should be more careful when working with wiring and electrical equipment.
Common faults and solutions
Tidy "tens" with installed LEDs
The control panel may stop working for several reasons.
As a rule, removing the instrument panel is carried out for the following malfunctions:
- The backlight on the “tens” control panel stopped working. In this case, it is necessary to diagnose the condition of the contacts, as well as the condition of the wiring responsible for the suspension. The shield could stop working simply due to the combustion of safety elements, or the lamps could fail due to wear, often the cause is a short circuit. In principle, as practice shows, there are more than enough reasons, so sometimes identifying and solving a problem without a tester can be very problematic.
- One of the most serious problems for which a disassembled device may have to be replaced is complete failure. If there is a system failure, and all sensors and indicators on the dashboard stop working without exception, the controller arrows fall down, and the light bulbs simply do not light up. To eliminate the problem, you must first diagnose safety component number 15, it is marked as F6 and this part is located in the fuse block. If this component is burned out, then this problem can be solved simply by replacing it with a new one. However, first you need to figure out exactly what the reason for its burnout is. First, you should find and eliminate the cause, only then install a new element. As a rule, the cause of a blown fuse is a short circuit in the on-board network.
- The arrows began to spontaneously move up and down. This problem occurs quite often in domestic dozens; as a rule, the main reason is the problem of poor ground contact. Firstly, the ground wire is connected to a partition designed to separate the passenger compartment and the engine compartment. If you need to get to it, you will need to dismantle the audio system from its installation location; the quality of its fixation must be checked. Secondly, quite often during installation the mass is removed to another place so that it is more conveniently accessible. So if you have an anti-theft system, but there is no wire under the car radio, try looking for it under the trim, in particular, next to the driver’s left foot. Thirdly, the ground wire could have been damaged during installation of a new car radio. When the negative wire is connected, the ground wire must be unscrewed. Next, it is reinstalled, however, as practice shows, it is often less reliable than it was originally. As a result of vibrations that occur during driving, driving on uneven roads, including potholes and bumps, the mount begins to weaken over time. Accordingly, this leads to the contact being lost, and this, in turn, leads to the inoperability of the control panel. So, first of all, you need to securely fix the wiring, as this can cause certain difficulties in the future.
- Malfunctions related to the operation of the device itself. If you need to qualitatively check whether everything is normal with this device, dismantle it as much as possible from the installation site, but to do this, do not disconnect the wires that power it. First, the white wire marked X2 is diagnosed, which is connected to the first contact. In addition, using a multimeter, you should also diagnose the presence of voltage on pins 9 and 10. If the system is working properly, you will notice when diagnosing that the system voltage is 12 volts. We also recommend checking the back of the dashboard - all conductive tracks on it should be intact.
- As practice shows, the problem of the control panel not working is often caused by the failure of the cigarette lighter itself. This is because many car enthusiasts practice connecting various electronic devices and gadgets to this socket for various functions. For example, it could be a charger for a mobile phone, a tablet; the charger can also power a video recorder, radar detector, GPS navigator and other devices. Since devices of this type consume a large amount of current, the devices are often damaged by the cigarette lighter itself, and the problem of burnout of the F19 fuse element can also often occur. Accordingly, the control panel either turns off completely or continues to function, only incorrectly. If the fuse is working, you can try to disconnect the plug socket. If these steps do not produce any results, then simply replace the safety device.
- Tuning the dashboard of a VAZ 2110 is often the reason for its performance. The new shield may not have been installed correctly and is no longer working. Or, during installation of the device, not all wires were connected, or they could simply be bent. If the problem is in the wires, then replacing them will solve the problem (video author - LedStyle70).
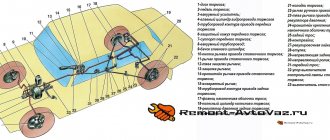
What is a shield
Behind the steering wheel there is a special panel equipped with a set of control and signal light indicators, which is commonly called a panel. This block in domestic and foreign cars is endowed with approximately the same functionality. On its front side there are the following components:
- the main space is reserved for a dial indicator that measures the current speed value;
- To the left of the speedometer there is a tachometer scale, which helps control engine speed;
- there are two smaller dial indicators responsible for displaying information about the temperature of the engine and the fullness of the fuel tank;
- six lamps are built-in to indicate the status of the backlight and pairs for the turn signals;
- all kinds of lamps responsible for the activated emergency lights, battery charge, oil pressure, raised handbrake, Check Engine and several reserve cells.
How to prevent the problem
The main reason for the failure of the stove fan itself is poor quality assembly. You should not skimp on such parts, and if a problem does occur, it is better to buy a high-quality unit with a manufacturer’s warranty. Such units are designed to operate under a wide temperature difference, but some manufacturers do not pay attention to quality and release stoves onto the market with a very low coefficient of resistance to temperature changes. We advise you not to skimp on this car part and purchase truly reliable components from trusted suppliers.
vote
Article rating
Checking fuses
When the backlight of the VAZ 2110 instrument panel does not light up, all the indicator lamps actually go out, and the arrows drop to zero, then motorists should check the main fuses. Fuse links responsible for the instrument panel are limited to 15 amperes . Traditionally, in VAZ models they are marked “F6”. It is advisable to have this element in stock so as not to end up in an undesirable situation.
To identify a burnt-out insert, you will need to open the fuse panel. On the “tens” of 2003, it is also necessary to check the condition of the connector into which the “F19” protective plug is inserted. “Six” and “nineteen” are located in the same row through several slots. When removing, special plastic tweezers mounted under the lid help.
During the replacement process, it is necessary to observe the amperage of the devices so that the electrical circuit works correctly.
The culprit for failure of fuses is most often a short circuit. Triggering can be seen by the burned out torn part inside the plastic fuse housing by looking into the light. The test can also be carried out, if desired, with a multimeter.
Glitch with the VAZ 2112 dashboard, all the arrows are missing.
Dashboard problem. All the arrows are lying (tachometer, speed, temperature, gasoline) and do not show anything, the backlight is on. All signals of the turn signals, handbrake and other sensors are on.
I checked all the fuses, they are all intact. The cigarette lighter works, but is not closed. The glove compartment light is completely turned off, all the wires have been disconnected. The plug to the dashboard checked everything is fine.
The only reason why this could happen, I think, is that I inserted an electric pump into the cigarette lighter and pumped up the tires. But even if it shorted somewhere, the fuses are all intact, the cigarette lighter also works.
Car VAZ 2112-24 (European panel)
Maybe someone has had such a case, who can tell me what? Where else to dig?
I'm looking for real advice, not banter as usual.
Posts: 2,220 From: the land of evergreen tomatoes
then just link https://spam.ru/viewtopic.php?t=230984 Send me your email and I’ll send it, otherwise spam comes out. I quote from the site: 1) the fault is with fuse F6, which is responsible for the portable lamp. In addition, 10A was installed, and not 15A as expected. 2) The same thing happened to me after I tried to pump the wheel in the cold with a compressor connected through the cigarette lighter. The wheel began to pump up, but then bam, and the voltage disappeared. I got into the car and saw that the panel was illuminated, the tachometer went up to 700 revolutions, and the other arrows remained in the zero position and the digital mileage did not show any numbers. 3) First of all, I climbed into the fuse box and almost immediately noticed a burnt-out F6, but the instructions do not say that the instrument panel is powered through it. Thanks to this site - now I’ll go to the store to buy a fuse. 4) it happened! All fuses are also intact!! Opening the fuse box helped! and it was found!! the path burned down! 5) Today I spent half a day searching for the problem “it wasn’t the woman.” I found it, two power wires of the unit were burnt in the connector in front of it, in the harness. I stuck it like that, but if only the frosty conditions didn’t allow me to go deeper.