Print this article Font size 16
Many people replace the input shaft bearing themselves, without the help of specialists from a service station. To perform such work, you need to know the location of the element you are looking for and the signs of its malfunction. Plus we will tell you in detail how you can understand this bearing.
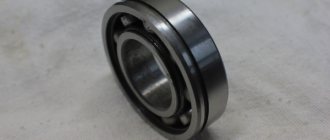
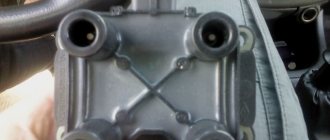
Element appearance
Signs of faulty gearbox bearings
Bearings in the gearbox ensure smooth rotation of the primary and secondary shafts and perform support functions. They reduce the load on the gears. It is better to replace faulty bearings in the Kalina gearbox, as in the future this will lead to damage to the transmission system, and possibly the shaft or gearbox housing itself.
The main sign of bearing wear is a hum in the gearbox. There are several nuances that allow you to more accurately determine which shaft the malfunction occurred on, namely:
1. If a “howl” is heard when the car is moving, in all gears, then the driven shaft bearings may be noisy.
2. At idle, when you press the clutch all the way, the hum disappears. The drive shaft bearings are probably faulty here. This may also indicate wear on the release bearing. To find out which of the two elements is “noisy”, do the following: press the clutch lightly, within the “free” stroke. If the sound has become louder, brighter, then the cause of the hum is in the release. If the sound does not change, then it is the support bearing of the input shaft.
3. Pay attention to the drive shaft oil seal. If there are leaks, then the bearing behind it is probably to blame. The reason may also be a leaky oil seal.
Replacing bearings in a Kalina gearbox usually solves the problem. But before that, you need to find out which of these products are in the box.
Dismantling in different ways
On the one hand, to reduce the repair budget, ideally the rolling bearing is replaced without dismantling the flywheel. At the same time, the main problem of repairing on your own arises - how to remove the bearing without special tools and devices. This manual traditionally presents techniques according to the principle from simple to complex.
Soap or bread
The flywheel is installed at the end of the crankshaft close to a seat specially designed for this purpose. Fixed with 5 – 8 bolts according to various fastening schemes. The bearing is installed in the flywheel body with a slight interference fit and can be removed quite easily, but access to it is limited.
The simplest “folk” method of removing a flywheel bearing is to fill the space of the inner race with thick plastic material. Most often, bread crumb or soap rolled out into plasticine is used according to the following scheme:
- the bread is stuffed inside the cage by hand flush with the outer plane of the bearing;
- a drift is selected, the outer size is equal to the inner diameter of the holder;
- light blows of the hammer on the punch crush the bread inside the bearing;
- by analogy with a liquid or plastic medium, the force from the pressure of the punch is redistributed throughout the entire volume of soap or bread crumb;
- the working medium penetrates under the rear surface of the bearing and pushes it out.
Dismantling with bread crumb
Soap or bread crumb is added inside after several light and precise blows of the hammer. The volume of these substances must be at least 1/3 of the volume of the rolling support. After the bearing body is pushed out halfway, the bearing is pryed up with a drift or hook and pulled out completely without much effort.
The technique has been tested on different machines, does not fail, and takes 10 minutes maximum.
Reverse hammer
There is a homemade and factory version of the device, the design of which differs from each other:
- a homemade reverse hammer - an analogue of a kit for installing the last row of laminate flooring near the walls;
- An industrially manufactured reverse hammer tool is a rod with a weight that moves freely along it, a collet clamp on the working surface, and a stop on the reverse side.
Reverse hammer in the form of a staple
Reverse hammer for removing bearings
To remove the bearing with a homemade device, one curved edge of the plate is inserted under the rolling support body from behind. The second hook is struck with a hammer, the force is transferred to the lower part of the tool, pulling the “consumable” out of its seat.
The factory version of the reverse hammer is much more convenient:
- the collet is clamped by the thread inside the holder;
- the weight hits the back of the tool;
- kinetic energy is transferred to the lower unit of the device;
- the bearing is pulled out of its seat with jerks.
A tool with 4 collet adapters for different diameters costs from 7,000 rubles. A homemade device is made in a quarter of an hour from scrap metal cutting.
An analogue of the factory reverse hammer can be made from a brass anchor of a suitable diameter. For example, for UAZ 3159 it is M12 16 x 50 mm, which costs about 50 rubles in Household Goods. You can weld the device from a rod and two metal washers:
- they limit the stroke of the weighting material placed on the rod;
- A piece of rod with a rounded end should be placed under the collet (bullet configuration).
Reverse anchor hammer
First, the device is driven inside the bearing race. The “bullet” enters the collet and expands it until the inner surface of the clip is completely compressed. Then, with light blows of the weighting agent in the direction from the flywheel, the bearing is pulled out.
Removed bearing on the return hammer sleeve
Two-bolt device
It is possible to make an improvised puller in a few minutes if you have two bolts and a crown or a steel cup. To do this you need to follow these steps:
- the head of the long bolt is inserted under the back of the bearing;
- a short bolt is used to wedge the previous fastener inside the holder;
- A crown with a hole in the center is put on the threaded part of the long bolt, resting its sides against the body of the flywheel.
Two bolt puller
When the nut is tightened, the head of the long bearing moves upward along the threads, pulling the bearing outward.
Screw puller
There are classic screw pullers with 3 sliding jaws for bearings. In this case, an internal puller is required for the rolling support unit:
- the paws are placed inside the clip;
- are hooked with the outer edges onto the bearing from the rear side;
- the working screw rests against the crankshaft body exactly in the center;
- when the screw is screwed in, the entire structure, together with the rolling unit, rises upward.
Screw Internal Bearing Puller
This tool costs 2 - 3 thousand rubles, but is suitable for different diameters of the holder, so it will be in demand in the garage of a mechanic who prefers to repair cars on his own.
Collet puller
Typically this device is sold complete with a reverse hammer and has the following design:
- a working screw is screwed into the center of the horseshoe stop;
- removable, collet screw tip.
Collet puller
The puller works on the principle of a screw device, but the clip is clamped with a collet along the inner diameter, and is not pryed off with paws from below, as in the classic version.
What bearings are on the Kalina manual transmission?
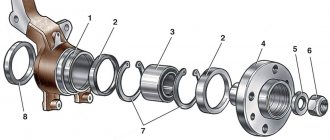
Before replacing the gearbox bearings on Kalina with your own hands, you need to understand their location and structure. There are 2 products attached to each of the shafts on Kalina. The front ones are roller, the rear are ball. A simplified diagram is shown in the figure.
1. Shafts To understand how to visually distinguish a ball element from a roller element, you need to consider the design of the product. It is shown schematically in the figure below.
2. Bearing design You can distinguish a roller from a ball bearing by the rolling element. In the first case they look like cylinders, in the second they look like balls. And this is what a set of four bearings for Kalina looks like.
3. Kit After diagnosing the box, proceed to replacing the box bearings on the Lada Kalina.
How to change manual transmission bearings
Before replacing the Kalina gearbox bearings, the box is removed and disassembled. Both processes require care and attention. It is also necessary to prepare tools and select an assistant.
Preparation
The car must be lifted or driven onto an overpass or inspection ditch.
Prepare the following list of tools:
- socket wrenches sizes: 10, 13, 19; 32;
- wrenches sizes: 10, 17, 19;
- TORX spanner T14, T25;
- large negative screwdriver or spatula for installation;
- hammer
The gearbox weighs more than 30 kg, so you need an assistant and a stand. After the car has been installed, lift the hood and secure it, and raise the handbrake.
Removing the box
After completing the preparatory stage, proceed to removing the gearbox. First, operations are carried out on top of the car according to the following instructions:
1. Remove the negative cable from the battery. 2. Remove the air purifying filter. 3. Remove the starter by first disconnecting the wires from the terminal and from the contact bolt. 4. Pull the clutch drive cable out of the clutch release fork. 4. Removing the drive cable
5. If the gearbox bearings are being replaced on Kalina 2, then 2 cables should be removed from the gear selection mechanism. In the figure they are indicated as number 1, and the mechanism as number 2.
You can remove the front wheels, this will make it easier to work. Then you should move under Kalina and do the remaining steps: 1. Remove the protective panel or mudguard on the left side. 2. Drain the oil from the box. 3. Unscrew the bolts on the lower clutch housing cover using a size 10 wrench and remove it.
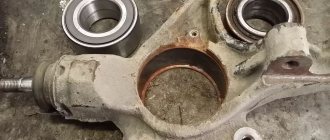
Crankcase cover 4. Next, the drives are removed from the wheels. To do this, first unscrew the 2 bolts that secure the ball joint to the knuckle using a size 17 socket wrench. Perform the operation on the left and right sides.
5. Using the gearbox housing as a stop, press the left and right hinges out of the gearbox with a spatula or wide screwdriver.
Move the drives away from the gearbox by moving the shock absorber struts outward. 6. Disconnect the electrical elements from the gearbox housing: the “trick” of the reverse lock solenoid.
Speed sensor chip.
Remove the block from the reverse light switch
7. When replacing bearings in the gearbox on Kalina 1, unscrew the torque rod together with the bracket from the box. Use 2 size 19 keys. One to hold it from turning, the other to unscrew it. The same bolts fasten the clutch housings and boxes together. After unwinding, remove the rod from the box.
8. Squeeze the plastic holder of the drive damper cable and remove it from the gearbox. It is located near the oil level indicator. 9. Using a size 13 socket wrench, unscrew the bolt securing the ignition unit bracket to the clutch. 10. Next, the gearbox is disconnected from the cylinder block using the 19th head. First, unscrew the top 2 bolts. After removing them, it will be possible to move the throttle drive cable to the side along with the fastening. The first bolt, indicated in the figure by the letter “a”, is short, the second, “b” is long. 11. Place supports, preferably adjustable ones, under the gearbox and engine.
12. Next, unscrew the lower bolts connecting the cylinder block and the box. First, use a 19-size wrench to unscrew the rear one.
Then use a socket wrench No. 19 for the front one.
13. Now the box is disconnected from the engine. It is necessary to remove the bracket between the engine and gearbox. First, unscrew the 2 bolts connecting the front left support cushion to the bracket.
14. Next, remove 3 nuts securing the bracket to the gearbox. After this, remove the bracket.
15. Then the 3 bolts on the rear support bracket are disconnected. Two of them are unscrewed with a socket wrench No. 19, and in the middle - No. 17.
16. Together with an assistant, move the gearbox away from the engine so that the drive shaft comes out of the clutch.
If you can’t pull it out, then move the power unit to the side, release it in front of the gearbox and pull it out. Do not push the input shaft against the clutch “petals”, otherwise they can be damaged. Disassembling the box Disassembling the gearbox should begin with cleaning it. Do not allow dirt to get inside the device. Then follow the following instructions: 1. Remove the speed sensor by unscrewing the retaining nut.
Then remove from the recess.
2. To install the gearbox on a table or workbench, unscrew the connecting pin from the clutch housing. To do this, screw 2 nuts onto it and unscrew it. Place the gearbox on the table, the clutch housing should be at the bottom. 3. Next, remove the reverse lock solenoid. First, unscrew the locking plug using key No. 13. The spring and ball are pulled out of the recess.
4. Then the solenoid is dismantled using key No. 36.
5. Unscrew the reverse lighting switch located nearby using key No. 22.
6. Next, remove the clutch release drive bracket from the body. It is held on by two nuts. First, using key No. 13, unscrew the first one, which simultaneously secures the rear cover of the gearbox housing.
Then with key No. 17 - the second one. Remove the bracket.
7. Having freed the gearbox from the “external” elements, remove the rear crankcase cover. To do this, unscrew the remaining 5 nuts using a No. 13 wrench.
8. Tapping upwards on the lid with a wooden hammer or a regular one, but with a soft tip, loosen it, lift it and remove it.
9. To continue disassembly, you need to unscrew the 2 nuts on the shafts. This cannot be done on rotating shafts, so they must be stopped by simultaneously engaging two gears: 3 and 5 or 4 and 5. If the shift rod is pressed in, the third will engage. If you pull it out, it's the fourth one. 10. Next, turn on the fifth. Remove the bolt securing the fork of this gear using a No. 10 wrench.
11. Then you need to lower the fork to engage the 5th “speed”. You can use a drift.
12. Now the nuts will unscrew. First you need to open them up. If you do not intend to replace the nuts during assembly, then remember which shaft each of them belongs to. Unscrew using collar no. 32. You'll have to put in a lot of effort. 13. Using a screwdriver, lift the 5th gear gear and remove the synchronizer and fork along with it. In this case, all the elements must be removed together, pressed against each other, so that the balls do not scatter. 14. Pull out the plug and mark the relative position of the coupling and the locking ring. Then remove the gear and ring and separate them. Remove the plate from the synchronizer. 15. Using a screwdriver, remove the 5th gear bushing from the secondary shaft. 16. Press the 5th gear gear off the drive shaft using two screwdrivers.
17. Pull out the thrust ring from the driven shaft.
18. Next, remove the plate held by screws and spring washers. An impact screwdriver is used. If the washers burst, they must be replaced during assembly.
19. Next, unscrew the clamps holding the fork rods. There are 3 of them; when removing them, remove the springs and balls from the holes.
20. Remove the retaining rings of the rear bearings of the drive and driven shafts. 21. Now disconnect the gear housing and clutch. Unscrew 13 nuts and 1 bolt around the perimeter of the gearbox. 22. To separate the gearbox, insert screwdrivers into special grooves located at the junction of the crankcases, gradually lift the upper part and remove it.
23. Remove the magnet for collecting metal debris from the crankcase.
24. Remove 3 rods and speed forks. Unscrew the screw securing the 1-2 speed fork to the rod. Then slightly raise the rod and turn it counterclockwise to remove the fork from the engagement with the gear selection mechanism. Remove the assembly. 25. Unscrew the bolt connecting the second rod to the 3-4 gear fork. Pull the knot out of the hook and remove it. 26. The 5th gear fork was removed first, so all that remains is to remove the rod.
27. Next, pull out the reverse idler gear axle. Then push the gear into the gear selection system, rotate it 30°-40° and remove it.
28. Since the bearings need to be replaced, the gear selection mechanism does not need to be touched. At this point the shafts can be removed. They are pulled out at the same time.
This completes the disassembly of the gearbox. Proceed to replacing the Kalina gearbox bearings.
Removing the VAZ 2107 gearbox
To remove the gearbox you will need a pit or a lift. The procedure is as follows:
- Disconnect (better remove) the battery.
- Engage neutral gear, disengage the handbrake, raise and hang the rear axle.
- Unscrew the bolts securing the cardan and the gearbox flange, and disconnect the cardan.
- Remove the exhaust manifold pipe by unscrewing the bolts.
- Disconnect the oxygen sensor.
- Remove the starter.
- Inside the car, remove the console and gearshift knob.
- Remove the gearbox protection.
- Unscrew the clamp connecting the catalyst to the exhaust pipe.
- Remove the clutch slave cylinder.
- Unscrew the speedometer cable, remove the boot and the reverse speed sensor wire.
- Remove the driveshaft.
- Unscrew the traverse while holding the gearbox.
- Unscrew and pull out the gearbox.
Replacing bearings
After removing the shafts, the inner rings of the front roller bearings remain on them. To compress them follow these steps:
- Place soft pads on the jaws of the vice and clamp the shaft.
- Remove the retaining ring located on the roller bearing ring from the shaft. Use a screwdriver for this.
- Using mounting spatulas or two screwdrivers, press the bearing ring.
Remember that the shoulder should be directed towards the drive gear. Before replacing the primary and secondary bearings of the Kalina gearbox, compress the old parts from the crankcase. There are pullers that perform similar operations. If they are not there, then you can use a screwdriver and a hammer. Insert a screwdriver into the groove, place a wooden block on it and, gradually tapping, remove the roller bearing.
To replace the rear bearing of the Kalina gearbox input shaft, you need to turn the shaft over. The same applies to the secondary. Using screwdrivers, remove the ball bearings. Remember that their open side faces the 4th gear gear.
Before installing new products, they must be lubricated with CV joint, lithol or graphite grease. Check the seating points in the crankcases. If there are potholes or severe wear, the crankcases will need to be replaced. Check the retaining rings, if they have lost elasticity, replace them.
The rear bearings are pressed in using a mandrel and a hammer. You need to select a pipe so that its diameter is equal to the diameter of the inner ring of the bearing. Attach the mandrel to the part and, tapping it, drive the part. The shaft should rotate smoothly and easily.
The inner rings of the front bearings are installed in the same way. But before this, the retaining rings are mounted, and the internal bushings are pressed onto them until they stop. The front roller bearings are inserted into corresponding recesses in the crankcases.
Lubrication
If the bearing is dry, but there is no damage on it, then you can completely get by with lubricating it and install it back. It’s only better to do this if you don’t have a new spare part on hand. There are two ways to lubricate the bearing. The first is to boil it in lithol, preferably in a water bath. A safer method of lubrication is by injection. Using a syringe, lithol is driven into the bearing; this method takes quite a lot of time.
Read more in the article “How to lubricate a release bearing without removing the box.”
Assembly and installation of the box
Before assembly, replace the input shaft oil seal. Clean the magnet from any metal debris. Replace the magnet if it begins to crack or become less magnetic. Check the gears and synchronizers; if they are chipped, replace them. Clean the contacting surfaces of the crankcases from traces of sealant. Then follow these steps:
- Engage the shafts and insert them together into the clutch housing.
- Install forks with rods.
- Reinsert the magnet.
- Lubricate parts subject to increased friction with transmission oil.
- Apply sealant to the contacting surfaces of the crankcases and rear cover before connecting them.
After assembling the box, install it back. Before “returning”, lubricate the end of the CV joint-4 drive shaft. Screw back the clutch housing stud, and also temporarily screw in 2 guides into the front lower hole of the cylinder block and into the rear upper hole - this will make the process of installing the box easier.
Next, insert the drive shaft into the clutch. The two screwed-in studs should go into the holes in the clutch housing, and the “original” stud should go into the cylinder block. The gearbox should rest against the cylinder block. After this you can remove the pins.
Is it worth changing the bearings in AMT yourself?
AMT is a robotic gearbox that combines manual and automatic gearboxes. It is almost as reliable as a manual transmission, but costs more. Consumes less fuel and consumables than a “classic automatic”.
The disadvantages include the high cost of repairs. It is not recommended to change bearings in AMT yourself. Firstly, the structure of the box is much more complex, so a qualified specialist can repair the car. Secondly, the car needs to be reprogrammed for any changes, which is also inaccessible to the average car enthusiast.
Conclusion
The gearbox bearing is one of the components of the gearbox, without which the entire unit will not be able to function normally. Unfortunately, a car enthusiast may encounter the need to replace this bearing up to two or three times during the entire life cycle of the car. If inexpensive analogues were previously installed, then there is a high probability that there will be many more replacements. We recommend purchasing only bearings from well-known manufacturers or automaker originals, and delegating the installation work itself to a trusted specialist. If problems arise with the gearbox, diagnosis and repair should not be shelved.