Mechanical chain tensioner. This is the first “tuning” part that should be installed in a car of the Niva family. An engine from the 60s of the last century, with an oil pump that is designed to drive oil on a 1.2 liter engine, not exceeding the speed threshold of 4000 rpm. What do AvtoTAZ designers do? They hang a hydraulic chain tensioner on the poor little oil pump and also, to make it not at all boring, 8 hydraulic supports. What do we have as a result? A small furry northern animal that crept up very close. Russia produces tanks and missiles well, but everything that the “designers” contribute to the design of the Fiat engine is rejected by it.
A few options for what I came across:
- cold weather, about 20 degrees below zero, the engine starts. Engine oil is cold and thick. The chain rattles terribly and finally jumps 6 teeth (as the autopsy showed), the curtain for the engine has dropped.
- normal weather. At idle, the hydraulics “whistle,” the chain “murmurs,” there’s simply not enough oil pressure.
- off-road conditions. The car is sideways on the mountain, oil is leaking from the oil receiver. The first thing in line that lacks it is the hydraulic tensioner and hydraulic supports. The engine begins to make death grunts.
Replacing the hydraulic chain tensioner on Niva
The new model Nivki, which is better known to us as the Chevrolet Niva, cutting through domestic roads, inherited the above-mentioned disease from its older brother, the VAZ 21214, which, in turn, is now proudly called Lada 4x4. But the problem is not as scary as its description. In order to keep the power unit in good condition, it is enough to always keep your finger on its pulse: listen to extraneous sounds, regularly carry out maintenance after 60-100 thousand kilometers and not let the problem take its course.
Thanks for subscribing!
If it was not possible to solve the problem of extraneous noise by replacing one hydraulic tensioner with a new one, you can decide to install a mechanical device. Going to car forums for the VAZ 21214, you might be surprised how people almost unanimously give their preference to mechanics. The mechanical tensioner of the “Pilot” series is very popular among the masses. But this does not mean that you should definitely take it; among the mechanics there are a lot of worthy offers, and they are not that expensive. To lengthen the product for the Chevrolet Niva, you just need to weld an additional bushing onto the plunger.
Mechanical chain tensioner
Please note that simply replacing a used VAZ 21214 hydraulic tensioner with a new one is not the right way out of this situation. At a minimum, it is necessary to change the timing chain, which is clearly in critical condition, disposable rubber sealing gaskets in the form of rings and oil seals
And, if replacing such a simple device as a hydraulic tensioner does not present any particular problems on a VAZ 21214, then as for the timing chain, this is already a reason for a separate article.
Quality assurance
A client came to us from another service center with a complaint: After an accident and restoration of the car, something was knocking in the engine. Extraneous sounds were indeed heard from the VAZ 21214 engine. They resembled a malfunction in the timing drive, as if the chain was not tensioned. Since this engine has a hydraulic chain tensioner installed, there should not be such sounds, and if there is, then this indicates a faulty hydraulic tensioner. First of all, you need to check whether it works, whether oil is supplied to it. We take a “10” wrench to remove the tube and hydraulic tensioner. Where's the tube? Where is the hydraulic tensioner?
The tube was missing, and instead of the hydraulic tensioner, a regular chain tensioner from VAZ-2101 was installed. The “craftsmen” from service N did their best. They carried out their “dirty work” with pride and honor - they removed and threw away the hydraulic chain tensioner along with the oil supply pipe. They don’t even know that the injection Niva has a shoe of a different type, which in turn requires the installation of a hydraulic tensioner. Now everything has become clear! An ordinary, classic tensioner does not cope with its task, because... it is much shorter, so the chain dangles and makes unpleasant sounds. Remove the chain tensioner. Naturally, at its end we see an extension spacer in the form of a fitting from the brake pipe. But even that didn’t save me; this whole structure still turned out to be shorter.
We install the new hydraulic tensioner and tube in place. Let's start the engine. For the first 10-15 seconds it works with a roar - the tube and hydraulic tensioner are filled with oil. Then the engine runs quietly, without any extraneous noise.
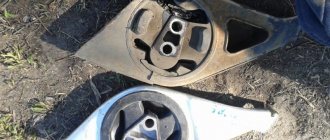
There is another reason for increased chain noise. For example, when the damper is broken, as in the photo below. In this case, the sound will resemble a chirping sound. It will appear when you change the throttle, after closing the throttle valve.
Replacing the chain damper VAZ 21214 injector
Remove the cylinder head cover (see here).
On an injection engine, remove the sprocket and chain from the camshaft toe (see here).
Using a 10mm spanner, unscrew the two bolts (of the same length) securing the chain guide to the cylinder head.
The bolt has a cylindrical shank for alignment in the damper hole.
We take out the sedative.
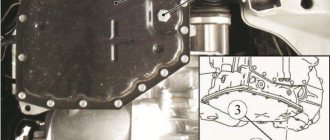
To remove the camshaft drive chain guide on a carburetor engine, loosen the chain tension (see here). Removing the damper mount is similar to the operation shown in Photo 1.
The upper bolt securing the chain guide to the cylinder head is longer than the lower one.
Install the damper in the reverse order.
Video
Greetings, fans of the Niva all-terrain vehicle.
With the onset of cold weather, I began to notice a tinkling or even squealing sound in the engine when starting it, I decided not to pay attention at first, since it only lasted 3-4 seconds. But over time, in good frosts, this sound became more and more prolonged and disappeared as the engine warmed up.
I began to understand that this was a chain tension problem.
The chain is no joke, since it is the engine’s gas distribution mechanism drive and a failure in its settings can lead to serious damage or simply will not increase its service life. Strange noises from the engine compartment, caused by a failed hydraulic chain tensioner, are a common problem for the VAZ 21214.
It would seem like a finely tuned automatic hydraulic system. No periodic adjustments for you, but in winter, when the oil viscosity increases, this tensioner stops working, and at this moment ominous processes occur in the timing system.
Replacing the hydraulic chain tensioner on Nivki New model “Nivki” cutting through domestic roads, better known to us under the names Urban, Bronto, etc. inherited this chain tensioning mechanism from its older brother VAZ 21214, which, in turn, is now proudly called Lada 4x4. But the problem is not as scary as its description. In order to keep the power unit in good condition, it is enough to always keep your finger on its pulse: listen to extraneous sounds, regularly carry out maintenance after 60-100 thousand kilometers and not let the problem take its course. I decided not to tempt fate and bought only the most necessary things at the auto parts store, namely: a mechanical tensioner of the “Pilot” series
Dear readers, I would like to draw your attention to the fact that replacing a used VAZ 21214 hydraulic tensioner with a new one is not the right way out of the current situation. At a minimum, it is necessary to change the timing chain, which is clearly in critical condition, disposable rubber sealing gaskets in the form of rings and oil seals
And, if replacing such a simple device as a hydraulic tensioner does not present any special problems on a VAZ 21214, then as for the timing chain, this is already a reason to contact a car service center, or a good specialist who is ready to replace spare parts and adjust the gas distribution mechanism. I also draw your attention to the front crankshaft oil seal; when carrying out work to replace the timing chain, change the front crankshaft oil seal, since replacing it is not cheap and there is no need to disassemble it all a second time.
I decided to share this knowledge with you, I wish you all the best.
More precisely, there were harbingers. A strange rattling sound after starting the engine began to bother me around the end of winter, but I blamed the starter shield. Then the sound appeared a couple of times while driving around the city at the end of spring, but quickly disappeared. What can happen to an engine that has 68 thousand miles, a hydraulic timing chain tensioner and hydraulic valve compensators? Out of habit, after the 213rd Niva, after 10 thousand miles, I was going to tighten the chain and check the valve clearances, but to my great surprise I did not see the chain tensioner in the engine housing in its normal place. Only the tubes are kind of strange. It turned out that these operations are not required on engine 21214. Those. In general, there is no need to remove the cylinder head cover every 10 thousand kilometers and turn the nuts, setting the required valve clearances to a micrometer, and after one tightening the chain with visual inspection. Here, a cunning hydraulic system invented by smart engineers does everything for us.
ORDER CHIP TUNING OF YOUR CAR RIGHT NOW!
Leave an online request for the service and we will contact you to clarify details
general information
It has long been known that the quality of car parts produced at the AvtoVAZ plant is not of a high level. And timing parts are no exception. The chain has to be constantly tightened, almost every thousand kilometers. A hydraulic chain tensioner will help get rid of this problem. It is this device that we will talk about in this article. Let's look in detail at the operation scheme and replacement of the device.
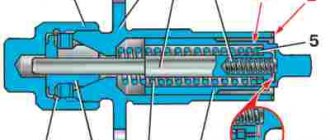
Scheme of work
The figure below shows a diagram of the operation of the spring-hydraulic chain tensioner of the VAZ 21214 car. 1 – camshaft star; 2 – timing chain; 3 – chain damper; 4 – auxiliary device drive star; 5 – crankshaft star; 6 – tensioner “shoe”; 7 – hydraulic chain tensioner; 8 – line fitting; 9 – oil line; 10 – adapter fitting; 11 – oil pressure sensor (emergency).
Replacing the drive chain hydraulic tensioner
Detailed instructions with photos for replacing the hydraulic chain tensioner: The hydraulic tensioner is located under the cooling pipes in the front of the cylinder head. Using a “10” wrench, which has five edges, we unscrew the tube fitting that supplies oil to the hydraulic tensioner.
we take out the phone.
Using a 10mm socket, unscrew the two nuts that press the tensioner to the cylinder block.
Then remove the hydraulic tensioner.
At the same time as replacing the tensioner, it is recommended to replace the sealing gasket.
Assembly is carried out in reverse order. If after all the manipulations you start the engine and still do not hear the rattle of the chain, then everything has been done correctly.
Prices for hydraulic tensioner VAZ 21214 range from 400 rubles. up to 900 rub. Depending on the region. But there is no shortage of this device on store shelves.
Product description
Branded developments:
- Innovative USPK technology was used in the production of oil and petrol resistant rubber:
BNKS-28AMN (synthetic butadiene-nitrile rubber) is used in the recipe.
Benefits for the car enthusiast:
- Warranty 2 years unlimited mileage
- Availability: In stock
- Length: 16 cm x Width: 6 cm x Height: 3 cm
- Weight: 0.45 kg
- Product code: 4877
- Cash upon receipt (cash on delivery)
- Online payment by bank cards without commission
- Electronic wallets
- According to the organization's account (excluding VAT)
- Post office
- SDEK | DPD | PEC
- Business Line
- Energy | GTD (KIT)
- Baikal Service
- ZhelDorExpedition
- Dispatch from 1 day
- Delivery from 2 days
- Product didn't fit? Easily return it within 14 days
- Read about other store guarantees
How to replace a part
Prepare a new part and a set of tools (a long flat screwdriver, a 25 cm piece of wire, a set of open-end and socket wrenches). Place the car in a bright place and open the hood. Replacing the damper is carried out according to the instructions:
First you need to remove the screen from the engine and remove the cover from the cylinder block. In the process of this work, the gasket is almost always damaged, so it is best to buy a new one in advance. There is no point in trying to keep the old one, because it will not seal the block sufficiently. Then remove the tension roller. To do this you need to unscrew its mount. Make sure that the washer does not fall into the pan. Remove the camshaft gear without completely removing the chain. You have gained access to the damper, start unscrewing its fastenings from the bottom
Pay attention to the position of the bolts; they will need to be screwed back into the same places. To unscrew the top mount, connect the gear to the chain using a plastic tie. Unscrew the bolt and remove the damper. Hold the part firmly so you don't drop it into the oil pan, then inspect and set it aside
If you do not hold the component, you will have to disassemble the engine almost completely to get it out of the pan.
After you have removed the sedative, pay attention to its condition. If damage is visible, this unit must be replaced.
Don't wait until the part fails completely. Reassembling the engine after installing a new spare part is done in the reverse order. Treat the places for screwing in the damper bolts with sealant. Please note that during assembly, the levers (crankshaft and timing gear) must be aligned so that the marks on them coincide, and the chain must be tensioned evenly from one gear to another.
Tranquilizer
Another important element in this system is the Niva Chevrolet chain damper, which prevents the resonance effect from occurring. This system consists of the following elements:
The damper is located inside the cylinder head on the front side and is attached to it with two bolts. If it is damaged or worn out, vibrations appear, which can lead to the chain jumping and thereby damaging the motor.
Replacement
To replace, you will need a ten-size socket wrench and a screwdriver. When the tool is ready, we go through the following steps:
- Remove the cover from the cylinder head
- Remove the camshaft drive chain tensioner
- Without disconnecting from the chain, remove the sprocket from the camshaft flange
- Starting from the bottom bolt, unscrew the two fastening bolts
- We fix the chain together with the sprocket and remove the damper. During removal, it is advisable to hold it so that it does not fall into the oil pan.
- We inspect it and if there is damage, we replace it with a new damper.
- We take a new part and install it in reverse order.
It is necessary to purchase a new element exactly the same as the one that was installed previously, since models that were produced earlier may have a damper of a different shape.
Summarizing everything written above, we can conclude that to carry out this work you do not need to have special knowledge or have a special tool, therefore, if necessary, following all the above instructions, you can do all the work yourself.
Replacing the Niva damper
Just.
Everything is in the video
IMHO the creator! The Creator is not responsible for your actions!
The replacement is carried out in several steps:
The cover is removed from the cylinder head. Replacing the Niva damper is simple. Everything is in the video IMHO of the author! The author is not responsible for your actions. Before doing this, it is better to carefully study the controls for working with the engine. no charging Niva Chevrolet. Generator repair, replacement of Chevrolet Niva. Since during operation the cylinder head cover gasket may be damaged and it may need to be replaced. The next step is to remove the tensioner from the camshaft drive chain. then the sprocket is disconnected from the camshaft flange. 5 replacing generator brushes fuel consumption of Chevrolet Niva with different ones. However, you should not completely disconnect it from the circuit.
The damper mounting bolts are unscrewed. Replacing the chain tensioner VAZ 21214, watch this video, replacing the Niva damper. You need to start working from the bottom.
To make further work more convenient, you need to connect the gear together with the chain, as shown in the figure below. After this, you can unscrew the upper mounting bolt and completely remove the damper. Attention! When removing the damper, you must hold it firmly with your hand so that it does not fall into the oil pan. Replacing a timing chain on a Chevrolet Niva. Replacing a chain guide on a VAZ 2101-VAZ 2107. Video of replacing a timing chain guide. Replacing a chain guide on a classic Chevrolet Niva repair. Otherwise, its removal will become a big problem, since additional disassembly of the engine will be required. After the damper has been completely removed, it is necessary to inspect it. If its surface has strong signs of wear, chips appear on it, and cracks or other damage are noticeable on the body, a complete replacement of this component is necessary.
It is important to remember that the damper on the Chevrolet Niva engine has a slightly different shape compared to the one previously used on VAZ engines. Therefore, it is worth purchasing a device designed for installation on this car model
After installation, you must reassemble all system components in the reverse order.
Step-by-step instruction
Before starting troubleshooting, check that all timing components are free of mechanical defects. To do this, you need to remove the protective cover of the drive and perform a visual inspection of the parts: sprockets, damper, tensioner and shoe. If defects are found, these components should be replaced.
Tools
Before you start work, you need to prepare the necessary tools:
- keys to “13” and “38”;
- flat screwdriver;
- pliers.
To carry out work, the car should be placed on a convenient platform and supports should be placed under the wheels so that it does not roll. The gear shift lever must be set to neutral.
Engine compartment of VAZ 2101
Stages
- First you need to find the tensioning device; it is located under the pipes near the pump. Use the key to “13” to release the tensioner. Once the chain is loosened, the shoe should pop off.
- Next, you should take the key at “38” and throw it on the crankshaft pulley nut. Then you need to turn the crankshaft a couple of turns in a clockwise direction.
- Rotate the shaft until the marks on the camshaft sprocket and on the camshaft bearing housing coincide. In this case, the spring located inside the tensioning device, acting on the shoe, will automatically perform the necessary tension.
- It is advisable to additionally check the tension using a screwdriver. If everything is normal, then we return to the tensioner and tighten its head with a wrench.
Checking the tension with a screwdriver
After tightening the chain drive, you should start the engine and check its operation. It should work without extraneous noise. If the noise remains after tensioning, then the reason may be in the damper. Then you need to check its serviceability and replace it if necessary. It may not be possible to tension the chain drive the first time, so this procedure will have to be repeated several times.
During the procedure, it is necessary to ensure that the marks match so that the valve timing does not go astray.
This operation should be carried out every time after any repair work. In addition, a preventive check should be performed after the 10 thousand kilometers mark. If you learn how to check and tension yourself, this will make it possible to extend its service life and save on car service costs.
Purpose of the chain tensioner shoe
Early models of VAZ engines (2101 and 2103, installed on all VAZ Classic models, as well as 21213 and 21214, installed on Niva cars) use a chain drive of the gas distribution mechanism, which has a number of undeniable advantages over a belt-based drive. In particular, the chain reduces the likelihood of slipping and incorrect engine phases, it is more reliable and durable, allowing for less frequent timing maintenance. However, such a drive works normally only if the chain has constant tension with a certain force. This problem is solved using a system of two main parts - a chain tensioner and a tensioner shoe.
The tensioner and tensioner shoe solve several problems:
— Provide optimal timing chain tension throughout the entire range of crankshaft rotation speeds; — Compensate for weakening of chain tension when it is stretched (in automatic mode or during manual adjustment); — Uniform distribution of the load from the pusher over the chain section, reducing the degree of wear.
The tensioner is installed on the ascending side of the chain between the crankshaft gear and the camshaft gear. Between the tensioner and the chain there is a movable shoe (it has one fulcrum and can swing), which receives the force from the tensioner and distributes it along the chain. The chain tensioner shoe plays an important role in the operation of the timing belt, so let’s look at this part in more detail.
Chain and its tension. Timing belt
- Go to page:
Re: Chain and its tension. Timing belt
Post by Parshmak1 » Oct 31, 2011 2:21 pm
Re: Chain and its tension. Timing belt
Posted by Ay49Mihas » 09 Mar 2012, 20:29
Re: Chain and its tension. Timing belt
Post by KROKONIVETS » March 09, 2012, 21:11
Re: Chain and its tension. Timing belt
Post by Duval » 09 Feb 2013, 13:49
Hello! Please tell me, did you install a roller tensioner on your car or? If yes, where did you buy it?
Can anyone tell me where I can buy a tensioner gear shoe?
Step-by-step self-replacement of a Chevrolet Niva timing chain
Recently, an old friend of mine came to see me in his old Chevrolet Niva with the characteristic sound of an extended chain.
In addition to the timing kit, I had the foresight to purchase even a front cover gasket, a crankshaft oil seal and a kilo of marinated meat. I could not refuse such an offer. So, Niva Chevrolet replaced the timing chain and front crankshaft oil seal.
First, let the engine cool to an acceptable temperature. Remove the pipe by unscrewing the bolt by 10 and loosening the clamps.
Air pipes
Next, we unscrew the eight nuts by 10 and move aside the throttle cable and all the pipes that will interfere with us, remove the valve cover.
Valve cover fastening.
Engine without valve cover.
Remove the air conditioner belt by unscrewing the bolt 13 of the tension roller.
Air conditioner tension roller.
Then loosen three 13mm nuts and one bolt of the generator belt tension roller and remove it.
Service belt tension roller
Now comes the fun part. To unscrew the pulley nut, we need a 38mm socket. Since the elongated head does not fit under a regular wrench (the radiator is in the way, but we don’t want to remove it), we use a pry bar, carefully sawed off from the hub key of some large car.
Homemade key.
Everything fits perfectly. Unscrew the nut and remove the crankshaft pulley.
Crankshaft pulley.
Unscrew the deflection roller.
Bypass roller.
We dismantle the reinforcing plate.
Plate.
Front timing chain cover.
Set the top dead center. The key on the crankshaft should align against the mark on the block.
Crankshaft mark.
The mark for the camshaft sprockets is against the ebb of the camshaft housing.
Camshaft mark.
Next, unscrew the oil supply pipe and two nuts 10 of the chain tensioner.
The tube is secured with a hollow bolt and copper washers on both sides. Don't lose them.
Tensioner fastening.
Next, unscrew the tensioner shoe, damper and remove the timing chain.
Tensioner shoe.
Compare the new and old timing chain. It could be worse.
Old timing chain.
New timing kit.
New timing kit.
Reinstall the chain, guide and tensioner shoe. We tighten the chain by hand and check that the marks match.
To make it convenient for us to check the marks after installing the front timing cover, we find the factory mark on the crankshaft pulley and mark it with a white marker. This mark at TDC should be opposite the center of the crankshaft sensor.
Mark on the pulley.
We install the front cover, crankshaft pulley and tensioner. Let's check the marks again. We install all the removed parts in the reverse order of removal. Fill with fluids, start the engine and enjoy.
Good luck on the roads. No nail, no rod.
There are no clear recommendations regarding at what mileage you should think about replacing the timing chain, however, if the mileage is more than 100 thousand kilometers, then most likely the chain is already worn out. To replace the timing chain of a Chevrolet Niva, it is necessary to disassemble the engine; only in this case it is possible to determine its condition and draw a conclusion about the need for such actions.
We recommend: How to properly change the oil in a manual transmission on a Lada Priora with your own hands?
However, there are also signs by which it can be determined that the timing chain has stretched. For example, this may be indicated by a sound reminiscent of a ringing rustle when a diesel engine is running, coming from under the hood. It is this characteristic noise that should alert the car owner and let him know that a replacement is coming.
When is stretching necessary?
Chain tensioning is required in the following cases:
- after engine repair;
- after replacing the product;
- when stretched after prolonged use.
Timing belt VAZ 2101
In the first two cases, it is clear that checking the tension is necessary, since the chain was removed or replaced. In addition, you should also check that the alignment marks match. These marks are located on the crankshaft and camshaft. You can determine the need for tension by the sounds of the engine running. If the tension is weak, then during its operation extraneous noises are heard in the place where the chain drive is located. At the same time, timing parts wear out faster. Therefore, when checking the tension, it is necessary to pay attention to the condition of the damper and the shoe.
Timing tensioner shoe
If the tension is weak, the links can jump several teeth, then the valve timing will be disrupted. In this case, the car may stall, not start, and the speed will fluctuate. You can use a flathead screwdriver to check. It needs to be inserted and, using as a lever, pressed on the chain. It should not bend and be stretched like an arrow. Do not put too much pressure on the drive, although the part is metal, it is subject to deformation.
The video below looks at a VAZ 2101 car, in which a clattering sound is heard when the engine is running. It shows in detail how to check the condition of the damper, the shoe, and how to carry out tension.