02/04/2022 12 218 VAZ 2101
Author: Ivan Baranov
The timing chain plays an important role in the operation of the gas distribution mechanism. Over time, it stretches and requires tension, since the quality of the engine depends on it. Therefore, you need to know when to check the tension and how to tension the chain on a VAZ 2101. This topic is covered in an article and a video that demonstrates the process of checking and tensioning the chain drive.
[Hide]
How to determine if a chain drive is faulty
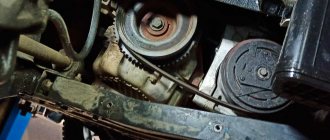
Unlike the timing belt drive, which is located outside the engine, the chain with gears is located inside the power unit and is completely hidden from view. On the one hand, this is a plus: the mechanism makes less noise and is generously lubricated with engine oil, which increases its service life. On the other hand, without removing the valve cover it is impossible to visually assess the technical condition of the unit.
The first sign of a chain drive problem is a rumbling sound coming from under the cover when the power unit is operating. The rumble of a weakened chain cannot be confused with anything; it is heard from the side where the gas distribution mechanism is located.
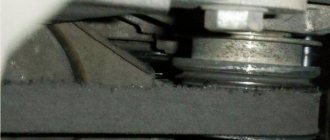
Loosening with a gap of up to 1 cm allows the chain to jump when starting the engine
Having heard such a sound, the car owner should check the condition of the drive so as not to encounter big troubles associated with engine repair. There are 2 ways: immediately go for diagnostics to the nearest car service center, or remove the valve cover yourself and make sure that the section of the chain near the camshaft gear is loose. Worsening tension is caused by the following reasons:
- due to stretching to such a length that the tensioning device is unable to pick up the slack;
- due to a faulty tensioner;
- the damping plate is worn out or torn;
- Due to the high mileage of the car, all the parts of the mechanism have worn out - the chain, gears, tensioner and damper.
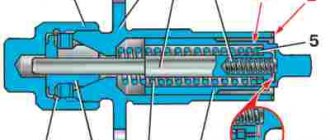
If an old-style mechanical tensioning device is installed in the car engine, then when the described symptoms appear, the first action is to tighten the chain with its help. To do this, simply loosen the outer nut holding the plunger spring and manually turn the crankshaft 1-2 turns. After which the nut is tightened again.
Old VAZ 2101–07 engines have a mechanical tensioner with a nut
Modern automatic hydraulic tensioners are not designed for manual adjustment and must be replaced if they break. You can verify that the element has failed only by removing it or disassembling the entire timing belt assembly. The same applies to the damper - on most cars, its wear can only be assessed when the mechanism is disassembled.
Ignoring the rumbling noise made by the chain will sooner or later lead to motor failure. The severity of the consequences depends only on your luck.
When to adjust tension
The load on the chain is maximum, so it can withstand up to 70-80 thousand kilometers. Don't forget to adjust every 10-15 thousand km. If you notice that there is a rumble, then inspect the system earlier. Before adjusting the tension, check the operation of the timing belt. Check the tension after repairing the system on a VAZ car. The characteristic rustling sound produced by a fallen chain can be recognized immediately. Listen to how the engine idles under the hood. Add speed, and the extra sounds will disappear. This will be a signal that it is time to tighten the tension.
Prepare the engine before adjusting the chain. Place the VAZ car on a horizontal surface and leave it on the handbrake. Then we prepare the engine as follows:
- leave the lever in the neutral position (gear switch);
- use a wrench to remove the cover from the engine;
- replace the old gasket on the cover with a new one.
Having completed these steps, the timing parts, including the chain, will be clearly visible.
Adjusting the drive itself takes little time. But do it carefully and carefully. For work, prepare two wrenches: a 38th open-end wrench and a 13th socket wrench.
Consequences of malfunctions
Problems in the timing chain drive lead to the following problems:
- A stretched and weakened chain jumps several teeth. As a rule, this happens when the engine starts.
- A chain operating with increased free play often breaks the guide and even “gnaws” a groove in the cylinder head made of aluminum alloy.
- In some brands of cars where a single-row chain is used in power units, it may break.
Note. Chain drives of the timing unit can be single- or double-row. The former are not as reliable and durable as the latter, and often break down after a run of 50-80 thousand km. Double-row drives break extremely rarely, even when the owner of the car does not pay due attention to it.
Double-row chains also break, but very rarely
The consequences of these problems may be as follows:
- The most harmless option is a shift in valve timing due to the chain jumping 1-2 teeth. The engine does not start well and vibrates strongly during operation, and there is a clear loss of power while driving. When you press the accelerator pedal sharply, shots are heard in the intake manifold or exhaust pipe.
- When there is a 3 tooth offset, the engine will no longer start. Another thing is that in practice such situations are rare; a too loose chain skips much more. The result is a piston hitting a valve that opened at the wrong time.
- Due to severe wear or breakage of the damper, the chain drive is weakened even more, causing the consequences described above.
- The damage caused by a broken single-row chain depends on the type of engine and the moment when it happened. If all the valves were closed, then the pistons, which continued to move, would not reach their plates.
This is what the valves look like after meeting the pistons
In power units with 8 valves, encounters with the piston are quite rare due to the technological clearances provided for by the design (except for individual motors). But a 16V engine valve that is open when the chain breaks or jumps almost always receives a blow from the piston. As a result, its stem bends and the valve remains in the open position. In especially severe cases, the consequences are as follows:
- even the valve seat and guide bushing are damaged;
- a through hole appears in the upper part of the piston;
- A dent appears on the plane of the cylinder head near the combustion chamber, which makes it necessary to replace it entirely.
A chain that has jumped or broken while driving makes itself felt by a sharp loss of power or complete engine failure. If you were able to hear a metallic knock, indicating the meeting of the piston and valve, then you should prepare for serious repairs to the power unit.
And this is a piston pierced by a valve plate
Option two. Wrong
This option is possible if you left a dirty, unprepared bicycle for the winter. When it was stored in conditions that were far from ideal, or maybe it stood outside all winter. The first thing to do is wash it. It will be more difficult to do this now, because the dirt has dried and the lubricant has frozen. But with the help of a sponge, warm water and car shampoo it is quite possible.
After you inspect his chain, it is most likely rusty and it would be better to simply replace it. But you can try to revive it by adding it to a rust remover and then lubricating it. You may also be upset by the condition of the tires on your wheels; they may crack and you will have to buy new ones.
And now that your bike has been washed, the rusty chain has been put in order, and new tires have been installed on it (or you’re lucky and you still have the old ones), then it’s time to follow all the recommendations given in the first option.
That's all the tricks, now all that's left is to ride your bike. Your first trip should be somewhere nearby. Check how everything works, whether there are any extraneous squeaks or vibrations. If something is wrong, it makes sense to contact a bicycle repair shop.
Also, don’t forget about safety, the feeling of the track has dulled a little over the winter, and it will take a couple of days until it recovers. And during the winter, motorists forget that you and I are also participants in the movement, so be careful, because we need a bicycle to receive positive emotions, and not additional abrasions. I wish you health, vigor and new impressions from cycling!
- Girl cyclist
- Economical operation of a mountain bike
- Which pedals to choose for a bicycle?
- Bicycle hub maintenance
- How to make bicycle wheels illuminated?
What is the service life of chains according to maintenance regulations and replacement frequency?
On average, a timing chain drive lasts from 200 to 350 thousand kilometers of a car. The indicator varies depending on the driver’s driving style and the quality of the engine oil used to lubricate the links and gears. The operation of the hydraulic tensioner also depends on it.
Reference. In cars from leading German and Japanese manufacturers, a double-row chain often lasts 450-500 thousand km, or even more.
Single row chain drive for Opel vehicles
In contrast to German brands, the two-row drives of Korean small cars from manufacturers KIA and Hyundai work surprisingly little. There have often been cases of stretching and replacing chains with a mileage of 60-90 thousand km on Hyundai Solaris (Hyundai Accent in Ukraine) and KIA Ceed models, which is comparable to the service life of timing belts. Hence the recommendations on when to replace the chain drive:
- On Korean small cars, you need to listen and check the condition of the drive starting from 60 thousand km. If the outcome is good, replacement is carried out in the interval of 120-150 thousand km.
- The same applies to single-row chains installed on many European economy-class cars, for example, Peugeot, Opel and small diesel engines from Audi.
- Two-row transmissions of other car brands should be given attention after 150 thousand km, periodically checking their condition. Replacement is carried out as wear occurs, but on average - no earlier than 200 thousand km.
To avoid troubles associated with timing drive failures, you need to carefully study the car’s operating instructions and the manufacturer’s recommendations for servicing a particular car.
Step-by-step instruction
The transmission elements of bicycles from most manufacturers, with rare exceptions, are compatible with each other. You just need to select the same number of transmission and chain speeds. For example, for a transmission with nine gears you will need a chain designed for the same number of speeds.
Removing the old chain
Using a chain squeezer, press out one of the pins (the pin that connects the chain links) in the bottom passage of the chain. If there is a locking link, remove it. After removing the roller, carefully remove the chain from the bike.
Top articles: Recreational bikes
If you use one chain for a long time without replacement, you may need to replace the cassette.
Installing a new chain
Shift reverse and forward gears to the largest sprockets. If your bike has a clutch, loosen it.
Throw the chain over the guide roller, pull it through the mechanism's legs, and wrap it around the tensioner roller. Carefully release the gearshift mechanism.
Chain measurement
You need to make sure that the chain will behave properly when shifting into any gear without damaging other parts of the bike. To check, the chain must be installed on the two largest sprockets, front and rear. Even if you never drive in such a gear.
Align the two ends of the chain and identify the extra links that need to be removed. To fix the chain in this position, use part of a bicycle spoke.
Once the required chain length has been determined, remove unnecessary links. Throw the chain back over the smallest sprockets.
Attention ! On full suspension mountain bikes you need to make sure there is enough chain length when the suspension is compressed
Circuit connection
For Shimano chains, you need to connect both ends with a roller. After installation, the excess part of the roller is broken off with pliers.
Rotate the pedals until the locking link is in the middle of the upper passage. Then hold the rear wheel to prevent it from spinning. Press down on the pedals and the locking link will finally slide into place. Make sure the chain is installed correctly. Pedal the bike using all gears.
How to choose a new set of spare parts
Like other automobile spare parts, timing chains are counterfeited by handicraft and Chinese manufacturers, after which they go on sale. Cunning businessmen are constantly coming up with new ways to deceive customers, for example, placing their low-quality products in original packaging from well-known brands originally from Western Europe. To avoid running into a fake spare part when purchasing a part, follow these recommendations:
- buy the chain from official sales representatives, dealers, or in stores that have a positive reputation among other users;
- do not try to save money by looking at products from unknown manufacturers;
- check the part for marks and deflection in a horizontal position;
- consult a familiar auto mechanic about which brand is best to choose for your car brand;
- Make a visual inspection of the product for careless workmanship or other signs - burrs, play between links, and so on.
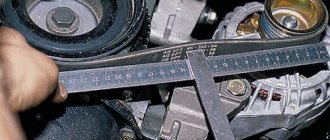
The chain is checked for deflection as follows: take it by one end and hold it flat. The second end should sag no more than 10 mm. If possible, check the hardness of the metal by carefully filing it with a file. The steel in high-quality products is hardened, and therefore is characterized by increased hardness and does not lend itself to filing.
Chain, gears, shoes and tensioner - complete replacement kit
Advice. The main technical characteristics of the chain are its size and number of links, and you need to select the part based on them. If you are in doubt, then do not buy a new spare part without removing the old one with which you can compare it.
If you are updating a chain drive with a significant mileage of the car (150-200 thousand km), then you will have to change all the accompanying elements - gears, tensioner and damper. When the chain has stretched after a run of 50-100 thousand km, it is not necessary to change the gears, but the tensioner must be checked for functionality. Also, don't forget to buy consumables - cover gaskets, O-rings and heat-resistant sealant.
Instructions for installing a bicycle chain stabilizer
When installing the tensioner you will need to use:
- a set of hexagons for 5, 4 and 2 mm;
- connecting rod squeezing;
- key;
- removable carriage device;
- thread lock;
- lubricant.
Assembly consists of several stages:
- Removing connecting rods and sprockets, and, if necessary, the carriage.
- Moving the largest star to the middle position. The post of a major star will be taken by rockling (impact protection).
- Screwing the so-called banana to the edges of the carriage projection.
- Bolt tightening.
- Checking the correct installation.
- Lubricating fasteners.
- Mounting connecting rods, putting on a chain, adjusting pressure rollers.
- Extension of the internal “pancake” to the star, maintaining a proportional distance between all parts. Care should be taken to ensure that the bicycle chain does not touch any parts.
- Bolting.
The chain stabilizer prevents it from falling off in the future. Correct actions promise comfortable trips in the future.
Replacing the timing chain
The complexity of the procedure lies in the dismantling of attachments and disassembling the power unit, which takes up to 3 hours. Removing and installing a new drive is quite simple. If all elements need to be replaced, then before performing work, be sure to delve into the timing drive structure of your car. Example: on the same KIA Ceed, the gear is pressed onto the crankshaft under heat, so you cannot dismantle it at home. Then disassembling the engine makes no sense, since it will be possible to replace one chain.
Among the special tools, you will need a device for fixing camshafts on a 16-valve engine (judger). The rest of the tools are standard:
- a set of open-end wrenches and sockets with an extension nozzle;
- jack, wooden stands and wheel wrench;
- containers for draining motor lubricant and antifreeze;
- plumbing tools - hammer, screwdriver, pliers;
- rags.
To work, you will need an inspection ditch and a portable lamp (flashlight). Place the front-wheel drive car on the pit in such a way as to provide access to the front wheel from the timing unit side. A rear-wheel drive car is positioned as conveniently as possible; there is no need to remove the wheels.
The procedure for disassembling and removing a stretched chain
First of all, the following preparatory operations are performed:
- secure the car with anti-recoil devices;
- disconnect the throttle valve heating pipe and drain the coolant from the engine jacket;
- in a car with rear-wheel drive, you need to empty the radiator;
- drain the engine oil;
- remove the lower engine protection and mudguards that interfere with further disassembly;
- disconnect the pipes and cable from the gas pedal, which prevents the removal of the valve cover.
Timing diagram of the 8-valve VAZ 2101–07 engine
Note. It is not always necessary to drain the oil, it depends on the make of the car. For example, when replacing a chain on a VAZ 2101-07, the lubricant remains safely in the crankcase and does not interfere with the work.
In a front-wheel drive car, you will have to remove the front wheel from the timing gear side and rest the car on a wooden stand. The jack will be needed later to lift the power unit.
Timing diagram of a 16-valve engine
It makes sense to consider the disassembly procedure using the example of the Korean car Hyundai Solaris 16V; in other cars with front-wheel drive, the principle of work is not much different:
- Disconnect the high-voltage wires, unscrew the spark plugs and remove the valve covers.
- Place a jack under the engine on the right side (in the direction of travel) and lift it. Unscrew the 2 elastic support mounting brackets and the power unit cushion itself.
- Loosen the tension roller of the generator drive and remove the belt. Remove both rollers - tension and parasitic, as well as the pulley from the power steering pump.
- Unscrew the water pump pulley, and then remove the pump from the engine. Now nothing prevents you from unscrewing the generator mount and moving it to the side.
- Loosen the bolt holding the crankshaft pulley. To do this, you need to jam the flywheel with a screwdriver or ask an assistant to hold the brake pedal while the gear is engaged. Remove the pulley without losing the key.
- Unscrew all bolts securing the timing cover and pull it out.
Aligning the marks on the camshaft gears
Note. When disassembling the rear-wheel drive version of the car, you do not need to remove the wheel, lift the engine and unscrew the mount. Instead, you will need to remove the radiator along with the fan.
After disassembly, you need to clean the mounting flange of the cylinder block and the cover from the remains of the old gasket and sealant, and also wipe off any oil and coolant leaks. Then, by turning the crankshaft, align all the marks stamped on the gears with the marks on the engine housing or other landmarks specified in the vehicle documentation.
There are 2 ways to loosen the chain for further removal:
- immediately unscrew the 2 bolts of the hydraulic tensioner and remove it;
- pry the latch of the clamp in the tensioner, press on the plastic shoe and loosen the chain.
After loosening, the chain drive can be easily dismantled manually, the main thing is not to disturb the position of the marks.
Video of disassembling the timing mechanism
Installing a new part on the engine
Before assembling the mechanism, make sure that you have all the consumables available:
- timing cover gasket;
- pump gasket;
- new rubber O-rings;
- new hydraulic tensioner;
- shoes for tensioner and damper (if necessary);
- high temperature sealant.
If it is necessary to replace worn tensioner and damper shoes, this is done before assembling the chain drive. This is not a problem; they are attached with 2-3 bolts (depending on the make of the car).
The yellow marks must be aligned with the marks on the gears
For convenience and error-free installation, manufacturers often put marks on the chain links that align with the marks on the camshaft and crankshaft gears. The first two are drawn in yellow, the third in black or another color. Therefore, the chain is put on the gears taking into account these marks, and then tensioned.
How to change the timing chain correctly: video
How to replace the tensioner
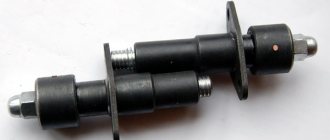
It is recommended to replace the hydraulic tensioner together with the chain drive. It is held on by two bolts that must be unscrewed to replace the part. The new tensioner is equipped with a pin that secures the plunger in its original state. When the chain is installed according to the marks, and its slack is selected in the direction of the tension shoe, the pin is pulled out and the spring pushes out the rod, which presses on the shoe with the guide. This way the chain is tensioned.
Hydraulic tensioners of various designs
Note. While the engine is not running and there is no oil pressure in the system, the chain drive will be tensioned only by spring force. Therefore, the tension will not be too strong.
After installing and adjusting the timing chain drive, manually turn the crankshaft 2-3 turns and check the position of the marks again. There is no need to specially lubricate the chain links; this will happen automatically after starting the engine. Next, the engine is reassembled with the installation of new gaskets on the sealant.
Why is this so important to do?
During operation, the chain is subjected to significant loads. After all, it interacts with two shafts - the crankshaft and the camshaft. Over time, the part stretches out. The chain pitch changes and the engine begins to operate unstably. As a result, the revolutions fluctuate, and the mechanism itself jumps one or more teeth. If the circuit begins to make noise, this is the first sign for diagnosis.
Experts recommend tightening the chain every 15 thousand kilometers. Its resource itself is about 100 thousand. By this time the part must be replaced. The sedative also changes. Before tensioning the chain on the VAZ-2107, check its condition. All the necessary elements can be found in the VAZ-2107 timing belt repair kit.
Bicycle gear shift adjustment
What is the essence of shifting gears on a bicycle? You press the shifter lever on the steering wheel (press hard), it travels a certain distance, while pulling out the cable and snaps into place with a locking mechanism (a dog, what is the correct name for it? Chapi, Scooby, Rex, Tuzeg?) The cable passes through the shirts and open spaces and pulls the transfer frame behind it. The frame moves and the chain is forced to rise to the top sprocket. Well, vice versa. The lever on the shifter snaps off, the cable is loosened, under the action of the spring the frame moves to the right stay of the bicycle frame and the chain jumps onto the smaller sprocket. Switching occurs discretely - one click (+ or -) and one shift of the switching frame. This discreteness sometimes needs to be adjusted so that the chain (via rollers) is positioned just opposite the desired rear sprocket. If the shift is configured correctly, then in the future (sometimes distant) you will only have to slightly adjust the entire shift system due to cable pulling. The adjustment can be made using a special adjustment drum located at one end of the cable. There are cables that do not need any introduction or adjustment by Power Cordz, all that remains is to determine the price.
004_moto_0811_070
The screw tensioner requires at least two keys - with one we loosen the axle nut (you may have to keep the axle from turning with another key), and with the second we adjust its position.
The screw tensioner requires at least two keys - with one we loosen the axle nut (you may have to keep the axle from turning with another key), and with the second we adjust its position.
other methods
There are a lot of ways to make a bicycle chain tensioner with your own hands from scrap materials. To do this you will need a small sprocket and a fastener. The fastening can be a clamp from a flashlight on the steering wheel, a cut-out aluminum leg in which holes are drilled for attaching the sprocket and bolts that will press it to the frame. Some craftsmen even make fastenings from an ordinary plastic cutting board. The main thing is imagination.
The tensioner is usually attached to the chainstay
It is important to take into account that you need to tighten the chain from the bottom (preferably from the bottom up). After all, the upper part is always tense when pedaling
High gear limiter (“H”)
The high gear limiter prevents the chain from jumping off the smallest sprocket and getting stuck in the middle of the dropout and it. And, although the index shifters perform the same function by tensioning the cable - preventing the chain from jumping off the smallest sprocket, but, correctly, regularly, and according to science, this should be done by the limiting screw. Cables sometimes break, you know.
We configure the high gear limiter as follows: 1. switch: the largest sprocket in the front and the smallest in the rear; 2. loosen the shift cable. This can be done by unscrewing the bolt holding the cable in the transfer area. Or you can screw in the adjusting drums on the shifter and shifter as much as possible. (I almost never use this. I set it so that their state is always screwed in.) 3. We set it so that the switch rollers lie in the same plane as the smallest sprocket. See picture. 4. Upon completion of the adjustment, you need to strongly pull the cable and clamp it on the transfer. Or, unscrew the adjusting drums if you were able to loosen the cable in this way.
Bicycle care consists of three main points:
1 - the chassis must be clean. The chassis consists of: chain, cassette, sprockets, rear and front derailleurs. The chassis of the bicycle is open, so it is necessary to constantly monitor its cleanliness. Sand and dirt on sprockets and chains are abrasive and significantly reduce component life and affect the smoothness of gear shifting. If the cleanliness of the frame and tires is an aesthetic matter, then the cleanliness of the chassis is practically necessary. There are special products for washing bicycles - it is recommended to use them.
2 - the chain must be clean and lubricated Cleaning and lubricating the chain is of paramount importance. Firstly, a dirty chain significantly reduces the clarity of gear shifting.
Secondly, dirt increases friction in the chain links and requires additional effort when rotating the pedals. You can use a small brush to clean the chain, but it is better to use a special machine. To do this, use the same wash as for a bicycle. With the help of a machine and a wash, the chain is cleaned faster (1.5 minutes - the chain is clean), and most importantly, the machine knocks out dirt from the inside of the chain links, which basically creates all the problems. After cleaning, the chain must be rinsed with water and then wiped with a dry cloth. Apply special Teflon lubricant to a clean, dry chain. This lubricant has an important feature - it is polymer. The liquid component dries out, leaving a polymer base, which, in fact, is a lubricant for the chain. Other lubricants are not suitable - the liquid base does not dry out, is squeezed out and collects all the dirt and dust on the chain even in dry weather. This problem does not arise with Teflon grease.
3 — maintain the required pressure in the tires. The tire pressure determines the driving performance of the bicycle and the likelihood of “figure eights” appearing on the wheels. The tire pressure depends on the tire diameter. Tyres on a standard mountain bike typically range from 19 to 22 inches. For such tires, the pressure range is 2.8 - 4.5 atmospheres (this is written on the side of any tire). 4 atmospheres recommended. Very often pressure is written in other units - PSI. The range of 2.8 - 4.5 atmospheres corresponds to 40 - 65 PSI. If tires have a smaller volume (for example, “slicks”), then the pressure can reach up to 6 atmospheres or more. In such cases, you need to proceed from the pressure range written on the tire. For a road bike (28-inch wheel), tire volume is 35 - 45 mm, pressure range is 3.5 - 6 atmospheres (50 - 85 PSI). Road bicycles have a tire volume of 18 - 25 millimeters, a pressure of 8 - 10 atmospheres or more. General recommendation: maintain pressure 85 - 90% of maximum.
Link removal process
Let's consider a modern way of adjusting the chain length using a device - a squeezer. Its low price more than compensates for all costs.
The design of the tool includes two grooves. The first squeezes out the pin, the second presses it in.
Algorithm of actions.
- We select unnecessary links.
- We insert one link into the squeeze and secure it with a clamp.
- We begin to rotate the knob and squeeze the pin.
- It does not need to be squeezed out completely.
- The movement formula will be as follows: tight movement - easy - difficult again.
- We disconnect the chain, leaving the pin on the plate.
- We count the links and dismantle them.
- The circuit connection occurs in the reverse order.
- Press in the pin.
- We carefully evaluate our work.
There are situations when the chain is stretched so much that removing the links does not have sufficient effect. In this case, it is better to purchase a new product.
Adjusting the front derailleur on a bicycle
Mountain bike storage.
It is recommended to store the bike in a dry, warm room. Cables and jackets of brakes and switches, bushings, carriage, column, chain, and other metal components rust from moisture. Constant violation of the rules for storing a bicycle usually leads to failure of components. Therefore, balconies, cold garages, and sheds for storing bicycles are not suitable. Usually there is a place for this in the apartment.
Cleanliness and dryness are the key to ensuring that your bike will last for a long time. When your bike is clean, it will be easier to notice damage, scratches, cracks or components that are about to break. In addition, dirt getting into any moving parts of the bike makes this very movement difficult. For example, sand getting into the bushings scratches its surface and wears out the bearings. It is enough to clean your bike at least once a week, but it also doesn’t hurt to wipe your bike from dust or excess dirt after each ride. Do not wash your bike with a strong jet of hose - this will wash out the lubricant. Just take a damp cloth and wipe the outside of the bike with it. Also, do not forget to wipe the rims and brake pads, at least with plain water.
006_moto_0811_070
The snail tensioner is simpler and more convenient: you only need one key, positioning accuracy is ensured by fixed notches on the snail and embossed dots opposite each number.
In addition, the required chain tension is ensured automatically if you turn the “snail” only by hand, without a key. One division roughly corresponds to one chain link. That is, in the case shown in the photo, you can easily take a chain 2 or 4 links longer. The snail tensioner is simpler and more convenient: you only need one key, positioning accuracy is ensured by fixed notches on the snail and embossed dots opposite each number. In addition, the required chain tension is ensured automatically if you turn the “snail” only by hand, without a key. One division roughly corresponds to one chain link. That is, in the case shown in the photo, you can easily take a chain 2 or 4 links longer.
009_moto_0811_070
How to check wheel alignment?
First, look at the motorcycle from the front and, turning the steering wheel, make sure that the front wheel is exactly in the center of the rear one (if you look along the sides of the front wheel, you can see the equal thickness of the rear tread). How to check wheel alignment? First, look at the motorcycle from the front and, turning the steering wheel, make sure that the front wheel is exactly in the center of the rear one (if you look along the sides of the front wheel, you can see the equal thickness of the rear tread).