The VAZ 2110 fuel pump has two varieties. The first option is mechanical, built into the engine and mainly used in carburetor engines. The second option is electric, built into the fuel tank for operation on fuel-injected cars. We will consider the electric fuel pump: its design, reasons for failure, the possibility of independent maintenance or replacement.
Fuel pump relay
The fuel pump relay is often mounted next to the fuel pump ground, that is, under the dashboard. A normally operating relay after turning on the ignition for a couple of seconds allows the pump to create pressure in the system and immediately turns off.
When the ignition key is turned, the driver hears a characteristic click (the relay is turned on), then a similar click will indicate that the fuel pump relay is turned off. If such clicks are not heard, this indicates a malfunction of the relay or its contacts. The optimal solution would be to replace the fuel pump relay with a new or known-good device. Let us add that the cost of spare parts is quite affordable.
How does a modern pump work?
The carburetor has been replaced by a modern, more reliable injector, so many owners of even the first ten cars are now trying to modernize their cars by removing the carburetor. And they do it right! But along with the injector, some other systems also need to be replaced.
Carburetor cars use a diaphragm pump to pump fuel when the engine is running. In the same place where the injector is installed, the electric fuel pump turns on, creating the necessary pressure even before the engine starts.
Fuel pump operation diagram
That is, it is powered by a battery. If an injector is installed on the VAZ 2110, then the performance and economy of the car is incomparably higher.
For an electric fuel pump, all the data that allows it to operate correctly is supplied from the computer. But, as you know, perfect units, like a perpetual motion machine, do not exist, so from time to time the pump on a VAZ 2110 (injector) needs to be disassembled in order to repair it.
Fuel system design
Diagnosis and Troubleshooting
It is relatively simple to verify that the electrical network is faulty - this can be done without removing the fuel pump. When the sound of its operation is not heard when the ignition is turned on, you must immediately check the fuse responsible for this circuit. It is installed in a block mounted at the bottom in front of the front passenger seat. You need to remove the block cover, find the fuse marked F3, rated for 15 A, and replace it. This kind of work can be done on the road.
If the operation of the fuel pump has not resumed, you should switch your attention to relay K2, located in the same block. It closes the power circuit of the pumping device based on a signal from the controller. You can also check the serviceability of the relay in road conditions, for which you will need a piece of copper wire
Diagnostics are carried out in the following order:
You can also check the serviceability of the relay in road conditions, for which you will need a piece of copper wire. Diagnostics are carried out in the following order:
- Remove relay K2 from the connector.
- Turn on the ignition.
- Using a wire, connect the contacts marked “30” and “87”; the numbers are marked on the relay. Another option is to apply power to pin “11” located in the diagnostic connector. The +12 V voltage can be taken nearby, from the cigarette lighter.
- If you hear the pump humming, then you need to change relay K2.
If after the above manipulations the unit is still “silent”, it is necessary to check the integrity of the wiring and the reliability of the contact at the place of its connection. This will require a device, so it will not be possible to carry out such work in the middle of a field. Unless you can check the serviceability of the fuel pump itself by disconnecting the connectors from it and supplying 12 V directly from any convenient source. If the pump still does not hum, it should be replaced.
It will not be possible to diagnose insufficient fuel supply to the injectors under road conditions, unless you carry a pressure gauge with a corresponding hose for connection to the fuel rail. The amount of gasoline supplied is characterized by the pressure in the network, to measure which you will need a pressure gauge. The check is performed as follows:
- Twist off the plastic cap covering the diagnostic fitting. It is located at the end of the fuel rail and is a regular spool.
- Press the spool rod to release the pressure in the line. In case of gasoline leakage, place a small container under the spool. Perhaps the malfunction will make itself felt already at this stage if there is no pressure in the network and no fuel flows from the fitting.
- Unscrew the spool and put the hose from the pressure gauge onto the fitting. With the ignition off, apply 12 V directly to the pump. To clearly record the readings, it must work for at least 10 seconds.
If the pressure is below 3.6 bar, you must first change the coarse filter. If this does not help, then you will have to check the RTD and the tightness of the injectors. This is the only way to accurately determine the source of the problem.
The video shows all the stages of diagnosing a fuel pump.
Video example: taking power from the main relay connector
If it doesn’t show correctly about + - 3 liters, then this is an error, but it’s better to install an on-board computer, it gives more accurate indicators, there’s no need to immediately go into the weeds.
My fuel pump stopped working when the engine control unit failed)).
I'm already tired of this little motor. I turn on the ignition, the relay clicks, the pump does not pump. I put my hand in the passenger’s legs, move the wires, it doesn’t help. I use a screwdriver and tap the relay. After these actions, the pump starts pumping when the ignition is turned on again.
It gets worse, now the pump fails when driving!
I searched everything there, swapped relays, fuses, felt how many wires go under the panel, nothing!
I'm so sick of this car already! It also stalls when you pull up to a traffic light at speed 3 and pull out the gear, the engine can’t hold the speed and stalls! I changed the TPS, XX, cleaned the throttle, etc., etc., the problem is not solved!
On the Drive2Ru forum, I started talking, they assured me that I’m not the only one, there are thousands like me! and no one can find the reason why the engine doesn’t keep the low speed bar and fails.
just like vibration at 100 km/h in the steering wheel.
and balanced the wheels in different service stations and changed the rims and mortars. bearings and brakes wheels, completely changed the entire suspension, the problem was NOT SOLVED! It hit the steering wheel for 100 km and continues to do so!
But the sensors are a separate issue! I constantly drove with a burning check. I'm tired of paying 450 rubles for a computer. diagnostics I bought BC ORION 10. Now it gives me errors. either low voltage at the TPS, or a knock sensor, etc. what kind of sensors are these that work so little and you need to run for a new one?
In the morning you start it, the speed is xx 1500 and rises to 2000 by itself! turned it off, started it, and it was fine. warmed up, drove off, stopped somewhere at an intersection, rpm 1300-1500 at 90C!
and this is ALWAYS the case, something is always preventing you from just driving, these little things are already infuriating!
The tire got a flat, I took it to the service station, they fixed it, pumped it up and drove on. Everything is clear here. and this electrician, it dried up the whole brain, how raw and unfit for use everything was.
some old Toyota, from the 80s, with an archaic injector does not cause such problems, everything works like a clock.
and VAZ is a car from Hell and for devils.
Check the mass air flow sensor. I had this on a viburnum and it didn’t work correctly. The voltage on it should be about.96-1.01, but mine showed 1.06. I changed it and the stalling stopped.
For me, on the contrary, I turn on the ignition, the pump works and does not turn off, I turn off the ignition, it turns off after 30 seconds.
Final check before replacing the starter
We turn the key to position II, and nothing happens... In this case, open the hood and remove the air filter by unscrewing the screw on the body and loosening the clamp on the pipe. The starter is located under the filter housing. In the photo we see the following: someone disconnected the solenoid relay cord.
What we found under the filter, we check with a needle probe that when you turn the key, “+12” appears. Then, after checking, we wrap the cord with electrical tape.
- The copper is polished to a shine;
- The wire (see photo) is supplied with “plus”;
- The starter doesn't even click.
The first thing you need to check is the battery contacts. We remove the terminals (key “10”) and look at what is under them. There is no point in measuring the voltage with a probe - it will show “12 Volts”.
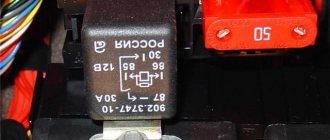
Causes: fuse, relay, connector
The pump power circuit includes many elements: closed relay contacts 5, fuse 3 (15 A), “+” wire, “pump-to-ground” wire. The most “difficult” defect is a short circuit of the “+” wire to ground. By the way, the cord itself is laid on metal, so such a defect cannot be ruled out.
Mounting block for dashboard
Both the relay and the fuse are located in a block located under the dashboard on the right. A fuse can blow in two cases:
- The “+” cord makes contact with ground;
- The motor resistance decreases due to overheating.
The first defect may be “floating”, and then it will be difficult to identify. But before calling an electrician, try checking everything else:
- Relay 5 should click twice: when the ignition is turned on and after 1.5 s. If this does not happen, replace the relay;
- Check fuse 3. If it is blown, you need to look for the cause.
Consider the situation: the relay is working, but the fuse is blown. Then we do this: disconnect the pump connector, install a new fuse and measure the voltage at the terminals. Details are below.
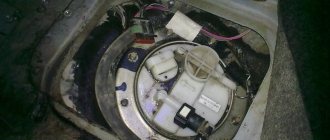
Connectors under the hatch, disconnecting them
You need to remove the hatch under the rear seat: two screws are unscrewed with a Phillips screwdriver. Next you need to disconnect the connector on the module, and then move on to the block under the dashboard.
First, turn off the fuel pump!
Replace the fuse. Let's move on to the fuel pump: connect the probe (zero cord) to any of the mounting studs. Voltage should appear on the “gray” wire when the ignition is turned on. And also check the potential difference between the “gray” and “black” wires - it should be equal to 12 volts, and also at the moment the ignition is turned on. Wiring:
- The two outer cords are the FLS sensor;
- “Black” – minus power supply;
- "Grey" is a plus.
The "black wire" sometimes loses contact with ground. At the last step, we checked exactly this version.
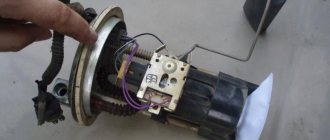
There are reviews from owners that say: the fuel pump on a VAZ-2112 does not work if the electric motor is working properly and there is voltage in the connector. This happens when the contacts of the internal terminal block oxidize (see photo).
Internal connector - yellow
Getting to the connector on the motor is not easy - you need to remove the fuel pump module by unscrewing 8 nuts around the perimeter.
Diagnosing the fuel pump
Safety precautions
Before unscrewing the nuts, you need to disconnect the two hoses. But first try starting the engine. The power supply to the fuel pump is not connected.
Please note - the power is turned off here!
Everything is ready for dismantling if:
- External connector is disabled;
- It is impossible to start the engine, although the on-board network is not de-energized;
- It is better if the tank is filled less than 50%!
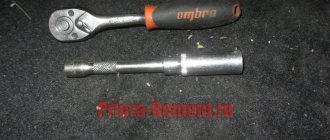
You need to unscrew two fittings from the module cover (top photo). Then use a socket wrench to unscrew the nuts from the studs and remove the retaining ring.
There is very little left to the internal connector
Having gained access to the internal connector, you need to clean its contacts. Assembly is carried out in reverse order. Good luck!
Removing the fuel pump on a car
Where is the fuel pump located on the Prior?
There are two types of electric fuel pump. One type is mounted inside the fuel tank, while the other is mounted under the vehicle just in front of the fuel tank. If the fuel pump is installed under the car, it will be held in place by a pair of bolts. You can easily determine that the fuel pump is located under the body, either by simply looking under the car, or, if it is not possible to see this way, by lifting the car with a jack.
Another option would be inspection from a viewing hole. You need to look directly in front of the gas tank, from the side of the filler neck. It is advisable to at the same time inspect the fuel line from the tank to the fuel pump. If there is contamination, the line should be cleaned. The pump will often be contained in a black insulating casing. You need to carefully remove the insulation, and then remove and slightly lower the fuel pump itself. It cannot be removed from the system until the wiring and fuel hoses are disconnected.
Removing the fuel pump: installation in the fuel tank
If your vehicle is equipped with a type of fuel pump that is mounted inside the fuel tank, it is necessary to dismantle it while inside the vehicle. The access point to the in-tank fuel pump is either under the rear seat or, if you're very lucky, it will be under the carpet in the trunk.
Lifting the upholstery you can see the hatch, screwed to the car body with 4-8 bolts. By unscrewing the bolts and removing the hatch, you can see the fuel pump. When dismantling an element, you must turn everything off before removing it from the tank. This is described in the following steps.
Disconnecting fuel lines
Now that the fuel filter has been visually located and the first steps have been taken to begin dismantling, you need to disconnect the fuel lines. If the pump is inside a fuel tank, there should be one fuel line on top of the pump that should be disconnected. Fuel lines are connected to the pump from two directions.
They are also called the low pressure and high pressure side of the pump or fuel drain and fuel supply lines.
To remove the lines, you need to loosen the clamp or fitting that holds the fuel line, then loosen the fitting and remove the fuel drain line.
When carrying out this type of work, it is necessary to have a convenient container on hand in order to drain the remaining fuel that flows from the elements of the fuel system into it, so that it does not flood the car interior or floor and create a fire hazard.
Disconnecting the fuel pump wiring
The last step in removing the fuel pump is to disconnect the wires that power the pump. There are two wires connected to the pump, one positive and the other ground. Usually the wires come in bundles. The harnesses are fastened together either with plastic latches or plastic clamps. In any of the options, disconnecting is not difficult. Even if the work is done by a non-professional.
Installation of a new pump must be carried out in reverse order.
Experts recommend paying attention to rubber sealing elements and fastening parts. In case of cracking, tearing or deformation of the material, they should be replaced with new ones. Video example of removing a fuel pump located in the tank:
Video example of removing a fuel pump located in the tank:
Replacing a mechanical fuel pump
Unscheduled replacement of a mechanical type device takes place in the following order:
- We dismantle the air purification filter.
- Remove the fuel supply line to the fuel pump.
- First loosen the tightening of the clamp.
- Remove the fuel supply line to the carburetor.
- Unscrew the fasteners of the product.
Installation is in the reverse order. At the same time, do not forget to look at the arrows on the products showing the direction of movement of fuel to the carburetor.
The question is often asked, how to check the VAZ 2110 unit in operation? To do this, it is necessary to tighten the screws on the cover with the pump lever depressed and test the carburetor accelerator pump.
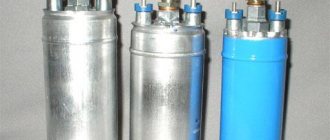
Bosch fuel pump performance - from 3 to 3.8 bar
The manufacturer Bosch produces its own fuel pump for each type of fuel system. Why, after the original fuel pump fails, do people install a Bosch fuel pump from a VAZ 2110? How does the pressure and performance of the fuel pump compare with the original one? If you put it with high pressure, will the flow rate increase?
Consumption does not increase due to the performance of the fuel pump, since on cars the return line is activated and excess fuel is returned to the tank, there is also a fuel pressure regulator, from the name it is clear, I think what function it performs.
Consequently, there was a 2.8 bar pump, they installed a Bosch VAZ 2110 fuel pump with 3.8 bar and it will only get better. Fuel consumption may increase if the fuel pump does not create sufficient pressure in the rail and the injectors begin to pour gasoline, which does not burn, rather than spray.
Problems with the starter VAZ 2110 VAZ (2111, 2112)
+1″>When the starter is turned on, the armature does not rotate, the traction relay does not operate
The battery is faulty or completely discharged. Charge the battery or replace it.
The battery terminals and wire tips are heavily oxidized; lugs are loosely tightened Clean the pole terminals and wire lugs, tighten and lubricate with Vaseline
Interturn short circuit in the pull-in winding of the traction relay, its short circuit to ground or open circuit
Replace the traction relay Open circuit in the power supply circuit of the starter traction relay Check the wires and their connections in the circuit between plugs “50” of the starter and the ignition switch
The contact part of the ignition switch is faulty: contacts “30” and “50” do not close. Replace the contact part of the ignition switch.
The armature of the traction relay is stuck. Remove the relay, check the ease of movement of the armature.
+1″>When the starter is turned on, the armature does not rotate or rotates too slowly, the traction relay is activated
The battery is faulty or discharged. Charge the battery or replace it.
The battery terminals and wire tips are oxidized; lugs are loosely tightened Clean the pole terminals and wire lugs, tighten and lubricate with Vaseline
The lugs of the wire connecting the power unit to the body are loose. Tighten the lugs of the wire.
The contact bolts of the traction relay are oxidized or the nuts securing the wire tips on the contact bolts are loose. Clean the contact bolts, tighten the nuts securing the wires
The commutator is burning, the brushes are stuck or worn out. Clean the commutator, replace the brushes.
Break or short circuit in the armature winding Replace the armature
+1″>When the starter is turned on, the traction relay is activated and switched off repeatedly
Battery is low Charge the battery
Open circuit or short circuit in the holding winding of the traction relay Replace the traction relay
Large voltage drop in the power supply circuit of the traction relay due to severe oxidation of the wire tips. Check the wires and their connections in the circuit from the battery to the “50” plug of the starter.
+1″>When the starter is turned on, the armature rotates, the flywheel does not rotate
Freewheel slipping Check the starter on the stand, replace the clutch
Reducer gears are damaged Replace damaged gears
+1″>Unusual starter noise when rotating the armature
Excessive wear of the armature and drive shaft bearing shells. Replace the shells or covers and supports with shells.
The starter is loose or its cover on the drive side is broken. Tighten the fastening nuts or replace the starter.
The starter is attached incorrectly. Check the starter fastening.
Reducer gears are damaged Replace damaged gears
The teeth of the drive gear or flywheel ring are damaged. Replace the drive or flywheel.
The gear does not disengage from the flywheel: – the clutch is stuck on the splines of the drive shaft – the armature of the traction relay is stuck Do the following: – clean the splines and lubricate them with engine oil – replace the traction relay or eliminate the jam
Final check before replacing the starter
We turn the key to position II, and nothing happens... In this case, open the hood and remove the air filter by unscrewing the screw on the body and loosening the clamp on the pipe. The starter is located under the filter housing. In the photo we see the following: someone disconnected the solenoid relay cord.
What we found under the filter
Using a needle probe, we check that when you turn the key, “+12” appears. Then, after checking, we wrap the cord with electrical tape.
- The copper is polished to a shine;
- The wire (see photo) is supplied with “plus”;
- The starter doesn't even click.
The first thing you need to check is the battery contacts. We remove the terminals (key “10”) and look at what is under them. There is no point in measuring the voltage with a probe - it will show “12 Volts”.
Scheme
The fuel pump circuit is not particularly complicated. In fact, the unit is an ordinary electric motor, powered by 12 volts from the car’s on-board network. The problem is that getting to it is not easy - you will have to disassemble half of the interior.
The electrical circuit includes:
- control module;
- ignition unit;
- wiring;
- fuse;
- relay.
All 2110 models that left the assembly line before 2000 have mechanical fuel pumps. Its components are:
- frame;
- top cover;
- return spring;
- two valves;
- a pusher equipped with a diaphragm.
Power is supplied to the fuel pump in the 2110 model after turning the key in the ignition switch. Voltage is supplied first to the relay. It closes and the unit begins to pump fuel. When the hoses are full, the on-board computer turns off the current. The engine is cranked by the starter and starts.
An important point is that detailed pinout of the fuel pump is not required when troubleshooting a fault, since most often easily replaceable standard elements fail.
Starter malfunctions and reasons for their occurrence
The unit does not spin the flywheel due to many factors. Below we will discuss defects in the immobilizer, pull-out relay, injector, as well as in the car wiring. Sometimes repairs are not enough, in which case the device needs to be replaced.
Faulty injector
The standard version of the VAZ 2110 is not equipped with injectors, but they can be supplied separately. Drivers choose these devices for many reasons: reduced fuel consumption, no need to warm up the engine in cold weather, increased power characteristics.
Article on the topic: We eliminate damage to the front and rear side lights on a VAZ 2114
The arrow points to the starter relay
If the starter is not working well, then you need to check the injector, which may be acting up due to bad gasoline. This is the only drawback of the injector - it requires high-quality fuel. It is also worth checking whether the connection diagram is followed.
Overrunning clutch failure
If the overrunning clutch breaks, the engine starts and runs perfectly. But when the car stops, the engine cannot be restarted; it clicks but does not start. In this case, you need to wait until the power plant has cooled down, and only then try to start it.
Also in this case, it is worth inspecting the wiring that comes from the coupling. Sometimes replacing damaged wires can solve a problem where the engine clicks but won't start. Another sign of a faulty clutch is the radio turning on spontaneously.
Solenoid relay
Once behind the wheel, the driver inserts the key and turns it, the fuel pump starts working, the dashboard lights up, but when turning further, the pump and the panel turn off, and the starter does not turn. In such a situation, the solenoid relay is most likely to blame.
Removing the solenoid relayFirst of all, you need to check whether there is voltage going to it. If it does, then it’s worth checking the lock itself or the alarm system, which may close the circuit. If all the elements work separately and do not start together, then the starter does not turn due to the solenoid relay.
Article on the topic: Independent replacement of the front and rear crankshaft oil seals on a VAZ 2110
Poor contact
In this case, the starter starts after several attempts, but it still clicks. This problem occurs due to damaged contacts. The inspection should begin with the battery. If the terminals are oxidized, you need to clean them.
If this does not help, then you should check the starter contacts, because when they are oxidized, the device turns poorly or does not start the crankshaft at all. If the starter refuses to work, but the immobilizer is running, then there is a malfunction in it. Here you won’t be able to remove the defect yourself - you need to go to a car service center. Now readers know how much it costs and why the starter does not work; it is worth doing the work yourself only if you have experience working with wiring.
Why is it acting up?
Let's look at the main faults.
- The main, most common reason that the fuel pump makes a loud noise and does not cope with its functions is the filtration system, which includes fuel filters, as well as a special mesh that is located inside the fuel pump. You can suspect that the culprits are here based on the following signs: • your fuel pump is buzzing much louder than usual. Moreover, you need to listen to it exactly when it starts, immediately after turning the ignition key. When the engine starts, you are unlikely to hear the pump humming, because it will be joined by the sounds of a running engine. In addition, you should know that the VAZ 2110 fuel pump hums loudly on its own, and its noise is drowned out by the fuel in the tank where it is located. Therefore, when getting into a car, you should not immediately turn on the music, but listen to how all its systems work; • failures occur in engine operation, which also indicates that fuel is supplied intermittently due to contamination of the filtration system; • These same faults are indicated by a drop in power. Most likely, the mesh is clogged with microparticles of various dirt, which enter the gas tank along with the fuel, or are formed there due to condensation and corrosion processes.
- The clearances available in the supercharger have been increased. A strained sound may indicate this malfunction. You can hear it working under load. In addition, power drops; the VAZ 2110 (injector) has poor throttle response. Gaps increase for several reasons. In winter, condensation may crystallize; in summer, the density of the fuel decreases, causing the fuel pump to cool and lubricate less well. Both provoke the formation of scratches, cavities, and grooves, due to which the gaps increase;
- The fuel pump suddenly stops due to the supercharger wedge, as a result of which the fork that connects the supercharger and electric motor shafts breaks. This blows the fuse. The ignition should be turned off immediately. There is a concern that when the pump stops and the current increases, the gasoline may ignite;
- In addition, a malfunction of the electronics transmitting signals to the fuel pump cannot be ruled out. Before you begin repairing it, you should check the reliability of all connections and wiring.
Safety precautions
Before unscrewing the nuts, you need to disconnect the two hoses. But first try starting the engine. The power supply to the fuel pump is not connected.
Please note - the power is turned off here!
Everything is ready for dismantling if:
- External connector is disabled;
- It is impossible to start the engine, although the on-board network is not de-energized;
- It is better if the tank is filled less than 50%.
You need to unscrew two fittings from the module cover (top photo). Then use a socket wrench to unscrew the nuts from the studs and remove the retaining ring. There is very little left to the internal connector. Having gained access to the internal connector, you need to clean its contacts.
Oxidation of the terminals of the internal connector is a typical disease of the VAZ-2112 fuel pump, and only one of the contacts does not work. The “+” terminal is more often oxidized.
The Lada Kalina fuel pump does not pump and does not work. Reasons, signs
Sooner or later, any car enthusiast is faced with the fact that the gasoline pump of the Lada Kalina fails. Some people immediately go to a car service center, but there are also those who try to fix the problem with their own hands. This procedure cannot be called easy, but it is quite possible to do it yourself.
Lada Kalina fuel pump repair video
https://youtube.com/watch?v=7xPJSUReJKg
The video shows the process of repairing and diagnosing the Lada Kalina fuel pump, as well as some recommendations.
Main signs of fuel pump malfunction and diagnostics
Gasoline pump Lada Kalina
Before proceeding with repairs, it is necessary to determine whether the fuel pump is faulty. There are direct and indirect factors that indicate this. So, let's look at the main signs of a malfunctioning gasoline pump on Kalina:
- Poor engine start when cold.
- The car moves jerkily.
- The motor does not start.
- Insufficient pressure in pipelines.
All these reasons may mean that the fuel pump needs repair or replacement.
Removing the fuel pump
Before you begin removing the Kalina fuel pump, you need to assemble the tools. To carry out this operation you will need: pliers and a screwdriver. So, let's get straight to the process:
- Disconnect the “minus terminal” from the battery.
- Relieve the pressure in the system.
- We dismantle the rear seat sofa.
- Under the carpet we find a hatch from which you need to unscrew the 4 fastening bolts.
Under the rear seat and carpet there is a panel that covers the Kalina's fuel pump. - Disconnect the fuel pump wiring connector.
- Disconnect the fuel hoses.
By pressing the block you can disconnect the fuel hosesDisconnect the inlet and outlet fuel hoses of the Lada Kalina
- Unscrew the fuel pump mounting plate counterclockwise.
The place where the fastening ring should be so that the fuel pump can be pulled out - Once in a certain groove on the body, you can remove the gasoline pump from the fuel tank.
- Installation is carried out in reverse order.
Now the fuel pump has been dismantled and you can begin troubleshooting and repairs.
Repair operations
Before you begin repairing the fuel pump on Kalina, it is worth noting that you need to be 100% sure that this is where the problem lies. If you are not sure, then it is worth checking all other systems, since it is not recommended to disassemble it unless absolutely necessary.
It is also worth noting that repairing this unit should be done slowly and carefully, since the part is fragile and careless movement can only cause harm. So, let's consider the sequence of disassembly and repair processes:
- Use a screwdriver to pry up the drain module and disconnect it.
- Disconnect the ground wire from the pump.
- From the inside we disconnect the intermediate wire connector.
Clogged fuel pump screenThe working part of the Kalina fuel pump
Internal view of the fuel pump housing
Use a screwdriver to pry up the ring and turn it clockwise
- We dismantle the pressure regulator.
- We press the plastic retainer and remove the fuel pump module.
- We remove the filter mesh from the housing.
- We reassemble in reverse order.
Fuel pump mesh for Kalina fuel pump
If during disassembly we identified parts that need to be replaced, then we replace them.
Selecting a fuel pump
If the fuel pump stops showing signs of life, it must be replaced. To select, you need to know the catalog number.
The original article number of the Lada Kalina fuel pump is 1118-1139009. There is also an analogue from the manufacturers Master-sport (1118-1139009-PCS-MS) and Pekar (1118-1139009).
Replacing and repairing the Lada Kalina gasoline pump is quite easy compared to what it seems at first. You can carry out this operation yourself in your garage, if you have a screwdriver and pliers. If the fuel pump is completely out of order, you can easily find a new one. As practice shows, car enthusiasts install the original part.
Troubleshooting, simple tips for reliable operation of the fuel pump
- If the VAZ fuel pump does not rotate, then first of all, check the integrity of its fuse and the functionality of the relay by replacing these parts. They are located behind the console panel, below, on the front passenger side. If their condition is satisfactory, to test operation, you need to apply supply voltage to the fuel pump directly. To do this, you need to remove the cushion from the rear seat and open the shield secured with screws. It must be remembered that if a security alarm is installed, the power supply to the VAZ pump will include an additional shutdown relay in case of a break-in.
- If the fuel pump does not respond to voltage supply or the filter needs to be checked and replaced, then you need to perform the following steps to remove the fuel pump from the fuel tank. To relieve pressure in the fuel lines, the fuel pump is turned off using a fuse and the car is started. After the internal combustion engine has stalled, open the gas tank from the filler neck to relieve the pressure of gasoline vapors, disconnect the negative terminal from the battery (to avoid a fire), disconnect the electrical connector from the pump installation flange on the gas tank, disconnect the connectors of the main gas lines (rubber gas-resistant ring on the line fittings must be replaced), the flange is unscrewed (8 7 mm hex nuts), the rubber gasket is removed and the VAZ fuel pump assembly with float and strainer is removed (a rag is first placed nearby so as not to stain the interior with gasoline). The fuel pump filter is being replaced or cleaned. If the pump breaks down, a new one is installed, since its design is usually unrepairable.
- At low engine power, the pressure in the fuel supply system is checked. This is done either independently using a purchased kit with a pressure gauge, or by checking at a service station (service station). If the fuel pump pressure is unstable and the return hose is pinched, it is less than 4 atm. then the pump must be removed and replaced. Otherwise, the problem may be clogged injection nozzles or improper operation of the fuel pressure regulator.
It is not at all necessary to change the fuel pump of a vehicle several times to understand the main points of its successful operation:
- driving a car with an empty tank is an extreme mode for the gas pump and ultimately costs much more than banal refueling;
- the gas pump “does not like” questionable gasoline, which also leads to frequent replacement of the filter and the pump itself;
- When replacing a VAZ 2110 fuel pump, you can give preference to imported analogues, whose pressure is higher and whose operation is more stable.
Source
Causes: fuse, relay, connector
The pump power circuit includes many elements: closed relay contacts 5, fuse 3 (15 A), “+” wire, “pump-to-ground” wire. The most difficult defect is a short circuit of the “+” wire to ground. By the way, the cord itself is laid on metal, so such a defect cannot be ruled out.
Both the relay and the fuse are located in a block located under the dashboard on the right. A fuse can blow in two cases:
- The “+” cord makes contact with ground;
- The motor resistance decreases due to overheating.
The first defect may be “floating”, and then it will be difficult to identify. But before calling an electrician, try checking everything else:
- Relay 5 should click twice: when the ignition is turned on and after 1.5 s. If this does not happen, replace the relay;
- Check fuse 3. If it is blown, you need to look for the cause.
Consider the situation: the relay is working, but the fuse is blown. Then we do this: disconnect the pump connector, install a new fuse and measure the voltage at the terminals. Details are below.
Wiring
On almost all car models, the wiring to the fuel pump consists of three wires: “positive”, “negative” and a wire for determining the amount of fuel in the tank. If the fuel pump stops pumping, the wiring may be damaged. You can check the power using a 12 W lamp, powering it from the external connector of the fuel pump. When the ignition is turned on, the light should light up. If not, then the external circuit is broken somewhere.
To check the external wiring, you need to connect in turn the “positive” and “negative” contacts removed from the fuel pump power connector. It is necessary to close the “negative” contact to ground, after which the light will light up when the ignition is turned on. So, it can be determined that the contact is inoperative. If the lamp does not light up, then the “positive” contact is damaged. Placing a contact on the relay in which the light does not light up, there may be a problem with the wiring in the section from the relay to the fuel pump.
How to check the fuel - air system of a VAZ 2110
Another reason why the VAZ 2110 will not start may be a faulty supply of the fuel-air mixture to the car’s engine. In the air supply system, malfunctions occur extremely rarely and boil down to either a tightly clogged air filter or a blockage of the air channel by a foreign object. Such malfunctions are unlikely to occur on a well-maintained personal vehicle. But if the car is, for example, a service car or recently purchased, it would be a good idea to make sure that the filter is intact and that there is no rag stuck in the channel after a recent repair.
The engine fuel supply system is controlled by an electronic control unit, which, in turn, regulates the fuel-to-air ratio based on readings from the mass air flow sensor (MAF) and the throttle position sensor. If both of them are faulty, it is not surprising that the VAZ 2110 does not start.
Diagram of the fuel air system of the VAZ 2110
Next, it’s worth checking the condition of the air filter, since this is the easiest thing to do. And, if none of the above steps help, you need to check the pressure in the system created when the fuel pump operates. Connect a pressure gauge to the diagnostic fitting of the fuel rail and measure the pressure. Its low level indicates a clogged pump filter, and its high level indicates a gearbox malfunction.
The normal pressure level directly depends on the type of engine installed in the VAZ 2110 car:
- the limit from 284 to 325 kPa is normal for engines of type 2111, 2112;
- the limit from 364 to 400 kPa is normal for engines type 21114, 21124.
By the way, the serviceability of the fuel pump can also be determined by disconnecting the main gas supply hose to the ramp and pumping gasoline through it into a clean container. A working pump will pump at least 1.5 liters in a minute. fuel.
Also listen to the starter. Does the main electromagnetic relay turn on with a characteristic click and does the electromechanical drive of the unit work at all? Despite the fact that the design of the starter is extremely simple, the electrical contact on it can easily be lost or the gearbox can fail. In the latter case, a characteristic creaking or whistling sound will be heard.
If the starter does not rotate, you should remove it from under the hood of the car. This process will not take much time, just like disassembling the block itself. It is worth checking the serviceability of the electrical part using a multimeter, “ringing” the windings, and disassembling the gearbox. A large amount of lubricant in it in the cold season does not allow the starter to rotate.
How to buy a quality device?
The price for a VAZ 2110 fuel pump in market conditions will be 2 times lower than in a specialized store. The equipment is in durable and sealed packaging. Inside the package is purified gasoline. If you smell gasoline, then the seal of the packaging is broken and there is a possibility of corrosion forming inside the gasoline pump. Submerged equipment is lubricated and cooled by fuel. When using low-quality additives and gasoline, internal electrical mechanisms are corroded. If additional substances are not used in the operation of the device (dry), then the brushes wear off and it overheats. The service life of the equipment is longer. Some car owners are planning to replace the VAZ 2110 Bosch fuel pump, the characteristics and pressure of which are not normal only due to long-term use. Its pressure can be 6-7 atmospheres. It was amazing to hear from an experienced driver his method for testing the fuel pump. To do this, he took a jar of water, turned it on on the battery, and by the flow of liquid he realized that the power of the gas pump had decreased.
Hi all! I drove and didn’t know grief! but my car started to start extremely poorly, where it starts and stalls, when I turn the key sharply, it starts and stalls again... and this can continue for 5 minutes... and eventually it starts... at idle it instantly shows 0.7... I changed the filter nothing has changed... while driving, I noticed that when you press the pedal sharply, it stalls... if you press smoothly, it pulls normally... if there is not enough gasoline in the tank, the light is on but the arrow is not in the air... you’re completely tired of starting... and then snow suddenly piled up...
Now the fuel pump is more complicated. I’m not looking for easy ways, you know...)) I started from the fact that the fuel pump from a BOSCH fret is suitable.
I advise you to read further very carefully, because I will try to answer most of the questions. and the fuel topic will be closed with this post specifically on ASTRA H.
BOSCH fuel pump 0580453453 is a VAZ pump. According to the catalogue, it was replaced by 0580454140. The strangest thing is that the BOSCH catalogs are different, it’s not clear which one to believe.
I dug up a table of pump performance... I can’t find anything like graphs anywhere to accurately understand the dependence... then we look carefully -
What to do Lada Kalina won't start
Stylish crossover Kalina
A lot of time has passed since AvtoVAZ announced the launch of a new project called Lada Kalina. Grandiose advertising and hope for a bright future did their job: millions of Russians, out of patriotic feelings, decided to choose the domestic Kalina, discarding numerous projects by Renault, Volkswagen and other factories positioning reliability and quality. But the joy was short-lived.
Already in the first months, Kalina did not show her best side, showing a capricious disposition. And it turned out that Kalina’s owners began to spend more time in the garage doing repair work than on trips. Engineers know their shortcomings and try in every possible way to get rid of them in each next generation of cars, to come up with something to increase the reliability of the car.
But for some reason the results are still little noticeable. As before, the car cannot please you with its endurance and wear resistance. The most unpleasant problem is that Kalina does not start from time to time. To return the machine to working order, it is necessary to find out the causes of the malfunction, and there are many of them. So, let's try to figure out why the Lada won't start.
Repair work
On a carburetor VAZ 2110 it is easier to replace the fuel pump if necessary. It is located under the hood and is not difficult to get to. It is enough to disconnect the pipelines, then unscrew the pump itself.
The electric fuel pump installed on an injection machine is located directly in the gas tank, so it is more difficult to get to it; this is done from the passenger compartment by removing the rear seat.
All fuel pumps are dismountable. After removing the cover, the mesh is removed and its condition is assessed. Of course, you can wash it, but it’s even better to replace it right away. Before starting repairs, you should purchase a repair kit, which must be equipped with a mesh.
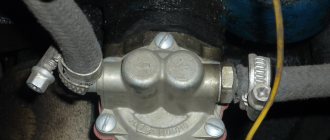
How to determine the status of the fuel pressure regulator (FPR)?
There are two ways to determine if an RTD is faulty:
- If the pressure with the engine not running with the fuel pump turned on is below 2.8 atm. To turn on the fuel pump directly without starting the engine, then on the diagnostic block we close the closest contacts to the gear shift lever.
- Turn off the fuel pump. The pressure in the ramp should drop by about 0.7 atm and remain at this level. If the pressure in the fuel system does not hold and immediately drops to zero, then the RTD or the pump check valve is faulty (located on the back side of the fuel pump motor; it is not advisable to change the pump because of it). Do not rule out cracks in the fuel line or poor condition of the injectors (gasoline flows in)