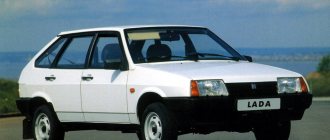
The safety of the driver and passengers directly depends on the serviceability and quality of lighting. In addition, tuning headlights for a VAZ 21099 car affects the appearance of the car, so drivers do optics tuning. The article is useful both for those who have encountered lighting problems and for those who have decided to make a tuned car.
Do-it-yourself headlight tuning for VAZ 2109
Almost every car owner wants to make his car unique. And it doesn’t matter whether we are talking about a Maybach or a VAZ 2109, 21099. With the help of tuning a VAZ 2109, you can make almost any car exclusive. Next, we’ll look at the elements of headlight tuning specifically for VAZ 2109 and 21099, and how you can do it yourself.
It should be noted that tuning both front and rear headlights is not as complicated a process as it might seem at first glance. The main thing you need is your imagination and the necessary materials.
Engine compartment modifications
In addition to replacing the power unit after it has exhausted its life, there are many components in the engine compartment whose wiring also needs to be replaced:
- high-voltage wires from the ignition unit;
- wiring of various control sensors;
- battery power cables (connections are most susceptible to corrosion).
Numerous sensors in the engine compartment require special monitoring:
- Coolant temperature sensor - if the electrical wiring is faulty, the driver will not notice overheating of the power unit;
- Brake fluid level sensor in the expansion tank - a leak or low level can lead to brake system failure;
- ABC system sensors - oxidation of contacts or disruption of wiring integrity can lead to system failure;
- Exhaust gas sensor - based on its readings, the electronic unit “prepares” the fuel-air mixture. If the sensor does not work, gasoline consumption will increase.
A useful addition to the functionality of the car is the acquisition of a modern anti-theft system.
Installing a modern alarm system is a special topic, since its work affects several main components and systems of a VAZ family car:
- General electrical system;
- Supply system;
- Sound and light circuit and actuators (side lights, headlights, sound signals);
- Standard immobilizer.
Advice: often manufacturers of alarm systems accompany the installation process with video and photo materials for each specific model of a particular family of cars. Before starting installation, you should read them carefully.
General alterations
Installing additional fog lights is a general modification because:
- Affects equipment in the engine compartment;
- Interferes with the instrument panel inside the cabin;
- Connects to the vehicle's standard power supply system;
- Attached to the power body.
To install and connect fog lights, you will need a wiring diagram for the VAZ 2109, because the package includes:
- Connecting wires;
- Terminal blocks;
- Switching relay;
- Actuators (buttons);
- A backlight lamp (or LED) indicating the status of lighting fixtures.
Alternative optics
Besides the fact that alternative optics on a VAZ 2109 or 21099 are beautiful, such headlights are much more reliable than standard lighting fixtures.
Why do the headlights fog up from the inside and thereby spoil the appearance of the car? The fact is that glass allows moisture to pass through, as a result of which the contacts oxidize, and the lamp may simply burn out. Even if this does not happen, the glass will fog up, resulting in poor visibility on the road. Replacing the glass won't do anything. The result, if there is one, will only last for a short time.
Based on this, we can say that tuning the rear lights on a VAZ 2114 or 2109 and 21099, or the front lights, is more of a necessity than just an external change.
Alternative optics for VAZ 2109
Necessary materials
First of all, it should be noted that regular spray paint will not work. This is due to the fact that the space inside heats up, and the paint simply slides off. To tune the rear headlights on a VAZ 21099 or 2109, you only need to use special paint.
A special substance for tuning headlights must withstand high temperatures. The cost of one such bottle does not exceed 500 rubles.
Car headlight tinting paint
Types of lamps
For rear and front lights, two types of lamps can be used:
As practice shows, LED lamps are most often chosen for rear lights. This is due to the fact that such lighting devices are much cheaper, but at the same time durable and economical.
In addition, we can highlight the following advantages of LED lights specifically for VAZ 2109, 21099:
- service life - at least 10 years;
- ergonomics;
- energy saving;
- response is 3 times faster than xenon.
Against the backdrop of all this, such headlights provide the optimal amount of light for the car. If you don’t want to change the rear or front headlights, you can tune the ones you already have. It should be noted that, unlike the front lights, the rear lights on the VAZ 2109 or 21099 can even be painted from the inside. It’s quite easy to make this a reality with your own hands.
Rear LED headlights
Types of panels
Instrument panels on the VAZ 2109 are of at least three types:
- Low panel;
- High panel;
- Electronic panel on nines with Europanel.
Europanel
On versions with a low panel, failure of the entire panel is extremely rare. This is due to the fact that here the speedometer and econometer are equipped with mechanical drives. Therefore, it is unlikely that they will fail along with the electrical component.
Dashboards with a high panel do not have an econometer, but the speedometer is also based on a mechanical cable drive.
Preparatory stage before painting
In order for the paint on the headlights to last for a long time, a preparatory stage should be carried out. The algorithm of actions is as follows:
- headlights are dismantled and disassembled;
- the additional turn signal reflector is removed;
- Using fine sandpaper or a special substance, chrome is removed from the surface of the lantern;
- primer is applied.
Please note that the primer must dry for at least one hour. The substance should be applied to the headlight of a VAZ 2109 or 21099 in 2-3 layers. Otherwise, the paint will simply peel off during use.
Preparing headlights for painting
Chassis
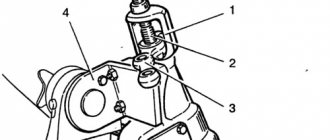
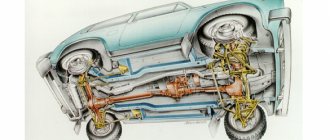
The suspension allows you to soften shocks to the body that occur while driving. Not only the comfort of movement, but also safety depends on its operation. The car should feel confident on the road and also withstand potholes and bumps well. The suspension helps absorb impacts, therefore extending the life of the car body. Tuning the VAZ 2109 suspension allows you to improve its characteristics, therefore it is relevant and in demand.
You can improve the chassis as follows:
- replace shock absorbers with gas-oil ones. It is recommended to buy shock absorbers and springs as a set. Monroe and Plaza sports shock absorbers are suitable for standard springs. For aggressive highway driving, Koni Sport or Bilstein Sport shock absorbers are more suitable. To improve the car's handling, it is enough to install a Monroe Gaz-Matic or Plaza;
Improvement of the car brake system is as follows:
- replacing rear drums with disc brakes;
- installation of a larger disc-caliper pair;
- replacing the master brake cylinder. This must be done with the obligatory implementation of the two previous options, since the standard cylinder will not be able to cope with the task.
Painting process
The paint must be applied in at least 4-5 layers. It takes at least one hour to dry completely. After this, you can assemble the entire rear light.
At the final stage, you need to be especially careful when applying the sealant. The old one is completely removed. After this, the surface of the rear light is degreased and a new sealant of the appropriate color is applied.
If this protective substance is applied incorrectly, the taillight of the VAZ 2109 (21099) will fog up, which will lead to more serious consequences. In general, doing this yourself is very simple.
Removing and replacing rear lights
- It is best to make the replacement before wiring problems begin.
- To work you need to remove the lights. On the VAZ 21099 it is hidden by a plastic decorative trim in the trunk.
- Now unscrew the fixing screws on the trim and remove them.
- Disconnect the block with wires and carefully remove it, being careful not to damage the board, because it sits tightly in place.
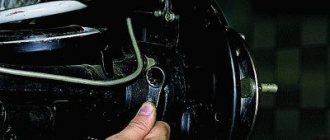
- Now, using a 10mm wrench, unscrew the 4 nuts securing the headlight housing. Remove the part from the machine. Now you can install the new part and calmly begin the replacement.
- The collection is done in reverse order (the author of the video is Automaniac1994).
Film tinting
If painting does not suit you, you can use tuning using film.
Here it is necessary to note the main rule: the better the quality of the film, the better the result. Therefore, in this case, savings are inappropriate.
Film can be applied to lanterns both outside and inside. But if you plan to cover the front of the headlight, you should understand that the film deteriorates much faster.
Film tinting of headlights
Engine
In order for a car to feel confident on the road and not be inferior to other cars at the start, it is necessary to improve its engine. Before this, it is necessary to upgrade the brake system and gearbox, only in this case you will be able to drive not only quickly, but also safely.
By tuning the VAZ 2109 engine, you can increase its volume to 1.7 liters. You shouldn’t increase it any further, as the motor will start to overheat and quickly fail.
Refinement of the engine consists of installing the following parts:
- lightweight crankshaft;
- forged pistons coated with molybdenum disulfide;
- lightweight connecting rods;
- piston pins with tapered chamfers.
In addition, you can replace the standard cylinder head with a head from Lada Kalina. The existing engine mounts are replaced with reinforced ones and the camshaft is replaced. As a result of such modifications, the car becomes more playful and powerful. It can accelerate to 180 km/h and produces 98 hp. With. If the model is carburetor, then jets with higher throughput are installed in the first and second chambers. In injection models, a January 7.2 controller is installed to control the motor.
Video: modification of the cylinder head
The process of pasting headlights
The algorithm is as follows:
- the headlights are carefully dismantled and disassembled;
- The reflector is removed using an abrasive material or a special liquid.
It is recommended to cover the glass with masking tape to avoid scratching it during work. To make it easier to level the film around the edges, you can use a spatula that is not too sharp. It's a little more difficult to apply film to the taillights. The gluing process itself is the same. Only the preparatory stage is somewhat different:
- the battery is turned off;
- the wires that lead to the lighting fixture are disconnected;
- The flashlight itself is disassembled.
Only after this can the procedure described above be carried out.
Pasting car headlights
In general, tuning a VAZ 2109 (21099) with your own hands is a simple process that almost anyone can do. But it also has several negative sides:
- significant deterioration of lighting;
- tinting is prohibited by law and is punishable by administrative penalties;
- possible problems during technical inspection.
Therefore, when doing such tuning with your own hands, you should understand and take into account these nuances. With the correct selection of materials and compliance with technical requirements, tuning, which was done by yourself, will not only add beauty to your car, but will also provide it with greater practicality.
What can be changed in the electrical circuit
Let's figure out what exactly car owners undergo alterations.
Moreover, we will indicate only those alterations that are not prohibited by the manufacturer and current regulations:
- Installation of a new instrument panel;
- Alteration of internal (interior) lighting;
- Installation of additional turn signal indicators in the rear view mirrors;
- Installation of additional headlights (fog lights);
- Installation of an acoustic and multimedia system;
- Immobilizer installation.
For reference: the visual differences between the standard panel and the “high” one are that the radio compartment is moved to the level of the dashboard. Accordingly, the wiring on the VAZ 2109 under the instrument panel must be replaced.
Interior modifications
Many owners come to mind with the desire to improve the lighting in the car interior.
Let us remind you that inside a passenger vehicle there are several places equipped with lighting sources:
- The salon itself (interior lighting);
- Glovebox;
- Cigarette lighter;
- Instrument panel (instrument cluster lamp and symbol lamp)
If you, as the owner, like a high panel in the cabin, then you cannot do without replacing the standard wiring. Because the:
- Control devices have a different location on the panel;
- The standard length of wires is not enough;
- Terminal blocks may also differ.
Accordingly, without replacing the electrical wires it will not be possible to use:
- instrumentation;
- on/off buttons for various devices.
Step-by-step tuning of VAZ-2109 headlights
Are you the owner of a VAZ-2109 and want to perform headlight tuning yourself? You will learn further how to do this. It is clear that any car owner wants to make his car special so that it is different and stands out among other cars, and it does not matter at all what brand of car we are talking about. And it is thanks to tuning that you can make your car unique. Now let's look at the nuances and elements of tuning VAZ-2109 headlights with our own hands.
If the appearance of the car is really important, then it is best to start tuning with optics. Headlights can fog up from the inside, which can also ruin the appearance of the car. This happens because the glass allows moisture to pass through, causing the contacts to oxidize and the lamp easily burns out.
Even if we take into account that this may not happen, in any case, due to fogging of the headlights, visibility on the road deteriorates, which increases the risk of an accident, therefore, tuned headlights are not just an external change, but also a necessity. For headlights and taillights, only two types of lamps are used:
In practice, LED lamps are most often chosen for taillights. And all because these devices are cheaper than xenon ones, but at the same time they are quite economical and quite durable. Here are the most basic advantages of LED lights for the VAZ-2109:
- Energy saving.
- Service life is about ten years.
- 2 times faster response than xenon.
But xenon lamps can only shine with high beam or only with low beam. In order for them to fully illuminate both the high beams and the low beams, you need to install bi-xenon there, and this is already quite expensive. If you prefer to drive at night, then, of course, it is better to install xenon lenses; they are mounted in different groups of sockets for car lamps.
To install such lenses, you will need to remove the outer glass, and then install the lens. But if you drive more often during daylight hours, then it is still better to install LED ones with an increased service life and good light. After listing all this, it seems that such headlights are the best option for a car, since they provide a sufficient amount of light. However, if you don’t want to change the front or rear lights, then it’s better to tune the ones you’re already using. If you still decide to change, then you need to be extremely careful so as not to fall for any kind of defect. A good-looking headlight does not mean high-quality work. The good news is that the rear lights on the VAZ-2109, unlike the front ones, can even be painted inside. Bringing this idea to life is quite simple.
Problems with the generator - the light dims due to lack of voltage
Many car owners drive with poor lighting and do not even suspect that the culprit is not the lamps or the headlights themselves, but the electrical circuit in the car. The first step is to check the generator, which produces a certain voltage during the trip and is the main source of electricity after the engine has been started. If the generator does not work well and does not produce the required voltage, the following troubles are possible:
- all elements of electricity consumption will not work very well, many may not turn on at all due to the lack of normal network operating conditions in the car;
- instead of the required 12V, 8-9V is supplied to the headlights at a constant network load, this can be checked by turning on the headlights with the engine off (if the light is normal, the generator is to blame);
- Also, if the generator malfunctions, fuel consumption increases, since the computer increases engine speed in order to obtain a more or less normal voltage in the network;
- Also, the poor quality of the generator is due to the fact that when you press the gas pedal, all lighting elements, as well as fans and other electrical appliances, begin to work better.
Now let's talk more about the process itself.
The important thing is that ordinary paint, which is sold in cans, is not suitable for this, because the entire space inside gets very hot, which is why the paint can easily slide off. For painting you need to use only special paint intended for this purpose. This substance must resist high heat as effectively as possible. The price of such a can is about 500 rubles. In order for the paint to serve you for a long time, you will need to prepare for painting in stages:
- the headlights need to be dismantled and then disassembled;
- then you should remove the additional reflector for the turn signal;
- remove chrome from the lamp with fine sandpaper;
- apply primer.
The primer must dry well; this will require waiting at least an hour. Special paint must be applied to the headlight in 2-3 layers, otherwise the paint may simply peel off. After this, it will take time again for the paint to dry completely, this will take about one hour.
Once the paint has dried well, you can completely assemble the rear optics. You need to approach the application of sealant with special responsibility. The old sealant must be completely removed, then the tail light must be degreased and the new sealant must be applied directly. This must be done carefully, since if the sealant is applied incorrectly, the headlight may fog up, which can lead to serious consequences.
It's also a good idea to install a set of strip LEDs or apply tint instead of painting. There is no need to save on film, since in this case the quality of the film is of great importance. It can be applied both from the inside and outside, but if you paste it on the outside, it is clear that the film will deteriorate faster.
In general, tuning headlights is not a particularly complicated process, but if you are afraid of making any mistakes, of course, you can buy tuning devices. However, the tuning process itself is interesting; every car enthusiast would like to do everything himself, putting his soul into this matter.
Causes of failure of the rear parts of the lighting system and driver actions
You can find out what the breakdown may be and how to solve the problem below. We will talk about modified nines.
Possible malfunctions of brake lights and their elimination
- Due to a voltage drop, a short circuit may occur and the paws will burn out.
- If it's time to strip the wires because the contacts have oxidized and the terminals do not conduct current well enough.
- Often, in the event of a voltage drop, it may be necessary to remove and replace fuses.
- If the reverse sensor contacts are broken or damaged.
Removing the brake light switch sensor In the case of the problems listed above, the easiest way, of course, is to install a new lamp.
This happens without any difficulty: you just need to turn off the lights, open the trunk and remove the wiring block. After this, holding the fixing elements that are installed on the sides, remove the panel and unscrew the lamp. In its place, install a new light device and assemble the assembly in the reverse order. If we talk about stops, both lamps and one of them may not work, that is, only in one headlamp. If such a problem occurs, it is necessary to immediately diagnose:
- Check the fuse and, if necessary, replace it with a new one. Fixing a breakdown is not enough, because, as in the case of human diseases, a burnout may be a fault in the system that needs to be corrected. If this is not done, you can change the device until the end of the life of the VAZ 21099. One of the reasons may be a short circuit.
- If the wiring in the signal lamp sockets has oxidized, the lamp needs to be twisted a little in the socket to scrape off the damaged layer. To make the work done more effective, you can clean the contacts with sandpaper.
- If the lamps in the stops burn out, you need to replace it with a new one and check whether the system will work. And if the contacts are bad, they need to be cleaned both on the board and on the wire block.
- If the tracks in the headlight circuit board are burnt out, then you can remove the board and visually diagnose its integrity. If there are burnt tracks, they can be modified by replacing the wiring.
- The sensor is faulty or the electrical circuit is broken. First, you need to remove the red and white wires from the sensor and connect them with a piece of wire. If the brake lights come on, then the sensor needs to be replaced; if not, you need to check the electrical circuit. It needs to be checked for broken contacts.
Modernization of headlights
Car repairers believe that tuned headlights are more reliable than those installed at factories. Rework options:
- replacing standard optics with xenon;
- use of LEDs;
- covering lighting structures with tinted products.
Replacing lamps
Factory bulbs installed in a car do not last long. LED lamps have the following advantages over a conventional incandescent lamp:
- service life of at least 5 years;
- ergonomics;
- low power consumption;
- fast response.
At night, it is very important to have a good view of the road. Changing the optics often improves the light performance of devices. Xenon lamps are more powerful than diodes, but LED lamps are easy to maintain and have a low cost. Do not forget that unregulated xenon lamps emit a very powerful luminous flux. This can lead to a traffic accident, as the oncoming driver may be temporarily blinded by the bright light.
Painting
A common method of auto tuning is darkening the optics with a special varnish or painting. To complete the work you will need a can of black paint. Only materials with high temperature ratings are allowed. Regular paint will come off as a result of heating, and no tinting effect will remain.
The work is carried out in stages:
- The headlight is removed from the car.
- The optics are completely disassembled.
- Using a curved screwdriver, unscrew the screws that hold the headlight mask.
- The turn signal reflector is removed.
- The chrome paint is being cleaned off.
- Apply primer for plastic in three layers.
- After the primer has completely dried, paint is applied (auto mechanics recommend applying paint in 5 layers.)
- The structure is being assembled.
- The headlight glass is cleaned of old compounds.
- The glass is washed, wiped dry and treated with a degreaser.
- Black sealant is applied along the edges.
- The device is assembled and installed on the car.
- The connection is made to the circuit through the fuse block.
If there is incomplete contact between the glass and the optics box, air may get inside, causing the headlights to fog up.
Film tinting
An inexpensive way to change the optics of a VAZ 2109 is to use a tint film. The result depends on the quality of the materials used. Good tint films have high light transmittance. This is an important indicator on which the lives of all road users depend. It is allowed to apply the film to the inner and outer surfaces of the headlight.
Applying a tinting film to the external surface is possible without removing the optics from the car. To do this, you need to prepare the surface: remove dust, dirt, the surface must be clean and dry. A notch is made and a piece of the required size is cut out. Soap and water are applied to the glass. The protective layer is removed from the film and applied to the headlight. The air is expelled. The surface is carefully wiped with a rag to remove any remaining liquid. This method is fast and simple. Even a car enthusiast who does not have special skills and knowledge can perform it.
When removing the headlight, it is recommended to handle the glass with care. It is allowed to seal it with masking tape to prevent scratching.
The tinting film is easy to remove. But tuning VAZ 2109 headlights with film has its downsides:
- peeling of the material after some time;
- reducing the brightness of the emitted light;
- violation of traffic rules, which may result in a fine;
- Difficulties in passing technical inspection.
Where is the power supply and its electrical circuit located?
The mounting block with fuses and relays is located under the hood, next to the windshield, on the left side of the car in the direction of travel. Over the entire period of production of nines, three varieties of such devices were designed. They differed among themselves in the number and location of fuses and relays.
Location of the mounting block in the VAZ 2109
Old style
Let's look at the description of the old-style VAZ 2109 fuse box, which was installed on cars produced before 1998. The mounting assembly had 11 electromagnetic relays, 16 fuse links and was marked 17.3722.
The photo shows the old fuse box
The fuse box is a plastic casing covered by a transparent cover. There are symbols on it that specify the purpose of the relay, the fuse rating, its installation location and the electrical circuits it protects. Thanks to this, it will be easy to find out where this or that protective device can be placed.
Rear foot improvement
Tuning the rear lights of the VAZ 2109 is simple. You can do this operation yourself or contact a specialized auto center. Modernization of rear stops is often necessary even for factory optics: contacts oxidize, lamps burn out. Several reconstruction options are possible:
- Using LED overlays. LED strips can create a unique pattern and make a car stand out in traffic.
- Application of diode rings. LED strips will allow you to define the hind feet and make them more expressive.
- Tinting. You can tune car headlights using film or paint. It is worth paying attention to the characteristics of the material: it must withstand high temperatures.
Changing the appearance of a car is an interesting activity. There are many types of tuning known. It is important to always remember that a car is a highly dangerous vehicle. The driver should always have a good view and lighting in the dark.
Models of good fog lights
As for fog lights, the most popular products are considered to be high-luminosity lamps from manufacturers Osram (Night Breaker model) and Philips (Xtreme Vision). According to the manufacturers, these models of fog lights have an increased luminous flux. Philips EcoVision lamps are considered less bright but more durable. You can also find Chinese fog lights from the Nord YADA brand on the market. Their cost is the lowest compared to analogues, but their build quality is appropriate.
Communities › LED Tuning › Blog › Lada 2109: Lens replacement + led headlight tuning Pro Sport
Salute to the people)) So many things have happened with these headlights that I don’t even know where to start)) Well, in general, these headlights are from the same car for which I made the tidy and buttons, who forgot to look HERE. I received Pro Sport headlights and the task was to replace the stock lens that is on the low beam on the Galaxy G5 while maintaining all the functionality of the headlight + install AG on the lenses + replace the light. turn signals to brighter ones. I combined some photos into one photo because I would have to make 2 parts)) These are the headlights:
The substrate was painted white gloss before I did it. We need this module with a lens:
I took it off, then washed it off the dirt and disassembled it down to the last screw:
Then I somehow wanted to compare the physical dimensions of the lenses in order to understand the complexity of the future work, and here I was a little kidding, so to speak))
How can I fit it in, huh?!) This is the first thing I thought about) After much thought and fitting, I began to adjust the old lens to the new one. We cut out/grind off everything that is not needed and modify the old reflector so that the new lens fits there:
Then on the other side:
So, I think she sat down. We fix the lens on the back side and try on the lamp, everything is ok:
By the way, in the photo you can actually see the size of the lens, what was there and which one was shoved in))
Now the top part. Before and after modification:
Trying it on with a new lens:
And then I realized that there was no way to tighten it because the base of the new lens was larger, even though I had filed it down! We need some kind of “adapter” that would combine the upper and lower parts into a single whole. For a long time I walked around the markets looking for a pipe of the required diameter, but I didn’t find anything! As a result, a plastic pipe turned up on which they wrap the film, hurray! In reality, my joy knew no bounds since I was already tired of this search)) But with all this, the pipe was 8 or 10 mm thick and it was necessary to grind out the inside so that a pipe with a wall thickness of 3-4 mm remained and at the same time it put on the lens body! After some brainstorming, I realized that I couldn’t cut it out myself so neatly and evenly – I needed a turner. Several turners did not take up the work, but I did find one smart guy and he helped me in this matter. I cut the pipe to the size I needed and ground out the inner liner so that it fits on the top and bottom of the old lens body. These are the “adapters”:
And I further refined them locally and combined the 2 parts into a single whole:
This is victory! I was extremely glad that things had finally moved forward)) Then I sanded everything, degreased it and filled it with epoxy resin inside and out in 3-4 layers - it holds up perfectly! For now I put the lenses aside and started making AG. I measured everything, did it and installed it in its new rightful place:
It shines very brightly, it’s impossible to take a photo in working condition - the photo shows a solid spot of light)) Once we install it on the car, I’ll try to take a photo during the day and post it here) The whole thing was assembled and is supported by a good layer of epoxy. Next I did the turn signals. I unpacked the headlight and we see 13 dead lights on the board from which there is almost no brightness))
I took the dimensions, made a board of the same size and soldered the lights with all my heart - 51 pieces)
In reality, it was very bright at night, the whole room was illuminated with yellow-orange light, during the day I took it outside and the result was also clearly visible!) Well, the turn signals and AG are in place, the tests have passed... it’s time to assemble the headlight. I painted the new lens housing matt black, just for beauty’s sake, and then, when installing it in place, I discovered another problem! Due to the increase in the size of the lens housing drain, the adjustment mechanism does not fit into place and there is still no way to adjust the lens itself! Damn, another “spike in the wheels” again! Having thought everything over, I went to my already familiar turner and ordered extended adjusting screws for tilting the lens and spacer tubes to extend the seat of the adjusting mechanism to the headlight itself. Time passed and I received everything, I was pleased with the quality - it was not in vain that I waited)) Here in the photo you can clearly see the difference between the adjusting screws and what simple tubes are needed for + new extended fastening screws:
And then the victory music sounded - the headlight was “defeated”)) Everything was assembled and still worked)) I really struggled with it for a long time to achieve a good result! As a result, we have a bi-xenon lens + AG in place where there used to be a mono lens that did not shine at all with some dull AG on 2 LEDs. Everything is hermetically and firmly assembled while maintaining the ability to adjust the lens + the turn signals have been replaced, which are clearly visible not only at night, but also during the day)) This is what the headlight looks like after all the modifications:
It is impossible to take a normal photo of the eyes in working condition, as they are very bright and blinding. In the future I will take a video/photo of the headlights on the car and post it here, it will be better visible there) Thank you for your attention))
Salon
The interior of the Nine was developed in the last century, so today it cannot be called a model. To make it more modern, there are many tuning options. Do not forget that it is ugly when the external tuning of a car is done very well, but when you open its doors, you see a worn-out interior. You can make the following interior changes with your own hands:
- additional sound insulation helps make the car more comfortable. To protect the interior from external noise, additional pasting is carried out on the partition separating the engine from the interior, bottom, doors, and engine compartment. For this, a special noise-insulating material is used, the thickness of which is 1.5–2 mm. It is made from butyl rubber composite sealant. The material has an adhesive layer with which it is attached to the car body;