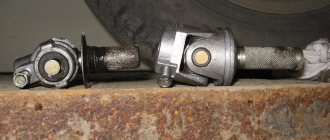
The front oil seal of the VAZ 2101-2107 engine is used to prevent engine oil leaks in the place where the accessory drive pulley is attached to the end of the crank. Although the sealing lip is made of high-quality fluorine rubber, over time its working edge wears out and lubricant leaks into the gap. Today we will share a method for replacing the front crankshaft oil seal of a VAZ “classic”. Even a novice driver can cope with the job, because to do this you don’t even have to remove the camshaft drive cover from the engine.
Why does the oil seal wear out prematurely?
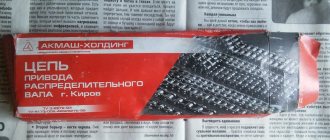
- use of counterfeit spare parts;
- pouring low quality gasoline into the vehicle, constantly running the engine at high speeds;
- motor overheating;
- dirty filter and untimely oil change in the car.
The front oil seal is the easiest to change. The rear one needs to spend much more time.
To replace the oil seal you need to perform a number of simple manipulations:
- The vehicle is driven into a pit;
- The battery is de-energized;
- We start the first gear to fix the crankshaft;
- Fixing the vehicle
Detailed instructions for replacing the crankshaft oil seal on a VAZ 2107
The oil seal or cuff of the crankshaft plays the role of a plug and the functionality of this unit largely depends on its condition. According to the instructions, replacing the crankshaft oil seal on a VAZ 2107 must be carried out every 150,000 kilometers.
If you decide to replace the front or rear oil seal yourself, then check the crankcase ventilation system in the engine. If it is clogged, be sure to clean it, otherwise all your efforts may be in vain.
Changing the front oil seal yourself
The first step is to disconnect the protection from the motor. We take an eight millimeter key. It is necessary to unscrew the front, rear and side screws. We remove the protection. If the car is fuel-injected, then removing the additional shield will not be too difficult.
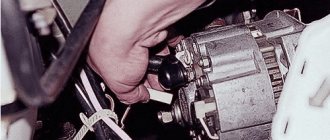
Next, you need to remove the generator, which would make it easier to get to the pulley.
We unscrew the generator nut, then move the generator, the belt will relax and it will be easy to remove it.
Using a special wrench, unscrew the nut that secures the crankshaft and carefully remove the pulley.
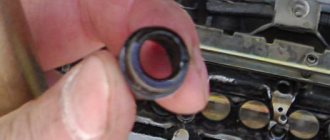
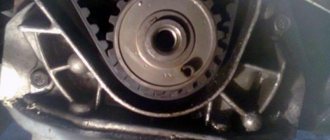
This is where the seal itself is visible. It may have cuts or tears. Carefully remove it with a screwdriver and wipe the area. Lubricate the new oil seal with oil and place it in place. Using a hammer, carefully press the part into the lid.
The work of installing the new oil seal is completed. Then you need to install the pulley and belt. Next, we install the protection back.
Replacing the rear oil seal
Now we are changing the rear crankshaft oil seal (cuff) on the VAZ 2107. This will require more time, patience and strength, since to access it you need to disconnect the gearbox. All preparatory work is carried out to the same extent, but the car is in neutral gear. Since you need to hang the rear wheels, you need to do this in a pit, and not on an overpass. The external size of this oil seal is 90 mm, and the internal size is 70.
First you need to disconnect the cardan from the gearbox:
- jack up and hang out the rear wheels;
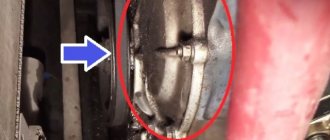
- if the VAZ 2107 is an injector, remove the heat shield of the catalytic converter (13 mm socket wrench) by unscrewing the 4 nuts from the studs (see figure). If the VAZ 2107 is not an injector, but a carburetor, we skip this step.
- Now you can start removing the driveshaft. Important! Take a file and make a mark on the universal joint fork and on the gearbox (differential) flange. When everything is put back into place, it must be secured in exactly the same relative position to avoid vibration and imbalance. That's what the label is for.
- Unscrew (with a 13 mm open-end wrench) the cardan shaft from the gearbox flange, while using a pry bar to hold the cardan shaft from slipping. Now let's hang the rear part of the cardan on a wire to the rear suspension, wherever you like.
- We disconnect the front part of the cardan shaft: we unbend the tendrils of the oil seal race (4 pcs.), Slide it along the cardan. We unscrew the bolts securing the intermediate cardan support (2 pieces) from the bracket, and disconnect the shaft from the elastic coupling by moving the shaft back.
Congratulations! The driveshaft is disconnected. Now you need to remove the gearbox to gain access to the rear oil seal. Removing the gearbox and flexible cardan coupling:
- First, the central panel of the radio is removed in the cabin. You will need a 10 mm wrench, pliers and screwdrivers. Unscrew the two console nuts from the top. Then use a flat-head screwdriver to pry up the decorative trim at the bottom, remove it and unscrew the bottom screws. We disconnect the toggle switches for lighting and heated rear window, and push out the connectors, disconnecting them. First you need to remember the connection diagram. Finally, we lift the panel up and back a little, release the gearshift “stick” and remove it.
- Next, remove the decorative covers of the gearshift knob. Then lift the handle up, use a flat-head screwdriver to press the lock and remove the handle. We carefully remove the damper (rubber) from it, using tweezers. Using two screwdrivers, we open the petals on the locking ring and remove it and its two bushings: rubber and locking.
- Unscrew the screws securing the gearshift knob casing (using a Phillips screwdriver) and remove it with the foam seal.
- move the upholstery aside and unscrew the lid in the floor;
- open the hood, unscrew the starter mounting bolts and move it back. As a result, he will release the checkpoint bell.
- disconnect the elastic coupling of the cardan. Attention! To successfully install it in its original place after replacing the oil seal, you must first tighten it with a special clamp.
- Using an open-end wrench (19 mm), unscrew the nuts on the bolts securing the coupling and gearbox shaft crosspiece (3 pcs.). After this, remove the coupling along with the seal and ring.
- Now, using the same wrench, unscrew the nuts securing the front driveshaft flange and remove it. These and the previous 6 nuts are self-locking; new ones will be required when reassembling!
- From the gearbox you need to disconnect the wires going to the white reverse light and the drive to the speedometer shaft.
- Now, without removing the hose, we disconnect the hydraulic drive and the clutch cylinder from the gearbox housing. After this, remove the clutch housing cover itself. You need to unscrew 2 bolts with a 10 mm socket wrench.
- Important! Now you need to install a support under the gearbox so that it does not fall on your head and the bolts do not become distorted!
- take a 19 mm socket wrench with an extension. You need to remove 6 bolts that secure the gearbox housing to the engine block. Now, using a flat-head screwdriver, pry the gearbox housing from the edge, remove it from the studs, rock it and remove the gearbox from the car, pulling the engine input shaft out of the clutch disc. Important! The box must not be skewed.
The preparatory work is finished! You can start replacing the rear oil seal. For this: - remove the flywheel and clutch shield, to do this we use a 10 mm socket wrench. You need to unscrew 2 nuts on the shield;
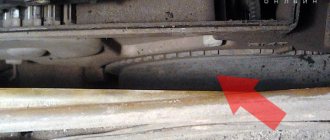
- Before changing the oil seal, you need to remove its holder so as not to damage the crankshaft flange. The figure clearly shows 6 bolts securing it, and 2 bolts of the rear part of the oil pan, A and B. They also need to be unscrewed, since they are screwed into the oil seal holder body.
Attention! There is a gasket between the oil seal holder and the cylinder block body. And if you have traveled such a long way to the oil seal, do not be lazy and change it regardless of the condition.
- We release the oil seal from the holder mandrel, to do this we fix it in a vice, and, through a special slot, use a flat-head screwdriver to remove it. The oil seal is inspected for damage and wear patterns.
- The seat is again wiped with clean gasoline, the new oil seal is lubricated with clean engine oil and pressed into the holder using a mandrel from the bearing or an old oil seal.
- Reassembly requires performing all steps in reverse order.
Congratulations! If you managed to independently get to the rear oil seal, change it and reassemble (in reverse order) the disconnected units, then you have passed the exam for an advanced amateur auto mechanic with flying colors.
Step-by-step instruction
Due to the limited space between the front of the engine and the radiator, it is difficult to press in a new oil seal without distortion. For this reason, experts recommend replacing the sealing element with the front engine cover removed. Of course, doing this on a mechanic’s workbench is much more convenient, but there are also pitfalls here. As practice shows, after such dismantling it is difficult to restore the tightness along the junction line of the oil pan, and in addition, there is a danger of breaking the internal threads in a rather delicate duralumin cover.
For this reason, we recommend using the more common and less labor-intensive method, in which the damaged oil seal is replaced directly on the engine. This work will require your attention and accuracy. It is more convenient to perform all manipulations on a lift, overpass or inspection pit.
- Put the car on the handbrake and set the gear lever to fourth speed.
- Disconnect the power terminals and remove the battery from the vehicle.
- Using a 17mm socket and a long wrench, loosen the self-locking nut securing the generator to the adjusting bar.
- Having installed a pry bar or the same wrench between the generator and the right subframe (spar), use it as a lever to move the generator towards the cylinder block. This will allow you to loosen the serpentine drive belt of the mounted mechanisms and remove it from the engine.
- Moving under the car, remove the mudguard and oil pan protection.
- Unscrew the ratchet nut using a special 38 socket wrench. In some cases, the fasteners grab so tightly that even the foot brake cannot be used to block the wheels. In this case, mechanics recommend removing the starter and using a strong wrench to block the flywheel. To remove a stuck nut, the wrench is extended with a suitable pipe. Please note that the crankshaft shank has a right-hand thread, so turn the ratchet counterclockwise.
- Remove the crankshaft pulley. For these purposes, use a mounting spatula, prying the part from different sides and using the tool as a lever. However, do not overdo it, as if you press too hard, you will break the front engine cover.
To play it safe, make sure you have a puller in your arsenal. With its help, you can easily and safely dismantle even those parts that are installed with a noticeable interference. - Clean the front part of the cover, the oil seal and its seat, otherwise dirt will get inside the engine when removing the sealing element.
- Using a strong, wide-bladed screwdriver, use a strong, wide-bladed screwdriver to pry up the seal with support from the oil seal socket. Tapping the handle of the tool, remove the damaged part.
- Before installing a new oil seal, wipe its seat until it shines - this will make installation easier in the future. If the damaged oil seal is removed too easily, this indicates wear of the socket in the camshaft drive cover. To ensure sealing in the future, apply a layer of automotive sealant to the side surface of the new seal.
- Carefully install the oil seal into place. Make sure that it does not warp and fits evenly into the socket.
- Using a suitable mandrel (you can even take a wrench to remove the ratchet if it is the right thickness), carefully press the oil seal into place with a hammer.
- Carefully inspect the crankshaft pulley. If there is significant wear on its working part, then replacing the oil seal will not eliminate the problem of oil leakage. In this case, replace the part.
- Before installing the pulley, lubricate the inner and outer surfaces of the pulley hub with engine oil. Lubrication will make it easier to install the part on the crankshaft, and most importantly, it will prevent premature wear of the working edge of the oil seal in the first minutes of engine operation.
- While turning the pulley, align the groove with the key installed in the groove of the crankshaft. By shaking and simultaneously pressing on the part, ensure that the hub fits inside the oil seal.
- Screw the ratchet nut all the way in by hand and tighten with a wrench. According to the manufacturer's recommendation, the tightening torque does not exceed 101.3-125.64 N×m (10.34-12.8 kgf×m).
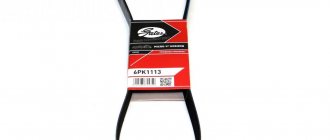
- Reinstall and tension the poly-V-belt of the accessory drive. Remember that excessive tension will cause accelerated wear on the alternator and coolant pump bearings. The deflection of the belt between the pump and the crankshaft with a pressure force of about 10 kgf x m is 12 - 17 mm.
- Tighten the generator mounting nut.
- Install the battery and connect it to the vehicle's on-board network. At this point the repair is considered complete.
What leads to rapid damage to the seals
We have already figured out that they should be changed regularly over time. However, there are a number of factors that can lead to faster damage to the cuffs. The most common among them are:
- contact with old oil;
- engine overheating;
- defect in the part itself;
- use of bad fuel.
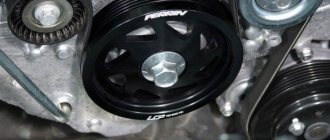
Where is?
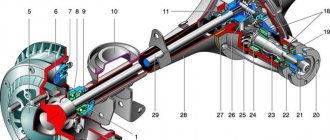
The oil seals are located in small holes on the camshaft drive covers. Being at the ends of the shafts, they perform two roles, the first is to prevent oil from leaking out and the second is to protect the components from dust and dirt entering the system. The camshaft cover is circled in red in the photo. The blue arrow shows where the crankshaft pulley is located, behind which the cuff is located.