A detail that does not catch the eye and seems insignificant, actually plays an important role in ensuring the functionality of all vehicle systems. Having a fairly simple and reliable device, the crankshaft pulley sometimes needs to be replaced. Most often it is removed when it is necessary to replace the crankshaft oil seal. In this regard, it is important to know what types of pulleys exist, what can cause breakdowns, and how replacement is made.
Types of pulleys for the crankshaft
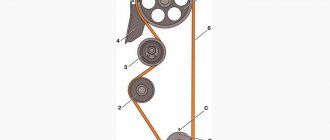
The vast majority of car mechanisms use energy received from the rotating crankshaft to operate. If the rotation of the wheels is ensured by a whole system of shafts and gears, then a crankshaft pulley is used to drive the gas distribution mechanism (GRM), generator, pump, air conditioner.
In different periods of the automotive industry and for different brands of cars, pulley design solutions independent of each other were used. It makes no sense to say which type of pulleys is better; for different operating conditions of the car there is a different type of pulley.
Crankshaft with pulley for V-belt
Almost all cars, trucks, and buses with engines developed by domestic designers in the Soviet era are equipped with a belt drive for the generator. The pulley for such a belt has an all-cast (all-welded) design, and the groove repeats the configuration of the V-belt.
The pulley is mounted on the end of the shaft through a key, which prevents it from turning, and is secured with a nut (less commonly, a bolt). The simplest design allowed the pulley to be used throughout the entire period of operation of the motor.
Crankshaft Timing Pulley
In order to facilitate the gas distribution system and wire, the designers proposed using a belt rather than a chain. A similar design is found on almost all modern cars. In order to achieve maximum coincidence of the angle of rotation of the crankshaft and camshaft, the inner surface of the belt has grooves, and teeth are applied to the outer rim of the pulley. That is why such a pulley is called toothed. Provided timely replacement of belts and proper operation, the pulley itself lasts quite a long time, and breakdown is rare.
Crankshaft damper pulley
At the moment of startup and a sharp change in crankshaft rotation speed, the belt and gas distribution system are subjected to a strong impulse mechanical effect. The developers proposed equipping the pulley with a damper - a rubber layer between the inner race and the outer working disk. This design has found wide application in engines for minibuses and light-duty vehicles.
The designers achieved the desired result, but at the same time significantly reduced the life of the pulley. Rubber loses its elasticity and breaks down due to temperature changes, aggressive environments, and mechanical loads. Car owners are forced to continuously monitor the condition of the damper and urgently change the pulley if defects appear. Sometimes the pulley breaks, completely immobilizing the car.
How to replace a crankshaft pulley
Whatever design the pulley is used on the motor, the principle of dismantling and installation remains the same. If the motor is located along the engine compartment, then the pulley is located in the lower front part, behind the cooling radiator. If the block is located transversely, the pulley can be accessed by removing the right front wheel.
The most frequently asked question on auto forums is: what thread is on the crankshaft pulley? The problem is that the nut or bolt is too tight. Experiencing serious difficulties during dismantling, car owners doubt the correct direction of their efforts.
In this case, there is only one answer - the thread is right-handed, that is, the nut (bolt) must be unscrewed counterclockwise. The crankshaft rotates in the opposite direction, which results in a gradual, strong tightening. If we add to this the processes of oxidation and corrosion, then it is very difficult to remove such a tightening by hand.
Knowing some techniques, the whole process can be reduced to 10 minutes. The algorithm of actions is as follows:
- the car is installed on the inspection hole, the wheels are fixed with stops;
- when the block is positioned transversely, the wheel is removed and a “tragus” is placed under the brake disc;
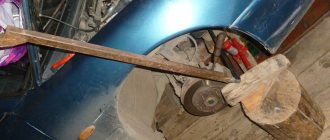
- a socket wrench with an extended lever is put on the head of the crankshaft bolt (nut) and rests against the floor in the direction of rotation;
- the armored wire is removed from the ignition distributor so that the engine does not start;
- By briefly turning on the ignition, the starter is activated, the force of which is usually sufficient to tear off the bolt (nut).
We recommend: Contact ignition system - what is it and what secrets does it keep?
This technique can be repeated several times until the puff is released. Next, unscrewing is done manually. To facilitate the process, it is recommended to cover all joints of parts with a layer of WD type lubricant or brake fluid in advance.
Pulling the pulley off the crankshaft is also not easy. Firstly, the landing dimensions are selected for the most durable connection and elimination of backlash. Secondly, the crankshaft pulley key also provides resistance due to the tight fit. It is ideal to use a special screw puller. In the absence of such devices, the pulley is removed using a pry bar, gently pressing on the back surface of the pulley in different places.
If the car owner managed to dismantle the pulley, then there will be no problems with its installation. Everything happens in the reverse order, and the crankshaft will provide itself with reliable clamping.
Crankshaft pulleys and their varieties
To operate the timing mechanism (gas distribution mechanism) of a pump, air conditioner or generator, a crankshaft pulley is used. There are different types of pulleys, each car has its own type.
Crankshaft with V-belt pulley
Many modern cars use a belt that interacts with the alternator. For such a belt, a pulley with an all-cast or all-welded design is used, with the grooves clearly repeating the shape of the belt.
The pulley is secured with a nut or bolt, depending on the design, and is inserted through a key onto the end of the shaft. Thanks to its simple design, the pulley lasts a very long time and easily withstands the entire service life of the motor.
Crankshaft toothed pulley
If earlier a chain was used to drive the timing belt, then over time many cars abandoned it and switched to using a belt in order to lighten the system. Now all modern cars use exactly this design with a timing belt for timing drive. To ensure that the rotation angles of the crankshaft and camshaft match as well as possible, grooves were made on the inner surface of the belt, and there were teeth on the pulley.
And the teeth fit perfectly into the grooves for the belt. So, it is precisely because this pulley has teeth that it is called a crankshaft timing pulley. If you change the timing belt on time, the entire system will last a long time. If you forget to change the belt, then you will have to overhaul the entire engine.
Crankshaft damper pulley
Since when starting the engine or during a sharp increase in crankshaft speed, an increased load is created on the belt and the entire timing system. Therefore, car manufacturers began to equip the pulley with a special rubber layer - a damper. This layer is located between the outer working disk and the inner race. This design is widely used in engines installed on minibuses and other similar vehicles.
Thanks to the use of a damper, it was possible to reduce the service life of the pulley, since due to temperature changes, the rubber loses its elasticity and breaks down. Therefore, for the system to work properly, car owners need to monitor the condition of this damper and, if something happens, change the pulley so that the car remains on the move.
Symptoms of a problem
Signs of a malfunction of the DPKV can be different. Often, dirt adheres to the end of the sensor itself, which can interfere with reading. Also, symptoms of a faulty crankshaft sensor may be as follows:
- The idle mode is unstable;
- Engine speed rises or falls spontaneously;
- Power drops;
- During acceleration, a “failure” is felt;
- The car doesn't start well.
In these cases, for the most part, the VAZ 2114 crankshaft position sensor is replaced.
In addition, the VAZ 2114 crankshaft sensor may well be in good working order. And on the “tidy” the DPKV error will appear (0335 or 0336). The reason for this may be a broken wire near the connector. This is easily determined visually; then it is enough to replace the connector without replacing the sensor itself.
If the owner notices signs of a malfunction of the crankshaft sensor on his car, then this is a “signal” about the need for diagnostics.
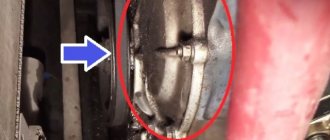
It is not difficult to guess where the crankshaft sensor is located on a VAZ 2114. Like many other VAZ models, it is attached to the engine, and more specifically to the oil pump, near the generator drive pulley, on its cover. The sensor is attached with one bolt, which is typical for many models of this family.
Here is the crankshaft sensor on the VAZ 2114
Typical causes of failure:
- Physical damage to the case;
- The interturn closure of the winding turns entails a change in the generation frequency transmitted to the control unit (frequency type sensors);
- Emergency wear or loss of pulley teeth.
Purpose of the crankshaft pulley
The design serves as a transmission from the drive to the attachment and consists of a massive disc-shaped cast iron part that is located on the axis. In addition, it contributes to cushioning during changes in rotation, balancing of the rotating device, and cooling of belts.
The design has a gap, with the help of which the disc is mounted on the camshaft in the front part, which comes from the carburetor or from the valve injector. The fasteners will be placed on it. And on top there are holes for attaching V-belts and poly-V-belts. The structure itself is quite heavy, so during manufacturing at the factory holes are made to reduce weight.
The part comes in two types - a crankshaft damper pulley and a regular one. Unlike the damperless part, the part has massive rings. There is a gasket on the outside, which is located separately from the base. The gasket reduces vibrations. In addition, the part is equipped with an outer disk and periphery connected by durable rubber. The rubber gasket protects against temperature changes and other influences. With prolonged use of the vehicle, the gasket wears out. Therefore, it needs to be changed from time to time in order to keep intact the more important part - the massive disk. External aluminum car part with irregularities. The toothed coating facilitates the operation of the part position sensor.
We recommend: Main types of passenger car suspensions
We connect the block with wires into place.
After installation and checking the gap, we try to start the engine. With a confident start and stable operation of the engine, we can say that the repair was carried out successfully.
Despite the fact that the breakdown of the synchronizing sensor is not frequent, knowledge of its symptoms and consequences, as well as methods of elimination, will be useful to the car enthusiast.
New sensors are available in almost any auto parts store. The price of DPKV can vary between 200-400 rubles. How much a VAZ 2114 crankshaft sensor costs depends on your region, the location of large spare parts stores nearby (usually cheaper there) and the greed of the seller. Can be ordered in the online store. When purchasing, take the old one with you so as not to make a mistake in choosing a model. To avoid defects and repeated purchases, it is advisable to purchase from well-established sellers.
Step-by-step procedure for removing the crankshaft pulley on a VAZ-2114
Before you begin dismantling the crankshaft pulley, you need to unscrew some components and parts on the VAZ-2114.
- First of all, we park the car and ensure it is stationary.
- Next, loosen the generator belt tension bolt and completely remove the locking bolt.
All bolts are indicated by red arrows.
- Then, remove the front wheel on the right, after lifting the car.
- We dismantle the opened mud guard of the wheel by unscrewing the bolts along the perimeter of the wing arch.
- When access to the engine is open, we finally remove the alternator belt.
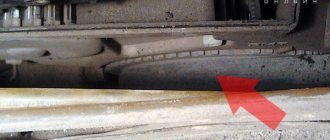
- Next, you need to fix the flywheel so that it cannot turn; to do this, it is best to insert a screwdriver into the plug, which is located on the side of the gearbox. The screwdriver is inserted directly into the opening that will appear when the plug is opened.
Insert the screwdriver into the hole indicated by the mark.
When the flywheel is secured, you can proceed to dismantling the crankshaft pulley.
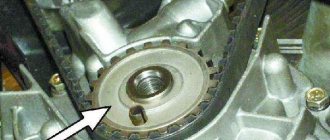
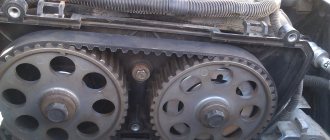
- We remove the timing belt, having previously set the marks.
The marks are indicated by red arrows.
- In order to make it easier to tear off the fixed bolt, it must be treated with the above-mentioned WD-40, and if it is not at hand, then with any liquid that, one way or another, affects corrosion, for example, brake fluid.
- When the bolt is saturated with this mixture, you need to take a head of the appropriate diameter with an extension, and using a wrench, turn it counterclockwise so that it moves from its original location.
- If it is not possible to unscrew the bolt the first time, it is possible to influence it by lightly tapping it with a hammer and applying a new treatment of the anti-corrosion mixture, and then again try to tear it out of place.
- One way or another, after several manipulations the bolt will give in and come off.
- When the bot is unscrewed, pay attention to the presence of a key on the shaft. It can be removed easily, the main thing is not to lose it afterwards.
This work should be carried out very carefully.
- If nothing else interferes, you can proceed directly to removing the shaft. To do this, you can use a special puller, or, if you don’t have one, use pry bars or screwdrivers.
- Next, we move on to dismantling. When working with a puller, as a rule, no questions should arise, but when working with hand tools, you must do the following.
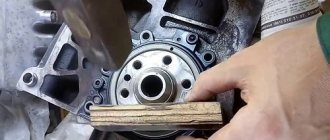
- Taking two screwdrivers or “installers” we insert them between the pulley and the crankshaft on both sides.
It is more convenient to pry off the crankshaft using a pry bar.
- Next, with successive movements we move the part from its place of fixation, gradually moving to the beginning of the shaft.
- Before proceeding with removal, it is best to tap the pulley itself with a wooden or rubberized hammer. This way you can avoid distortions during removal and additional exposure in the presence of corrosion and sticking.
Method 3
A jammed VAZ 2114 crankshaft pulley can be removed with some effort. Even an additional tubular lever does not always help break the nut. In such a situation, you can resort to a rather complicated option for removing the spare part using a starter. Because the starter drives the flywheel and the pulley itself: its force can be useful for sharply unscrewing the support. Step-by-step instructions for removing a part using these methods seem simple:
- The photo below shows one type of reliable fixation;
- Place the gearbox in neutral;
- When the starter starts, the nut is loosened.
- Move into the cabin and turn the key in the ignition a couple of times;
- After disassembling the generator and timing belt, proceed to securely fix the nut with a wrench without blocking the pulley;
- For safety reasons, disconnect the high voltage cables from the spark plugs;
Before carrying out work, it is also recommended to treat the contact surface of the nut with the workpiece with a special lubricant. After this procedure, all fasteners can be easily unscrewed.
After tearing off the nut, remove the part and carry out the necessary manipulations. When reinstalling a part, there is no need to tighten the nut with great force.
The only difficulty that arises when carrying out such a procedure is acidification of the thread. Treatment with chemical lubricants only partially solves the problem, so during disassembly it takes a lot of effort to successfully unscrew it.
Pulley removal
Unscrewing a fastening bolt or nut is only half the battle. Next you need to pull the pulley out of the shaft. The pulley cannot be removed easily by hand unless its seat is broken. In addition, if the pulley fits tightly onto the shaft, it is also secured against turning by a key.
There are special pullers for removing the pulley from the shaft. There are mechanical and hydraulic pullers.
The design of a mechanical puller is simple. Usually it has three legs, with which you need to hook the pulley itself, and rest the central rod against the shaft. After which, you need to rotate the rod, the legs will straighten and pull the pulley towards you.
There are even simpler pullers that you can make yourself.
If there is no removable device for the pulley, then you can use pry bars. If one person is filming, then take turns, moving it a little on each side so that there is no distortion. If there are two, then at the same time, from different sides, the pulley is pressed out from the crankshaft with a sharp movement.
It also happens that when using a puller, the walls of the pulley grooves cannot withstand and break off. Therefore, when using pry bars, they must be engaged as close to the shaft as possible.
Functionality check
If you decide to check the serviceability of the sensor yourself, treat this procedure responsibly and carry it out correctly. On a VAZ 2114 car, the crankshaft sensor is checked in several ways.
- Using a multimeter. The serviceability of the induction sensor can be assessed by the resistance of its coil. In a working product it is 500-700 Ohms.
- On the multimeter, set the measurement limit to 200 millivolts, connect the probes to the terminals (where the standard wires are connected). Pass a steel object several times in front of the core. The working sensor will “see” the metal and there will be voltage spikes on the multimeter display. If there are none, replace the part.
- But the most accurate results when checking are provided by an oscilloscope. When using this device, one hundred percent results can be guaranteed; it reads all the information from the sensor while the engine is running. It can be observed on the device screen. The engine, during tests, should operate at different speeds. They start with eight hundred revolutions, then two thousand, and raise it to six thousand. If the lines (on the device screen) are of different lengths, you need to look for the cause of the malfunction. Remove dirt, check the pulley for defects, and so on.
How to replace a crankshaft pulley
Each car has its own characteristics for replacing the crankshaft pulley, but the principle is generally the same. If the engine is located lengthwise in the engine compartment, then the pulley will be in the lower front part of the engine compartment, immediately behind the radiator of the cooling system. If the engine is located transversely in the engine compartment, then in order to change the crankshaft pulley, you will have to remove the front right wheel.
Also, many are concerned about what kind of thread is used on the crankshaft pulley, so as not to accidentally tear it off. After all, the nut that holds the crankshaft pulley is usually very tightly tightened. Therefore, you need to know exactly which way to turn.
We recommend: Car suspension: elements, diagram, types
But there is nothing complicated here - the thread is right-handed, so if you need to unscrew the nut, you need to turn it counterclockwise. You also need to understand that the crankshaft rotates in the opposite direction from the thread, so the nut is tightened even more during operation.
In addition, no one has canceled oxidation and corrosion, so after a certain time it will be really problematic to unscrew such a nut.
But if you know what to do, then everything becomes quite simple and replacing the crankshaft pulley will be a piece of cake. The actions are:
- The first thing you need to do is place the car over the pit and fix the wheels;
- if the motor is located transversely, then remove the wheel and place something under the brake disc instead of the wheel;
- We put a wrench of a suitable size on the nut or bolt head, but with a large lever and rest against the floor in the direction of rotation;
- remove the armored wire from the ignition distributor so that the engine does not start;
- Using the ignition key, we set the starter in motion; this force is enough to unscrew the nut or bolt.
As soon as the nut begins to unscrew, you can then manually unscrew it using a wrench. By the way, to make it easier to unscrew the nut, you can apply WD grease or another similar lubricant to it.
Next, you need to pull the pulley off the crankshaft, which is also not an easy task, since the belt and pulley are very firmly connected to each other and there is no play between them. In addition, the crankshaft pulley key is tightly fitted, which also provides resistance.
Therefore, it is advisable to use a special screw puller; you can also remove the pulley using a pry bar, pressing in different places on the back surface of the pulley.
If you manage to remove the pulley, then the most difficult work has already been done. It will not be difficult to install the pulley in its place; you need to do everything in the reverse order, and the crankshaft will provide a reliable clamp on its own.
And then a video about how to quickly unscrew the crankshaft pulley using the method described above:
conclusions
The causes of the malfunction of the crankshaft position sensor of the VAZ-2114 have been established. So, do not forget that you need to make sure whether this is actually the reason, or whether there are other faults with the car. For this, there are diagnostic options that can and should be used.
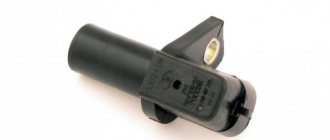
First, let's look at what a crankshaft position sensor is. The crankshaft position sensor of the VAZ 2114, like many other VAZ models, is an electromagnetic device that transmits information about the position of the crankshaft to the electronic “brains” of engine control. This sensor is very important; the correct operation of the fuel injectors and the ignition system depends on it. It doesn't break down often. But if you are going on a long trip, it is advisable to have a spare one.
Crankshaft position sensor VAZ 2114
Reasons for dismantling the crankshaft
Dismantling the crankshaft on a VAZ-2114 may be required in the following cases:
- The reason that comes first is most often the replacement of the timing belt and other work that is somehow related to the gas distribution mechanism. Work should be carried out in accordance with the regulations, or if the mechanism fails.
- Another reason for dismantling is the failure of the crankshaft oil seals. They are changed when oil leaks occur in the places where they are installed.
Pulley fastening
On all VAZ-2114 vehicles without exception, the crankshaft pulley is fixed using a massive bolt, which can cause problems when removed.
A curved spanner wrench is good for fixing.
- First of all, this is due to its location, since it is difficult to securely and securely fasten the key or socket head.
- Secondly, even if you managed to position the key correctly, you will have to make every effort to dismantle it . This is due to the fact that at the factory it is tightened as tightly as possible in order to avoid the facts of self-unwinding. Also, the right-hand thread may not be the best for unscrewing it, which during operation only screws the pulley in tighter and causes the part to stick.
When performing work to remove it, it is best to keep WD-40 on hand.
Video
This video contains useful tips on how to unscrew the nut securing the pulley to the crankshaft of a car engine.
An option for unscrewing the crankshaft pulley bolt using a poly V-belt.
How to remove the crankshaft pulley on a VAZ (2108, 2109, 21099, 2110, 2111, 2112, 2113, 2114, 2115).
How to remove the crankshaft pulley bolt. Bolted connection.
How to tighten a crankshaft pulley very quickly.
Removes the crankshaft pulley on a Honda car without a special key.
If you are faced with the problem of how to unscrew the crankshaft pulley bolt, this article is for you. We will describe this process in detail so that you can quickly and easily remove the crankshaft pulley and then begin repairing it.
Modifications of Lada Kalina 1118
The sedan model was sold on our market from 2004 to 2013 without any significant changes.
| 1.4 l 11194 89 hp 127 Nm and 5-speed manual transmission VAZ 1118 |
| 1.6 l 11183 80 hp 120 Nm and 5-speed manual transmission VAZ 1118 |
| 1.6 l hp 132 Nm and 5-speed manual transmission VAZ 2181 |
| 1.6 l 21126 98 hp 145 Nm and 5-speed manual transmission VAZ 1118 |
We have separate detailed material on all Kalina power units on our website.
You can download the Russian-language user manual for Kalina here
A large amount of information on the car has been collected on the forums of its owners.
The main advantages and disadvantages of this model are described in the material Behind the Wheel
Lada Kalina Sedan 2011. Car review
Khabarovsk Forum – 27R.Ru – 27 Region
Repair. The key on the crankshaft under the timing pulley was broken.
Seems like a fairly common failure:
The end bolt on the crankshaft that secures the timing belt toothed pulley and the large outer belt pulley has become slightly loose. As a result, the key under the timing gear pulley was broken. Replacing this pulley and installing a surrogate key did not help much. It broke again in 4 days.
The eternal question: WHAT TO DO? Do not suggest replacing the crankshaft or replacing the engine. Interesting concrete experience with results, both positive and negative.
There are proposals to put this entire farm on good cold welding. What do you say?
Re: Repair. The key on the crankshaft under the timing pulley was broken.
Re: Repair. The key on the crankshaft under the timing pulley was broken.
Unread message TDA_ » 07 Nov 2009, 20:01
surik_v wrote: The eternal question: WHAT TO DO? Do not suggest replacing the crankshaft or replacing the engine. Interesting concrete experience with results, both positive and negative.
There are proposals to put this entire farm on good cold welding. What do you say?
Re: Repair. The key on the crankshaft under the timing pulley was broken.
I think the problem is that the limit switch on the crank is also a little broken. therefore, even a new pulley could be put on the shaft easily by hand without effort. Apparently such play will also eat up the new keyway. Therefore, two options come to mind: - bore the pulley inside and make a bushing with a new groove so that it fits very tightly onto the shaft. — put on cold welding (very good)
why not use current for cold welding? what are the contraindications?
Re: Repair. The key on the crankshaft under the timing pulley was broken.
why cold welding, just put it on tape.
if it’s completely broken, it might actually be grabbed in a couple of places by regular welding, not cold, with that in mind. so that you can blow it off with a grinder if you need to remove it.
Re: Repair. The key on the crankshaft under the timing pulley was broken.
Unread message mals » 07 Nov 2009, 21:26
yeah, that's right about the tape. I had the same canoe, I took it to Lamarck, they “welded” the cjr, like cold welding, and gave me a lifetime guarantee. I only had it for 1,500 km, then I went to Vladik and back again. The glue guy himself went crazy, he walked around confusedly about what couldn’t stand it, “how can this be, it’s fastening it tightly.” So I sold the car, then I heard that it was broken again and the crankshaft was replaced.
ps. True, I constantly kept the revs in the region of 4.5-5 with peaks of up to 6.7 when I drove to Vladik and back, maybe because of such a load, but nevertheless.
Re: Repair. The key on the crankshaft under the timing pulley was broken.
mals wrote: yeah, right about the tape. I had the same canoe, I took it to Lamarck, they “welded” the cjr, like cold welding, and gave me a lifetime guarantee. I only had it for 1,500 km, then I went to Vladik and back again. The glue guy himself went crazy, he walked around confusedly about what couldn’t stand it, “how can this be, it’s fastening it tightly.” So I sold the car, then I heard that it was broken again and the crankshaft was replaced.
ps. True, I constantly kept the revs in the region of 4.5-5 with peaks of up to 6.7 when I drove to Vladik and back, maybe because of such a load, but nevertheless.
Re: Repair. The key on the crankshaft under the timing pulley was broken.
Catzilla will not be able to mill a new groove - if you move the teeth on the timing gear - that's it. The TDC and timing marks on the large pulley will go away - that’s two.
so not everything is as simple as it might seem. Considering the material of the knee, it is most likely due for replacement. If the pulleys are broken, then it’s a little simpler. In the large one, you can gouge out the groove and mark new marks, and gouge out the small horseradish. Firstly, it is nitrided, secondly, it is hardened, and thirdly, it is made from 30 CHC. Good luck.
There is only one way out - find a milling machine operator. which will make a new groove in the knee with a 180 degree offset. This will be the least error. Then relabel the pulley. First you need to count the teeth on the small gear. If their number is not a multiple of 2, then you are very unlucky.
Re: Repair. The key on the crankshaft under the timing pulley was broken.
Unread message TDA_ » 07 Nov 2009, 23:34
if it’s not a multiple, then you can make the angle a little smaller Because cold welding sucks. There are actually many options.. For example, put it on paint.
More promising but also less correct. Weld the key to the shaft and sell the car.
If you want to do it well, and don’t mind the sex, make a key from copper and fix it on the shaft. Fill the chips on the shaft. Pull out the key. Treat the shaft so that the pulley fits. Collect.
Re: Repair. The key on the crankshaft under the timing pulley was broken.
Well, laugh with laughter, but this is not the first time I’ve heard about tack welding, but I haven’t tried it myself.
To change the knee and butt, you will have to remove the box, and sometimes the entire engine.
Re: Repair. The key on the crankshaft under the timing pulley was broken.
Re: Repair. The key on the crankshaft under the timing pulley was broken.
Re: Repair. The key on the crankshaft under the timing pulley was broken.
Re: Repair. The key on the crankshaft under the timing pulley was broken.
Unread message TDA_ » 08 Nov 2009, 21:58
Re: Repair. The key on the crankshaft under the timing pulley was broken.
Re: Repair. The key on the crankshaft under the timing pulley was broken.
Re: Repair. The key on the crankshaft under the timing pulley was broken.
The keys are not made from any kind of rod, simply from a material suitable in terms of strength and hardness on a conventional surface grinding machine. At least that's what we do. The blanks are milled, then heated, and then finished on a grinder. Total business. And about the mythical rod. - give it a standard designation in the assortment, then I’ll believe it.
The question is - why change the earbuds if they are still quite normal? Is it really impossible to put the same ones in their places? What will change? IMHO - they install a new one only so that later they don’t have to disassemble the engine a second time for capital, since it has already been disassembled. Then change the rings and the seals around the edges.
Remill the groove; no amount of surfacing or graphite keys will help. The deposited material will be worse + you will get a heat-affected zone on the shank of the elbow and be happy if the pulley does not fall off at all after 1000 km. Milling a keyway is the simplest procedure, performed on a vertical machine with a finger cutter (calibrated according to the normal class). An hour's work with installing the part into the machine. What makes you think that this is more expensive than a new knee?
There are no electrodes specifically for surfacing. There is a material, there are its physical and chemical properties, and there is an electrode corresponding to all of this. Whether it will be E42 or UONII or Sarmite is chosen solely from what you want to get after surfacing. You can also fuse SV08G2S and it will work out well, depending on what for.
Re: Repair. The key on the crankshaft under the timing pulley was broken.
mail_robot Oh Dima, there are so many certificates in the office wall, and you don’t know about the inserts
Standard inserts come in several size groups, and one is selected for each neck at the factory. As far as I remember, Toyota has 3 main numbers, 5 connecting rod numbers. This is done to ensure a more even oil gap.
If you install a standard shaft - the dimensions of the journals (within thousandths) - will be different, the oil gap will no longer be even, it is unlikely to go beyond the tolerance limits, but it is still wrong. And if somewhere the load is high, it may not be able to withstand it.
In general, the liners on the capital are replaced due to their wear. Of course, there is no direct metal-to-metal contact, but a constant oil film and uncleaned dirt particles wear out the liner.
Necessary tools for work
The VAZ-2114 crankshaft oil seal is replaced in a garage or car service center. You can change it yourself if you have minimal plumbing skills and the necessary tools:
- jack and reliable support for lifting the car and hanging the internal combustion engine;
- wheel anti-roll bars;
- set of socket heads from 10 to 27;
- open-end and ring wrenches;
- slotted screwdriver;
- hammer;
- container for draining used oil from the engine sump;
- special graphite lubricant;
- automotive sealant;
- rags or wipes.
Repairs are best done by changing the engine oil and cleaning the crankcase. In this case, you will need a can of fresh oil, an engine sump gasket, an oil pump cover gasket, and a new front oil seal.
Sensor types
Sensors differ in operating principle and design features.
- inductive type. Inside there is a metal rod with a magnet at the outer end. It is designed to magnetize the rod. A winding of copper wire is wound around this rod, the ends of which are brought out in the form of connectors for connecting wires. The operating principle of the inductive type crankshaft position sensor: when a steel object is located next to the rod, a signal appears at the terminals.
- The operating principle of the next type of crankshaft sensor is slightly different. It has a hall sensor inside. When a metal object is brought close to it, its state changes (from logical zero to one and vice versa).
- frequency Let's look at how this type of crankshaft sensor works. The engine control unit generates pulses of a certain frequency. They are fed to the sensor and when a metal object is brought to the sensor, the generation frequency changes. By changing the frequency, the controller determines the presence of an object near the sensor. The sensor reacts to the metal of the crankshaft ring teeth (on some cars it is located on the flywheel).