Every second car enthusiast who tries to repair his favorite four-wheeled friend with his own hands has encountered the problem of how to remove the crankshaft pulley. After reading the instructions in the maintenance and repair manual, at first glance, the procedure does not seem complicated, however, when you first try to unscrew the ill-fated bolt, it turns out that this is not so easy. It is completely unclear how to fix the crankshaft so that it does not rotate. Another problem is where is the best way to get to the treasured bolt. Removing the crankshaft pulley causes a lot of trouble because it is too tight. There is a high probability of damaging many parts of the engine compartment or the paintwork of the body.
The problem is that the crankshaft pulley bolt (or nut, depending on the model) is tightened with great force during installation. This is done so that it does not unwind spontaneously, since if unscrewed, serious damage and expensive repairs cannot be avoided. The degree of tightening gradually increases as the engine operates and is aggravated by sticking, coking, and corrosion.
In reality, the entire dismantling process can take 10-15 minutes, but there are some techniques you need to know and use. Different motor models use either a bolt or a nut to secure the pulley. Each option should be considered.
How to unscrew the crankshaft pulley nut?
The nut at the end of the crankshaft holding the pulley is a sign of the engine of a classic rear-wheel drive car like VAZ from model 2101 to 2107, Niva and the like. Such a nut is also called a “ratchet”, since it can have ledges for a “crooked starter”.
It is better to do the work above the inspection hole. The crankshaft should be secured by placing the gearbox in 4th gear and applying the parking brake. You should stock up on the following tools in advance:
- socket or socket wrench 36 (or 38);
- lever extension in the form of a piece of pipe.
While under the car, try to unscrew the nut with a wrench with a sufficiently long lever. If the attempt is unsuccessful, put the gearbox in neutral and proceed as follows:
- the candlesticks are removed;
- while in the pit, install the key and extension so that the end rests on the floor or spar as the shaft rotates;
- turning the key in the ignition switch gives a short-term impulse.
As a rule, on the first or second attempt the nut comes off and is then unscrewed with a regular wrench. Don't forget to loosen and remove the alternator belt.
How to unscrew the crankshaft pulley bolt?
The bolt holding the pulley predominates in engines in front-wheel drive cars, when the block is located perpendicular to the axis of the car. In this case, you will have to tinker more, since it is more difficult to get to the bolt. To work you should prepare:
- jack;
- “tragus” (stump);
- a socket to the size of the bolt with an extension and lever;
- set of automotive tools.
In search of an answer to the question of how to remove the crankshaft pulley, many car enthusiasts begin to look for an opportunity to do this without prior preparation. By definition, such attempts cannot be successful.
In order to correctly remove the pulley, you must perform the following manipulations::
- the right front part of the car is lifted, the wheel is removed;
- the car is installed on a “tragus”;
- From the top side of the hood, all parts that impede access are removed: the air filter and the engine mudguard;
- the alternator belt is removed;
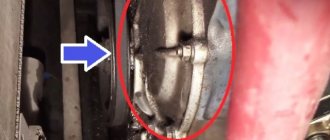
- to fix the crankshaft, the plug on the clutch block is opened and a pry bar is inserted into the resulting window to jam the flywheel teeth;
- under the wheel arch, a head with an extension and a lever is put on the pulley bolt;
- the bolt is unscrewed counterclockwise.
In the vast majority of cases, the bolt can be unscrewed. If it does not give in, then you can add the length of the lever. If this does not help, then you should use the help of the starter as described for the pulley nut in the “classic”.
We remove the pulley using folk automotive experience
Any threaded connection, even if tightly tightened. can be untwisted with less effort if you use some folk-automotive tricks. The problem of how to unscrew the crankshaft pulley ceases to be such if you moisten the bolt head or nut in advance with special WD oil, vinegar or brake fluid. Sometimes lightly tapping the edges of the nut helps.
Unscrewing a bolt or nut does not always solve the problem, since the pulley is held quite firmly on the shaft. You can remove the pulley using a regular pry bar, carefully prying it off from different sides. It is important that the force application point is as close to the shaft as possible. For hopeless cases, it is necessary to use a crankshaft pulley puller. This is a special device, which is a pin with a nut on which 2-3 grips are attached. The ends of the grippers are secured to the edges of the pulley, and the end of the pin rests against the center of the shaft. By twisting it clockwise, you can gradually pull the pulley off the shaft.
You should not be sure that in all cars, without exception, the crankshaft rotates clockwise.
For example, in some Honda cars the crankshaft rotates counterclockwise. It follows from this that the thread on the pulley nut (bolt) will be left-handed.
We recommend: Which is better, electric corrector or hydrocorrector for headlights on a VAZ 2110: pros and cons
How to unscrew a bolt?
- As a rule, the pulley is attached to the crankshaft with a bolt only on front-wheel drive vehicles. To unscrew the bolt holding the pulley on the crankshaft, you will have to work hard, because getting to the bolt is not easy. Before you begin, you need to prepare the necessary tools: a jack, a head to match the size of the bolt and a lever with an extension, a tool kit for a motorist and a “tragus” (you can use a tree stump as a tragus). The removal phase looks something like this:
- We install a jack on the right side of the car in the area of the front wheel. Jack up the car and remove the wheel;
- Under the car, near the jack, we slip a trestle or stump (whatever is at hand). This will ensure the reliability and safety of bolt removal;
- During the work it will become clear that the bolt cannot be reached. We open the hood of the car and remove all parts that prevent full access. The air filter, the protective brushes of the car engine and the generator belt are usually removed;
- To unscrew the bolt you need to fix the crankshaft. To do this, you need to lock the flywheel teeth. Open the plug on the clutch block and insert a pry bar or screwdriver into the resulting hole. It is not very convenient to carry out actions to hold the flywheel lock and at the same time unscrew the bolt alone. You can ask someone for help;
- We take a head selected to the size of the bolt, with an extension and an additional lever, push it under the wheel arch and put it on the bolt;
- Turn the lever counterclockwise.
By the way, not on all cars the crankshaft moves in the direction of the clock hand. In some Honda models it has the opposite direction, which means that the bolt must be unscrewed to the right.
In most cases, the bolt gives in immediately, but if it is still in place, then you can use a slightly longer lever, and then it will definitely work.
How to unscrew the crankshaft pulley
Depending on the design of the crankshaft, the pulley is attached to it either with a nut or a bolt. On rear-wheel drive vehicles, the pulley is usually secured with a nut.
The engines of some rear-wheel drive cars can be started with a special crank, for which special protrusions are made for engaging the crank. This handle is also called a “crooked wrench,” and the engagement for this wrench is called a ratchet.
The pulley fastening nut is installed with a size of 36 or 38 mm on a wrench. Use a socket wrench. The key is strengthened by welding a long handle or putting on a tube to increase the “shoulder”.
How to unscrew the pulley nut:
- Place the car on a pit or overpass.
- Apply the hand parking brake.
- Turn on 4th gear at the gearbox, put chocks under the wheels.
- Do not tap too hard on the edges of the nut.
- Throw on a socket wrench, extend it with a pipe and remove the stuck nut.
If the pulley nut does not come off:
- Move the gearbox handle to neutral.
- Remove the spark plug wires from the spark plugs to prevent the engine from starting.
- Place a socket wrench on the nut and extend it with a pipe. Place the wrench in such a way that the pipe rests against the ground or the machine spar on the right side to prevent the pulley from turning clockwise.
- We make a couple of short sharp turns of the ignition key to turn on the starter. The starter will begin to rotate the flywheel, the flywheel will rotate the crankshaft, and the pulley will be secured with a key. In this case, the stuck nut usually “comes off” quickly.
The crankshaft pulley on front-wheel drive vehicles is generally secured with a bolt. To remove the crankshaft pulley of a front-wheel drive car, you must proceed in this order:
- Raise the front right side of the car with a jack. Place a trestle, stump or a pair of wheels with rims.
- Remove the wheel.
- Dismantle and remove the air filter with housing.
- Remove the protective cover.
- Loosen the belt tensioner and remove the alternator belt.
- To fix the crankshaft, you need to remove the plug in the clutch housing, then insert a pry bar into the hole and rest it between the flywheel teeth.
- Now you need to put on the socket wrench, extend it with a pipe and sharply try to turn it counterclockwise. The main thing is to remove the stuck pulley bolt.
If it is not possible to remove the bolt from its place, then we use the method of unscrewing it with a starter. This method is shown above.
Helpful advice from locksmiths who have seen a lot: use solvent or WD-40, or a similar rust preventative. After spraying it on the thread (if the pulley is secured with a nut), you need to wait 15 minutes, then try to unscrew it. If it’s a bolt, then it’s not easy to apply this product to the threads, although if you spray it around the bolt, it’s possible that liquid will pass through the micro-cracks and decarbonize the joint.
We recommend: 5 effective ways to get rid of foggy car windows
Basic faults
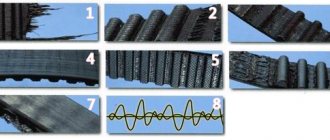
There can only be three main faults with the timing belt:
- violation of the integrity of the structure;
- under- or overtension;
- break.
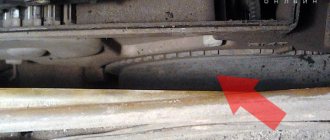
In the first case, the belt may simply delaminate, as evidenced by dangling reinforcing threads. In addition, belt teeth are often cut off. These problems are the result of mechanical damage, improper adjustment:
- camshaft stars;
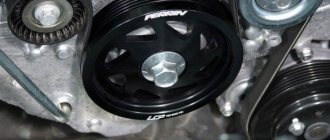
- crankshaft pulley;
- toothed roller;
- pumps;
- tension roller.
The tension roller is designed to tension the belt by rotating around its own eccentric axis. If it is not adjusted correctly, the belt may be too tight, which will sooner or later render it unusable. The same problem will occur if the belt is loose.
The most unpleasant surprise, especially on the road, is a broken timing belt. In this case, the engine will immediately stall, and it will be possible to start it only by installing a new belt.
Unscrew the pulley nut
The nut that holds the pulley at the end of the crankshaft indicates that we are working with a classic version of the engine, namely a VAZ-type car. So, before starting work, you need to prepare the necessary tool, namely a socket or socket wrench for “36” or “38”, you also need to prepare a piece of pipe about 30 cm (later you will find out why). It is better to do the work above the inspection hole. If this is not possible, then it is better to use a jack and definitely a tree stump (better to be safe).
We set the gearbox lever to the fourth gear position and turn on the parking brake mode (handbrake). We try to unscrew the nut using a wrench with a long lever while being under the car. If the attempt fails, you need to use another option.
Set the gearbox lever to the neutral position and remove the spark plugs. We install the key so that it rests (in the case when the length of the key is not enough, a pipe is used) against the floor or the rear spar in the direction of movement of the crankshaft. When the requirements are met, it is necessary to turn the ignition key to give short-term pulses. Sometimes the nut fits so tightly that you can’t get it off the first time. Mostly it is released on the third or fourth try. Once the nut is stripped, it can be tightened with a wrench.
New camshaft for 2114
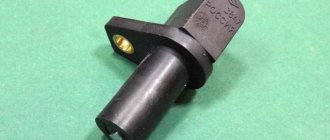
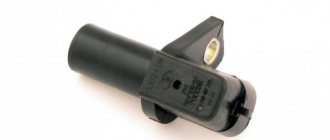
Replacing the VAZ 2114 8-valve camshaft is one of the stages of engine overhaul. Online stores offer many options for the design of the part, including so-called “sports camshafts,” which supposedly promise a significant increase in power. But we will focus on the standard part with catalog number 21110100601000. This part is sold in most major online stores. Price range: 2100-2600 rubles.
Dimensional characteristics of the standard part:
The appearance of the new camshaft can be seen in the figure below.
Dismantling and replacement
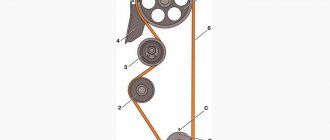
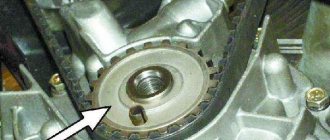
Regardless of the design, where the part is located, it is important to remove and install it in the same order. Depending on the location of the motor, the part is located in the front part behind the cooling radiator. But if the motor is placed across the engine compartment, then your hand will not reach the part. Because to remove the crankshaft pulley, you need to remove the right wheel. If it is difficult to change, it makes sense to pay attention to the drawing, the work will speed up.
The vehicle is rolled onto the inspection hole and secured so that the car does not move from its place. To get there and remove the structure, you need to unscrew all the parts that impede access (air filter, mud flaps, etc.). Remove the generator belt. Next, open the clutch block plug and insert a pry bar into the hole to lock the flywheel.
The elements of the part are characterized by strong fixation, so they are not easy to remove. To turn a part, it is necessary to make a lot of effort. If dismantling is performed for the first time, it will be difficult to unscrew the crankshaft pulley. The reason is that factory production is characterized by strong tightening of the component parts.
Important! The right screw pattern means that the unscrewing process occurs counterclockwise. The car part spins in the other direction, so if it has oxidized, it is not so easy to disassemble it; it is useful to use additional means.
How to unscrew the crankshaft pulley nut
When turning fasteners, it is important to follow the recommendations, then the process will take at least 15 minutes. The effort should be applied as close to the camshaft as possible:
- use a pry bar to pry it up from all sides;
- If necessary, use a special universal crankshaft pulley puller for this part.
The device is presented in the form of a hairpin with 2-3 grips. The end of the gripper is secured to the edges of the part, and the end of the pin is placed in the middle of the shaft.
Scroll clockwise. But not all brands of cars turn clockwise; in some cars, the work must be done in the opposite direction. In this case, it is important to put your gear lever in 4th speed and turn on the handbrake.
If you can’t turn it, the lever should be in the neutral position. The next step is to remove the candlesticks. The key is placed on the floor or on the rear side member and turned in the direction of movement of the device.
All maneuvers make it easier to scroll, so further actions must be performed manually; if necessary, lubricate with brake fluid or WD grease. In addition, tapping the edges of the head can make your work easier.
How to remove the crankshaft pulley bolt
To do the job efficiently, the disassembled machine is placed on a stump. The pin holds the part together and is usually found in front-wheel drive automatic cars. The thread is designed in such a way that it is tightened during the torque when moving.
It is necessary to perform actions that open access to the base. To do this, it is important to stop the rotation well. A mount is used as a fixation. The tool is inserted into the flywheel gears. It must be adjusted securely so that it does not fall out during the turning process. Therefore, it is better to do the work with an assistant. Next, put a socket head of the same diameter as the pin onto the pin, attach a lever and an extension (a piece of durable pipe). After this they begin to slowly unscrew it.
Important! The longer the extension, the easier it is to unwind.
People's automobile experience
The difficulty of dismantling lies in the specially selected strong connection, without play. The fasteners are tightly screwed. They practice using a pry bar, while slowly pressing on the back surface of the part.
We recommend: How to replace and remove the fuel pump on a Lada Kalina with your own hands?
When purchasing a part, you must have new fasteners. You will need a front oil seal and suspension belts. When purchasing, you need to pay attention to the grooves and marks. They must be free of defects. Otherwise, after a while you need to replace everything with a new one.
Important! When performing work, you need to pay attention to the crankcase ventilation system. If contaminated, under the influence of excess pressure, the oil seal will leak lubricant. When screwing, you need patience and, as a rule, you can achieve results after 3-4 attempts.
Installing the pulley on the crankshaft
To properly install the crankshaft pulley, it is necessary to lubricate it with grease or other viscous agent. This will make the fastener installation process easier. To put it on, tilt the washer slightly to the side and pull it onto the base. Next, you can use a tapping motion with a hammer to process the hub through a soft rubber gasket. Then, in the reverse order, you need to tighten the other parts of the car.
Important! If you do not fit it tightly into the groove, then everything will hang out, so you will need to replace it with a new one soon.
Consequences
Now, let’s take a look at the consequences that can arise when oil regularly leaks from under the crankshaft oil seal. The timing belt is located next to the front oil seal: if engine fluid gets on it, the belt may break faster during operation.
The clutch mechanism is located next to the rear oil seal, and if consumables get on it, the system will lose its friction characteristics. One way or another, in both the first and second cases, fluid leaks and engine contamination are inevitable,
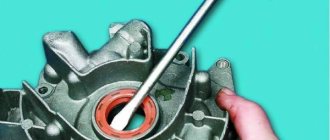
There was a leak from under the front oil seal
It should be noted that a leak from under the oil pump gasket can also be confused with a leaking oil seal. These elements are located next to each other and the motor fluid in both cases will flow from one side. It is also worth adding that in this case the crankcase will be dirty, since any dirt that remains there will stick to the lubricant.
A broken timing belt is the worst outcome if the crankshaft oil seal leaks. Moreover, on many engine models, cases where engine valves were bent were recorded. In this case, the motorist will need:
- replace the timing belt;
- replace the cylinder head gasket;
- replace the valves, and grind them in;
- grind the engine cylinder head, since in 98% of cases it will be uneven and, accordingly, will not fit tightly to the engine, which will negatively affect the reliability of the power unit.
In addition, if the vehicle is regularly used, the pistons may be damaged by a leaking oil seal, since these are the elements that rub against the valves and can be damaged by them. Experienced car enthusiasts know that minor defects and irregularities on the piston surfaces will not in any way affect the operation of the power unit as a whole.
But in practice, there have been cases when the piston was simply pierced by the valve itself: in this case, the car owner will have to fork out for expensive repairs, almost a major one. After all, you will have to replace:
- directly failed piston;
- broken shaft valve;
- all liners around the circle will also need to be replaced;
- and change the crankcase gasket.
So, let’s summarize the total costs that a driver may experience in the event of a leak of engine fluid from under the oil seal:
- replacing the timing belt;
- changing valves, grinding them in;
- grinding the surface of the cylinder head;
- replacing the head gasket;
- adding lubricant to the engine, as well as antifreeze to the cooling system;
- It is also advisable to replace the cylinder head mounting screws;
- replacing the piston (if it fails);
- it may also be necessary to replace the piston rings;
- replacing the pan gasket.
A motorist who operates his vehicle with a leaking oil seal may face such consequences.
Rear oil seal leaking
Now let’s look at the consequences that the owner of a car with a leaking rear oil seal may face. As in the case of the front oil seal, the car owner will not have such catastrophic problems, but a leak in itself is already a significant problem. To solve it you will have to:
- dismantle the gearbox;
- remove the clutch mechanism along with the disc;
- remove the flywheel.
All this is needed in order to simply get to the oil seal. As for the consequences, if the rear element leaks, motor fluid can flood the clutch mechanism, as a result of which the device will lose its frictional characteristics. In this case, the vehicle:
- will significantly lose power;
- fuel consumption will increase (the driver gives gas, and the car also drives, respectively, gasoline consumption increases);
- you will have to add a lot of lubricant to the engine (all of it, of course, will not leak out, but you will have to add enough).
Folk tricks
Let's look at a few folk car tricks that have helped more than one driver.
- Each threaded connection, by the way, not only on the part of the car, can be unscrewed by first lubricating it with a special oil, for example: HP, sunflower oil, vinegar, brake fluid.
- In rare cases, lightly tapping the edges of the bolt and nut with a hammer or wrench helps.
- Removing a bolt or nut does not mean removing the pulley. How to unscrew the crankshaft pulley without a special key? The pulley sits very firmly on the shaft; it can be removed using a pry bar or a screwdriver and carefully pry it off in several places.
How to unscrew the crankshaft pulley bolt? — Encyclopedia of Japanese cars
Honda makes reliable engines, but they don’t install them like everyone else, with the belts to the right, but vice versa. Accordingly, they spin in the opposite direction - counterclockwise. The seemingly insignificant difference makes you think when you have to unscrew the crankshaft pulley bolt. This must be done at least every 100 thousand km - to replace the timing belt, but unscheduled work also happens: replacing the oil seal, for example. The bolt is tightened with a huge torque of 185 Nm for a 17 head, but to unscrew it, a much greater force is required. It will not be possible to remove the bolt while cranking the engine with the starter: the direction of rotation is wrong.
The gear engaged and the brake pedal pressed to the floor also do not help - the transmission springs, but the bolt does not give way. On older cars, there is a window in the clutch housing opposite the flywheel crown, and some people try to stop it with a mounting tool or a sharpened crowbar. Such a duel between man and machine sometimes ends in spilled blood or a torn crankcase, and sometimes both. The pulley has a hexagonal cutout for a branded key. Only you can’t find a 51 hexagon with a hole for a 17 head on sale, and ordering it for one-time work is expensive. Meanwhile, a blank for a special key is sold on any market: heating battery locknut 54, internal diameter (thread) - 39 mm, width - 10 mm. We grind down its edges by 1.5 mm, weld a strong flat handle 180-220 mm long - the tool is ready. On some pulleys, the corners between the edges of the cutout are rounded, so you can also saw off the mating parts on the nut a little. We unscrew the bolt with a 17 mm head with an extension and a powerful wrench.
You can weld the turned workpiece to a Zhiguli wrench for the crankshaft nut - you will get a VAZ-Honda universal wrench. It is convenient to rest the handle on the front wheel drive shaft.
To prevent the key from falling off, rest the extension cord on a reliable stand. Sometimes it is not even necessary to remove the wheel, but if tires with a larger diameter than the standard ones are installed, the wheel will still have to be removed or a wrench with a universal joint must be used.