To ensure complete control over the operation of all systems, the engine is equipped with a variety of sensors. Some of them carry an informative and emergency load, others transmit information necessary for the proper operation of the power plant. The latter includes the crankshaft sensor of the LADA Priora car.
There is another gradation of car sensors:
- sensors, the failure of which leads to unstable operation of systems;
- devices on which safety depends;
- sensors, without which engine operation is impossible.
Malfunction of the crankshaft sensor Lada Priora
A car is a collection of complex interacting elements, components and assemblies. To maintain, monitor and regulate the normal operating mode of the engine, a system of special sensors is used. One of the main ones that has a significant impact on engine performance is the Priora crankshaft sensor.
This is an important element that controls the operation of the fuel injection system in the internal combustion engine. The device has several common names: DPKV, synchronization sensor.
The principle of operation of the product is that during its operation it measures data on the position, frequency, direction of rotation of the crankshaft and transmits signals to the electronic control unit.
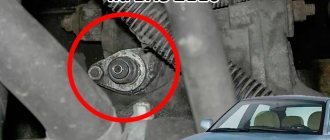
Where is the Priora crankshaft sensor located?
The device is located in the engine compartment next to the oil filter. The sensor housing is secured with just one “10” bolt in a special socket to the right of the generator drive pulley.
Features of work
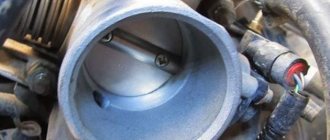
The operation of the device is based on the Hall effect. The measurement principle is based on the principles of conductivity, the variability of its level depending on the approach or distance of metal products. For this reason, the working, sensitive part of the sensor is inserted into the generator drive pulley.
In turn, the pulley has metal teeth along its entire circumference, two of which are missing.
There are several types of sensors:
- magnetic, induction products;
- classic type;
- optical type.
Common malfunctions of the Priora crankshaft sensor
DC malfunctions can be caused by:
- external mechanical damage;
- breakdown of the sensitive element (semiconductor);
- problem with electrical wiring.
In the first case, damage may occur as a result of unprofessional technical work or simple damage to the sensor housing. In the second situation, violations of the internal elements of the DPKV occur.
For example, a break in the winding wires, a short circuit in the inductive coil, a malfunction of the amplifier-comparator as a result of voltage drops in the vehicle’s on-board network. The third common case is characterized by various breaks in the wiring that transmits signals from the DC to the electronic control unit.
As a result of exposure to high temperatures and aggressive environments, cases of oxidation of the contact chip of the device are diagnosed. Symptoms of a problem
Regardless of which Prior crankshaft sensor (16 valves or
- After the car starts moving, after a while, twitching and power loss begin. The symptoms feel similar to when the fuel runs out. In addition, often the car simply stalls, but it is possible to start it again.
- One of the most obvious, common signs is when the car starts perfectly, runs for about twenty minutes, after which the internal combustion engine stalls, and all further attempts to start the engine are unsuccessful. Performance is restored after some time (when the engine cools down). Then you can drive the car for some time, after which the above situation is repeated in a mirror image.
- The engine stalls or starts poorly in bad, wet weather conditions. Similar problems appear after driving through deep puddles and damp sections of the road. If the above signs of malfunction of the Priora crankshaft sensor appear, do not rush to replace the element with a new product. First of all, conduct a thorough examination of the device using computer diagnostics and using a multimeter. When problems arise with the sensor, an error appears on the car’s dashboard. The two most popular errors are diagnosed as: “low or high sensor signal level.” To check circuits, wiring, and conclusions, measurements are taken using a multimeter.
Replacing the crankshaft sensor for Priora
If the cause of engine operating problems is the sensor itself, it should be replaced immediately. The process is simple, and to carry it out you only need a key or a “10” socket.
Step-by-step work process: As usual, when working with electrical wiring, with elements attached to it, you should disconnect the negative terminal of the battery. The area where the device is located is quite cramped, so you should arm yourself with convenient, compact available equipment.
Required Tools
If the car owner decides to change the crankshaft sensor himself, then he will need the tools from the table below.
Table - Tools that should be prepared to replace the crankshaft sensor
| Tool name | Note and Features |
| Socket wrench or open-end wrench | "at 13" |
| Kardanchik | For easier access to the sensor mount |
| Vorotok | With ratchet |
| Head | "on 10" |
| Penetrating lubricant | For example, WD-40 |
| Rags | To clean dirt |
Lada Priora Hatchback BLACK -STAR (former) › Logbook › replacing the camshaft sensor
Where is the crankshaft sensor located? how to check the crankshaft sensor (synchronization sensor) A malfunction of the phase sensor (AF) can only be determined with a diagnostic tool. If the sensor fails, the engine characteristics do not change in any way, except for a slightly increased fuel consumption (0.5 l), which is easily hidden behind the driving style. Another symptom is a delay in starting the engine for 2 seconds due to waiting for a signal from the sensor. Afterwards the ECU will switch to pairwise parallel injection.
If, due to this malfunction, the car stalls and idles unstably, and also becomes “dull” during acceleration, then it is worth checking whether the toothed pulley on the crankshaft (which goes to drive the generator and other systems) has turned. To check, it is necessary to set the first cylinder to top dead center (TDC). The crankshaft position sensor should look at the beginning of the 20th tooth from the two missing ones.
If everything is in order with the pulley and operation, then you need to reset the error on the ECU and see under what conditions it appears again. If an error does not occur when the engine is idling, all connections and wires must be checked. This is done by wiggling the terminal and wiring harness. If an error appears during this operation, then you need to look for a bad contact, it has nothing to do with the sensor.
If the error occurs 15 seconds after the reset during smooth operation, then you can safely change the sensor. For reliability, it can be checked (a test diagram is available on the Internet), but the price of a new sensor is about 200 rubles - for this money it is easier to buy a known good one, and, even if it turns out not to be the problem, have a spare one.
So, we are convinced that the problem is in the sensor and we will change it.
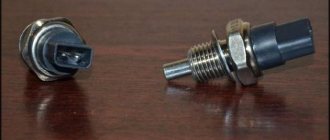
To replace the phase sensor on cars of the Priora, Kalina and Grant families with a 16-valve engine, we will need:
Wrench “10” (preferably a head “10”) Hexagon “5” Wrench “17” Phase sensor for the 16-valve VAZ1 engine. The sensor is installed on the front side of the engine (radiator side) near the intake camshaft pulley. It is not visible from above. We determine the position by the wiring harness suitable for this location.
Determining the position of the phase sensor
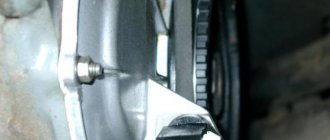
2. Disconnect the terminal. Using a 10mm wrench, unscrew the two bolts. Unscrew carefully, as they tend to “run away” under the car and into the generator along with the washers.
3. Remove the sensor and inspect it. In this case, mechanical damage was found on it from the camshaft pulley. It is necessary to remove the protective plastic casing and check the condition of the entire mechanism. If the DF has no traces of contact with the pulley, then simply replace the sensor with a new one and reassemble it in the reverse order.
Inspecting the removed sensor
4. I’ll immediately make a reservation that in this case there was a problem with the generator pulley (the gear ring of the crankshaft sensor turned). The crankshaft sensor determined the TDC position with an error, the engine vibrated strongly, which led to the breakdown of the phase sensor. And only then did the error light up on the instrument panel.
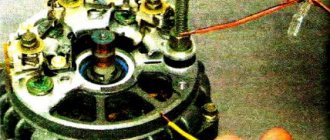
5. Unscrew the screws securing the casing using a 5mm hexagon. They are located at the top and along the edges, one in the center below the lip and one on the left edge of the casing below. We take out the screws along with the casing. We inspect the condition of the timing belt (in the photo below, for clarity, the cover has already been removed).
6. Set the first cylinder to top dead center. To do this, either put the car in 4th gear and drive, or turn the crankshaft or camshaft bolt with a key. The marks on the camshaft pulleys should fall under the slots on the plastic boot (indicated by arrows).
Setting the first cylinder to top dead center
7. Both marks should be at the top. To check the correct alignment of the crankshaft, there is a window in the gearbox, but it is made for an 8-valve engine, and in the 2112 engine it is very difficult to navigate through it. It’s easier to check by the ring gear on the auxiliary pulley. The crankshaft sensor (CSC) should look at the beginning of the 20th tooth after the gap (the arrow on the right shows the gap, the arrow on the left indicates the CSC):
Crankshaft sensor direction
8. If everything matches, then through the slots in the intake camshaft pulley we determine the condition of the curtain. It should not have any defects. The gear should not move or swing freely. If a phase mismatch or damage to these elements is detected, it is necessary to disassemble the timing drive. How to do this is described in detail in the article replacing the timing drive on Lada Priora, Kalina and Granta cars (16 valves).
Determining the status of the curtain
9. If all components are in order, then install a new sensor. By turning the crankshaft, we make sure that the curtain does not come into contact with the sensor.
10. Reassemble in reverse order.
Types, design and principle of operation of DPKV
Regardless of type and design, crankshaft position sensors consist of two parts:
- Position sensor;
- Master disk (synchronization disk, synchro disk).
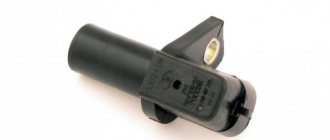
The DPKV is placed in a plastic or aluminum case, which is mounted next to the drive disk using a bracket. The sensor has a standard electrical connector for connecting to the vehicle's electrical system; the connector can be located either on the sensor body or on its own short cable. The sensor is fixed on the engine block or on a special bracket; it is located opposite the drive disk and, during operation, counts its teeth.
The drive disk is a pulley or wheel, along the periphery of which there are teeth of a square profile. The disk is rigidly fixed to the crankshaft pulley or directly to its toe, which ensures that both parts rotate at the same frequency.
Camshaft and crankshaft sensors for Lada Kalina 8 valves description and replacement nuances
The camshaft sensor Kalina 8 valves becomes unusable from time to time. This can happen for various reasons, but the result is the same - the part needs to be replaced. The situation is similar with the crankshaft position sensor. You will learn in the article how to dismantle old and install new elements of a car of this type.
Phase sensor (camshaft position)
You will find this part on the cylinder head on the left side. The operating principle is quite simple. There is a special pin on the camshaft itself. When it passes by the sensor, but sends a signal to it. This moment corresponds to compression of the piston of the first cylinder.
The controller determines the camshaft angle. This is important information for machine systems and sensor failure has certain consequences. The information is sent to the vehicle's ECU, which uses it to control the ignition and fuel supply to each cylinder.
In what situations is replacement required?
If this part fails, you will see a “Check” indicator on the vehicle’s instrument panel. This is how the ECU signals the driver that the engine needs to be checked. At the same time, the fuel supply pattern changes - it goes to all cylinders simultaneously and, as a result, consumption increases.
The cause of the breakdown may be mechanical damage, as well as other things. There is no point in trying to repair the old unit itself - it costs little and you will waste more nerves and time.
In the video below you will find instructions for replacing this part (the author of the video is Alexandr V).
Replacement instructions
To replace the camshaft sensor, you only need a "10" key. It is better to use a socket with a collar or a ratchet. It will be inconvenient to work with a regular key, although it is still quite possible.
The dismantling and installation procedure is as follows:
- First, disconnect the block with wires by pressing the latch and slightly pulling it up;
- now, using the key, unscrew the part itself;
- it can be pulled out by slightly pulling towards the windshield;
- installation is carried out in the reverse order of steps.
There are no difficulties in this process, but be careful not to damage both the block with wires and the connector for the controller itself on the cylinder block.
Crankshaft position sensor
Although this controller rarely fails, its failure can lead to the most unpleasant consequences. You may simply end up in the middle of the road with no way to continue driving.
This element is installed on the oil pump cover. The DPKV transmits information to the ECU so that it can synchronize the fuel supply. Inductive type sensor. As mentioned above, it rarely fails, but this becomes a big problem.
In what situations is replacement required?
If this DPKV is completely out of order, you will not be able to start the engine at all.
But even if it just works intermittently, this can be recognized by a number of signs:
- poor engine starting;
- unstable work;
- power reduction;
- detonation with increasing load.
If you notice such signs and there are no other reasons for them, change the sensor. You can check it by testing the resistance of the windings. If the ohmmeter readings differ from 550-570, then the part is faulty. Fortunately, it costs little and replacement can be done very quickly.
Replacement instructions
To replace this part, you will again need a "10" key and nothing else.
- Turn off the ignition. Then disconnect the wire block by pressing the latch.
- Now, using a wrench, unscrew the fastening bolt.
- All that remains is to remove the old DPKV and install the new one in the reverse order.
Instructions for replacing the regulator
The crankshaft DP is located on the oil pump cover near the camshaft drive. To replace it, you need to buy a new device according to the markings on the old product.
The replacement procedure is simple:
- Remove the negative terminal from the battery.
- We disconnect the block with wires from the DPKV by bending the lock.
- After this, use a “10” key to unscrew the fastening bolt.
- Now it is fashionable to remove the regulator.
- The installation site should be cleaned of dirt and a new product can be installed.
- Next, the fastening bolt is screwed in and the wires are connected.
DPKV - what kind of sensor is it, why is it needed on Priora and why the engine does not start
From the brief introduction it is clear that the crankshaft sensor is the most important structural element on a car, without which the engine cannot operate. The main purpose of the device is to transmit a signal to the computer about the position of the crankshaft at an appropriate period of time. Reading information about the position of the crankshaft allows the control unit to decide on sending signals for fuel injection and ignition in the corresponding engine cylinders.
In addition to information about the position of the crankshaft, the sensor also informs the control unit about its rotation speed. The frequency at which the crankshaft rotates is displayed on the car's control panel, for which a tachometer is provided. The electronic method of measuring the crankshaft rotation speed is highly accurate. Based on the readings of this sensor, the following actions occur:
- The fuel injection time is set through the injectors in the corresponding cylinders.
- The ignition timing is determined, which allows fuel assemblies to be burned more efficiently and effectively.
- The efficiency of the internal combustion engine operation is assessed.
- Information about the crankshaft rotation speed is transmitted to the instrument panel, which is necessary for the driver.
By means of DPKV, the moment of passage of the pistons at the top and bottom dead centers is determined. Based on this information, engine operation is adjusted. Without such a device, not a single ECU works, so if it malfunctions, you will need to immediately resort to finding out the causes of the failure and eliminating them.
This is interesting! A car uses a large number of different sensors. In addition, many of them respond to or influence the operation of the motor. However, the failure of any sensor, except for the DPKV, will not entail such consequences as the inability to start the engine. Only the crankshaft position sensor can cause the engine on a Priora to not start.
Causes of failure
There are not a large number of signs of failure of the DPKV on the Priora, but they still exist. Failure can be caused by the following factors:
- Mechanical impact;
- Sensor aging;
- Failure of the sensitive element;
- Electrical wiring fault;
Let's take a closer look at each of the factors.
- Mechanical impact. Under mechanical stress, such as repairs or other reasons where mechanical pressure or shock may be applied to the sensor, the sensor housing may be damaged, causing the sensing element to fail or give incorrect readings.
- Aging can also be caused by damage or corrosion of the sensor itself or its sensitive element, which will consequently lead to incorrect readings.
- Failure of the sensor's sensitive element completely stops the internal combustion engine and makes it impossible to start the engine.
- Wiring , as described above, must be shielded and securely fixed in the sensor connector. It happens that it is the DPKV wire that gets damaged due to the closely located exhaust manifold, which affects the operation of the internal combustion engine.
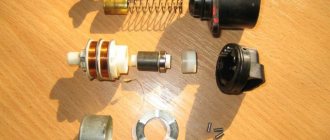
Idle speed regulator (sensor) VAZ 2114
At its core, the idle speed sensor is a valve equipped with a shut-off needle, through which the amount of air supplied to the combustion chambers bypasses the throttle valve is dosed. That is, when the damper is completely closed, and the controller comes to the conclusion that it is necessary to increase the idle speed, the idle speed controller (IAC) slightly opens or completely opens the intake port and thereby leans the fuel mixture. As a result, the car does not stall at idle even when driving on a cold engine. A stepper motor integrated into the regulator is responsible for driving the valve needle.
Where exactly is the speed sensor located on the Lada Priora?
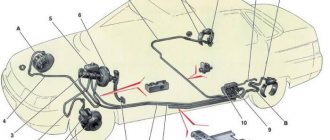
One of the most important elements on a Lada Priora car is the speed sensor, the operation of which requires continuous monitoring. Incorrect operation of this sensor can lead to a decrease in traction, increased fuel consumption, and its complete incapacity can create an emergency situation on the road.
Experienced motorists are familiar with the situation when, at a speed of 100 km/h, the car’s speedometer slowly slides to 80, while the car continues to move at the same pace. If you have encountered such a situation, then it is advisable to know where the speed sensor is located on the Priora and possible solutions to this malfunction.
The speed sensor on the Lada Priora is located on the top of the gearbox housing. A faulty sensor transmits incorrect information, which is reflected in the form of incorrect operation of the car.
Checking the speed sensor
Finding out the functionality of this element is much easier for the owner of a Priora with an on-board computer. A message will appear on the display informing you that there is no signal being received from the speed sensor.
It is also easy to understand this without a computer by changes in idle speed, unstable traction, incorrect speedometer readings and increased fuel consumption.
Error codes on Priora and their interpretation
Method No. 1 without removing the sensor
The Priora must be positioned so that one of the wheels does not touch the surface. Next, the contact of the speed sensor should be connected to the voltmeter and the suspended wheel should begin to rotate. The appearance of voltage on the tester will confirm the working condition of the sensor.
Method number 2
To check the sensor using this method, you will need a test lamp. Next, you need to disconnect the terminal that supplies the pulse.
We hang the wheel above the surface and, after connecting the test lamp to the positive terminal of the battery on one side and to the impulse terminal on the other, we begin to manually rotate the wheel.
If the lamp blinks when the wheel rotates, then you need to look for the fault in other components.
Removing and replacing the speed sensor
To get to it you need to have some tools and a little time. Tools you will need:
- Two screwdrivers: flat and Phillips.
- Socket head for 10.
- Handle with ratchet.
To get to the location of the required element, you need to unscrew the clamps and remove the injector inlet pipe, which is routed from the air filter to the throttle assembly. To do this, unscrew the coupling bolts on both sides of the pipe, unscrew the bolt of the thin hose and remove the entire structure. After completing these steps, you will be able to see the location of the speed sensor.
Once nothing interferes with the view of the speed sensor, you can dismantle it.
Disconnect the wiring going to the sensor from the power connector. Using a 10 mm socket and a ratchet, unscrew the nut on the stud. Carefully pull the sensor housing out of the seat
If it is difficult to dismantle, you can use a flathead screwdriver to make it easier. Carefully pry the housing of the element being removed from below and remove it from the gearbox.
Next, we install a new speed sensor and securely fix it, having previously lubricated the sealing rubber with machine oil.
We return the air duct pipe to its original position and secure it. We connect power to the battery.. Checking the idle speed sensor on a Priora
Checking the idle speed sensor on a Priora
Sensor selection
You need to purchase a new speed sensor to avoid problems. Visually, the sensor intended for the Priora is almost no different from the Kalina element, and many sellers claim that one model can easily be replaced by another model.
Sensors that look similar have completely different fillings, and after installing an inappropriate element, frequent malfunctions in the operation of the ECU and incorrect readings on the speedometer will occur.
Therefore, before purchasing, you need to carefully study the old part, rewrite the catalog number and purchase exactly the same model.
We recommend: Replacing the cabin filter of Kia Rio 2013
Replacing the crankshaft position sensor
The crankshaft position sensor on Priora and other VAZ vehicles is one of those parts that, if it fails, the engine refuses to work. No, in fact, nothing will happen to the engine at all, but there may not be a spark. Or it can be variable, that is, appear or disappear.
Many owners who first encounter a similar problem with DPKV on a Priora first of all begin to look for the cause in the ignition coils, spark plugs, and often it even comes to the engine control unit. But in fact, the reason is simple, first of all, with the symptoms described above, you need to check the crankshaft sensor.
In order to replace it, you will need a 10 mm wrench, or better yet, a 10 mm socket with a wrench or ratchet handle.
Video instructions for replacing DPKV on a Priora
First, you need to complete some preparatory steps, which will be discussed below:
- Open the car hood
- Disconnect the negative terminal from the battery
- Disconnect the block with wiring harness from the crankshaft position sensor
- Using a socket with a wrench, unscrew the sensor mounting bolt
- Remove the faulty sensor and install a new one in its place - a known good one.
To understand the entire repair procedure, it is better to watch a video review, which clearly shows all the subtleties and nuances of this work. The video below will show the repair using the example of a car of the tenth family with an 8-valve engine, but in essence there will be no difference with a Priora and a 16-valve engine.
It is worth paying attention that the wiring that goes to this sensor also tends to get damaged, break, etc., which leads to the same consequences. In this case, you will have to look for a new section of wiring with a plug
If you have any questions, you can ask below and we’ll discuss it together. By the way, regarding the price of the new sensor, you can buy it on Priora for from 350 to 450 rubles, depending on production.
Symptoms of a problem
Signs of a malfunction by which you can determine the imminent failure of the DPKV or its complete inoperability are listed below:
The car jerks when driving, dips appear similar to a lack of fuel;
- The engine stalls spontaneously, after which it is difficult to start again;
- When it rains, the car begins to twitch or stall;
- The engine does not start, there is no spark;
If such symptoms are detected, it is necessary to pay attention to DPKV.
Replacing this sensor on a VAZ 2110-VAZ 2112
1. The sensor is an electronic component of the engine, wires are connected to it, so before starting work, turn off the power to the vehicle’s on-board network: disconnect the negative terminal from the battery (the procedure is described in the article: “Replacing the battery on cars”).
2. Now press the clamp securing the wiring to the sensor with your hand and disconnect it (photo 1). Proceed carefully; in practice, there are quite a few cases of the latch breaking due to excessive impact. Next, using a wrench, unscrew the bolt that secures the sensor to the bracket (photo 2) and remove the sensor. On the device, turn on the voltmeter function with a measurement limit of up to 200 mV and connect the wires coming from it to the sensor terminals (photo 4). Taking a flat-blade screwdriver, very quickly try to move it over the face of the sensor. The device will begin to give readings around 0.3 V. Nothing happens? – replace the sensor.
Note!
It is more correct to check the sensor for serviceability when it is installed on the machine. A special device is connected to the sensor terminals. device, start the car and watch the jumps on the device. Please note that the car will not start, do not drain the battery too much.
3. If it turns out that the sensor needs to be replaced, be sure to take exactly the same one: identical shape and length. After installation, use a set of special feeler gauges to check the distance between the sensor face and the crankshaft pulley teeth; this distance should be within 1±0.41 mm.
Additional video:
Below are the videos
Examination
Checking the DPKV is carried out in two ways: visually and using a diagnostic tool.
Visual inspection
When checking, you must pay special attention to the condition of the sensor; it must be in good condition and free from the following defects:
- There should be no cracks or chips;
- The sensor head must be free of dirt and chips;
- The connector must be clearly fixed and not loose;
- The wire must be without damage to the insulation and screen;
- The wires near the connector should not be exposed;
Also, during a visual inspection, it is necessary to check the pulley itself. Its teeth should stand out clearly and not be clogged with dirt.
Particular attention should be paid to its damper, quite often the pulley crown rotates on the damper and the sensor reads incorrect readings from the sensor due to the displacement of the pulley crown
Examination
Before you can check it, you first need to get to it. And the device is located in a not very convenient place on the engine. So be prepared to spend some time on this.
Now to the question of how to check it. Let's look at the two most common situations, but first, let's remove the element.
- The sensor is removed with a 10 mm wrench;
- Be sure to make special marks on the crankcase and sensor before removing. This will allow you to return it to its original place, or install a new regulator in the correct position;
- If there is no external, visible damage to the crankshaft sensor, then you need to use a multimeter;
- Don't forget to measure the distance between the sensor and the timing disk. In the normal position, the gap ranges from 0.6 to 1.5 millimeters.
First way to check
In this case, you will need an ohmmeter, which you will use to replace the resistance on the winding. According to the manufacturer's standards, the indicator ranges from 550 to 750 Ohms.
It's okay if your numbers are slightly different from the norm. If the deviations are serious, you will definitely have to replace the sensor.
It should be noted in fairness that the crankshaft position sensor on VAZ 2110 models rarely breaks down. Among the main reasons for its failure to function normally is the accumulation of dirt, mechanical damage, as well as banal factory defects.
Second method
Here you will need a voltmeter, a transformer and an inductance meter. It is advisable to measure resistance under compact temperature conditions.
Once the ohmmeter readings are obtained, arm yourself with an inductance measuring device. Normally, the device should show from 200 to 4000 units (millihenry).
https://youtube.com/watch?v=fpHT2StBVnU
Diagnostics
Before taking steps to dismantle and diagnose the DPKV, you need to make sure that the device is securely fastened and clean the place of its attachment and the contact connector from dirt. After this, the performance of the internal combustion engine is checked again. If symptoms of sensor failure persist, it is dismantled.
Removing the sensor:
After removing the sensor, you need to understand whether it is the cause of the engine malfunction. Before diagnosing DPKV, check the integrity of the connectors and cable. The performance of the device is checked using a multimeter:
- The meter is set to ohmmeter mode.
- The multimeter probes are connected to the DPKV contacts - the normal resistance will be in the range of 550–750 Ohms.
- The meter is switched to voltmeter mode, and a metal object is brought to the tip of the sensor. The multimeter should detect voltage surges.
If such measurement results are not observed, then the DPKV must be replaced.
When buying a new Lada Granta crankshaft position sensor, first of all you need to pay attention to branded products. Such a DPKV will cost much more than its analogues from unknown manufacturers, but it will not bring unexpected troubles on the road
How to check the Priora phase sensor
In order to identify malfunctions in the operation of the device, you need to pay attention to the following signs:
- the appearance of the “Check Engine” indicator on the instrument panel;
- identification of error codes 0343, 0340 when connecting an on-board computer or diagnostic device;
- noticeable increase in fuel consumption;
- regular, unstable engine operation;
- general deterioration in vehicle dynamics (reduction in engine power).
Now about diagnostic methods.
For a 16 valve engine, the test is carried out using a conventional multimeter. For this you will need:
- The measuring device itself. Measure and check the total voltage in the vehicle network (with the ignition on).
- Now you need to make sure that the device for determining the camshaft position is provided with the necessary voltage from the on-board network. To do this, attach the probes of the multimeter to the contacts of the chip (central connector). The voltage must be at least 12 volts. The white-black connector should produce 4.5-5 volts.
- If the indicators from the previous step are within normal limits, then it’s time to check the performance of our sensor. To do this you will need to remove it from the block. Then connect the device to the connectors of the chip using small wires. Measure the voltage parameters at pin “B” (should be at least 0.9V). Turn on the car's ignition. Bring a thin metal plate to the measuring element of the sensor (place it in a special slot) and look at the multimeter display; its readings should change and be about 0.4 V. If the measurement readings have different values, the sensor is faulty.
Now let's talk about how to dismantle the device itself to determine the position of the camshaft.
Repair of the Priora clutch sensor
Often, sensor malfunctions can be easily resolved without replacing it.
First you need to check whether the sensor end reaches the clutch pedal pusher. If the pusher does not press on the limit switch, it is necessary to adjust the position of the sensor relative to the pedal.
Another common failure is a break in the wires going to the sensor contacts. This malfunction can be easily detected by checking that the wires are securely fixed with your fingers. To fix this problem, you need a soldering iron, solder and rosin. When the sensor is removed from the car, soldering wires to its contacts is not difficult.
If the sensor wires are not broken and the limit switch reaches the pusher, the problem may be a faulty sensor contact or a broken limit switch. They may oxidize, become deformed or break. The functionality of the contacts can be checked using a multimeter. To do this, you need to connect the device to the sensor terminals and check the change in resistance between them when you press the limit switch.
Oxidized contacts can be cleaned, restoring the functionality of the sensor. If this does not work, it should be replaced. The price of this part is low, and you can buy it at most auto stores.
https://youtube.com/watch?v=2doB7DrqyGM
Examination
Checking the sensor is carried out in two stages: visual and with instruments.
A visual check involves inspecting the sensor and its parts for visible damage.
The sensor should not have:
- Cracks and chips;
- Metal shavings on the sensing element;
- There should be no moisture in the DPKV connector;
- The connector must be clearly fixed on the sensor;
You should also check the pulley for its integrity and alignment.
Checked:
- Damper integrity;
- Alignment of the pulley with respect to the sensor;
- Pulley teeth are dirty;
Oscillogram of DPKV VAZ
An oscilloscope is used to accurately diagnose the operation of the DPKV. By connecting the oscilloscope probes, an oscillogram of the DPKV operation will be displayed on the monitor screen, on which you can clearly distinguish the point where the teeth skipped and measure the signal value in volts based on the maximum amplitude of the 58 teeth located between the skip points.