The most common transmission problem on Niva cars is failure of CV joints drive. First symptoms may be minor, in the form of an appearance slight crunch at the start of movement with the steering wheel turned out.
If you do not replace the CV joint on the Niva in time, the consequences can be disastrous, to the point where your drive jams while driving with all the ensuing consequences. To avoid this, it is necessary to promptly replace the hinges, and also constantly monitor the presence of lubricant in them.
So, to replace you will need at least the following tool:
- Head 13, 27 mm
- Ratchet and crank
- Extension
- Hammer
- Chisel or flathead screwdriver
- Jack
- Balloon wrench
Dismantling the drive assembly on a Niva 2121 car
As for the repair procedure, we present the main points below:
- First of all, we lift the car with a jack (it is also advisable that it is in the inspection hole).
- Using a screwdriver and a hammer, knock off the protective cap of the hub nut and unscrew it.
- Using a 13mm wrench, unscrew the nuts securing the ball joint to the steering knuckle.
Now you can remove the drive shaft from the Niva's front wheel hub. To remove/replace the outer CV joint, remove the retaining ring.
To release the internal one, you must first unscrew the three nuts securing the pressure plate.
- Then we pry up the plate with a screwdriver or a sharp chisel and pull out the inner CV joint from the front axle gear housing.
- Since the space between the shock absorber and the front suspension spring is minimal, it is not very convenient to pull out the drive assembly, so it can be disconnected.
- If necessary, defective CV joints are knocked down and new ones are installed in their place in the reverse order.
- It is imperative to apply a lubricant, such as a CV joint, to each of the grenades and securely fix the boot clamps.
- The assembled drive is installed on the Niva in the reverse order.
Nuances of dismantling the Niva front drive shaft
To get acquainted with the difficulties that await you when you have to remove the front drive shaft, watch the video:
Removing the drive shaft and replacing the internal CV joint on a Niva or replacing the drive assembly
3.7.
VAZ-21213 (Niva). Front wheel drive
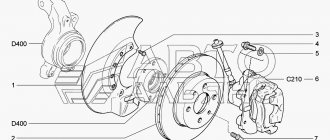
GENERAL INFORMATION Front wheel drive 1 – internal joint housing; 2 – clamp; 3 – cover fastening ring; 4 – wheel drive shaft; 5 – protective casing; 6 – protective cover; 7 – thrust ring of the cage;
| 8 – separator; 9 – clamp; 10 – ball; 11 – outer hinge cage; 12 – retaining ring; 13 – outer hinge housing |
Torque is transmitted to the front wheels from the front axle through the right and left drives, each of which consists of a 4 shaft and two joints of equal angular velocities. The hinges are mounted at the ends of shaft 4. The outer hinge is connected to the front wheel hub. It is of a rigid type with an angular degree of freedom. The internal hinge is of a universal type, with angular and axial degrees of freedom. It connects to the side gear of the front axle. The outer hinge consists of a housing 13, a cage 11, a separator 8 with balls 10, a locking ring 12 and a thrust ring 7. The holder 11 is connected to the housing 13 through balls that fit into the grooves of the holder, made along the radius, and into the grooves of the housing. The race is mounted on the splines of the shaft 4 until it stops against the ring 7 and is fixed with a retaining ring 12. This ring, when compressed, freely passes through the spline hole of the race 11, which allows you to connect and disconnect the hinge and shaft 4. The hinge is protected from dirt and moisture by a cover 6, which in turn, it is protected from mechanical damage by a casing 5. On the shaft 4 and on the hinge body, the protective cover is held in place by tension clamps 9. The design of the internal hinge differs from the external one in that it has straight grooves. The axial movement of the hinge parts in the housing is limited by wire retainer 2. The internal hinge parts and individual batches of the external hinge are sorted by size into several assembly groups, so during repairs it is not allowed to replace any one hinge part. It must be replaced as an assembly. Protective covers 5 and covers 6, clamps 9, ring 3 and lock 2 can be replaced separately.
3.7.1.
VAZ-21213 (Niva). Removing and installing the drive
GENERAL INFORMATION Removal PERFORMANCE ORDER
1. Place the car on a lift or inspection ditch.
2. Apply the parking brake. 3. Raise the front of the car and place it on stands. 4. Disconnect the shock absorber from the lower suspension arm. 5. Compressing the suspension spring, disconnect the ball joint from the lower arm. 6. Remove the wheel hub cap and unscrew the wheel hub bearing nut, and then the inner joint housing bearing cap nuts. 7. Remove the bolt securing the right front axle suspension bracket. 8. Remove the outer and inner hinges from the wheel hub and the front axle. Installation PERFORMANCE ORDER
1. Installation of the front wheel drive is carried out in the reverse order of removal. 2. When tightening the nuts of the front wheel hub bearings, adjust the clearance in the bearings as indicated in subsection 4.1.3.
3.7.2.
VAZ-21213 (Niva). Disassembling and assembling the drive
GENERAL INFORMATION Parts of the external hinge of the front wheel drive
| 1 – hinge body; 2 – separator; 3 – clip; 4 – ball |
Disassembly PROCEDURE
1. Disassembly is carried out in case of damage to the protective covers and casings in order to check the hinge parts and the quality of the lubricant.
2. Unclench the clamp 9, remove it from the rubber boot 6 and slide the casing with the boot on the shaft to open access to the joint cage 11 (see Fig. Front wheel drive). 3. Using a drift and a hammer, knock the cage 11 off the shaft. Warning
To prevent jamming of the retaining ring 12, it is important to prevent the cage from becoming distorted by choosing the correct force and direction of impact. 4. Slide the thrust ring 7, the protective cover 6 and the casing 5 from the shaft 4. 5. Slide the protective cover and the casing of the internal hinge on the shaft and, having removed the lock 2, remove the shaft 4 assembled with the cage, separator and balls from the housing 1. 6. Using a drift and hammer, knock the inner joint race off shaft 4. 7. After removing the thrust ring, slide the protective cover off the shaft. 8. Wash the internal cavities of the hinge housings and other parts. 9. The most complex and responsible operations are the disassembly and assembly of the outer hinge, the details of which are shown in Fig. Parts of the external hinge of the front wheel drive. 10. Good quality of disassembly and assembly work is ensured by compliance with the following techniques. 11. Mark with paint the relative positions of the cage, separator and hinge body.
| 12. Secure the outer hinge in a vice. |
13. Tilt the cage and separator so that one ball comes out of the groove of the hinge body as completely as possible. Using a soft metal screwdriver, press the ball out of the separator. 14. Then turn all the parts so that the ball located next to it takes the same position, and remove it from the separator. Using these techniques, remove the remaining balls. 15. The sequence of removing balls from the separator may be different - through one ball. 16. Light tapping on the separator or holder with an object made of soft material is allowed. Excessive force when turning the separator is unacceptable, as the balls may become blocked, which will complicate further disassembly.
| 17. Install the separator with the cage so that the elongated holes of the separator are located against the projections of the hinge body and remove the separator assembly with the cage. |
| 18. Remove the cage from the separator by placing one of the protrusions of the cage in the elongated hole of the separator and then roll the cage towards the straight edge of the hole. |
19. Wash all parts and blow with compressed air. Assembling PERFORMANCE
1. Assembling the outer hinge is carried out in the reverse order of disassembly. 2. Before assembly, lubricate all parts with CV joint-4 grease. 3. When installing the separator assembly with the cage into the hinge body, ensure that the marks made before disassembly match, and place the cage with an annular groove (under the thrust ring) towards the shaft. 4. When installing balls into the separator, tilt the cage approximately at an angle twice as large as the separator. 5. Fill the hinge with CV joint-4 lubricant in the amount of 60 cm3. 6. Before striking the shaft (4) to connect it to the inner race (11), it is necessary to install a new retaining ring (12) strictly in the center, and then sharply strike down the end of the shaft (see Fig. Front wheel drive). The retaining ring will compress and slide through the splined hole in the cage. 7. When pressing the joint housing oil seal ring, use mandrel 67.7853.9533. 8. After assembly, the cage may block when the shaft swings when the ball does not rotate. This is not a sign of poor assembly, since such blocking will not occur when the hinge rotates during operation. 9. Using the above techniques, completely disassemble the inner joint. In this case, the clip must be removed towards the larger diameter of the separator. 10. Assemble the internal hinge in the reverse order. In this case, it is necessary to align the marks made before disassembly. 11. The elongated conical part of the separator should be directed towards shaft 4. When assembling, fill the joint with CV joint-4 lubricant in the amount of 150 cm3. 12. When installing the protective covers of the hinges, use the mandrel 67.7853.9537. 13. If there are no knocks or vibrations and the protective covers are in good condition, then disassembling the front wheel drive is not recommended.
content .. 70 71 72 ..
How much does it cost to replace a CV joint on a Niva?
The price of new assembled drives starts from 3000 per one. If we consider the CV joint separately, then for the internal one you will have to pay from 900 rubles, and for the external one from 1600 rubles and more. The final price depends on the place of purchase and the manufacturer.
Drivers did not know what a constant velocity joint, or CV joint for short, was until front-wheel drive cars began to conquer the market. After all, the wheels must turn, but this is impossible to do with the help of a cardan transmission. CV joints (popularly called “grenades”) are also found on cars with all-wheel drive today—the Russian Niva 2121 is no exception in this sense. If you take care of the hinges and change the anthers on time, the factory-assembled unit can last more than 100 thousand km (it all depends on operating conditions). But sooner or later the X-hour comes, and replacing the CV joint on the Niva becomes inevitable. The process is not easy, including choosing a node in the store. But more about everything.
Chevrolet Niva › Logbook › Replacing the right drive
Hello my dear reader, today I will tell you how to replace the drive.
First of all, I had to drive the car into the garage, but the wheel wouldn’t spin. No problem, I lower the rear wheels to about 0.5 atm and start digging out the snow
After the 20th attempt, I finally drove into the garage. I take the wheel off and see this
I unscrewed the caliper, removed the disc with the hub and so on
I think ok, move on. I sat down to think and the upper lever, or rather its silent blocks, caught my eye
I remove the fist for convenience, unscrew the shock absorber from the lever, having previously placed a jack under it. I go down into the pit, unscrew the drive studs, one bolt that holds the drive to the silent block (I don’t know what it’s called correctly), unscrew the same bolt on the other drive, and also remove the brackets that hold the gearbox to the stabilizer. Simply put, I unscrewed the entire gearbox. Why did I do this? Everything is very simple, in order to move the gearbox closer to the left side (in the direction of travel), so that the drive is easier to reach.
Well, with the help of a hammer and a bunch of obscenities, I manage to get the victim
It was possible to replace only the front CV joint, but a long time ago, my father bought two new drives and we changed the left one, because the same thing happened to him, and this one was wrapped up and sent in ziplock until better times.
I went to the store and bought a new bearing, hub, and silent blocks.
I started with a simple one, repairing the lever. I thought for a long time about how to knock out the old rubber bands, but fortunately I had a phone with the Internet at hand. It was not difficult to find a way to replace the silent bands.
Source
CV joint device VAZ 2121
Both hinges include fundamentally the same elements, differing only in size and cost.
When it is necessary to make a turn, the angles of both shafts change, the balls move along the grooves and transmit physical force to the wheels of the front axle. Usually a “Rtseppa” (“six-ball”) hinge is used. It cannot transmit torque from the gearbox on its own: for this, a shaft is used - a hollow steel pipe connecting the outer CV joint with the inner one. The latter operates continuously at a rotation angle of 10 degrees. The external unit operates in the same way, provided the movement is smooth. But as soon as the wheels turn, the angle at the outer joint increases to sixty degrees.
If the car moves on an uneven road, the distance from the outer unit to the inner one changes, so the shaft is mounted in such a way that it can either move in or out.
Removing front wheel drives VAZ-21213, VAZ-21214
Removing front wheel drives
PERFORMANCE ORDER
We carry out the work on an inspection ditch or a lift.
We show the operations using the example of the right drive - its dismantling is more labor-intensive. Drain the oil from the front axle gearbox. Unscrew the adjusting nut of the hub bearings and remove the cone bushing. Disconnect the lower shock absorber mount from the lower arm spring support cup. Disconnect the lower ball joint from the lower arm of the front suspension.
We move the steering knuckle to the side and remove the shank of the outer joint housing from the hub. Using a 19mm spanner, unscrew the bolt securing the front axle bracket to the right bracket of the power unit support... Using a 13mm socket, unscrew the three nuts securing the front axle bracket and the bearing cover of the internal joint housing to the gearbox housing. We remove the front axle mounting bracket... ...and use a mounting blade to pry the bearing cover of the inner joint housing by the lugs. We remove the internal joint housing from the gearbox... ...and remove the right drive assembly. The connection between the bearing cap and the gear housing is sealed with a gasket.
The gasket is asymmetrical, so it is installed on the gear housing studs in only one position.
We remove the left drive in the same way, except that three nuts...
...only attach the bearing cap.
Install the drive in reverse order.
Source
How to remove the drive
Untimely replacement of the hinge will lead to dire consequences: in the worst case, the drive may jam, which at high speed can lead to an emergency situation. Therefore, it is more advisable to replace the unit in time. How to change the CV joint on a Niva? It is best to remove everything assembled; for this you will need:
- socket head wrench for 13 and 27 with a wrench (preferably a ratchet type);
- extension to the wrench in the form of a hollow pipe;
- hammer;
- flat screwdriver (you may also need a chisel);
- a jack and a wheel wrench for removing the wheel.
Inner CV joint
Place the car on a viewing hole, and if possible, on a lift. In the first case, you will need a jack. But first you need to remove the hub nut cap with a screwdriver and loosen it, then remove the wheel and unscrew it completely.
Further steps to replace the grenade on the Niva:
- Using a 13mm socket, unscrew the nuts securing the ball joint to the steering knuckle.
- Using a jack, smoothly lower the lower arm onto a suitable wooden block.
- Remove the shaft from the hub by moving the steering knuckle up and back (secure it with wire), and removing the retaining ring to remove the outer joint.
- Remove the 3 pressure plate nuts securing the inner CV joint. Pry it up with a flathead screwdriver and pull the internal assembly out of the gearbox.
- If it is inconvenient to remove the hinge when assembled, disconnect it.
Below see how to remove the CV joint on Niva 21213 - video.
Tools that may be required for replacement
In order to remove the inner CV joint on a Niva yourself for the purpose of subsequent replacement, you may need tools such as:
- Driver and ratchet.
- Head 13.27 mm.
- Hammer.
- Extension.
- Jack.
- Flat screwdriver, chisel.
- Balloon wrench.
Many people prefer to change the CV joint themselves to save money. But it is worth noting that auto mechanics are not born, not every person can do this, that is, not all people know how to remove the internal CV joint on a Niva. Therefore, in this case, it is best to seek help from specialists. But it is worth noting that replacing this element is a rather expensive procedure.
How to replace a grenade
Once you have the inner grenade in your hands, collect the bearing balls if they have fallen out and place them in a container of kerosene. Remove the retaining ring from the shaft that holds the race and separator. Take a drift and, hitting it with a hammer, knock down the hinge, hitting the end of the cage. Remove the retaining ring and thrust ring. Clean all removed parts with a metal brush and rinse in kerosene.
Disassembling the hinge
Lateral clearance in GP and differential bearing preload
In accordance with the instructions, the lateral clearance and preload of the bearings are adjusted using tool A.95688/R.
In its absence, a caliper of a suitable size will perform the specified role.
To ensure the required preload, fix the distance relative to the bearing caps at the beginning of tightening and at the end. The required difference between the values is 0.2 mm.
The side clearance is adjusted by bringing the driven gear closer to the drive gear until it disappears. Initially, one of the nuts is in a loose position, the other (working) is tightened.
How to put it in place
Reassembly begins with lubricating the shaft and installing the boots in their original places. Next, the retaining rings are put back in place - it is better to do this in a vice. The next point is to install the hinge on the shaft: feel for the splines and lower it until it comes into contact with the ring located outside. Now, through the wooden spacer, hit the CV joint with milk so that it snaps into place. Move the part in different directions to make sure it is securely fixed. All that remains is to install the anthers with clamps.
Installation of the unit is carried out in the reverse order of removal. In this case, it is recommended to use screw clamps rather than standard ones. The hub nut needs to be installed with a new one. At the final stage, do not forget to use it to adjust the clearance in the bearings.
Structure
Important! If you decide to replace the CV joint yourself completely or change its individual parts, you need to understand its design, and only then dismantle it and then replace it.
Replacing a CV joint is an expensive procedure, which in a service center will significantly affect the thickness of the car owner’s wallet. The part is made of heavy-duty materials that are resistant to mechanical stress and aggressive environments. Accordingly, these materials, like the part itself, are quite expensive.
And the cost of replacing a CV joint will be approximately half the cost of the mechanism. That is why many try to replace it themselves in order to save some money on repairs. But not everyone is born an auto mechanic, so the average person must first find out what parts the mechanism consists of. Here is their list:
The anthers perform two functions at once: they protect the hinge from dust and dirt. After all, in essence, a CV joint is an external part that is located on the bottom of the car. This means that all small particles when driving fall on the hinges in the same way as on the rest of the chassis.
On each wheel drive there are two mechanisms, which have almost the same structure, only slightly different in shape and size. As a rule, left and right CV joints are interchangeable on most car models. If you are in doubt, it is better to go to a car service center and ask if it is possible to buy left-handed hinges for right-hand drive on such and such a VAZ model for installation on right-hand drive, or vice versa.
Sometimes the entire mechanism requires repair, but more often it is the outer one that is worn out, while the inner one, as a rule, is almost eternal. But sometimes it may require replacement.
The design of the mechanism is not that complicated. The separator rotates the balls, which are located in the grooves of the fist and the outer housing. All this is covered by anthers that protect the parts from dirt and dust, as well as from leakage of lubricant. When replacing, the most difficult thing is to dismantle the mechanism itself so that you can install a new one entirely or change its individual parts.
Recommendations for choosing CV joints on Niva
The first thing you should pay attention to is the number of teeth (splines) on the hinge. Until 2004, there were 22 of them (the hub corresponded to this number), then there were 24, but sometimes units with 22 were still installed. So you just need to count them on your machine. But if everything is clear with this point, another question arises - about the manufacturer. Most experienced Niva owners recommend purchasing factory hinges, complete with shafts. The only negative here is the huge number of counterfeit products. There are only three main large suppliers: VAZ, BelMag, Trialli. Another company, LGR, overcomes the 5% sales barrier.
Reasons for rapid wear of joints
The main enemies of any hinge mechanisms are dust and dirt, which act as an abrasive and accelerate the wear of the grenade. As soon as the car owner misses the damage to the elastic cover and drives for some time without replacing it, the same dirt will get inside, which sooner or later will do its job, even if you change the boot.
There are other reasons leading to malfunction and replacement of elements:
- there is not enough lubrication in the mechanism or its quality leaves much to be desired;
- driving too aggressively on bad roads, constantly creating extreme loads on the CV joints;
- factory defect in the parts of the unit.
The exception is the situation when there is a manufacturing defect, but this happens quite rarely.
The main symptoms of CV joint failure on Niva
The first sign is the appearance of a characteristic crunching sound from one, or less often both, wheels while driving. An unpleasant sound appears when turning and when accelerating. The crunch is heard especially clearly during a sharp start. And another symptom is jerking during acceleration. Having realized that replacing the CV joint on the Niva is needed in the very near future, it is necessary to determine what exactly has failed.
You can do this in two ways:
- On a stationary car. You will need to move your hands, tug the shaft connecting the hinges - there should be no play. Its presence indicates the need to replace the unit. To check the inner CV joint, hang one of the wheels and turn on first gear - the faulty unit will certainly crunch when the wheel rotates.
- When moving. You need to drive on a flat road, alternately turning the steering wheel in one direction or the other. A crunching sound will be heard from the side where the outer unit is faulty. To check the internal joints, you will need to overcome small holes and bumps at low speed so that the wheel drops as low as possible. Where the crunching sound comes from is where the internal CV joint on the Niva needs to be replaced.
It should be noted: a crunch in the hinges indicates that replacing the Niva 2121 internal or external CV joint is inevitable. The hinge can still be saved if you notice it in time.
Primary signs include:
- boot rupture;
- the appearance of grease on the inner surface of the wheel due to a torn boot;
- a whistling sound reminiscent of friction against metal;
- weak jerks when moving away (the grooves of the “grenade” begin to break), sometimes weak clicks (2-5).
Checking the CV joint
First, you should jack up the car and see if the boot is cracked. If there is visible damage in it, then a large amount of dirt has probably accumulated inside, which will cause an unpleasant crunch when turning and starting with the wheels turned.
As a rule, in this case, it is enough to clean and rinse the internal parts with gasoline, lubricate them, and put them back together. In addition to lubrication, you will also need to replace the anthers with new ones. But if you operate a car for a long time with dirt inside the CV joints, this can lead to their complete failure, which is why at the slightest crunch you need to immediately sound the alarm. Do not forget that replacing a CV joint on a VAZ 2110 or any other car model will cost approximately 1,500 rubles, this cost is only for the part.
How to diagnose joint wear
There is a proven method for diagnosing joint wear. To do this, you can “start” with the wheels turned out, if at the same time you feel a clear crunch in the front part of the chassis, then they will have to be changed. To be completely sure, you can also spin the car or start with the wheels slightly turned. You will immediately feel whether the left or right mechanism crunches. If it is both, then you will have to jack up the car and determine which of them has play. If both hinges are loose, you need to prepare for significant expenses.
Signs of wear will be visible if you put the car on a jack on the side where you hear the crunching sound. Then you need to grab the drive with your hand and shake it in different directions. If you feel significant play, the bearings are definitely worn out, and you can prepare to buy a new CV joint.
A couple of tips to help prevent CV joint wear
Despite the fact that many car enthusiasts do not even suspect the presence of such a part in their car, as a rule, they themselves are the culprits of its breakdown.
It must be remembered that aggressive driving is the first reason for joint failure. In particular, these are constant sharp starts with the wheels turned out and driving in reverse with the same steering wheel position. In addition, we need to remember what roads we often have to drive on. If rough terrain is normal driving conditions, then the boots should be checked more often than usual. In addition, timely replacement of lubricant in CV joints is the key to their long-term operation.
Aggressive driving, as you know, also means sharp starts. They are the cause of overheating of CV joints, and where there are high temperatures, there is increased wear of parts, no matter what high-strength materials they are made of.
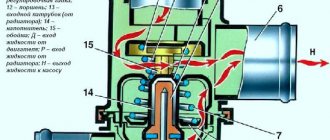
Front axle release mechanism
Front axle disconnect mechanism for VAZ 2121
Disabling/enabling the front axle is done from inside the car using the transfer case lever while driving. When driving on a dry, hard-surfaced road, disabling the front axle allows you to significantly save gasoline (up to 2.5 l/100 km). on rough terrain, the front axle is also easily engaged from the passenger compartment. Savings are achieved by reducing friction losses in the transfer case drive.
Price there: 7,500 rubles. = 2,000 UAH. .
What do you think? if necessary? What are the disadvantages, what are the advantages. Is it malicious? and so on.
#2 OFF SITE Willi
- Auto: G160.
- Name: Roman
- Gender: Man
- City: Irpen
#3 OFF SITE Onegin
- Auto: Shiva-Nevrole
- Name: Evgeniy
- City: Kyiv, Borshchagovka
What do you think? if necessary? What are the disadvantages, what are the advantages. Is it malicious? and so on.
I sincerely do not recommend installing such a device since our rear axle is not designed for such loads and neither is the transfer case itself. When they were developing the Niva, they thought for a long time about which drive to choose based on the designs developed at that time that were used in the series and which would allow their use on a car of this class. From what was suitable, only the Taz axle was suitable, but even it did not last long under the Niva during endurance tests, as a result of which it was decided to give 50% of the torque to the front axle (there was a development of a monoblock design of the gearbox + RK, but it was abandoned for economic reasons) in the role of which was a new product now used everywhere on front-wheel drive basins.
In general, in order to extend the life of the transmission, I do not recommend installing this device, the Niva already does not shine with reliability and thoughtfulness of design, and then such happiness falls on it and the savings are questionable - it’s cheaper to install an LPG.
#4 OFF SITE Gavrik
- Car: VAZ-21213
- Name: Victor
- Gender: Man
- City: Kyiv
disabling the front axle allows you to significantly save gasoline (up to 2.5 l/100 km).
as the classic used to say: I DON’T BELIEVE!!! but with our short wheelbase, handling will deteriorate. If you are interested, remove the front cardan and drive without it for 200-300 kilometers, and then you will definitely decide for yourself whether it’s worth it or not!!
By the way, when I had problems with the clutch and was slipping, I managed to reduce fuel consumption from 12.5 to 10 in the urban cycle, so a lot depends on the “flies” in my head.
#5 OFF SITE mamont
- Car: KIA Grand Sportage
- Name: Alexey
- Gender: Man
- City: Kyiv
#6 OFF SITE Willi
- Auto: G160.
- Name: Roman
- Gender: Man
- City: Irpen
Well, HZ. In many cars, everything turns off. In general, it’s strange to hear that the UAZ bridges did not withstand the road tests under the Niva. But the Zhigulet one drives. Maybe you’re right. But for anyone, this once again proves that the Niva is not the best option for a car that is suitable for our purposes .By the way: in the past, on Nivas they generally threw out the transfer case and left one rear axle. Everything drove on asphalt. And my friend pulled a trailer loaded like this on one bridge (he was working on potatoes) and loaded it in a way that was not childish. And nothing happened to the bridge. And another comrade, before my eyes, tore the drive into a motorcycle, practically on the asphalt. On tires 215-75R15 Mudya from Goodrich. So HZ, HZ.
IMHO: If I were the owner of a Niva, I would probably buy this device. Moreover, in the city all-wheel drive is not needed at all. And in the off-road there is nothing to do with one rear wheel drive.
#7 OFF SITE muzolyajunior
- Car: Vitara Cabrio
- Name: Sanya
- Gender: Man
- City: Kyiv
. But for anyone, this once again proves that the Niva is not the best option for a car that is suitable for our purposes.
- Onegin likes this
#8 OFF SITE Onegin
- Auto: Shiva-Nevrole
- Name: Evgeniy
- City: Kyiv, Borshchagovka
In general, it’s strange to hear that the UAZ bridges did not withstand sea trials near Niva. But the Zhigulet one drives.
Well, let's start with the fact that I didn't say a word about the UAZ bridges, no one installed them on the Niva or even considered the possibility of installing them - these are bridges for a car of a different weight category and installing them on a frameless car is at least frivolous - It tears out all the attachment points and these bridges are heavy for the Niva.
But for anyone, this once again proves that the Niva is not the best option for a car that is suitable for our purposes.
Excuse me, but for which “ours” is this? Suitable for ours - this is a light SUV, many started with it and many continue to conquer off-road terrain with it, gradually improving it.
By the way: in the past, on Niva cars they generally threw out the transfer case and left one rear axle. Everything drove on asphalt. And my friend pulled a trailer loaded like this on one bridge (he was busy with potatoes) and loaded it in a childish way. And nothing happened to the bridge. And Another comrade, before my eyes, tore the drive into a motorcycle, practically on the asphalt. On tires 215-75R15 Mudya from Goodrich. So, HZ, HZ.
There are plenty of details everywhere, but among close associates/comrades/neighbors this is more of a rule. One thing I can say for sure is that this did not add much to the bridge’s lifespan.
Moreover, in the city all-wheel drive is not needed at all. And in the off-road there is nothing to do with one rear wheel drive.
Operating principle
Torque is supplied to the gearbox (Gearbox) and transfer case of an all-wheel drive vehicle. From it, the force is directed to the front and rear axles. The Niva cardan transmission supplies torque to the axles.
Gearboxes are installed on the axles, which translate the movement of the driveshaft into rotation of the wheel axles. Both units of the front and rear Chevrolet axles have a similar design: drive and driven gears located at right angles to each other. The gearbox gears are equipped with specially shaped teeth, and their design facilitates maximum transfer of forces between the shafts.
The gearbox itself is covered with a cast aluminum housing, closed with a metal cover. The gears are placed in a sealed space filled with transmission oil, which provides lubrication to the interacting parts and also dissipates heat.
Gearboxes installed on Niva vehicles must be marked indicating the gear ratio.
Symptoms of problems
If the following signs of malfunction appear during operation of the Niva vehicle, then additional diagnostics must be carried out:
- while driving around a turn, a characteristic crunching sound is heard from the front of the car, as if steel balls are touching the body during operation;
- the same thing, only instead of a crunch, a knock is heard, it may disappear when moving in a straight line;
- A constant crunching sound that does not disappear when driving in a straight line indicates wear on the internal grenade.
Remember that after such noise appears on one side or both, you cannot immediately delay repairs. Otherwise, a faulty CV joint can cause a lot of trouble right on the move. To make sure the grenade is broken, you can check it in 2 ways:
- Choose a flat area so that there is enough space for the Niva to turn. Make several circles around it clockwise and counterclockwise, turning the steering wheel all the way. Listen carefully to the sounds that arise. If they sound like a crunching sound, proceed to part 2 of the diagnosis.
- Place the machine over the inspection hole and check for play in all 4 units manually by rocking and turning the axle shaft in different directions. A worn joint will immediately make itself known.
If it turns out that the boot is damaged or water is leaking from it, then the CV joint in this place has probably become unusable.
How to change anthers
All manipulations with the axle shaft must be done by holding it in a vice. To disassemble and remove CV joints, you will need very simple tools:
- Hammer
- Punch
- Screwdriver
- Side pliers for removing circlips from the shaft
When replacing worn-out anthers with new ones, you will need to remove the grenade. The instructions on how to remove the Niva outer CV joint are quite simple; work – does not require special skills:
- Remove the clamps from the boot. Move the boot towards the center of the shaft.
- Using a drift and a hammer, being careful not to hit the separator, knock off the outer race of the hinge. Collect all the balls (there are 6 in Niva)
- Using pliers, remove the outer retaining ring, knock the inner race off the splines and remove the inner retaining ring. You don’t have to remove the internal one, but to prevent it from damaging the new boot, you need to wrap it with electrical tape.
- Remove the boot from the shaft (or both, if the second one needs to be replaced)
When installing new boots, it is recommended to put on additional protection in the form of a plastic cap on the outside.