December 18, 2015 Lada.Online 183 007 18
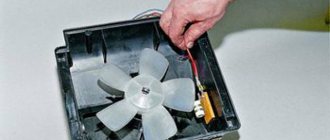
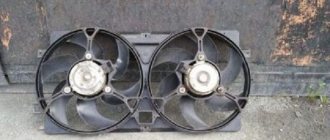
The stove on the VAZ 2121, 2131 has a number of advantages and disadvantages. One of them is associated with an electric fan, which not only blows weakly, but also makes a lot of noise and whistles during operation. Replacing it with a new type fan will solve only part of the problems. As practice shows, it is better to install an additional fan from the figure eight “snail” type.
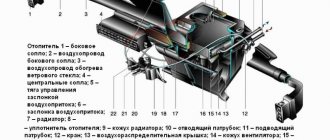
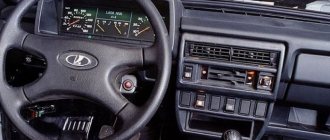
The point of the modernization is to install on the Lada 4×4 an additional electric fan from the VAZ 2108, which will be located in the engine compartment inside the air intake, where it is normally positioned at figure eight. Let us remind you that the standard Lada 4×4 fan is located inside a plastic box in the cabin.
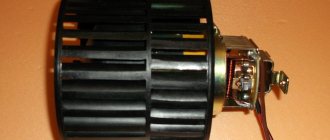
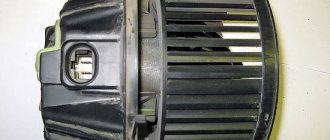
You will need: a figure-eight stove fan with a casing (catalog number: 2108-8101091).
The fan control can be left as standard, then there will be the least amount of modifications. Or use additional parts from the VAZ 2108:
- an additional heater resistor (article: 2108-8101081), which will need to be placed in the air intake next to the fan;
- fan speed switch (2108-3709608), which is mounted on a panel in the SUV interior.
Engine from 2108 to Niva
In general, having suffered from the roar of chains and the carburetor, I decided to install the 21083 engine on my Lada. Why not a shesnar? They ask for it very expensively in our city at showdowns.
Among the advantages: + Quieter and more responsive engine + Injector + Lots of opportunities for tuning, unlike a classic internal combustion engine, and you can then throw gear on it + The 21083 injection engine is more powerful than the classic injection engine. Cons: -Cutting, sawing, drilling, adjusting, etc. and so on. First, we disassemble the engine and take the crankshaft to a turner so that he can cut a classic bearing under the gearbox input shaft (Photo is not mine, but the meaning is the same. There were a lot of photos, but after not approaching a digital camera for a long time, my parents decided that my photos were not needed and took up a lot places on the flash drive, they just erased them, of course, without asking me. Well, okay, let's continue): I left the basket and clutch disc with the standard classic ones; everything is screwed into the regular places without problems.
Next, I had to think about what to do with the release lever: whether to make a spacer for it or not. I decided not to do it, it’s just that there is a cast bolt with a ball in the gearbox to support the clutch fork.
Next are the supports for attaching the cushions and the cushions themselves: On the right side of the studs the original ones remain, only one hole for attaching the support will have to be drilled out larger. But on the left side the studs are thicker, we drill out all 4 holes for fastening the support, due to the fact that I didn’t have such studs in the block, I had to buy bolts with fine threads and screw everything to the block. Now we need to install the block in place, measuring the engine mounts from the Niva and I decided to leave the regular ones because... they are the same in height. And we need to make the engine higher so that the pan doesn’t rest against the beam and we don’t have to overcook anything. And again the cylinder head washers come to our aid, we put them under the supports.
Having installed the block in place and tried to screw the starter, it didn’t work again, now this “bad” starter is resting against the crown. Yes damn@, I didn’t want to remove the engine ten times, just measure it roughly, put washers under the starter bolts and voila, now everything is spinning, everything is working.
The block was then installed in place by the head, but that’s a completely different story...
Installation of heater fan from 2108
- Go to page:
Installation of heater fan from 2108
Post by ALK » June 28, 2010, 01:37
Well, I just shoved the heater motor from the 8 into myself and realized... I'M FUCKED. I’m tired of spending a lot of money on this bucket, because I’m running out of time with money, but there’s no return as such... it won’t become a plane, whatever you say. although at first speed it blows like before, at second it didn’t blow... and it’s quiet! When driving, I can’t understand whether the motor is working or not? on the 3rd (PF) it blows so much that the engine shield shakes
however, because of the mistakes, something needs to be completed/remade/remade, a lot of time is wasted. another part of the time is spent on “what if we do it like this”
I thought about welding it myself according to Smogil, but Smogil himself said that he altered, completed, changed some things. Accordingly, no one changed the drawings, but they were too lazy. lack of experience, material and stupid time for reconciliation. I’ll say one thing for sure... the model in the compass didn’t want to come out according to the drawings
so we took the simple route - the casing itself was purchased. stove in pasker, wires in UP. terminals, crimper in different places at different times... once in Auto49 I bought a twist button
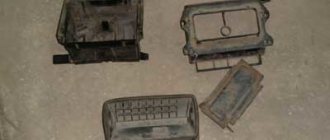
I started with disassembly... I came to the dacha, pulled out the center console, untangled the wires, and adjusted a few things. I snapped off the lower part of the casing and away with it. I unscrewed the top part of the stove and the boots - I unscrewed it myself, alone... I didn’t understand why a second person was needed. 2 bolts unscrewed themselves, 2 bolts began to turn after the nut was loosened... a screwdriver between the edge and the boot and everything unscrewed... I took off the boot and was amazed - 13-year-old dust. the damper is a whole different story...
I cut the studs with a 2kW grinder (“r-time”) to a length slightly longer than the bolts (you can make 3/4 of the stud bolt and nothing will stick out :) )
I assembled everything onto the studs (a stud and 4 nuts per stud - a couple of nuts secure the stud, one nut holds the top of the stove, the second a boot), I put on a new boot and the damper doesn’t fit in the way.. how can I remove it?
I called - to no avail.. I went to smoke the manual.. and no one in the manual removes the damper.
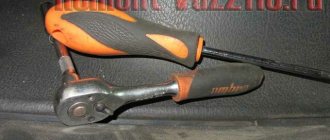
but in the photos I saw a nut there! I felt on the original, felt for the second... I took the ratchet, the head and moved one, then the second. then he mutilated himself for about 15 minutes, cut his hands from the radiator fin, flared up and made a puddle of antifreeze in front of the garage at the dacha..
Oh, how I didn’t want to remove the heater radiator. because it will cause problems later
took it off, carefully took it out, poured half the radiator into a glass, put it aside, pulled out the upper part of the stove.. wow, damn it.. the design is worthy of a cabinet of curiosities.. the damper axis is still okay, but on the back side, closer to the cabin, this mandula is held by 2 ears, in front valve cover 2 studs, which are the axis of the rocker .. it’s difficult to explain how it all looks .. you need to see it. There was so much dust there... so black! this is horror.
All the plastic that I put back had to be washed under pressure, and then wiped with a rag and washed off again. I left it to dry and went to look for a piece of iron so that air could come from the stove to warm my feet, but the mafon... arched, hummed. The plastic has dried up.. an 8-film was moved to the place of the old resistance and secured with a self-tapping screw.
the next day, not finding drills for metal, a 200-gauge nail was taken and 4 identical holes were made in the piece of iron, then drills were found and the damper was drilled. I assembled it with rivets, and before that I sawed off the unnecessary guide ribs.
collected all this oh! Zhigulevskaya and began to hang up the air box. I hung it up, moved the wires, the hose to the vacuum unit and the hose from the carb.
Well, I think the finish line is soon! as if it weren't so
We fasten the snail and understand that we won’t go anywhere, otherwise we won’t hang the wire on the ignition coil. in addition, the holder of the explosive wires gets in the way, but thank God, it bends; remove the coil, unscrew the screw on the “clamp” and move the coil itself down relative to the clamp.. now it hangs low, but it’s still barely enough
Everything has been assembled, it looks like nothing is bothering anyone... look, the gap between the snail and the box is 2 cm... where will the snail suck the air: from the street or from under the hood? I was advised to make a seal from the hood seal, fortunately it was lying around old at the dacha... to be honest, there was no way to bend it evenly. There was a simple way out of the situation - a strip of isolon along the length and 5-6 plastic clamps. connects in 30 seconds, doesn’t go anywhere... the only drawback is that not everything turned out well, but there is something to practice on
By the way, the boot itself was glued from the bottom with the same isolon using 88-grade glue! assembled as is. I messed up the wiring with the terminals, but now the stove works, it works when there is a battery, and not when the ignition is on. The wiring is connected directly from the battery through the fuse block to the 15A blade. further wiring is elementary. the mass hangs on the wiper motor bracket.
impressions - OOOO! blowing! and it’s not bad, it’s an infection, it’s blowing.. but the current is when the car is turned off, that is, there is an opportunity to enjoy the cold air.. hot air is sucked in in a traffic jam
the hood closes without any problems, I threw the wiring into the corrugation, and at the same time pulled the wires from the exhaust pipe, melting the wire
Well, the worst problem is with the removal of the heater radiator... I didn’t tighten the hose well, I didn’t tighten the clamp properly... the antifreeze leaked inside. Fortunately, I turned around so that my muzzle was higher and I immediately knew where to look.
tension from the fact that you have to hold the clamp, along which hot antifreeze flows almost like a trickle - this is indescribable despite the fact that it’s already 5 o’clock and Sunday .. and the back was burned, I tightened it, topped it up, started it up, went to look, and there was a cloud of antifreeze steam
I twisted it, revved it up, pushed the plugs... turned on the heater - hot air was collected and drove home... on the way I looked at the heater hoses again - TTT, everything is dry
I haven’t noticed any special joys yet, the air conditioner doesn’t replace the open window either... we’re waiting since the cold weather
Who knows what's going on behind the fence of the zoo? ©
see also
Comments 20
Subaru Sound 1.6 manifold in place, digest the lower part. It will fit, no difference.
I'll tell you a secret, a limited edition of sixes with 83 carburetor engines 21068 was produced on a VAZ car. If you're interested, google it!)))
So where can you find such an engine? And the distributor again stands on the side, just like a classic internal combustion engine, only with its own location. Where to look for a belt for it? You just can’t install a regular eighth because of the distributor or cut the shield.
This is still in the plans, a lot of things need to be installed for the injector with wiring, what did you do, it’s probably necessary to buy a tank for the pump, just like you did anyway
The tank is necessary. The non-submersible pump did not work for long. And the engineer connected it according to the diagram.
How about fuel economy, what is the consumption, I also want to install a current carburetor with injectors, there are a lot of problems that I bought anyway
In terms of consumption, depending on how you drive, I had 3 liters less in the city. And as for the carburetor, where are you going to put the distributor? Hole in the shield? It’s easier with an injector, and the price of the engines together with the mounted one will be two to three thousand different. And the engineer himself. eats less.
Have a question, how to arrange it? And I saw spacers for a classic flywheel on the drive.
I don’t know about the design, and I don’t see the point in spacers
With a spacer, the internal combustion engine moves forward, there is no need to sharpen the elbow and flywheel. no need to chisel the engine shield or cut the crankcase.
The knee needs to be sharpened to fit the bearing, whether with or without a spacer, because in classic gearboxes the bearing supports the primary, without it everything is screwed up. And you can move the motor out without a spacer, move the box a little closer.
a spacer is placed between the 08 elbow and the classic flywheel, and spacers between the block and the box. On the drive they installed a 16 valve on the Chevy, look in the drive search engine.
damn, brother, why the hell do you need this engine))) No offense. What is his potential? he has no volume or meat in his head for washing down, the only thing that can be done is a 16 V cylinder head, I advise you to do it quickly, buy a head from Priora, you can get a new one, shafts and off you go. The 21083 engine itself, in my opinion, is nothing, I draw this conclusion because at the moment I am driving a 2114, 1.5 liter. On the check, I have 1.8 liters. from the spirit of hope. It has potential, and the channels have room to sharpen and the volume is good, but the 21083 xs has potential, only in replacing the head, and what power does it have? 80-82 hp. Even the Shahi carburetor with Weber carb and 93 gasoline had 80 hp. Russia-83 has not yet introduced new environmental standards. By the way, the Shahi, with the same power, has good torque from the bottom, and even a turbine can be installed on a classic-engine engine without modifications. And I give you a thumbs up for the work done and advise you not to bother with this engine anymore until you are ready to replace the cylinder head, and if it’s time to upgrade the bottom, you can install a crankshaft from a 1.6 engine with pistons with a crumpled finger, it will be 1.6 liters though would. Or you can install a lighter piston like the Prior one. What else can I do with this engine, idk)) If I were you, I would plug in a 1.8 out of hope, shorten the shaft onto it angrier and an injector with a receiver and a clear exhaust. Which, in principle, is what I will do with mine sooner or later. I’ll just leave the shaft the same 780 okb.
Features of installing a diesel engine on a VAZ 2121
If the manufacturer does not provide the opportunity to buy a Lada 4×4 with a diesel engine, then craftsmen will appear who will install it with their own hands. So, which diesel engine is suitable for the VAZ 2121? Here are the most popular models:
- Peugeot XUD-9SD (1.9 l, about 70 hp) together with Fiat Polonez gearbox.
- Peugeot XUD 11 with Fiat Polonez gearbox.
- Toyota 3C (79 hp) or 3ST (100 hp) together with Toyota Noah gearbox.
- Motor from Volkswagen Vento.
- And many others.
To install a diesel engine, a large number of modifications will be required. The simplest and most common way of such tuning is to use the engine that was installed for export versions of the SUV (XUD-9SD). Its installation requires the least amount of changes to the machine design. It has a good location of the oil intake (in the front, not in the center or rear), the oil filter (on the front left, like the Lada 4x4) and attachment points to the body. In addition, it is easy to find spare parts for this engine model. The approximate procedure is as follows:
- Engine mounts are suitable for VAZ 21215.
- The gearbox bell and the box itself fit well from Fiat Polonez.
- Rework the pan, oil intake, flywheel, exhaust system, etc.
- The easiest way is to complete all the modifications according to the documents.
In other words, no diesel engine can be installed instead of a gasoline engine without modifications. What do you think, is it necessary to change the Lada 4×4 internal combustion engine to a diesel one? If yes, which one and why? Let us remind you that you can improve off-road performance in an easier way, for example, by installing mud tires.
Installing the 2108 engine on a classic
First, we need to free the engine compartment of our car from everything unnecessary, namely from the old engine; from it we only need the starter and the mounting brackets for the engine mounts. After this, we can move on to our new heart, and first we will have to disassemble it a little and remove the crankshaft from it in order to press the support bearing of the input shaft 2101 into it as much as the original one sticks out, it must be cut off and the bearing pressed in its place. A turner will help you with this for a small price.
This drawing can also help you with this. After that we put our crankshaft back. At the same time, you can immediately grab the flywheel to sharpen it under the classic crown for pressing. The turning work is done, now we need to rearrange the brackets from our old motor; there are special holes on the side of the figure-eight block. Then you will need to slightly knead the engine shield, just as in the case of a 16 valve engine. We put a flywheel on the engine with a crown already pressed onto it, and attach a classic clutch basket to it.
Engine cooling system.
You should start with the rear thermostat, as you probably already understood that you will have to make the entire cooling system yourself. It needs to be made at a maximum angle to the side so that it does not rest against the engine shield. This is roughly what it will look like, this one is made from an old eight-point thermostat, if you want you can make a metal one, it’s up to you.
After this, you can put the motor in its place, having first replaced the old pillows with new ones; I recommend using pillows from the Niva. To ensure that your oil pan does not touch the lower beam, I recommend placing a thick washer on each pad; with this you can win a few precious mm. When the motor is in place, you can continue with the cooling system; you will need to make pipes like this. This is how they will look on the car. The thermostat is a classic one. With the cooling system, I think I have more or less clarified the picture for you, of course it will not be possible to describe everything, but I told you the main thing.
Final work on installing the VAZ 2108 engine.
After all the above work, all you have to do is lay the return line, install a classic starter, run the wiring, and also make the exhaust manifold yourself, connect everything after that, you can try to start it. I want to say that the process is not easy, you will have to spend a decent amount of your time, effort and money, that’s all, good luck in your endeavors, if you have questions, write in the comments.
Also read other interesting articles about how to build a cramp yourself on our website and join our VKontakte group.
Hi all. I forgot to unsubscribe and post a photo report. I'm correcting myself.
In general. 2 weeks ago my original stove motor completely failed. And having studied the modification of the stove for a long time. I realized that the time had come. Down with this noise like from a thermal power plant.
In general, the modification is quite simple. And you don't need any special skills. The main thing is that your arms are straight.
What is needed for the remodel:
Stove motor from 2108 or 2110. Soldering iron Glue Pieces of unnecessary plastic. And so on little things. I don't remember what. But the main thing is a soldering iron with a thin tip. To cut a hole for the motor.
PS After installation, the first test was a delight. You can't hear the stove motor at all. You can only hear the breeze from the engine. With a panel that looks like a six-wheel one, you’ll have to tinker with it in the cabin. And not only with her.
In general, everything is in your hands. Did it on abum. Using pictures. If there are any questions. Ask.
Source
It’s done) heater motor from VAZ-2108 to Niva)
For a long time I have been thinking about installing a heater motor from the Eight. After all, the original airflow is not enough for the windows, and the noise from the original stove is like a jet engine) I saw this modification for the first time from a friend on the 214th Niva. I took it for a ride and realized that I would definitely do it by next winter and I would like to see such a useful modification, but in a more thoughtful way, namely: 1. I will insert the snail in the middle of the boot, and not from the edge (air will be sucked in from the street through the intake, and not from under the hood; the circulation of the air flow from the street will be preserved to some extent when driving without the heater on) 2. All joints and cracks of the air ducts will be completely removed and taped 3. Air diffusers will be made from metal plates on the cochlea (so that the entire radiator area is blown) Well, now the installation process itself:
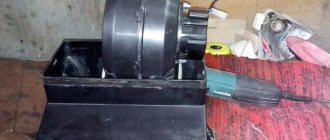
Remove the boot (it is secured with 4 bolts ) and dismantle the air damper. Now we are faced with the task of installing the snail into the Nivovsky boot (cutting, sawing, pruning). The main thing is that it is in the center and recessed as much as possible down the body.
on the body of the snail we cut out a recess for the hood lock (unfortunately there is no photo, I forgot to take it) and close it with whatever we want (personally, I closed it with plastic plates that I glued to the sealant) After we have finished installing the snail, the task ahead is to install the diffusers on it . We cut out the plates with a grinder (I used a galvanized sheet), heat them with a burner and drive them into the plastic case like oil.
But before that, connect the snail to power (for example, a battery) and, by trying on, select the optimal angle for installing the plates for maximum air dispersion. Then we make such a plate at the bottom of the boot so that everything is sealed and preferably from a whole piece.
and Let’s assemble the structure (Boot + snail + plate) I put everything on aquarium sealant (of all sealants, this is the most vigorous! (strong), I have tested it more than once.
in advance we make a hole in the boot for resistance (I used Kalinov resistance and a button) Next, between the radiator body and the metal frame of the car (where the damper was located), I inserted a piece of penofol (so that the air flow would blow 100% onto the radiator and nowhere else, take the width of the foam foam 10 mm) by covering it with sealant on both sides.
Now we take the seal (elastic band) of the boot, also apply sealant on both sides and join our entire structure (radiator housing and heater housing (boot)). Naturally, we do it together (one from above under the hood holds the bolts, and the second from the interior presses down the radiator housing and attaches the nuts .Then everything was pulled together well without fanaticism.Then I cut strips of penofol and pushed them between the radiator and the case so that not even a small hole remained. Well, now we move on to the part of the structure in which the original fan is located. Of course, I pulled it out. We close it on it the cover for blowing the legs and the whole thing is filled with sealant (the entire body around the perimeter, all the cracks on it. Of course, I didn’t forget about the legs) I made holes on the sides and inserted the cooling system pipes there (adjusted them to size so that the air blows cleanly on the legs and out of nowhere) and of course put them on sealant.
In the future, I’ll probably come up with some kind of screws (to block the airflow of the legs), but as practice has shown, the windshield has enough flow together with the airflow of the legs. I pasted this part on top at the junction with the radiator body with thin penofol (again, so that there are no air leaks) and secured it with standard brackets. After that, I decided to remove the dashboard in order to dismantle all the air ducts and humanly glue them at the joints and in the seams (there are gaps there, mother, don’t worry!) yes, the dashboard could be removed immediately, to make it easier to unscrew and join the radiator housing (but since the car was used every day, and I did everything after work, it took me a week.) If, of course, you take this matter thoroughly and immediately, then it would be better to remove the dashboard right away. I did the air ducts for the side windows this way (I cut off this square and inserted the air duct directly into the deflector, and not as it was - the deflector was inserted into the air duct. Now the flow goes to the side windows and not under the dashboard.
Yes, the length has shortened and they can no longer be secured to the nuts under the torpedo (who needs that, the main thing is that it’s blowing) Putting the torpedo in place I’m writing everything in one go, so I might have missed something. Anyone who doesn’t understand something, ask. Well, let's move on to the final part of our story - ELECTRICAL. Here's the diagram.
Everything is clear from it. We drag the wires from under the hood to the button, which we embed wherever it is convenient for anyone, and connect) It is, of course, better to connect through a relay. Well, in the end we are happy with the work done)
I approached this matter with all responsibility. I was in no hurry, I did everything thoroughly. And yes, there is airflow at speed when the stove is turned off! This is also not unimportant. What can I say lastly? I am one hundred percent satisfied. I don’t turn it on the second speed anymore. It blows beautifully, quietly. And it’s very hot in the car. Much better than with a standard heater. The glass comes out with a bang! Some people install copper radiators, but I decided to try it with my family, and I’ll tell you that’s more than enough. Thanks for your attention)
Advantages of diesel
For off-road use, a diesel engine is preferable. The advantages of a diesel engine over a gasoline engine in an SUV are obvious :
At the same time , any diesel engine has its drawbacks : the engine is demanding of high-quality fuel, and the cost of repair and maintenance of fuel equipment will be noticeably higher than that of gasoline. A more powerful engine requires modifications to the gearbox, transfer case, and axle gearboxes. Starting a heavy fuel engine in winter has its own characteristics and often requires special heaters.
What did you improve?
The modernized stove has a number of advantages:
- Quiet, and at 1st speed silent.
- Productive, at speed 1 it blows at the level of speed 2 of the old fan. At maximum speed, dust will fly out of the air ducts.
Such tuning of the heating system is mandatory for drivers of northern cities.
Have you improved the Lada 4×4 stove in this way? Write reviews and additions on this modernization, take part in the survey. Let us remind you that other modifications to the SUV are published in this category.
Photo: Flea in-flight magazine
Keywords: stove 4x4 | 4x4 air ducts
Share on social networks:
Found an error? Select it and press Ctrl+Enter..
Technical characteristics of engines on Niva
Since the domestic car has been so advertised, let's take a look at the technical characteristics of the Niva 2121 internal combustion engine. They are all recorded in the table.
| Parameter | Meaning |
| Power | 87 horses |
| Engine capacity in liters | 1,7 |
| Ecoclass | Different models have different classes. For example, 21214-41 – Euro 3. 21214-30 – Euro 4. |
| Torque | 129 Nm |
| Number of cylinders | 4 |
| Number of valves | 8 |
| Max speed | 142 km/h |
| Cylinder diameter in mm | 82 |
| Piston stroke in mm | 80 |
| Nutrition | Distributed |
| BC | Cast iron |
| cylinder head | Aluminum alloy |
| Lifetime of the power unit | 150,000 km |
| Fuel for operation | AI 95 |
| Cylinder operation | 1-3-4-2 |
| Tact | 4 |
Attention! The closer the Niva engine is produced to the year in which it lives, the higher the environmental class.
The Niva's fuel consumption is as low as all small cars. Car owners often change their gasoline engine to a diesel engine for their Niva Chevrolet. Let's take a look at the advantages obtained by installing this engine and the negative aspects that the owner has to face.
Recommendations from specialists for upgrading the stove with VAZ parts
Installation of VAZ parts should be carried out subject to the following rules:
- It is necessary to make the mounting socket for the new part 2 centimeters larger to reduce the vibration load.
- The installation of the tap must be carried out taking into account the specifics of the VAZ heater. In this case, there will be fewer problems with this part.
If, while dismantling the old stove, you notice that it has significant wear, then it is best to replace the unit completely. In a seemingly intact “snail,” only the engine needs to be replaced. Disassemble the case carefully to avoid damaging it. Replacing the heater motor is the most time-consuming procedure. You will not need to adjust the stove body to the size of the snail.
The plant's attempts to introduce a diesel engine
AvtoVAZ considered the option of installing a diesel engine from a foreign car together with the GM concern , however, things did not go further than developments and prototypes.
The following modifications of the Niva are known::
Repeated attempts were made to introduce Chevrolet Niva and other foreign engines , but they did not receive factory approval and certification.
Advice . Niva VAZ212151 with a French internal combustion engine, which had a certificate of conformity and all the necessary modifications, were exported. If you can find such a car, then it will be easier to transfer the power unit from it to the Chevy Niva.
Practical advice for installing a diesel engine
When deciding to install it yourself, you should pay attention to the following experience. Among the possible units that the designers of both the classic car and the Chevrolet Niva considered was the Peugeot engine with the index XUD-9SD
Not the most powerful unit (from 69 to 75 hp) is highly reliable.
When planning such tuning, you need to be prepared to make some modifications:
- Replace the gearbox. Among the options, a box from Fiat Polnes was offered, as it would work with such an engine. But it won’t be easy to find a unit from a car that is now rare.
- Clutch mechanism. When searching for a box, they immediately select a clutch mechanism, which must ensure transmission of rotation and match in size.
- Engine support points. When installing on the Niva, the front engine mounts required modifications.
- Pallet shape. Taking into account the dense layout of the Niva’s engine compartment, the pallet requires an original shape, and was often made individually.
- Exhaust system. Minimal modifications to the exhaust piping are required.
The serial Niva with this engine was produced until 2009 and was mainly exported. With a certain amount of luck, the car can still be found in advertisements for sale. A special feature of the car is its low dynamics. The car reaches the first hundred in only 25 seconds.
When carrying out independent modernization, do not forget about one more aspect. Replacing the engine with a non-similar version will require technical expertise. In practice, it will be possible to undergo such a procedure, but it will require a certain investment of time, money and nerves. Only after this you have the right to count on hassle-free registration of your car with the traffic police. Perhaps we should wait for the car to appear in a diesel version when the new generation comes out.
AutoNews / Reviews / Tests
What kind of diesel engine can be installed on Niva
Diesel for Niva: solving problems of self-installation
Passenger cars and SUVs with diesel engines are very popular abroad. For us, the idea of equipping a car with such an engine did not take root for a long time. Only not so long ago UAZ all-terrain vehicles with such an engine began to arrive on the market.
Nevertheless, there were attempts to make a jeep with a diesel engine. One example of such a car was the diesel Niva
.
This VAZ Niva 2121
was exported and had an index of 21215.
Equipping a car with a diesel unit has a number of positive qualities. These engines are significantly more economical than gasoline-powered units and are less demanding on fuel quality. They have excellent traction characteristics at low engine speeds. The service life of a diesel engine is not easy, which allows it to be used longer without undergoing extensive repairs.
The main drawback of these engines is the complexity and high cost of repairing the fuel accounting system, since a number of units use precision-machined parts.
Installing the 2108 engine on a classic
First, we need to free the engine compartment of our car from everything unnecessary, namely from the old engine; from it we only need the starter and the mounting brackets for the engine mounts. After this, we can move on to our new heart, and first we will have to disassemble it a little and remove the crankshaft from it in order to press the support bearing of the input shaft 2101 into it as much as the original one sticks out, it must be cut off and the bearing pressed in its place. A turner will help you with this for a small price.
This drawing can also help you with this. After that we put our crankshaft back. At the same time, you can immediately grab the flywheel to sharpen it under the classic crown for pressing. The turning work is done, now we need to rearrange the brackets from our old motor; there are special holes on the side of the figure-eight block. Then you will need to slightly knead the engine shield, just as in the case of a 16 valve engine. We put a flywheel on the engine with a crown already pressed onto it, and attach a classic clutch basket to it.
Engine cooling system.
You should start with the rear thermostat, as you probably already understood that you will have to make the entire cooling system yourself. It needs to be made at a maximum angle to the side so that it does not rest against the engine shield. This is roughly what it will look like, this one is made from an old eight-point thermostat, if you want you can make a metal one, it’s up to you.
After this, you can put the motor in its place, having first replaced the old pillows with new ones; I recommend using pillows from the Niva. To ensure that your oil pan does not touch the lower beam, I recommend placing a thick washer on each pad; with this you can win a few precious mm. When the motor is in place, you can continue with the cooling system; you will need to make pipes like this. This is how they will look on the car. The thermostat is a classic one. With the cooling system, I think I have more or less clarified the picture for you, of course it will not be possible to describe everything, but I told you the main thing.
Stove modernization
To upgrade the stove on your Niva, we suggest that you borrow, first of all, a VAZ-2108 stove fan. We do not recommend installing it instead of what is already installed on your Niva; by the way, you are unlikely to succeed, since it is located inside the car. It will be problematic to introduce a fan from 2108 into the cabin, so they find a more suitable space for it in the engine compartment. Upgrading the stove involves installing an additional fan, which is what we suggest you do.
Nuances when installing an engine from Priora to Niva
Of course, standard units and body elements with suspension are not designed for the installation of the 21126th engine. But with minor modifications, everything can be done in the best possible way.
Let's consider the main nuances that may arise during the installation of the Priora power unit:
Of course, in addition to the above points, certain problems may arise after installing the motor. For example, inaccessibility in the timing mechanism - in this case, when replacing the belt, you often have to drain the coolant. Due to the alteration of the sump, another negative point appears - now there is less oil in it than it should have been from the factory - this can lead to negative consequences under critical loads on the engine.
The clutch, according to reviews of many owners with already converted engines from Priora, is somewhat worse than on the same Chevrolet Niva, so its service life is reduced, and accordingly, you have to bother with replacement more often. But, as they say, everyone understands perfectly well what they are getting into when installing an engine of greater power and with non-standard mounts.
If you want to see what usually results from such tuning, the video review below will be a visual aid.
Such tuning takes a lot of effort and time, but this stopped few people in such cases!
What kind of engine can be installed on a VAZ 2106
What kind of engine can be installed on a VAZ 2106
In this publication we will try to figure out what kind of
engine for a VAZ 2106. To replace the standard VAZ 2106 engine, I can recommend an engine from a VAZ 2112.
Replacement can be started by drilling out the right cushion mounting to 8mm. The rest of the mounts for these motors are the same, however, it will be necessary
cut out the engine shield. But do not cut out the shield with a grinder, since the presence of double sheets of metal and other amplifiers make this work dangerous; it is best to use a gas torch. In this case, it is necessary to leave a margin in the width of the window for the movement of the motor on the supports.
True, it is necessary to digest the pan, because a stiffener will rest against the beam and it will be necessary to
tinker. The bearing located at the end of the crankshaft serves to support the input shaft on the VAZ 2101 gearbox; if it is missing, the clutch and gearbox will very quickly fail.
The bearing will have to be installed, since it is not available in front-wheel drive cars. The VAZ 2101 crankshaft bearing is installed in any crankshaft of VAZ cars without problems. In this case, the stubborn original boss is completely removed, and the end of the crankshaft is bored so that eventually the bearing protrudes to the same distance as the boss.
It is also necessary to remake the flywheel, but the starter remains the same. To do this, you need to take a new crown and flywheel of the VAZ 2101 and re-align the crown. In this case, the gearbox becomes without problems, except for the upper left ear, which does not coincide by only a couple of centimeters.
The outlet can be mounted with three bolts, this is enough even for harsh driving conditions. We install the clutch from a VAZ 2112 through an adapter, with a release from a dozen, while the fork and slave cylinder remain original.
All lines of the cooling system will be different depending on the radiator used, so you can model this system at your own discretion. It is best to make an exhaust system from scratch. The accelerator pedal can be installed from a VAZ 1118.
The article answered the question: What kind of engine can be installed on a VAZ 2106 . For those who want to do this work, I will also say that it would be a good idea to move the oil neck, since its location is not entirely convenient.
Add a comment Cancel reply
#1 Vittalyk
Sent 20 June 2009 - 15:55
#2 Suicide
VIP Member 1?330 messages
#4 Artoor
#5 masterok
#7 RombI4
Advanced Members 140 posts
Sent 22 June 2009 - 20:37
p.s. I think I watched how, in top weight, they stuck the heart of a clearly non-Russian assembly into our classic? you need to dig there..)
Tuning the VAZ 2106 engine
Greetings. Sorry, no photos, I took the car a long time ago.
Budget tuning of the VAZ 2106 engine. Mainly for drifting.
We were given a standard 1.6L engine with a manual 4-speed gearbox.
Tuning VAZ engines is similar for all classics.
The tuning will be in order to achieve maximum power at rpm above 6000, without any risk to engine life.
So, it was decided to bore the pistons to maximum volume. There were many options, but they were all unsafe. And what is the volume of a 1600 block?
I accidentally saw a neighbor at his dacha dismantling a GAZ 24, and the idea came to me to install pistons together with wet liners from the Volga. The sleeves there are thick-walled, which means the pressure on the walls will be minimal!
It was decided to install pistons with an internal diameter of 85mm and an external diameter of 92mm. This requires serious sharpening
Features of operation
To ensure long-term and trouble-free operation of the power unit, it must be very carefully and properly maintained. It is also recommended not to allow the engine to operate in extreme modes.
First, let's look at the VAZ-2123 engine, it is a modified version of the power unit installed on the “classic Niva”. The main differences are as follows.
The Z18XE engine was widely used in various car models. There are several modifications of the power unit. Installed on the Chevrolet Niva, it had the following features.
The result was an original motor with interesting settings. Thanks to the settings, it is possible to achieve some variation in power and throttle response.
Service
To achieve maximum service life, it is important to properly maintain the motor. First of all, it is worth remembering the importance of timely replacement of engine oil. It is recommended to carry out this work once every 15 thousand kilometers. Every second replacement should be combined with washing. This recommendation applies to both engines.
Removal and subsequent installation of the VAZ 2108 engine
Then we remove the wires from the starter, release the fuel line clamp and carefully remove it. We also remove the coolant pipes and the tube from the special vacuum brake booster. Remove the exhaust pipe from the muffler. We give back the timing belt cover. This is almost a mandatory procedure, since due to lack of distance, it will subsequently be difficult to remove the engine.
Using a wrench and the corresponding head, we tear off all the fastening bolts. Using a hoist, you need to slightly lift the engine and loosen its mounting bolts, at the same time, it is better to raise the power unit a little, this way the mounting bolts will come out easier. Unscrew the bolts all the way and pull them out completely. We hook and lift the motor using a hoist. Carefully remove the engine protection. We remove the generator. This completes the preparatory work.
Replacement problem
The fact is that to replace the engine on a VAZ-2121, you can choose almost a dozen different engines, but they are all from foreign cars. But the main problem is that you will have to do some additional work during installation, for example, install or change fasteners, add new parts. Because of this, it is not so easy to find a budget replacement option. The choice is significantly narrowed down to just a few options. For an engine to be suitable for installation, it must meet several conditions:
Which engine should you consider first?
Source
How to remodel the stove on Niva 21213 with your own hands?
Do-it-yourself modification of the stove on Niva 21213 is necessary if the car’s heating system malfunctions. There is no point in delaying this, because uneven thermal regulation leads to foggy windows or icing. In any of these cases, the view of what is happening on the road deteriorates. The malfunction causes wear of individual elements of the device or manufacturing defects.
Fault Diagnosis
The stove supplied as standard will need to be modified for preventive purposes. The procedure will not take much time, but it will prevent many problems in the future. Driving experience suggests that the first severe frosts will undermine the “health” of the device. The list of main weaknesses is as follows:
- the optimal operating temperature range for model 2121 is from -5 to +10°C;
- inability to warm up the air in the cabin if outside is -8°C or lower;
- when the blowing power increases, the temperature does not increase;
- When driving in 2nd gear, the noise from the Niva's stove becomes significant.
That is why it is better to take the necessary measures in advance. The driver has few alternatives. On the one hand, everything remains in its place. The heating device is used at minimum power. During mild winters this is still tolerable, but with the onset of real cold weather the conditions will become unbearable. On the other hand, it's easy to spend a few hours rectifying the situation.
Further developments proceed as follows. If the heating in the car is running at ½ power, you can limit yourself to minor repairs. The main thing is to make sure that there are no noises or extraneous knocks, otherwise the Niva 21213 should immediately go for a technical inspection.
The presence of an unpleasant sound indicates the need to replace the device. A specialized retail network offers ready-made options for heating mechanisms for Niva. If desired, it can be assembled independently.