The reason for inspecting the condition of the rear brake pads on the Lada Granta editorial car was a grinding noise that appeared from the right wheel during braking.
It usually appeared after washing a car or driving through puddles. It feels like there is a drum full of sand. Interestingly, the grinding sound appeared only on the right, and was never observed on the left. It is quite obvious that dirt got there, but why then doesn’t dirt get into the brake drum of the left wheel? Today we will find out.
At the time of inspection of the rear brakes, Grant's mileage was 40 thousand km. By the way, the front pads were replaced at 23 thousand km, which by that time had been ground down almost to metal. Maybe the rear ones are already on their way? They say that the rear pads last on average 2-3 times longer than the front ones. Since the “mileage” of the rear pads has already approached two “resources” of the front ones, it’s time to take a look.
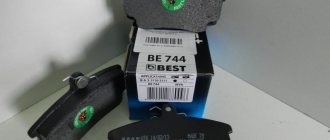
New set of rear brake pads
To replace the old ones, a new set of rear brake pads was purchased from.
We bought these pads for the first time, so there is nothing to say about them. At the same time, they “lifted the mood” a little. Pay attention to the upper right corner. The manufacturer focuses the buyer's attention on the protection against counterfeiting that this set of pads supposedly has. Nearby you can see a protective sticker, which, according to legend, ensures that the original cannot be replaced “anyhow.” Now let's turn the packaging over.
As you can see, there is no sticker on the opposite side! Open the package, take out the pads and put whatever you want in there. That's protection, that's protection! We can only hope for the integrity of the seller.
Step-by-step instructions for replacing rear brake pads
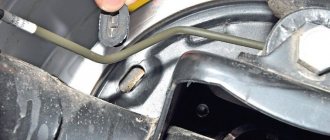
Now let's proceed directly to the process of replacing the rear brake pads. For clarity, we will illustrate each step. The first thing you need to do is loosen the parking brake or handbrake cable, in other words.
Step 1: climb under the car and remove the thermal shield by unscrewing four 10mm nuts.
Step 2: remove the rubber muffler hangers, on one side and the other.
Step 3: move the casing forward, towards the engine.
So we got to adjusting the handbrake....
Step 4: loosen the cable by unscrewing the nuts almost completely.
After we are done with the handbrake, we proceed to replacing the rear brake pads.
Removing the brake drum
Step 5: remove the rear wheel, after first lifting the car with a jack and installing a safety support.
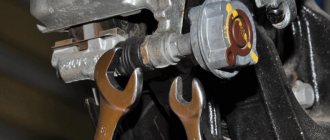
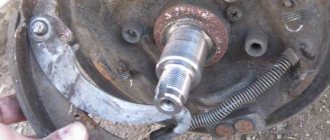
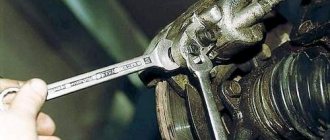
Step 6: to remove the brake drum, take a 7 key and unscrew the guides.
Step 7: after unscrewing, the guides can be screwed into the threaded holes that are located nearby.
By the way, these threaded holes are precisely intended for dismantling the brake drum. It turns out to be something like a puller. When tightened, the guides rest against the hub and remove the drum from the brake pads. But since we have loosened the handbrake and the pads do not interfere with us, the brake drum can be easily removed without their help.
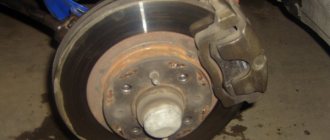
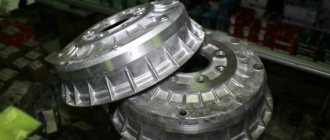
Step 8: remove the brake drum.
However, this is not always the case. If you do not loosen the handbrake, then in some cases it will be very difficult to remove the brake drum. Let's demonstrate this with a simple diagram.
The brake drum cannot be removed
During prolonged use, a groove or depression forms inside the brake drum from the brake pads. To ensure that the parking brake works properly, the handbrake cable is periodically tightened. As a result, a moment comes when the brake pads enter this very opening and do not come out of it even with the parking brake lever lowered. The diagram shows exactly this situation.
With this position of the brake pads, as you yourself understand, removing the brake drum will be very problematic, since the pads will play the role of a retaining ring. And only when we loosen the handbrake will the pads return to their original position. Like in this illustration, for example.
Once the brake pads are clear of the burnout area, the brake drum can be easily removed.
Although in our case there is no wear on the brake drum yet, loosening the parking brake cable made its removal much easier.
Problems with dismantling the brake drum with a mileage of more than 200 thousand km
Now, forget about everything that was mentioned above, if the mileage of your car has exceeded 200 thousand, or the age of the car is approaching ten years. If you or the previous owner have never changed the rear brake drums and working brake cylinders, then the situation with dismantling the brake drums can turn into a real challenge.
Everything that was said earlier applies to the situation when the rear brake cylinders are in good condition and the pistons in them are not jammed. Let's go back to the diagram.
Rear brake cylinder jammed
Everything is the same here, just imagine that the brake cylinder is already “tired” from time to time. One of its piston may not move at all (jammed), while the second one barely moves, extending only a couple of millimeters.
Even if we loosen the handbrake, a jammed brake cylinder will prevent the pads from compressing and leaving the wear zone. Removing such a drum will be very problematic. If the drum rotates freely, but is not removed, then know that the culprit is the bead formed as a result of wear, which clings to the pads and prevents the removal of the drum.
A heavier hammer will solve the problem.
The question arises: What to do? Each case is individual, but in general there is not much choice. Arm yourself with a heavier hammer and a block of wood that you will place against the back of the brake drum. The diagram shows places for striking.
The principle is the same as when tightening wheel bolts: “cross to cross”. First you hit in one place, then in the diametrically opposite one, etc. Here is the part of the brake drum that you need to hit.
Then everything depends on your skill, but we sincerely hope that it won’t come to that.
Maximum permissible brake drum wear
In general, the manufacturer has determined the maximum permissible wear of the brake drum. If its internal diameter becomes larger than 201.5 mm, then such a drum must be replaced.
Average life of rear brake cylinders and brake drum
The average service life of a brake drum is 100 -150 thousand km. It all depends on driving style and operating conditions. With the rear brake cylinders, not everything is so simple - it’s a complete lottery. But on average they work for 1-2 years without problems. As soon as you notice that the brake cylinder has begun to “sweat”, replace it immediately. If you change worn out parts of the brake system in time, then you definitely won’t need a HAMMER.
Diagnostics of friction lining wear level
Most modern cars are equipped with special digital wear sensors. When the programmed level is reached, an indicator light is activated on the central instrument panel, indicating a breakdown of the brake circuit.
Unfortunately, the Lada is not yet equipped with digital sensors; you need to navigate by the actual thickness of the body of the lining. The maximum permissible threshold for using the body is 1.5 mm. Above the specified limit, the operation of the technical device is not safe. The degree of wear can be determined by removing each wheel and measuring the thickness with a caliper.
Alternative option: turn the steering wheel to the extreme left/right position, visually assess the thickness without resorting to dismantling work. The above recommendation only applies to the front circuit. For rear wheels, unconditional removal of discs.
Continuation of step-by-step instructions
Now let's get back to replacing the brake pads, continuing from the point where we removed the brake drum (Step 8).
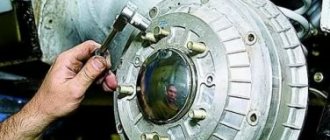
Step 9: Remove the perforated disc called the anti-lock braking system (ABS) rotor.
Now, to remove the brake pads, you need to disconnect the springs that hold them in four places. A simple device in the form of a hook was made from a piece of wire, which is very convenient for disconnecting and putting back on the brake springs.
If someone is used to using pliers or a screwdriver, please do so. This tutorial will use a crochet hook.
Step 10: disconnect one side spring.
Step 11: disconnect the lower spring.
Step 12: disconnect the upper spring.
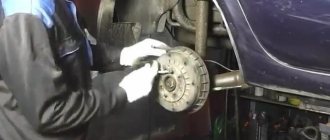
Step 13: Carefully remove the released brake pad without damaging the ABS sensor.
Step 14: remove the top spring and spacer bar.
And we still have one more spring holding the brake pad, located on the left.
Step 15: disconnect the side spring and move the free block down.
Step 16: disengage the lever from the handbrake cable.
This completes the removal of the old brake pads.
Washing removed parts
If desired, everything you removed can be washed with gasoline or brake cleaner. To do this, it is convenient to use a small paint brush.
We wash the springs, the spacer bar and the lever for the manual drive of the pads; we will need it later.
Step 17: disconnect the brake pad manual drive lever from the old pad. To do this, you need to pull out this cotter pin.
Step 18: press on your finger and disconnect the lever.
Now we do the same with the new block, only in the reverse order.
Step 19: Insert the finger, put on the washer, insert the cotter pin and spread the antennae apart.
Ready! The new block can be installed in place.
Step 20: You can immediately put the lower tension spring on the pad, and then thread the manual brake lever into the parking brake cable.
Step 21: fix the block using a side spring. For these purposes, it is more convenient to use an awl.
We start the spring. The main thing here is to get into the hole. When the tip of the spring hits the hole, you will hear a characteristic click.
From this moment on, the development of events can take the most unexpected turn. Please be careful, because now we will look at the most common mistakes due to which the brake drum does not fit on the pads.
Three preparatory steps
The standard equipment is equipped with: front disc brakes, and at the rear, a drum mechanism familiar to domestic car enthusiasts.
DOT fluid reservoir It must match o. Excess liquid is drawn out of the tank using a syringe or bulb. First, of course, you need to unscrew the cap (see figure below).
The marks on the tank are on the side
After replacing the pads, the fluid must be added back.
The body can be secured using a jack and a safety net. All actions are similar to changing a wheel. The jack is installed in front of the arch, and then, having shifted the body to a sufficient height, a safety part is placed under it. The wheel itself needs to be removed too.
Procedure:
- Loosen the fastening screws on the disk;
- Carry out actions with a jack;
- Remove the wheel.
The last step is to release the handbrake. Don't forget this.
For vehicles with ABS
Before replacing, disconnect the ABS system sensor. It is installed behind the hub on the outside of the shield.
Find the connector
Remove the sensor
All the steps look simple: disconnect the connector and use a TORX E-8 wrench to unscrew the fastening screw. The sensor housing can then be brought out.
Common mistakes when assembling rear brakes
To avoid this problem, pay attention to this slot in the block.
This is where the spacer bar will be inserted.
Error one
If the spacer bar will be installed below this slot, for example, as in the image below.
In this case, you will not be able to put on the brake drum.
Error two
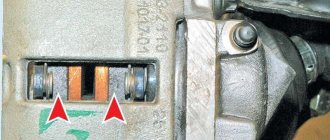
The next mistake concerns the spacer bar itself.
As you noticed, it has a narrow slot on one side and a wide one on the other. So, using a wide slot, the spacer bar is inserted into the block with a lever. You understand that the lever with the block needs a larger opening. If you put the bar the other way around, you won’t be able to put on the brake drum.
Error three
And one more reason that may prevent the brake drum from fitting freely is the brake cylinder. More precisely, not the cylinder itself, but the pistons of the brake cylinder moved apart to the sides.
After all, as the old pads wore out, the pistons in the brake cylinders moved outward more and more. Now that we have installed new ones in place of the old pads, the pistons of the brake cylinders must be returned to their original position, that is, compressed or pressed in. Otherwise, the brake drum may not fit on the new pads.
Methods for compressing rear brake cylinders
Method one. The most common way to compress brake cylinder pistons is shown in this illustration.
Here two mounting blades are used, one side rests against the brake casing and the other against the brake pads. When the blades are compressed, the pads press on the pistons of the brake cylinder and return them to their original position. It's simple.
And if you don’t have mounting blades on hand, what should you do?
Method two. You can use two front brake pads by first drilling through holes in them. This is what the device should look like.
The bolt on top serves as a kind of spacer. Instead, you can use an ordinary wooden block. But even if it is not possible to build such a device, there is another way.
Method three. We take a piece of wood and press the piston through it with a small hammer and light tapping.
The method is, of course, barbaric, but it works.
Are the wheels different on different models and modifications of the Lada Granta?
The brake discs on different modifications of the Grant differ only in size. All of them are ventilated:
| R13 | R14 | R15 | |
| Where are they located? | "Kalina", "Granta" with an eight-valve engine | “Priora”, “Kalina” (eight- and sixteen-valve engines), “Lada Granta” and “Granta Liftback” - only for sixteen-valve engines | "Granta Sport" and "Kalina Sport" |
| Peculiarities | Less anther | Same size as boot | Installed only on sports versions of cars |
| Width | 250 mm | 280 mm | 380 mm |
| Acceptable wheel size | R13 and more | R14 and more | R15 and more |
If you want to upgrade your car's brakes, you can replace R13 with R14. The main thing is that the rims are no smaller than R14. This is practiced by those who are not satisfied with the stock Grant brakes. After modification, users experience a significant improvement in braking quality.
Install R14
If such a replacement does not suit you, take a closer look at new brake discs from foreign cars. They will fit perfectly, no modifications will need to be made. Those who made such a replacement were satisfied.
Return to step-by-step instructions
This concludes the review of errors and returns to assembling our brakes.
Step 22: after installing the spacer bar, place the second block in the block with the lever.
Install carefully so as not to damage the ABS sensor. After installation, all that remains is to put on the springs.
Look again at how the spacer bar should be installed.
If it’s the same for you, then everything is fine.
Step 23: The next step is to tighten the top spring. It is more convenient to tighten the spring with a hook.
Step 24: put on the lower spring.
Step 25: We put on the side spring in the same way.
Make sure all four springs are in place before moving on to the next step.
Step 26: put the ABS rotor in place.
Step 27: put on the brake drum.
Step 28: We turn out the guides that we had screwed into the threaded holes to fix the brake drum with them.
We tighten the guides. If the brake drum turns easily, then everything was done correctly.
Step 29: After installing the brake drum, you can put on the wheel.
Step 30: at the end, do not forget to tighten the handbrake back, which you loosened at the beginning, screw on the casing and hang the muffler on the rubber bands.
At this point, the replacement of the rear brake pads can be considered complete.
Grinding noise in the brake drum
At the very beginning of this article, we talked about a cut in the right brake drum that appeared after washing the car or driving through puddles. Upon examination, the cause was identified. The grinding noise was caused by accumulated dirt.
Pay attention to the size of some of the holes through which water should exit.
The holes are almost completely clogged - this is a sign that too much dirt has accumulated. To eliminate the grinding noise that occurs when braking, it is enough to clean the inside of the brake drum from accumulated slag. A regular screwdriver will do for this.
We simply scrape off the coked dirt. Carefully clean the groove located at the rear wall of the brake drum.
But how much slag was in the brake drum.
It was because of this that the unpleasant grinding noise appeared.
Why is there no grinding noise in the left wheel? This is due to your driving style. Many drivers try to drive through any puddle not in the middle, but from the side, if possible, so that the driver's side is outside the puddle. So that if something happens, you can go to “land” and not “to the open sea”. It turns out that the right wheel “bathes in mud” more often than the left one, which is why more dirt accumulates in the right brake drum.
Have you encountered problems when servicing rear brakes, the solution to which is not described in this article? If yes, please share your experience in the comments.
DSC_09
If the drum cannot be removed, then, turning it evenly, use a hammer with a plastic tip (or an ordinary hammer through a wooden block) to strike the end of the drum.
If the drum cannot be removed, then, turning it evenly, use a hammer with a plastic tip (or an ordinary hammer through a wooden block) to strike the end of the drum.
Next, you need to recess the pistons inside the working cylinder. For this…