We quickly and easily remove a stuck brake drum on a Niva.
This is how, if you have a gas burner, you can simply remove a stuck brake drum
and don’t even prick its edges!
For lack of anything, he will go and cut down the logs
. You just need to not prop up the car with it, but lower it there. To guarantee safety, it would also be good to put stoppers under the wheels: if the car rolls, it will certainly not run very far, but it will provide additional repairs (and savings and, God forbid, injuries).
Before you pick up a sledgehammer, it would be a good idea to go around the hub with a steel brush. Salt and mud wound around the rim are cemented at a good level of concrete mortar. After cleaning, the centering belt is treated with something like WD-40. There is no need to hit one place with all your might - firstly, there is the option of warping, or bending the drum, and removing it will be even more difficult, and secondly, of course, destroying something that was not supposed to be changed. It is necessary, however, to carefully tap around the circumference, while tapping not on the metal, but on the block, which will act as a gasket.
Как снять тормозной барабан РЅР° РЅРёРІРµ S€РµРІСЂРѕР»Рµ
RџСЂРѕРІРµСЂРёС‚СЊ внутреннюю S‡Р°СЃС‚СЊ S‚РѕСЂРјРѕР·РЅРѕРіРѕ барабана. Незначительная выработка барабана РѕС‚ действвоСЏ коло РґРѕРє является нормальным явлением.
Rзмерить внутреннюю SЂР°Р±РѕС‡СѓСЋ RїРѕРІРµСЂС…ность R±Р°СЂР°Р±Р°РЅ Р° РІ нескольких местах. Сравнить результаты полученных измерений. Таким образом, автоматически RїРѕРґРґРµСЂР¶РёРІР°РµС‚СЃСЏ RѕRїS‚РёR јР°Р»СЊРЅС‹Р№ зазор между РєРѕР »РѕРґРєР°РјРё Рё барабаном.
Работу выполняйте РЅР° автомобиле СЃ вывешенными заднРёРјРё колесами РЅР° подъемнике РёР »Рё автомобиле, установленном SЃ RїRѕRјРѕС‰СЊСЋ домкрата РЅР° Р ѕРїРѕСЂС‹. Спрессуйте, равномерно заворачивая болты РІ РґРІР° СЂРµР·С ЊР±РѕРІС‹С… отверстия бара Р±Р°РСР°. РќР° стоящем, РЅР° земле автомобиле 2—3 раза нажмите РЅР° пед аль тормоР·Р°, чтобы подвести RєРѕР»РѕРґРєРё Rє барабану.
RќРёРІР° RЁРµРІСЂРѕР»Рµ R·Р°РјРµРЅР° R·Р°РґРЅРёС… S‚РѕСЂРјРѕР·РЅС‹S… RєРѕР»РѕРґРѕРє, S†РёР»РёРЅРґС ЂРѕРІ Рё барабанов. R'идео Рё фото инструкция
РќР° плановом SЂРµРјРѕРЅС‚Рµ Сѓ нас находится R°РІС‚омобиль РќРёРІР° R ЁРµРІСЂРѕР»Рµ (Chevrolet Niva), 2005 РїРѕРґР° выпуска, РїСЂРѕР± ег 137 тыс.РєРј., РЅР° которой необходммо выполнить Р·Р°РјРµРЅС ѓ задних тормозных РєРѕР» РѕРґРѕРє, барабанов Рё С†Релиндров. RџРѕРєР°Р¶РµРј RєР°Рє SЌS‚Рѕ RјРѕR¶РЅРѕ SЃРґРµР»Р°С‚СЊ SЃРІРѕРёРјРё SЂСѓРєР°РјРё, RхРµ RїSЂРёР±Р µРіР°СЏ Рє помощи специалистов.
РќР° заднем левом колесе RїРѕС…оже SЃРѕСЂРІР°Р»Рѕ колодку, РїСЂРё S‚Рѕ SЂРјРѕР¶РµРЅРёРё РёРґС'С‚ скрежет, RїСЂРё включении R· адней передачи РїРґС'С‚ заклинивание RєРѕР»РµСЃР° СЃ последующем срывом. RџРѕСЌС‚РѕРјСѓ SЂРµС€РµРЅРѕ SЃСЂР°Р·Сѓ RїРѕРґРЅСЏС‚СЊ Ryo SЃ RѕR±RѕРЅ… SЃС‚РѕСЂРѕРЅ RїРѕРјРµР ЅСЏС‚СЊ колодки, барабаны Рё С†РелиндрРеРєРё. RџРѕСЃР»Рµ SЌС‚РѕРіРѕ вакуумом RїSЂРѕРєР°С‡Р°РµРј S‚РѕСЂРјРѕР·Р°.
РЈ нас правда РёР· этого РЅРірѕ‡РµРіРѕ РЅРµ вышло, РІСЃСЏ резьба остал ась РЅР° болтР°С..., очень SЃРельно закисло, поэтому RЅР° помощь РїСЂРёС…РѕРґРёС‚ R јРѕР»РѕС‚РѕРє, так как бара бан нам РІ итоге РІСЃС' равно РїСЂРёРґС'тся RјРµРЅСЏС‚СЊ. Такая SЃРёС‚уацвознккает, РєРѕРіРґР° РїСЂРё R·Р°РјРµРЅРµ RєСЂРµРїС'жны Рµ Резделия РЅРµ промазывают СЃСЏ медной смазкой, СЏ считаю что РЅР° этом экономить РЅР µ РЅСѓР¶РСРѕ!
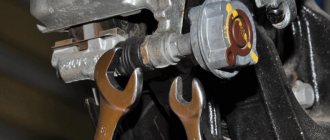
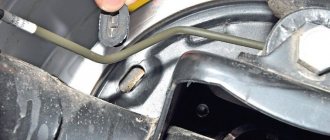
Ключом РЅР° 10, ослабляем Рё затем откручиваем S€С‚уцер. R'SѓРґСЊС‚Рµ RіРѕС‚РѕРІС‹, RїРѕР»СЊС'тся S‚ормозная R¶РёРґРєРѕСЃС‚СЊ. Ставим Рё РїСЂРекручиваем новый тормозной цилиндр. Р'СЃРµ болты крепления SЃРјР°Р·С‹РІР°РµРј RјРµРґРЅРѕР№ смазкой, С‡С‚РѕР±С ‹ РІ дальнейшем Сѓ нас РЅРµ было проблем СЃ откручРеванием.
Собираем новые S‚ормозные RєРѕР»РѕРґРєРё, RѕРЅРё Sѓ нас S„РёСЂРјС‹ TRIALLI, номер РІ каталоге Р·Р°РїС‡Р°СЃС ‚ей GF-232, одеваем трос ручного тормоза Рё заводим РёС… РЅР° РјР µСЃС‚Рѕ.
RћSЃР»Р°Р±Р»СЏРµРј для S‚РѕРіРѕ S‡С‚РѕР±С‹ наши новые S‚ормозные RєРѕР»Р ѕРґРєРё прижались Рє С †Релиндрику. Так как колодки S‚еперь Sѓ нас сжаты, новый тормозной Р ±Р°СЂР°Р±Р°РS долж ен одеться легко.
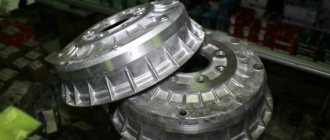
R'арабан РјС‹ ставмфирмы TRIALLI, его РЅРѕјРµСЂ TF-078. Перед установкой СЃР±Реваем накопившеюся РіСЂСЏР·СЊ РЅР° РїРѕСЃР °РґРѕС‡РЅРѕРј месте S‰С'ткой СЃ металлическоРNo. щетиной, затем смазываем RјРµРґРЅРѕР№ смазкоо№.
Ставим барабан ообираем РІ обратном RїРѕСЂСЏРґРєРµ.
Так как РјС‹ SЃРїСѓСЃРєР°Р»Рё немного S‚РѕСЂРјРѕР·РЅСѓСЋ R¶РёРґРєРѕСЃС‚СЊ, наРј необходимо выполнРЕть RїСЂРѕРєР°С‡РєСѓ тормозов , если РІС‹ РЅРµ трогали С†Релиндрики, то делать вам этого РЅР µ РСѓР¶РСРѕ. ПрокачРевать, вернее SѓР±РёСЂР°С‚СЊ РІРѕР·РґСѓС… РёР· системы будеРј РїСЂРё помощи спецРеального РїСЂРёР±РѕСЂР° вакуума S‚РѕСЂР°. R' SЂРѕР»РёРєРµ RІС‹ RјРѕР¶РµС‚Рµ SѓРІРёРґРµС‚СЊ RєР°Рє RїSЂРѕS…РѕРґРёС‚ SЌS‚РѕС‚ RїСЂРѕS†Р µСЃСЃ.
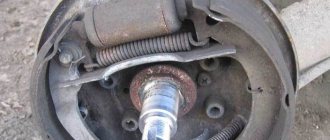
РЎРЅСЏС‚РеРµ S‚РѕСЂРјРѕР·РЅРѕРіРѕ барабана РЅРёРІР° S€РµРІСЂРѕР»Рµ
РўРѕСЂРјРѕР·РЅРѕР№ барабан снимают для его замены РїСЂРё RїРѕРІСЂРµР¶Рґ ении Рели РеР·РСРѕСЃРµ SЂР°Р±РѕС‡РµР№ РїРѕРІРµСЂС…РЅРѕСЃС ‚Рё, Р° также для контроля состояния S‚ормозных механРёР·РјРѕРІ Рё для замены С‚ ормозных колодок Рё рабочих С†Релиндров.
Работу выполняйте РЅР° автомобиле СЃ вывешенными заднРёРјРё колесами (РЅР° подъемнике или омобиле, установленном SЃ RїRѕRјRѕS‰СЊСЋ домкрата РЅР ° РѕРїРѕСЂС‹).
Рычаг РїСЂРеРІРѕРґР° стояночного S‚РѕСЂРјРѕР·Р° должен быть РѕРї ущен РґРѕ СѓРїРѕСЂР° РІРЅРёР· (автомобил СЊ расторможен).
кам потребуются: ключи «на 12V», отвертка, РґРІРµ монтажн S‹Рµ лопатки.
Р'ключите I передачу Рё SѓСЃС‚ановвите SѓRїРѕСЂРЅС‹Рµ Р±СЂСѓСЃРєРё RїРѕ Рґ передние колеса.
Проверьте: рычаг стояночного S‚РѕСЂРјРѕР·Р° должен Р±С‹С ‚СЊ опущен РґРѕ СѓРїРѕСЂР° РІРЅРёР· (автомобиль расторможен).
RЎРЅРёРјРёС‚Рµ заднее RєРѕР»РµСЃРѕ.
RR»СЏ SѓРґРѕР±СЃС‚РІР° работы SЃРЅРёРјРёС‚Рµ декоративный колпак. РџСЂРё замене барабана колпак RјРѕР¶РЅРѕ РЅРµ SЃРЅРёРјР°С‚СЊ.
RЎРјРѕС‡РёС‚Рµ R·Р°Р·РѕСЂ RјРµР¶РґСѓ R±Р°СЂР°Р±Р°РЅРѕРј Ryo S„ланцем RїРѕР»СѓРѕСЃРё RєР°РєРѕ Р№-Р»РеР±Рѕ Р »РµРіРєРѕРїСЂРѕРЅРёРєР°СЋС‰РµР№ жидкостью (керосином, WD-40 Рё С‚.Рї.).
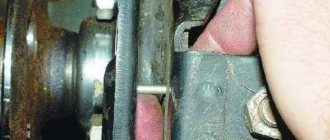
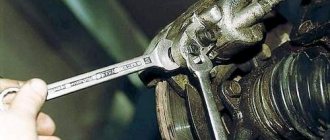
Р'ыверните РґРІР° болта (РЅР° фото ввден РѕРґРїРЅ) крепления тРѕСЂРјРѕР·РЅРѕРіРѕ барабана Рє РїРѕР "СѓРѕСЃРё.
Строньте барабан СЃ полуоси R»РµРіРєРёРјРё SѓРґР°СЂР°РјРё RјРѕР»РѕС‚РєР°.
Если барабан РЅРµ снимается SѓСЃРёР»РёРµРј СЂСѓРє, сбейте его РјРѕР»РѕС ‚РєРѕРј, используя деревянный Р±СЂСѓСЃРѕРє, Рели.
Спрессуйте, равномерно завворачивая болты РІ РґРІР° СЂРµР·С ЊР±РѕРІС‹С… отверстия бара Р±Р°РСР°
RЎРЅРёРјРёС‚Рµ S‚РѕСЂРјРѕР·РЅРѕР№ барабан.
РџСЂРё установке прежнего барабана SЃРЅРІРјРёС‚Рµ напильникоРј Р±СѓСЂС‚РеРє РЅР° рабочей поверхности R ±Р°СЂР°Р±Р°РСР°, образовавшийся РІ результате РёР·РЅРѕСЃР°.
Установите барабан РІ РїРѕСЂСЏРґРєРµ, обратном SЃРЅСЏС‚РёСЋ.
Предварельно зачистите РѕС‚ РєРѕСЂСЂРѕР·РёРё посадочный RїRѕSЏSЃRѕRє RїRѕR»СѓРѕСЃРё, SЃРјР°Р¶СЊС‚Рµ RµРіРѕ RіСЂР°С„РёС‚ РѕРІРѕР№ смазкой кли смазкой ЛСЦ-15 Рё сведите RєРѕР»РѕРґРєРё СЃ РїРѕРјРѕS ‰СЊСЋ РґРІСѓС… монтажных лопа S‚RѕRє.
Учтите, что РїСЂРё вдавливанви RїРѕСЂС€РЅРµР№ РІ цилиндры РїРѕРІС ‹С€Р°РµС‚СЃСЏ уровень S‚РѕСЂРјРѕР·РЅРѕР№ Р¶ RІРґРєРѕСЃС‚Рё РІ бачке RіР»Р°РІРЅРѕРіРѕ S‚РѕСЂРјРѕР·РЅРѕРіРѕ S†РёР»РёРЅРґСЂР°.
RџSЂРё необходмости откачайте R¶РёРґРєРѕСЃС‚СЊ.
Проверьте легкость вращения колеса. R»РѕРїСѓСЃРєР°РµС‚СЃСЏ R»РµРіРєРѕРµ R·Р°РґРµРІР°РЅРеРµ барабана Рѕ колодки.
РќР° стоящем, РЅР° земле автомобиле 2–3 раза нажмите РЅР° пед аль тормоР·Р°, чтобы подвести RєРѕР»РѕРґРєРё Rє барабану.
Общества - ШевІСЂРѕР»Рµ Niva › Р'лог › Как SЃРЅСЏС‚СЊ R·Р°РґРЅРѕРµ тормР*Р·Рые барабаРС‹ ?
Р'сем привет, сейчас желал было RїРѕРјРµРЅСЏС‚СЊ R·Р°РґРЅРёРµ S‚РѕСЂРјР ѕР·Рые колодки. Как досадно Р±С‹ это РЅРµ звучало РЅРµ сумел снятьбарабан. RљР°Рє РёС… грамотно SЃРЅСЏС‚СЊ?
СпасРеР±Рѕ Р·Р° совет СЃ вывешиванием Рё РїСЂРѕ РіСЂ Рµ ван ем барабан R°. РћС‚ себя хочу добавить что РЅР° шпильках есть небольшой Р »СЋС„С‚ РїРѕСЌС ‚РѕРјСѓ РєСЂСѓС‚Реколесо вперед Рё назад RїРѕС‚РѕРј RїРѕС‡С‚Рё само СЃР ѕСЃРєР°РєРёРІР°РµС‚. Еще раз спасибо Р° то полдня SЃРµРіРѕРґРЅСЏ простукивалПо РїРµ SЂРёРјРµС‚СЂСѓ S‡РµСЂРµР· дерев S‡Р°С€РєСѓ РІСЃРµ SЂР°РІРЅРѕ SЃРІРѕР ±РѕРґ чуток
Лучше РїСЂРѕСЃСѓРјРјРёСЂСѓР№:1. R'R”-40, 15 RјРёРЅСѓС‚, R'Р”-40, 15 RјРёРЅСѓС‚.2. Попробовать S„РѕРєСѓСЃ СЃ вывешиванвем Rё SЂР°Р·РіРѕРЅРѕРј, торможением. RќRµ S‚R°Rє SѓR¶ Ryo RїR»RѕS‚РЅРѕ RѕРЅ SЃS‚РѕРёС‚. (Если РІСЃРµ промазать, то РіРґРµ-то 0.5 РјРј РЅР° S€РїРёР»СЊРєР°С… РґРІРёРіР°РµС‚С ЃСЏ.
)3. Стучать через монтажкудеревяшку, РЅРѕ это SѓРґРѕР±РЅРµР µ RІРґРІРѕРµРј, S‚.Рє. СЂСѓРє РЅРµ хватает. R»РµСЂРµРІСЏС€РєСѓ РЅР° барабан, сверху RјРѕРЅС‚ажку RїРѕР»РѕР¶РёС‚СЊ РїРѕ РЅР µР№ бить — так получается более SЂР°РІРЅРѕРјРµСЂРЅРѕ S‡РµРј SЃ деревСяшкой.
How to remove the rear brake drum of a Niva Chevrolet
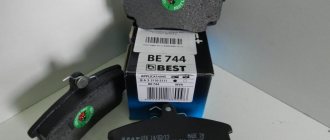
According to the AVTOVAZ catalog data for the VAZ 2123, the front pads are assigned the number 2123-3501090. The average price of original pads is 550 rubles.
Due to the low quality of most original products, we will consider analogues:
- SANGSIN SP1168 — 480 RUR;
- TRW GDB265M - 620 RUR;
- BOSCH 0986466601 — 650 RUR;
- FERODO FDB195 - 950 RUR;
- ATE 13046080062 — 1450 rub.
Based on the proposed substitutes, we conclude: for a small additional payment it is better to take a high-quality analogue from a world-famous manufacturer. Improved braking performance and safety may come at the cost of reduced brake rotor life.
Service and operation
Manuals → Chevrolet → Niva (Chevrolet Niva)
3 – rod with a diameter of 8 mm
3 – tubular mandrel with an internal diameter of 12 mm
If the drum flange and hub are severely corroded, this connection must be moistened with kerosene or brake fluid and left for some time. To avoid damaging the drum and deforming the brake shield, it is strictly forbidden to hit the drum rim with a hammer or insert a screwdriver between the shield and the drum rim, using it as a lever.
Transfer case control
The key to long-term operation of the transmission is the correct choice of its operating mode. Each owner of a Niva Chevrolet car can first become familiar with the operating rules using a specially developed manual. First of all, you need to understand the operating modes of the transfer case and their activation. On Chevrolet Niva cars, the downshift/upshift, as well as the locking, are activated by one lever, which has five positions.
- Central position – neutral is on.
- Back and to the right - high gear with the differential unlocked.
- Back and to the left - high gear with a locked differential.
- Forward and to the right - low gear with the differential unlocked.
- Forward and left - low gear with a locked differential.
Removing the brake drum Niva Chevrolet
The brake drum is removed to replace it if the working surface is damaged or worn, as well as to monitor the condition of the brake mechanisms and to replace brake pads and working cylinders.
Perform the work on a vehicle with the rear wheels hanging (on a lift or a vehicle supported by a jack).
The parking brake lever must be lowered all the way down (the car is released).
You will need: 12mm wrenches, a screwdriver, two mounting blades.
Engage 1st gear and install thrust blocks under the front wheels.
Check: the parking brake lever must be lowered all the way down (the car is released).
Original auto parts
The part itself consists of a metal base and a ceramic or synthetic lining. Due to increased friction, components must be fire resistant and wear resistant. There are both disc and drum variations of the systems. The pads in both cases differ in shape and method of fastening. As a rule, the drum version is rarely used, and only on the rear wheels. The LADA Sport kit will cost you about 650 rubles. It already has all four parts, you don’t have to buy anything else. They have a width of 8 millimeters and a length of 11 cm. A quiet and high-quality replacement option. Don't forget to check that the article numbers match one of the ones below:
- 2108-3501080;
- 21080350180083;
- 2108-3501800-83.
https://www.youtube.com/watch?v=ytaboutru
AvtoVAZ itself offers a similar solution. VAZ-2108 brake pads are suitable for most VAZ car models and cost about 480 rubles. In particular, they can be installed on VAZ 211213, VAZ 2121. The set consists of two front and two rear pads.
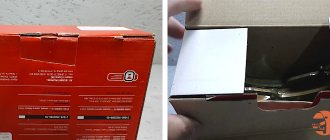
Check that the items and dimensions on the box are correct. If the barcodes are poorly printed, the box does not match the image in the catalog - most likely, this is a fake.
Replacing pads on the rear axle
To replace the rear pads, you will need to carry out the same preparatory work, after which the first thing you need to do is loosen the handbrake. Subsequence:
- We remove the spring near the lever from which two cables go.
- Using two “13” keys, you need to unscrew the bracket nuts, after which the cables weaken and do not affect the pads.
You can start directly replacing the pads
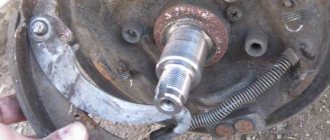
- You need to remove the drum from the axle shaft using a “12” key by unscrewing two bolts. The drum often sticks, so you need to tap it with a hammer around the entire perimeter.
- The working cylinder must be pushed inward on both sides using a flat screwdriver.
- You need to pry the tension springs by pulling them out.
- The block must be moved to the side opposite to the other block by the lower part, after which the two blocks are removed from the shield.
Brake drum VAZ 2121 rear Ukraine
We loosen the handbrake cable, for this purpose we hold the tetrahedron with pliers, unscrewing the nut, usually there is a lock nut, in the presented case there is none: We loosen so that our new brake pads are pressed against the cylinder. Brake drums for Chevrolet Niva that the pads are now compressed, the new brake drum should be put on. Before installation, we knock off the accumulated dirt at the landing site with a brush with iron bristles, then lubricate it with copper grease.
Place the drum and assemble it in reverse order.
Because we didn’t drain enough brake fluid, we need to bleed the brakes; if you haven’t touched the cylinders, then we can’t do this for you. To pump, or rather remove air from the accounting system, use a special vacuum degasser device.
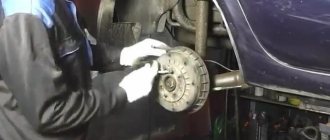
How to Remove the Rear Brake Drum Niva Chevrolet
We will show you how you can do this yourself, without resorting to the help of specialists. It looks like the pad on the rear left wheel has been torn off, there is a grinding noise when braking, and when reverse gear is engaged, the wheel jams and then breaks.
Therefore, it was decided to immediately lift and change the pads, drums and brake drums for the Chevrolet Niva on both sides. After this, we'll bleed the brakes with a vacuum. Using a 12-mm socket, we unscrew the drum mounts: Then we screw in two bolts: Nothing really came of it for us, all the threads remained on the bolts, it was very soured, so a hammer comes to the rescue, since we will eventually have to change the drum anyway. This situation arises when, when replacing fasteners, they are not coated with copper grease; I believe that there is no need to save on this!
First, soak everything in WD, then apply sharp blows with a hammer to the inside of the drum:
Eliminate vibration with additional fasteners
Vibration in the body is the main “disease” of the Niva; it often occurs due to improper alignment of the transfer case. Most often, vibration occurs on VAZ 21213/21214 cars, since the transfer case is mounted only on two supports on the sides of the body; on the Chevrolet Niva, the transfer case is already installed on three supports.
- driveshafts are poorly secured;
- wheels are not balanced;
- there is play in the cardan crosspieces (vibration is especially affected by play in the rear driveshaft crosspieces);
- The vibration comes from the engine itself.
Vibration when starting off on a Niva can also occur for the following reasons:
- the mounting supports of the transfer case have become loose;
- The rubber on the RK supports themselves broke.
Installing the third support of the transfer case on VAZ 21213/21214 vehicles allows you to reduce the level of vibration of the transfer case; with this support it is easier to center the transfer case. The part can be purchased at auto stores or made yourself. The finished product comes with three long studs (for model 2121); to install the third support on this machine, you will need to unscrew the short studs from the transfer case housing and install new studs from the kit. We carry out repairs as follows:
- dismantle the front passenger seat in the cabin;
- remove the floor tunnel lining;
- in the cabin we move aside the carpet covering the body amplifier (in front of the handbrake lever);
- remove the transfer case (alternatively, you can simply hang it up, but removing the third support makes it easier to install);
- We attach the bracket of the new support to the body of the RC;
- we install the transfer case in place, center it in the optimal position, and fasten the side supports;
- we combine the third support with the body, drill two holes in the bottom;
- Using washers, bolts and nuts (from the kit) we attach the support to the bottom of the body.
Also interesting: DIY Niva 21213 transfer case repair: video instructions
In order to install the subframe, the transfer case must be removed. It is more convenient to carry out such work in a pit; we carry out repairs as follows:
- leave the car in neutral gear;
- disconnect the propeller shaft from the transfer case, it is advisable to mark the driveshaft flange and the drive shaft so that during installation, align the driveshaft according to the marks - this way, the occurrence of unnecessary vibrations is eliminated;
- dismantle the muffler mounting bracket;
- remove the gearbox traverse;
- jack up the transfer case, remove the side fastenings of the transfer case;
- We treat the places where the subframe fits to the body with Movil;
- place the subframe on the gearbox studs;
- we mark the attachment points of the subframe on the side members, drill holes, attach bolts to the body;
- we tighten all fastenings, except for the transfer case supports themselves;
- we perform alignment of the steering wheel;
- Finally tighten the transfer case supports.
It should be noted that installing an additional support or subframe on the steering wheel does not always lead to the desired effect; in some cases, vibration only increases.
Installing ventilated discs
But what needs to be done when replacing brake discs on a Chevrolet Niva? Installing ventilated discs instead of standard ones is quite difficult; you will have to perform several costly manipulations:
- Replace wheel rims. Instead of size R15 you will need to put R16.
- Of course, you need to buy the discs themselves.
- You will also need a new set of pads.
- You still need to install new calipers and fasteners.
After installing all the elements, you can start operating the car. And do not forget to promptly check the condition of the brake mechanisms. If necessary, you need to replace the brake discs on the Chevrolet Niva. If the standard ones do not suit you, you need to install ventilated ones - they can not only eliminate overheating, but also significantly improve braking efficiency.
Sources used:
- https://kalina-2.ru/remont-vaz/kak-snjat-zadnij-baraban-na-nive-2121
- https://prodemio.ru/kak-snjat-zadnij-baraban-na-nive-21214/
- https://auto-park24.ru/remont/kak-snyat-tormoznoj-baraban-na-nive-shevrole.html