Car : Lada Priora. Asked by : anonymous. The essence of the question : I choose rear pads, which ones are better?
Hello everyone, PRIOR GUARDS. Nice site, I approve. Now I will change the rear pads and handbrake cable. The previous ones lasted about 50,000 km , which is generally cool for me. I love to rock out and pull the handbrake in the winter.
It’s a pity I didn’t remember which ones I set last time. And if I take them out of the drum, I’ll see what brand it is. And if not, which of the not very expensive ones last a long time and brake well?
Why do rear pads wear out rapidly?
Several factors influence the wear rate of the rear pads. In the first place here is the driver’s illiterate work with the brake system. Considering the fact that the Priora is equipped with a fairly powerful engine, most drivers prefer aggressive driving with rapid acceleration and sharp braking. With this type of driving, the operation of the car’s braking system leads to the fact that the rear pads wear out very intensively. Many inexperienced car owners, due to ignorance, practically do not use engine braking.
The second factor is the replacement of the rear pads on the Priora with low-quality spare parts. Questionable manufacturers of cheap elements may use low-quality and sometimes simply unsuitable materials to produce the friction layer of linings. This can not only reduce the manufacturer's recommended replacement schedule, but also render the brake drums unusable. Let's look at the main signs that require urgent replacement of the rear brake pads on a Priora.
Front disc brake pads
Front disc brake pads for the Lada Priora have the following dimensions: length – 104.4 mm, width – 62.1 mm and thickness – 17 mm. The cost of brake pads from different companies varies accordingly; it varies from 363-780 rubles.
I would also like to note that there are some points in the reviews about brake pads. Ferodo brake pads differ from each other in the color scheme of the packaging, there are red and green. The pads from Ferodo Premier, those that are red, are better than others, they are much stiffer, and their developer presents them in the comfort class segment. In turn, the manufacturer Ferodo Target produces other pads, their packaging is green, they are quite soft, and they work worse, but there is one plus that the brake disc will not be damaged as a result of braking.
Pad diagnostics
You can assess the degree of wear of the rear pad by the condition of the front one - on a similar AvtoVAZ model it wears out much faster than the rear one. For this purpose, the brake mechanism has a special window with a rubber plug.
The last one needs to be pulled out. Through the viewing slot you can roughly estimate how much time is left before replacing the rear pads on the Priora. If the thickness of the lining is 1.5 millimeters or less, then the front pads also need to be changed. They also require replacement if the linings on them are oily or have deep chips or grooves. It happens that the friction lining peels off from the metal base. This is also a reason for replacement.
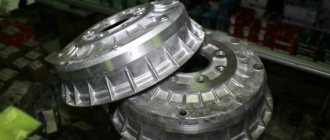
To assess the condition of the drums and pads, you need to remove the rear wheel and drums. There should be no mechanical defects on the surface of the latter. If the wear on the working surface is quite severe and there are deep grooves on it, then the part needs to be replaced.
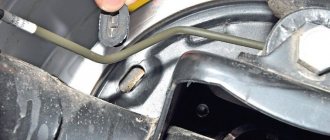
It is also a good idea to check the brake fluid level. The new pads are thicker than the old ones, and to replace the rear pads on a Priora, you will need to press the brake pistons into the cylinder. Liquid may leak from under the expansion tank cap. The handbrake should be released. The parking brake cables must be released as much as possible.
Preparatory procedures
So, if you decide to install new pads, please note that they are sold exclusively as a set. They cannot be changed individually, at least two, on both front or rear wheels at once. In order to carry out the procedure, you will need to carry out some preparatory procedures. Let's look at them briefly:
- prepare a set of wrenches that will be used in the work, as well as a hammer and a minus screwdriver;
- Make sure the brake fluid level is below the maximum level. If there is a lot of it, you will need to partially drain it;
- jack up the car and remove it from the handbrake.
When everything is ready, you can start. Read more about how the work goes.
Peculiarities
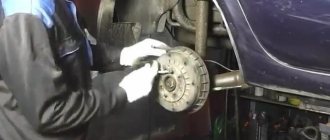
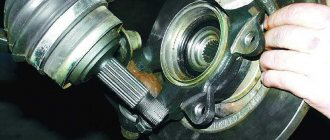
The first step is to remove the rear wheel and fix the car. If the vehicle is equipped with an anti-lock braking system, then the rear brakes have design features, and this must be taken into account. On a car with ABS, disconnect the wheel speed sensor from the brake shield. This is done so as not to damage the sensor or wiring. Under the drum there is a master disk for the ABS sensor. How to dismantle it? Remove the sensor using the E8 head.
Difficulties in selecting parts
Before you begin replacement, you must select a suitable set of pads. There are many options for the Lada Priora on the market. Conventionally, they can be divided into two categories - parts equipped with ABS and those without this system. It is not difficult to understand what type your Lada Priora is - the diagram of cars with an anti-lock braking system includes an ABS sensor and a wire connected to it.
The basic principles of selection are common to the two categories. The product must be well packaged, have protective holograms and quality certificates. When purchasing a whole set with release springs, it is advisable to check them. We often came across sets from China where the spring brackets were turned in the wrong direction.
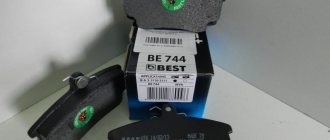
There is no need to look for how much the cheapest kit for a VAZ will cost. It is better to give preference to original parts or famous analogues. Even at a higher cost, the pads will provide excellent service life and excellent braking dynamics.
Selection for cars with ABS
Below is a list of pad sets with the best price-quality ratio.
| Part name and number | Minimum price, rub. |
| AT 2090-118BP | 400 |
| AutoReal AV18-350-2090 | 450 |
| Pilenga BSP1005N | 600 |
Selection for cars without ABS
If your Lada Priora is not equipped with an anti-lock braking system, then you should purchase special pads. The most popular sets are the following.
Replacing rear pads without ABS and with ABS
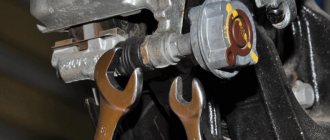
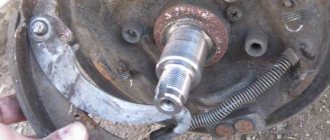
Using a 7 key or similar head, unscrew the guide wheels. You need to unscrew it carefully. If it cannot be unscrewed with a key, then it is better to use the head - the threads can be easily damaged. Then the drum is dismantled. If it does not come off, then hit it with a hammer from the back side through the bars. The blows must be applied evenly. When replacing the rear pads on a Priora with ABS, you must also remove the disc.
Then the pistons of the rear brake mechanism are compressed. This can be done with two screwdrivers. The piston should be recessed inside the cylinder on each side. To carry out a similar procedure, you can press on the pads with screwdrivers. It is convenient to rest the latter on the shoulder of the brake flap.
Then, using a screwdriver, disengage the hook of the upper tension spring. The latter will be connected to the block. And after that you can remove the spring. The upper stops of the pads are removed from the piston slots and the spacer bar is removed. Similar operations are carried out with the lower tension spring.
Using the same screwdriver, disengage the pressure spring. It is also connected to the block. Now you can remove the front pad. If you release the spring from the rear block, you can remove it too. The handbrake drive lever can be removed from the hole in the cable end. Then you can proceed to installing new parts. It is definitely recommended to change the pads only as a set on the left and right wheels. A total of four pads are changed.
Procedure for replacing brake pads on Lada Priora
1. Place the machine on a level surface, engage first gear, and place wheel chocks under the wheels. Do not apply the handbrake, otherwise this will complicate the process of replacing the pads.
2. Loosen the wheel bolts and lift the wheel. Unscrew the bolts completely and remove the wheel.
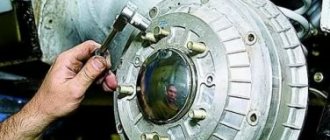
3. There will be a drum hanging in front of you that needs to be removed. Unscrew the guides using a 6 key. If there is nothing to catch on, you can use a small vice. Clamp the guide in a vice and unscrew it.
4. Remove the drum. There are times when it simply gets stuck and doesn’t move. Take a rubber mallet and knock it off the end, tapping it all the way around. Try to hit it very carefully, as the material from which the drum is made is very fragile and there is a risk of breaking it completely.
5. After the drum is dismantled, you can begin to remove the pads themselves. Remove the cotter pin securing the handbrake lever and free it from the spring.
6. Release the pads from the spring that secures them at the bottom. Then disconnect the springs that hold the pads in a vertical plane. The last spring should be removed with extreme care, holding the pistons of the brake cylinder. If they come out, brake fluid will leak, so try to hold the pistons with one hand.
7. When installing new pads, tie the pistons with a large layer of thread, and after installation, simply cut the thread and get rid of the remainder.
Setting the parking brake
After replacing the pads, the handbrake may need to be adjusted. Adjust it with an adjusting nut. The full travel of the parking brake should be approximately 2-4 clicks. A properly adjusted handbrake should not block the wheels when lowered. They should rotate easily.
After replacing the rear brake pads on a Priora, extraneous sounds may appear when braking - this is normal. The parts should rub against the drum. After some time (300 kilometers) such sounds should disappear.
Vehicle preparation and tools
Before you start replacing the rear pads with your own hands, you need to prepare a tool. We will need:
- a set of standard keys;
- minus and Phillips screwdriver;
- pliers;
- wooden mallet or rubber mallet;
- metal brush;
- Additionally, you can get graphite lubricant, VD-40 fluid and a special hook for removing the tension springs.
The machine should also be prepared for work:
- open the hood and find the brake fluid reservoir. Use a syringe to remove the brake fluid to the minimum mark. The spent pads extend further, the cylinder itself is similar, and when changing pads you will have to refill it. The brake fluid will return to the reservoir and may spill onto the engine, so it is worth taking it away;
- All wheels must be securely secured by placing wheel chocks on them.
The process of changing the front pads
This need may arise when:
- the thickness of the rubbing lining is less than normal (1.5 mm);
- the linings are stained with oil, which leads to a decrease in the efficiency of the brakes;
- the lining has peeled off from the metal;
- various depressions/chips appeared;
- When braking, extraneous sounds (creaks) are heard.
After you decide which pads to put on the Priora, you need to make sure that you have all the necessary tools (there are not many of them):
- keys for 13 and 17;
- flat screwdriver and chisel;
- hammer;
- brush and rag.
Front brake pads
To replace faulty brake pads on a Priora, in addition to the above, you will need to stock up on free time and patience, since you are most likely not a professional, and not everything may work out right away. Replacing the front brake pads of a Lada Priora should be carried out in a specially designated place where the car can be secured conveniently for you (garage). You can purchase brake pads either in a specialized store or order them online. But it’s better, of course, to see the product, otherwise you can order one thing, but they will deliver something completely different.
Once the car is in place in the desired position, do not forget about installing wheel chocks. Let's get to the fun part.
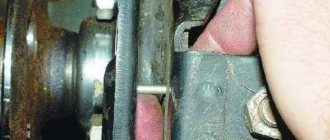
- First you need to remove the wheel from the front, after which the brake mechanism should be cleaned with a brush/rag;
- if you find that there is a lot of corresponding fluid in the brake cylinder, you will need to pump it out, otherwise it may subsequently interfere with the normal “revival” of the wheels;
- We install a screwdriver between the outer pad and the caliper so that you can press on the cylinder. While resting on the first part, you need to pull the second one all the way;
- using a screwdriver, it is necessary to remove the corner of the non-flat washer: either knock it off with a chisel, or bend it if possible;
- using a 13 key, you need to unscrew the fastening bolt of the bracket - another key that we took in advance can help with this;
- when you lift the body of the released bracket, you will be able to easily remove the damaged auto pads;
- The entire brake mechanism will need to be thoroughly cleaned of dirt and rust, but at the same time, try very hard not to harm the cylinder, in particular, its protective cover.
Installing new elements:
- they need to be prepared before installation;
- when you put the front pads on the Prior in place, make sure that the springs and their edges are parallel to each other;
- using both keys, place and screw the bracket body into place;
- We install the wheel that was previously removed.
It turns out that replacing brake pads on a Prior is not such a difficult process. After all the parts are in place, use the brake pedal to return the piston and add brake fluid to the cylinder to the required level. Replacing the front brake pads will generally take no more than 2 hours.