A constant velocity joint (CV joint, “grenade”) is a device that transmits torque from the car engine to the wheels. It was invented in the 20s of the XX century. Before the advent of the CV joint, cars with front-wheel drive, which were distinguished by high cross-country ability and maneuverability, lost power when cornering, vibration occurred, and torque was distributed unevenly.
Created for a special purpose, CV joints have high strength. There is an opinion that the CV joint mechanism - with proper care and proper handling, of course - can even outlive the car itself. Unfortunately, problems can arise with the grenade. Read on to learn about the characteristic signs of problems and how to replace a CV joint with your own hands.
What is needed to install a new CV joint
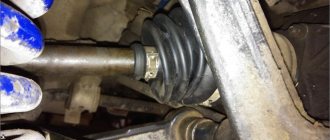
The CV joint, despite its strength, has parts that can wear out over time or if used incorrectly. Often, CV joint replacement occurs due to damage to the boots - during driving, cracks and holes appear that become clogged with dirt, water and dust. This way you can drive hundreds, or even thousands of kilometers, which will finally finish off the mechanism. Boot problems are expressed in a crackling sound when turning the wheels (when turning to the right, the left wheel cracks, when turning to the left, the right wheel cracks). Sometimes the CV joint has to be replaced due to incorrect actions by the driver. Acceleration of the engine with slipping, starting on the wheels turned out, braking by the transmission - often the cause of the malfunction lies in this.
Play in the ball joint has a negative effect on the CV joint. It occurs when the support itself is already severely worn out. If this problem is not identified in time, it will have a very negative impact on the CV joint. Thus, driving at high speed can tear out the support pin, which can cause the grenade to break.
It is extremely rare that CV joint failures are caused by factory defects in the mechanism parts or initially incorrect installation. Coupled with a worn boot, the problem can reach unimaginable proportions. Many reviews on automotive forums mentioned the poor quality of some parts - both basic functional elements and additional little things, like clamps.
Regardless of the source of the problem, a grenade that is not working properly will require replacement. Machine manufacturers claim that when parts wear out, the entire mechanism must be replaced, even those elements that were not damaged by failure. Considering the high quality of materials, the repair will cost quite a lot. In this regard, the car owner tries to replace the CV joint with his own hands. What will the driver need?
- pit or lift;
- hammer, screwdriver, pliers, jack;
- a set of keys or heads;
- bench vice;
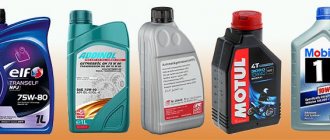
- new clamps, lubricant (CV joint-4, for example), hub nut with stopper.
The latter (consumables) are often provided with a new grenade. All of the above are suitable for replacing outer and inner CV joints.
How to replace a CV joint with your own hands and tips for prevention
A car is not only not a luxury, but sometimes it ceases to be a means of transportation for a long time. The most common cause of malfunction of parts and assemblies is the friction process, which occurs as a result of the contact of various mechanisms during operation. Despite the fact that modern technologies for the manufacture of metals and their processing can significantly increase the service life of car parts operating in harsh conditions, and the use of high-quality lubricants significantly reduces the coefficient of friction, various breakdowns will always haunt vehicle owners. Among the most common causes of failure of front-wheel drive iron horses is CV joint failure. In most cases, this failure cannot be repaired and the constant velocity joints will need to be completely replaced. How to replace the CV joint will be discussed later, but before you begin this operation, you need to learn how to correctly determine the malfunction of this part.
Checking the condition of the CV joint
Experienced motorists know that there are external and internal CV joints. There are differences between them. Let's take a closer look at them.
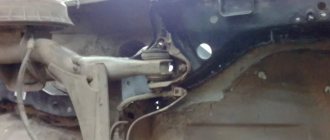
- External (external) CV joints - two pieces, located on the hubs, transmit torque to the wheels. The steering angle is significantly higher than that of an internal CV joint. They also take on more load. Accordingly, they break down more often and require regular inspection and replacement if necessary. They have a smaller size.
- There are two internal CV joints that make the axle shaft move; they are located in the gearbox, one on each side. They are larger in size. They are less subject to stress and, accordingly, can work longer.
You can assess the condition of the CV joint yourself. The easiest way to inspect the external one is to turn the steering wheel all the way (to the right or left) and quietly move away. If there is a problem, a cracking or crunching sound will appear. The more damage is done to the CV joint parts, the louder the sound will be.
If problems with the external grenade are accompanied by a crash when turning, then problems with the internal grenade are accompanied by a crack when moving straight. The sound will intensify if you drive off-road - every bump, hole or ditch will clearly remind you of the problem. If you notice a crunching sound, carry out repairs immediately - problems with the internal CV joint are very dangerous. It's a little more difficult to inspect:
- We put the car on the lift.
- We turn on first gear, the wheels should rotate slowly (the car should be slightly raised).
- The presence of a distinct crunching sound is evidence of problems.
If you hear a cracking sound while driving - when turning, when overcoming off-road obstacles, or sudden acceleration - immediately fix the problem. Timely inspection and repair will help the car owner remain a driver and not a pedestrian. In addition, a problem detected in time will help to avoid critical situations on the road.
Signs of failure of the outer grenade (CV joint).
- signs that your grenade has already broken
- signs that the grenade will soon come out and break .
How to understand that a grenade will soon break.
Of course, the first sign of a malfunction of the external grenade is a crackling sound . If you hear a crackling noise while driving with the steering wheel turned, it is definitely a CV joint. The greater the angle of rotation of the wheel and the harder you press on the gas, the louder the clicks. Another sign that does not always appear is vibration on the steering wheel at speeds greater than 80 km/h. The vibration is only slightly similar to the vibration from an unbalanced wheel. It usually manifests itself as a slight twitching of the steering wheel.
How to understand that the outer CV joint has broken.
If the CV joint breaks, the car will stop moving. In any gear engaged, press the gas, the speed increases, but the car does not move.
How to understand that it is the outer CV joint that has broken, and not the internal one or the clutch in general (the first signs of failure are similar to the signs of a clutch failure)? First of all, start the car and put it in any gear. Next, open the hood and look in turn at each of the shafts going from the box to the wheels (one short, the other long). If any shaft is spinning, it means that the CV joint has broken on this side.
I recommend not just visually looking at the shaft, but touching it with some long, hard object, such as a stick. The main thing is that there is nothing on it that could wrap around the shaft . When you touch the shaft with a stick, if it is spinning, you will feel a slight vibration. This is usually done in the dark, because it is difficult to understand whether a cylindrical object is spinning, especially in the dark.
Is it possible to do without replacement?
Having seen the cost of repairing or completely replacing the CV joint, inexperienced motorists think that they can drive anyway: just think, something crunches down there, a big deal. And it's actually a big deal.
Some car enthusiasts think that the strength and durability of parts makes them completely invulnerable, which is absolutely not the case. Replacing the grenade is the only possible option that will allow you to drive comfortably.
It is necessary to change the CV joint after identifying the slightest problems in its operation. Have you noticed any wear on the boot? Does your wheel crunch when turning? Don't over-tighten, otherwise the machine will just fall into place one day. Why do we need a car that can only remain in the garage as a dead weight? That's right, an experienced driver is not interested in such a car. Moreover, replacing the external CV joint is quite feasible on your own.
Boot replacement and repair
The boot can be changed without removing the grenade if you have special equipment. His work is demonstrated on video. If you do not have such a device, to remove and replace it, you must perform the above procedure for removing the drive and dismantling the hinge. The procedure is necessary if there is even minor through damage on the boot.
Temporary repairs to the CV joint boot can be made without removing it from the vehicle. To do this, you need to thoroughly clean and degrease the damage, then seal it with a piece of rubber and cyanoacrylate-based glue (superglue).
An alternative repair method is to seal the holes with silicone caulk. It should be remembered that it takes a day to completely polymerize.
Note: express repair is a temporary measure. Replacing the inner joint boot may be delayed for a short time, but not completely cancelled. Typically, these types of repair methods are used to get to the point of repair.
Replacing the outer CV joint
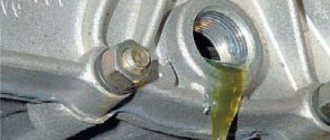
An experienced car owner with practical skills will not encounter any problems when taking on the task of replacing the outer CV joint. The list of tools necessary to carry out the “operation” has already been presented above. In addition to tools and supplies, there are a few other things worth doing. Before removing the wheel, drain a little oil from the gearbox - this will make it easier to work with. You will also need a pry bar - it will serve as a lever when removing the drive shaft.
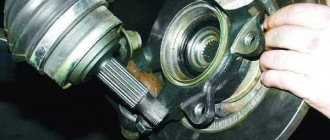
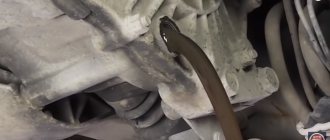
Let's assume that the problem is on the right. Replacing the right CV joint begins with removing the wheel. We unscrew the hub nut, remove the brake disc, caliper, ball joint and steering tip. We take a pry bar or crowbar and remove the splined drive shaft. Using light blows of a hammer (a support, such as a wooden block, will come in handy), we knock out the outer hinge. Next we perform the following steps:
- It is necessary to remove the hub nut and tear off the wheel bolts. We put stops under the rear wheels.
- We jack up the car, hang it up and then remove the wheel.
- Remove the bolts holding the steering knuckle to the ball joint.
- Turn the steering wheel all the way. Pulling back the steering knuckle, we pull out the outer half of the hub along with the old CV joint. If the grenade does not budge, hit it lightly with a hammer.
- We remove the old boot and clamps and throw them in the trash.
- We remove the CV joint with hammer blows, rotating it along the axle shaft.
- We fix the installed new hinges in the hub together with the boot.
Replacing the left CV joint is carried out in the same way. When returning parts to their place, the above procedures should be done in reverse order. When knocking down a CV joint with a hammer, hit it clearly - some models are equipped with an ABS ring, which does not like strong blows to it. Don't forget to add gearbox oil. When installing the wheels back, be extremely careful to avoid falling apart.
How to remove a vaz shruz
Having determined that it is the external grenade that is broken, we begin to remove it.
How to unscrew the hub nut on a VAZ?
First of all, unscrew the hub nut. To do this, take a 30mm head and a lever, the larger the better. We put bricks under the wheels to prevent the car from rolling (simply putting it in gear is not an option, the wheel will spin) and begin to unscrew the hub nut.
In this matter, the more you weigh, the better, since I very often lacked my weight and leverage of about one and a half meters. I got out of the situation in the following way: I stood completely on the lever, as close to the edge as possible, thereby giving maximum tension to the nut, and hit the lever with a hammer. Usually this method helped me unscrew even the most soured wheel nuts.
One more nuance: if the outer walls of the head come into contact with the walls of the hub, it is better to lubricate the head with mining or lithol, or, in extreme cases, with silicone grease. Thanks to this trick, the head will not bite in the hub.
How to remove a grenade?
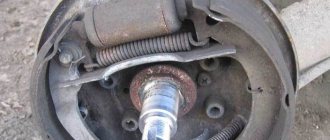
The hub nut is unscrewed, now we remove the wheel, unscrew the two bolts that hold the ball joint, disconnect the suspension arm and the hub, move it to the side of the car while lightly tapping the grenade, remove it from the hub. At this point there are two options:
- The grenade is already broken.
- Replacing the grenade due to its crunching sound.
In the first case, you simply remove the outer part of the CV joint from the shaft, then the retaining ring from the drive shaft and knock off the cage with a hammer.
In the second case, removing the CV joint becomes more difficult. You need to deflect the grenade relative to the shaft at the maximum angle so that the bearing balls and their cage are visible.
Now use a hammer to break the jumpers of the cage between the bearing balls and take out the balls one by one. When you take out the last ball, you can remove the body of the grenade, and then its inner part sitting on the shaft, after first removing the locking ring from the shaft.
Of course, you can simply try to knock the grenade off the shaft, but due to the locking ring this will be problematic.
That's it, the CV joint is completely removed. Now let's start installing the new part.
When to change CV joint
There may be several signs of problems with the operation of such devices. Usually, drivers determine by the sounds from the car's suspension that the CV joint needs to be replaced. This is indicated by a crackling noise when the car turns sharply. To make sure that you urgently need to replace the CV joint, you should stop and turn the wheels to their extreme position. A crunch that appears after starting means that the damaged front CV joint needs to be replaced.
The appearance of the same sounds when the wheels are turned in the opposite direction means that the mechanism on the other side of the wheel has come to an end. In such a situation, the condition of the protective covers should be assessed. It is better to put the car on a lift and inspect them carefully. If fresh signs of grease are visible near them, the bellows need to be replaced. If its rupture is clearly visible and there is no lubrication, you will need to immediately replace the CV joint.
Signs of breakdown
The “grenade” is perhaps one of the few car parts that will, in any case, let you know if it’s broken. Surprisingly, even taking into account the fact that both parts of the CV joint operate in extremely unfavorable conditions, most often its outer part is subject to repair. In any case, no one is immune from failure of the left or right wheel joint, so it is extremely important to periodically check their condition.
CV joints deserve the most attention if the following appear while the vehicle is moving:
- extraneous noises from under the hood or bottom of the car (crackling or knocking);
- deterioration of controllability and dynamics;
- problems when turning the steering wheel to one side.
Having noticed such “symptoms”, you can be 80-90% sure that the fault of the “grenade” is to blame and repair is inevitable. However, there is no need to rush into it; before organizing this procedure, it is advisable to make sure that there is a problem with the CV joint. This is not so difficult to do - just:
- Place the car over the inspection hole or lift it onto an overpass.
- Examine in detail the condition of the CV joint of each wheel. Special attention should be paid to the anthers. If they are deformed, there are strong grease leaks or metal chips in the part area, then you can safely go for a new CV joint.
- The final confirmation of the malfunction of the “grenade” will be made by dismantling it, disassembling it and assessing its condition. A similar procedure is discussed in more detail below, along with repairing the part.
Fault diagnosis
How can a novice car enthusiast who has never encountered a similar problem check the CV joint on his own? It is not at all difficult to determine the malfunction and replace the CV joint with your own hands, but you will first need to determine which part is faulty.
With significant wear of the inner race, significant play in the CV joint is formed, which makes itself felt with various sound effects. The CV joint most often crunches when turning. This defect, with significant wear, can also be manifested by small jolts on the steering wheel. This effect is especially noticeable on cars not equipped with hydraulic or electric power steering.
Significant wear of the CV joint can also be determined by shocks when starting the car, as well as by a sudden change in engine operating mode, especially at low speed. This technical problem can also be caused by other transmission malfunctions, which, under certain conditions, can produce similar sounds, so before passing a final verdict on the old CV joint, you need to make sure that the diagnosis is correct. To determine the radial clearance, you will need to hang the front suspension of the car one by one and, having fixed the main drive shaft, turn the wheel in different directions; if the free rolling of the wheel is significant, and a knock is observed, the CV joint can be considered faulty, and it must be replaced immediately. In some cases, the cause of this phenomenon may be a weakening of the CV joint to the vehicle shaft. This problem is solved by tightening the bolts holding the CV joint. In this case, the conditions for tightening this part with the necessary force must be met. If the tightening torque is less than that set by the manufacturer, then this malfunction will make itself felt again after a short period of time.
If the cause of a CV joint failure is excessive wear on the race, the CV joint must be replaced using original spare parts.
Malfunction prevention
In order for this part to last as long as possible, it is necessary to completely eliminate the possibility of dirt and water getting under the rubber cuffs of the CV joint. If there is the slightest damage, this part must be replaced with a new one.
For this purpose, it is better to use original spare parts that are made from high-quality rubber. If you purchase counterfeit cuffs, the procedure for replacing this part will have to be carried out too often.
Another reason why the CV joint often fails is its insufficient fastening to the main gear shaft. If the bolts are not tightened well enough, then over time they begin to unscrew randomly. In this case, the outer CV joint moves significantly away from the shaft, and with a significant gap, knocking noises will be observed in the transmission. If this malfunction is not detected in time and the fastening bolts are not tightened, then in a short time the CV joint will be completely “broken.”
How to change the CV joint and how to determine the malfunction of this part is described in detail in the article. The operation of replacing the CV joint will not take much time, but if you do not want to fix this problem yourself, you can always turn to a car repair shop for help.
Source
Video text
When removing the CV joint, the retaining ring jammed. Before that I screwed in the hub bolt, but it didn’t bring any results, it just became deformed - I could barely unscrew it. Also, shock manipulations were useless. How I solved this problem, watch the video. POPULAR VIDEO OF THE CHANNEL: RESTORING A BALL JOINT WITH YOUR OWN HANDS. HERE: https://www.youtube.com/watch?v=1-CjF.
REPAIRING BENDEX - EASILY WITH YOUR OWN HANDS. HERE: https://www.youtube.com/watch?v=vdeFs.
Good luck to everyone with the renovation!
===================================================== ==== Optimization (not for reading!) remove the grenade, CV joint, removing the CV joint, how to remove the CV joint, cannot be removed, car repair, car repair, auto repair, chassis repair, replacing the CV joint, grenade VAZ, grenade, replacing the grenade, outer boot , engine repair, how to remove, dismantling, grenade repair, remove, axle shaft, replacing a grenade with abs, replacing an external grenade, replacing a grenade on a Prior, a grenade with abs, difference between CV joint and abs, CV joint puller (replacing a grenade), splines, removing a grenade , hub, grenade stuck, knocking out CV joint, grenade boot, replacing grenade boot, solaris box, solaris repair, box repair, repair, Solaris, solaris, hub puller, drive, tripoid, OLEG Vinokurov boot, remove grenade, CV joint, CV joint removal, how to remove a CV joint, not removable, car repair, auto repair, auto repair, chassis repair, CV joint replacement, VAZ grenade, grenade, grenade replacement, external boot, engine repair, Car repair, how to remove, dismantling, grenade repair, REMOVE, how to remove CV joint from the shaft, how to knock the CV joint off the shaft, the CV joint cannot be removed, how to knock the CV joint off, how to remove the grenade from the drive, how to knock off the outer CV joint, how to remove the grenade, how to knock the CV joint off the shaft, how to remove the CV joint from the drive, how to remove the CV joint without a puller ,the grenade cannot be removed, how to knock a grenade out of the drive, replacing the CV joint, the outer CV joint cannot be removed, how to knock a grenade off the drive, how to knock a grenade off the shaft, how to remove the retaining ring on the CV joint, the retaining ring of the CV joint, the outer CV joint, how to knock out a grenade, daewoo lanos, how to shoot down a grenade, VAZ 2110, replacing CV joint drives, replacing CV joints, VAZ 2110, 2112, Kalina, Granta, Priora, replacing CV joint drives, outer CV joint, cars, auto, car, car repair, do-it-yourself VAZ, Lada Kalina repair , AvtoVAZ, CV joint replacement, grenade replacement, external grenade, the cv joint replacement, toyota joint replacement, how to change a grenade, replacing a CV joint with your own hands, changing the CV joint, external grenade, external grenade, CV joint boot, cv joint replacement, ersatz gleichlaufgelenk, puller CV joint, replacing a grenade with a puller, a grenade puller, a do-it-yourself puller, how to make a puller, making a puller, how to remove a grenade with a puller, replacing the outer CV joint, extractor, extractor cv joint, ท่านครับ-ตาพวกนายแล้ว ข้อรูปแบบสากล, abzieher gleichlaufgelenk . replacement of the outer Geely grenade, replacement of the Geely ck grenade, grenade, CV joint, puller, replacement of the grenade (CV joint) with a puller, replacement, replacement of the outer grenade and internal drive boot on a VAZ 2112, replacement of the outer VAZ 2112 grenade, replacement of the internal drive boot of the VAZ 2112, replacement grenades and boot of VAZ 2112, replacement of outer CV joint of VAZ 2112, do-it-yourself VAZ repair, do-it-yourself VAZ repair, youtube editor, toyota
In the article we will look at how to change a grenade on a VAZ-2109 and similar cars. The latter include models 2108, 21099, 2113, 2114, 2115. However, all front-wheel drive VAZ cars have a similar design, so our manual can be used when repairing other models. But first, let's look at what a grenade is, what it consists of, and for what purpose it is installed on a car.
Preparation for repair
Let's say you are absolutely sure that the CV joint needs to be removed (for lubrication, replacement or disassembly). What to do in such a situation? First of all, it is important to properly prepare for repairs. In general, the set of preparatory measures consists of three stages.
Selection and purchase of a new CV joint or its separate part. At this stage, it is important to purchase the same version of the “grenade” as the one currently installed in the car’s transmission. This can be done using:
- using VIN codes of a car or part;
- selection method “by example” (preliminary removal of the CV joint will be required);
- contacting professionals at the service station.
Providing certain conditions, namely:
- preparation of an inspection pit or overpass;
- cleaning the suspension repair area from dirt;
- if possible, find an assistant.
Preparing the necessary tools for repair. The list includes:
- basic set of wrenches and sockets;
- unnecessary rags;
- a special device for shooting “grenade” or a hammer, a mount;
- jack (in the absence of an overpass or inspection hole).
After completing these procedures, you can begin to remove and repair the CV joint. Don’t forget that to carry out suspension repair work, you need to have some understanding of the car’s structure and basic auto repair skills. If you do not have such knowledge, it is better to take the car to a service station for repairs.