- How to use it correctly
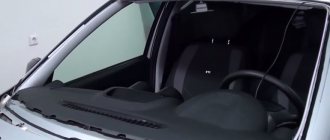
- About heated seats
- Do-it-yourself modification
- How to turn on the heated windshield
- Buy a ready-made kit
- Testing heated side mirrors
- Peculiarity
- How heating works on Vesta
- Defrost MAX mode
- Connection
- Causes of heating malfunction on Lada Vesta
- How heating works on Vesta
- Results
- How to solve this problem?
About heated seats
The heating works quite efficiently. The only drawback is the lack of heating sensitivity. That is, there is no option to select power (low, medium, high), as on some foreign cars. But it does not “fry” all the time, but automatically turns off/on while the indicator is on.
The heating works quite efficiently. The only drawback is the lack of heating sensitivity. That is, there is no option to select power (low, medium, high), as on some foreign cars. But it does not “fry” all the time, but automatically turns off/on while the indicator is on.
3_4
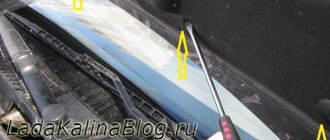
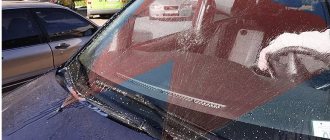
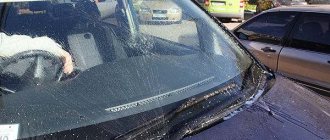
The photo shows the glass after 8 minutes of heating at an outside temperature of -13 degrees. The rear one has become transparent, but on the windshield there is only a narrow embrasure from the heater fan blowing. If you wave the wipers, they will not cause any damage to the ice on the glass. The photo shows the glass after 8 minutes of heating at an outside temperature of -13 degrees. The rear one has become transparent, but on the windshield there is only a narrow embrasure from the heater fan blowing. If you wave the wipers, they will not cause any damage to the ice on the glass.
The photo shows the glass after 8 minutes of heating at an outside temperature of -13 degrees. The rear one has become transparent, but on the windshield there is only a narrow embrasure from the heater fan blowing. If you wave the wipers, they will not cause any damage to the ice on the glass.
However, electronic diagnostics revealed some errors, and they were erased from memory. So far the frosts have receded, so I can’t say anything about changes in the heating operation yet. Taking this opportunity, I would like to ask the owners of Russian cars and foreign cars with a warm windshield: how efficiently does it heat up in yours?
Lada Vesta from ZR park: going for service
Do-it-yourself modification
Attention! You perform all actions at your own peril and risk. The author is not responsible.
You will need: install an additional non-locking button in the car panel (or buy a block with five buttons), a relay with two groups of switching contacts, 1N4007 diodes and a transistor.
Description of the circuit: When the button is pressed, the low level at pin S1-14 activates the standard heating of the entire CBKE and at the same time the relay is activated due to the pickup by the transistor for a time determined by the capacitance of the capacitor. After 3-4 seconds, a low level appears at pin S1-34 and fixes the relay in the on state for the time specified in the CBKE (6 minutes). The relay turns off the heated mirrors and rear window, leaving only the windshield.
As a result, when you press the additional button, the indicator of the standard button lights up and only the heated windshield turns on. After 6 minutes it turns off on its own.
Dismantling
To connect, first of all, you need to gain access to the SAUKU - the heater and air conditioning control unit. On Vesta and X Ray, the algorithm is different, so it’s worth looking into everything in more detail.
Lada Vesta
In a sedan, the SAUKU unit is traditionally located on the center console. To get to it, you will need to remove 3 elements:
- Panel overlay (plastic);
- Key block;
- SAUKU overlay.
The plastic trim is fixed to the center console using plastic fasteners. To snap them off, you need to pry it at the bottom and pull it towards you.
Next, the panel with the keys is dismantled, which is attached to the clamps, also around the entire perimeter. They need to be snapped off.
The most difficult thing to remove is the SAUKU trim.
It is better to start working on the left side. First you need to get to the fuse box by removing the plastic cover that covers it. You need to turn the 3 plastic handles that secure the lid at the bottom, and then remove the lock from above.
In the end, all that remains is to pull the cover from below, disconnect the clamps that secure it to the device from above, and remove the cover. Once the fuse box cover is removed, you will need to remove 2 mounting screws.
Next, we move on to the central part, where it is also necessary to unscrew the 2 mounting screws, which are located directly under the panel with the keys.
Then all that remains is to unscrew 1 mounting screw on the right side, which is located under the glove box lid.
After this, access opens directly to the SAUKU block, which is attached to the cover plate with Torx screws. They need to be unscrewed and the plug disconnected.
Lada X Ray
Independent connection of a heated windshield on a Lada X-Ray through an additional alarm channel also begins with the removal of the SAUKU unit. Everything here is noticeably simpler than on Vesta. The panel itself with the block is fixed with 2 hooks at the top and 2 iron guides equipped with springs at the bottom.
You need to carefully pry the panel at the bottom and carefully pull it towards you. This will cause the top fasteners to disengage.
In the end, all that remains is to disconnect the plug from the wires.
Peculiarity
Owners of the sedan and crossover noticed one technological feature - the heated windshield of the Lada Vesta and X-Ray cannot be turned on remotely, even if the engine has automatic start. Because of this, many people, after starting the engine remotely, even when the power unit warms up, have to wait until the windshield thaws.
On models equipped with climate control, this problem is almost non-existent, since the climate control unit, after the engine is turned off, remembers the functions that were turned on before and, upon subsequent startup, activates them too. Therefore, in order not to wait for the glass to thaw, you just need to remember to turn on the heating, and at the same time the mirrors, before turning off the engine.
How to use it correctly
Owners of Lada Vesta have already noticed the dependence of the heating operation on weather conditions and temperature conditions. The heating function is most effective when the air temperature is not higher than -10 degrees. When the snow flooring has slightly melted and moved, you can remove it using the wipers; hastily turning it on can lead to deformation of the brush drive mechanisms. At lower temperatures, it takes longer to warm up the glass. In this case, you should not expect an instant result from the function.
Defrost MAX mode
On luxury Vestas with air conditioning, the “Defrost MAX” mode appears. It allows you to most effectively clean all windows and exterior rear-view mirrors from fogging, freezing or icing. To enable this mode, you need to press the corresponding button (No. 24) on the climate control unit.
When the mode is activated, the air conditioning (if conditions permit), electric heating of the windshield and rear windows, as well as side mirrors will be forcibly turned on. The entire air flow is directed to the blower nozzles of the windshield and front side windows, and the maximum air speed and temperature are also set.
How to understand why the heated mirrors are not working and fix it yourself?
The option of heated mirrors is very helpful for drivers in winter. Without it, the surface of the mirror becomes covered with an ice crust, which significantly impairs visibility. But, like any other heating device, the heated mirrors sooner or later break down, which forces motorists to replace the mirrors with new ones. At the same time, they are quite expensive, and spending that kind of money is completely inappropriate, because you can restore them to working capacity on your own.
Necessary tool
The set of necessary tools is quite modest, and every motorist will probably have one. The first step is to get a multimeter to check the electrical circuit. We may also need a soldering iron, screwdrivers, electrical tape, and a spare fuse.
Let's start troubleshooting
The first step is to check the condition of the fuse responsible for heating the mirrors. To determine which fuse is responsible for the mirrors, you need to look at the repair instructions for your car on the Internet. If the fuse turns out to be blown, then simply replace it with a new one. You can determine that it has burned out not only visually, by looking at the broken wire inside, but also using a multimeter. To do this, you need to switch it to the resistance measurement mode and touch the fuse contacts with the probes; if the device does not show anything, then the fuse has burned out.
Checking the button
If the fuse turns out to be working, then you should next check the heating button. Sometimes it happens that the contacts on it burn out and it stops working. Checking its functionality is quite simple, but getting to the wires we need can be difficult. To gain access to the reins that fit the button, you need to remove the panel on which it is located. Next, we again take the tester with the resistance testing mode turned on and press the probes to the button contacts. When you press the button, a short circuit should occur, that is, some numbers will appear on the device. If nothing happens, then the problem is in the button, and it needs to be replaced with a new one.
Looking further
The next stage of the search is disassembling the mirror. It must be removed from the car, and the wires that go to it must be checked for voltage. To do this, switch the tester to voltmeter mode, press the heating button and, applying one probe to a metal part on the body, and the second to a wire contact, measure the voltage. It should be 12-14 V. If there is current, then everything is in order with the wiring, and we only have one suspect left - the heating element.
Calling the mirror
It is necessary to determine whether there is a break in the filament that is glued to the mirror. We take the tester, turn on the resistance test mode and touch the mirror contacts with the probes. The resistance of a working mirror should be in the region of 10 to 30 ohms. If the device shows 100 ohms or more or even a break, then the fault has finally been found. Some heating elements cannot be repaired and must be replaced. But there are mirror designs from which you can peel off the old heating element and install a new one in its place.
You can buy a new heating plate at automotive stores. Some of them are sold without terminals for the wires, and this is where we need a prepared soldering iron. You will need to unsolder the male terminals from the old mirror and solder them into the new heater. Next, we glue the new plate onto the mirror and, after checking its functionality, put everything back together.
Photos from Internet resources
Connection
Not all 2180 owners are satisfied with the operation of heating the windshield, rear windows and rear-view mirrors simultaneously with the heater fan and air conditioning. There is one way out of this situation - installing a separate button. Even on Vesta models that do not have a heated windshield function as standard, it is possible to connect this very convenient function when replacing the glass unit.
If you need to replace your heated windshield for technical reasons, you should contact an official Lada dealer. Under the guarantee, the procedure is carried out free of charge, after an examination. It is necessary to make sure that replacing the windshield with heating is the only solution to the problem, since not a single part will last better than the original one.
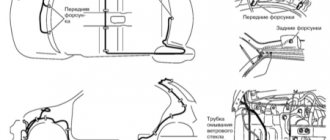
When the disassembly of the interior components is completed, it is necessary to program the additional alarm channel for a pulse lasting 1 second when controlled from the key fob. Next, the additional signaling channel needs to be connected to the plug of the SAUKU unit (black). For Lada Vesta this is a green wire, the second one from the edge, which is marked in the picture.
As for X-Ray, the location should be identical, but before connecting it is strongly recommended to inspect everything with a multimeter - when the heating is turned on, the wire should briefly produce ground.
After this modification, the connection of the heated windshield on the Lada Vesta and X-Ray through the additional alarm channel will occur from the key fob. And after a few minutes the heating will turn off on its own.
Everything is clearly demonstrated in the video.
Dismantling
To connect, first of all, you need to gain access to the SAUKU - the heater and air conditioning control unit. On Vesta and X Ray, the algorithm is different, so it’s worth looking into everything in more detail.
Lada Vesta
In a sedan, the SAUKU unit is traditionally located on the center console. To get to it, you will need to remove 3 elements:
- Panel overlay (plastic);
- Key block;
- SAUKU overlay.
The plastic trim is fixed to the center console using plastic fasteners. To snap them off, you need to pry it at the bottom and pull it towards you.
Next, the panel with the keys is dismantled, which is attached to the clamps, also around the entire perimeter. They need to be snapped off.
The most difficult thing to remove is the SAUKU trim.
It is better to start working on the left side. First you need to get to the fuse box by removing the plastic cover that covers it. You need to turn the 3 plastic handles that secure the lid at the bottom, and then remove the lock from above.
In the end, all that remains is to pull the cover from below, disconnect the clamps that secure it to the device from above, and remove the cover. Once the fuse box cover is removed, you will need to remove 2 mounting screws.
Next, we move on to the central part, where it is also necessary to unscrew the 2 mounting screws, which are located directly under the panel with the keys.
Then all that remains is to unscrew 1 mounting screw on the right side, which is located under the glove box lid.
After this, access opens directly to the SAUKU block, which is attached to the cover plate with Torx screws. They need to be unscrewed and the plug disconnected.
Lada X Ray
Independent connection of a heated windshield on a Lada X-Ray through an additional alarm channel also begins with the removal of the SAUKU unit. Everything here is noticeably simpler than on Vesta. The panel itself with the block is fixed with 2 hooks at the top and 2 iron guides equipped with springs at the bottom.
You need to carefully pry the panel at the bottom and carefully pull it towards you. This will cause the top fasteners to disengage.
In the end, all that remains is to disconnect the plug from the wires.
Results
In severe frost (at -20 degrees), the thawing order will be approximately as follows:
- 1 minute - the ice on the mirrors begins to melt;
- 2.5 minutes - the ice on the mirrors has almost melted, the bottom of the windshield (stove) begins to thaw;
- 4 minutes - the mirror elements are completely dry, the snow on the threads of the rear window will melt;
- 5-6 minutes - the windshield and areas on the side windows near the mirrors noticeably move away from the ice;
- 7-8 minutes - the heating has melted the ice from the main part of all the windows, you can drive.
In warmer weather, you can start driving earlier, as soon as the engine speed drops to operating speed. There are no comments on the operation of Vesta’s heating; one can only find fault with the fact that the seat heating is not adjustable.
Let us remind you that a discussion of the reasons why Vesta does not start well in cold weather or why the engine does not start at all is not included in this article. Other reviews and tests are in this category. Leave feedback on the operation of the heaters in the comments to the article.
- 1 minute – the ice on the mirrors begins to melt;
- 2.5 minutes – the ice on the mirrors has almost melted, the bottom of the windshield (stove) begins to thaw;
- 4 minutes – the mirror elements are completely dry, the snow on the threads of the rear window will melt;
- 5-6 minutes – the windshield and areas on the side windows near the mirrors noticeably move away from the ice;
- 7-8 minutes - the heating has melted the ice from the main part of all the windows, you can drive.
The operating principle of the heated windshield Lada Vesta
After starting the engine, while it is idling, press the heater activation button once. The indicator begins to flash to confirm that the system is active.
The left and right halves of the windshield are heated alternately at intervals of 30 seconds. The duration of the entire cycle depends on a number of factors:
- temperature outside;
- machine downtime;
- technical condition of the unit;
- degree of clogging of deflectors and air ducts.
Control unit for ventilation and heating system with air conditioning (manual control)
- After turning on the air conditioner (separate button No. 18), the indicator lights up. Cooled air enters the car, and the humidity drops sharply.
- To cool the incoming air, press button No. 18.
- The minimum air temperature depends on the degree of air outside, the angle of solar radiation, fan speed, active recirculation mode and driving speed.
- The air supply mode is adjusted by pressing buttons numbered 11 – 16, the indicator light lights up.
Be sure to start the vehicle engine before activating the air conditioning system. Do not turn on the cooler when the outside air temperature is below 5 °C from approx.
- Do not direct the air flow towards the body, limbs of the driver or passengers.
- Before starting the air conditioning system (hereinafter - AC), make sure that at least one or more deflectors on the dashboard are in the open position. Otherwise, the air ducts will freeze and the SC will fail.
- It is strictly forbidden to direct a flow of cold air onto the windshield or side windows. This will lead to freezing and dulling.
- While the air conditioner is operating, moisture and condensation will accumulate under the bottom of the car on the asphalt. Don't worry, this is a natural process.
Active air conditioning consumes 5-7% of the power from the power unit and also increases fuel consumption by 3-5%. The indicator values are averaged; the higher the speed, the higher the consumption. When driving in mountainous areas, the SK coils can turn off automatically, as the load on the engine increases several times.
Fuse box in the passenger compartment of VAZ-2170, -2171, -2172
The fuse box in Priora is located at the bottom of the dashboard, on the left side of the steering wheel. To get to it, you need to open the cover, which is held on by three latches. Rotate each locking knob 90 degrees and pull the lid down and it will snap open.
Fuses in the interior mounting block
F1 (25 A) - radiator cooling fan. If your fan does not work, check its motor by applying 12 V directly to it from the battery. If the engine is working properly, then most likely the problem is in the wiring or connectors. Check the serviceability of relay K1.
The fan in the Priora usually turns on at a temperature of 105-110 degrees. Do not allow the engine to overheat, watch the arrow of the temperature sensor.
If the fan runs constantly and does not turn off, check the coolant temperature sensor located on the thermostat. If you remove the connector from the working sensor, the fan should turn on. Check the wiring to this temperature sensor, as well as the contacts of relay K1, move this relay, clean the contacts. If this is the case, replace it with a new relay.
F3 (10 A) - high beam, right headlight. F4 (10 A) - high beam, left headlight. If the headlights do not shine on high beam, check the K7 relay and the headlight bulbs. The steering column switch, wiring or connectors may also be faulty.
F5 (10 A) - sound signal.
If the signal does not work when you press the steering wheel button, check relay K8. The signal itself is located under the radiator grille; you can get to it by removing the plastic casing from above. Check it by connecting the voltage to 12 V. If it doesn’t work, try turning the adjusting screw, or replace it with a new one.
F6 (7.5 A) - low beam, left headlight. F7 (7.5 A) - low beam, right headlight. When replacing lamps, be careful; there are separate lamps for the low and high beams, so they can be easily confused. It is better not to install lamps in high-power headlights; the reflectors may melt and the desired effect will not be achieved. Most low beam headlight problems that cannot be corrected by conventional means can be related to the light control module (LCM). The low beam relay is only available in cars equipped with a light sensor, it is located in the place of relay K1; on most cars this relay is not in the mounting block; the low beam circuit goes through the MUS block. It happens that the tracks in the block burn out; if there are problems, it is better to replace it with a new one. If the windshield wipers turn on spontaneously when the low beam is not working correctly, the problem is most likely in the windshield wiper control unit, located in the center of the dashboard, the topmost block, next to the radio, is best reached from the glove compartment, or by hand through the removed console covers at the feet.
F8 (10 A) - alarm signal. If the alarm does not work, also check relay K9.
Necessary tool
To ensure that the replacement of the VAZ 2110 windshield goes smoothly, you should get a gluing kit. When purchased through an online store, the TEROSON PU kit will cost about 1,150 rubles, but will quickly recoup the costs. Its composition:
- instructions for use.
- applicator;
- cloth for cleaning surfaces;
- 8596 sealing adhesive;
- cartridge nozzle;
- primer;
- cutting wire;
In addition, you need to have other devices on hand:
- new consumable.
- several office knives;
- solvent for nitro paint;
- a set of flat screwdrivers and spatulas;
With an assistant, changing parts is easier and faster.
Price is not a guarantee of quality! But you shouldn’t take the cheapest materials either - fakes are not uncommon.
Advice from professionals
- For information on how to properly and effectively repair a windshield, read our article “A crack in the windshield, how to fix a crack with your own hands.”
- Never attempt to replace or install heated glass unless you have sufficient experience and knowledge.
- As an alternative to a heated windshield, there is a portable heated windshield that operates directly from the cigarette lighter, and a special washer fluid reservoir heater.
- A heated windshield allows you to cope well with the problem of icing, without the need to stir the windshield with all kinds of brushes and scrapers. Which often cause many small scratches.
- Despite all the advantages of heating the windshield. Heat often causes cracks in the windshield.
Self-installation
Autonomous installation of a heated windshield will require knowledge not only of electrical circuits, but also of installing the panel.
To integrate the option you will need:
- We remove the old windshield.
- Purchase and install a new one with heating threads.
- Connect the heater terminals to the power source.
- Install the relay and rear window heating button.
It is important to understand that not all models offer this feature. Therefore, installation is possible only if the system is provided for by the project and is installed in advanced configurations
To install the rear window, you will need to follow the same steps as for the front window.
Heated injectors and wipers also require intervention in the car's wiring and the insertion of an additional button.
- connect complete blocks, relays and connectors.
- We carry out the wiring according to the diagram from the set of heated brushes;
- install the key into the console;
- remove old cleaning products;
Installation of injector wiring is no different from installation of heated brushes
it is important to select in advance a suitable part with a reliable fastening to the hood cover
Flaws
Let us dwell on the negative aspects of the heating function:
- expensive replacement in case of breakdown. The slightest impact on the glass, for example, a pebble from under a wheel, leads to the appearance of cracks and huge cracks. Repairs can cost up to 100,000 rubles depending on the make of the car.
- temperature changes can lead to destruction of the glass surface (especially if the ambient temperature is -30 degrees). But it is worth saying that special relays are now used to solve this problem;
- the presence of thin threads forming a mesh interferes with the operation of radar detectors and other gadgets;
- high price for installing such an option (especially on German cars);
Stove malfunctions
Lada Vesta is a warm car. The car should be warm and comfortable. If this is not the case, it means that one of the heater elements has broken down. What problems you may encounter:
- The temperature of the supplied air does not correspond to the declared one (the system does not have enough antifreeze, the radiator of the Lada Vesta stove is clogged, an air lock has formed in the pipes, etc.);
- Vibration of the stove or extraneous noise (most likely this is an electrically driven ventilation device);
- Weak or excessive air flow (dampers are not working properly);
- The heater does not work at all (there may be problems with the electronic control system, serious damage to the heater body, etc.).