Layout of injectors and hose routing
| EXECUTION ORDER |
|
|
- Make sure air flows only in the direction away from the hose. Otherwise, replace the injector.
- Installation is performed in the reverse order of removal. Finally, adjust the nozzles (see Section Adjusting glass washers).
Installation of fan nozzles
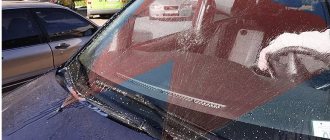
We got around to installing fan-type nozzles for the windshield instead of the classic jet nozzles standardly installed at the factory.
We can talk about the pros and cons of both types of nozzles for a long time. Well, I don’t like the supply of washer fluid to the windshield with a jet nozzle only to actually one place on the glass. Whether it’s spraying small drops over almost a large area of glass with a fan nozzle. Accordingly, the removal of various road dirt with brushes is done more efficiently and not on conditionally dry glass. True, washer fluid consumption increases. In short - as many drivers as there are, so many opinions on choosing the type of injectors. Wandering around the shops in the spring, I noticed these: At the top is a nozzle for the rear window, which I took along with the nozzles for the windshield, fortunately the price for everyone is 40 rubles apiece. I would like it to be more decent, but in our city the choice is small. There was no catalog number for the windshield for the injectors, only the name “Drop”. I suspect that they are VAZ ones. At the same time, I bought 20 buttons (hood insulation) 1118/1119-5007722, just in case, for 3 rubles.
I'm starting to install fan nozzles for the windshield. To make it easier to install them, I removed all the insulation buttons (removing the original factory ones is a pleasure - soft and elastic). But I still dropped 3 pieces for protection. I could only get one. And what the hell with the other two of them – they’ll fall under the car along the way. Well, so that the insulation does not interfere, I prop it up with a fishing rod stopper.
The original jets are attached to the hood using antennae.
After removal, I was convinced that no “saffron milk caps” had appeared under them in 4 years.
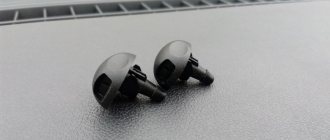
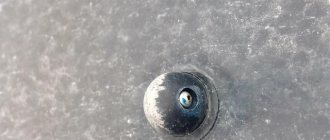
The purchased fan nozzles are secured with a nut. They fit into the standard technological hole without any problems, gaps or modifications, but I still treated the contact area of the injectors with the hood a little with transparent sealant.
On the left side the nozzle was screwed on with a nut quite tightly. On the right, either the plastic nut was loose, or he was overzealous. I solved the problem by replacing the nut from the injector to the rear window. They approached each other like family.
I put on the tubes from the washer and secured them to “everyone” with additional clamps. That's it - the injectors are in their new place.
I secured the hood insulation in place. 2 buttons purchased to replace the lost ones turned out to be of dubious quality, i.e. somewhat harsh. I think when removed again they will not survive the stress and will break.
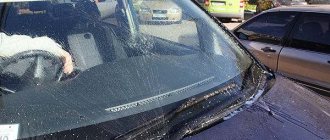
All that remains is to properly adjust the position of the water supply by the nozzles - even though I didn’t expect them, they are also adjustable in different planes. I pre-adjusted the driver's side a little higher, so at speed it started to throw up to the very top of the glass and roof. I had to lower it a little. On the passenger side on the starboard side you will have to tinker a little with the adjustment - there was not enough time to get it right. The photo quality is poor - you can’t really see how the injectors work. And it was not convenient to take pictures with one.
In general, I am very pleased with the quality of the fan injectors, especially since they can be adjusted efficiently at any time.
Volvo fan injectors and Toyota check valves for Lada Kalina hatchback
I decided to purchase and install fan washer nozzles from Volvo and check valves from Toyota.
On the drive, a lot has been written about this combination, but I still want to share, the impressions are only pleasant.
The original single-jet injectors were thrown out almost immediately, I replaced them with double-jet ones from the Chevrolet Niva. An excellent option, by the way, they worked well, but I wanted more, anyway, even 4 jets on the glass do not allow you to wash it completely, so the only option left is fan nozzles. Drive helped with the choice.
The following was ordered through the Exist online store:
Volvo 30655605 Washer nozzle 2 pcs. — 556.24 rub.
Toyota 85321-26020 Washer valve 2 pcs. — 100.92 rub.
You can easily find and order using the codes. The order itself was delivered 2 days after prepayment:
Volvo fan injectors and Toyota check valves
Volvo injectors are made with high quality, the price is of course high, but the result is worth it)
Volvo fan injectors
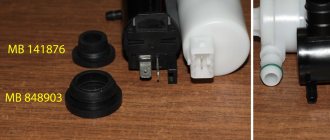
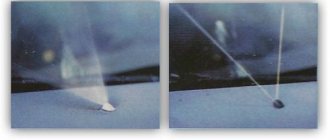
The check valve allows liquid to flow only in one direction, thereby water does not flow out of the tube and when you press the lever, the washer flows immediately and the wipers do not drive on dry glass, and if you are going to install fan nozzles, then I think it makes sense to buy check valves right away.
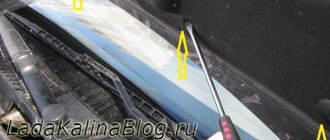
The arrow indicates the direction of fluid flow
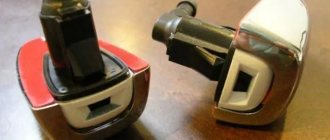
But if everything were so simple, then it would not be interesting) The fact is that the Volvo injectors are slightly larger than the standard ones and without modification they simply will not fit into the standard place (well, if the holes in the hood are not widened). Here's a comparison with the stock one:
injectors from Kalina and from Volvo
To solve this problem, you need an 8mm thread cutting die. and a stationery knife. We cut off the excess with a knife and cut the thread:
8mm thread cutting die.
It turns out something like this:
Tightened with regular nuts:
But this is not the only problem, because... The hood of the Volvo is apparently slightly different from the hood of the Viburnum, then with a normal installation the injectors will shoot a little higher, you need to raise the back of the injector. To do this, I cut out supports for the injectors from an old rubber mat:
When adjusting the jet height, the elastic band will need to be trimmed.
And then everything is simple, remove the hood noise, snapping off half of the piston, try on the injectors, leave the back part of the rubber to adjust the height, and cut off the front part so that it looks like in the photo:
The height of the jet can be adjusted with an elastic band
We install check valves in front of each nozzle, observing the direction of fluid flow:
arrow to injector
We check everything, install it, tighten the nuts, on the back it looks like this:
As a result, we get liquid sprayed over the entire area of the glass; the liquid hits the glass before the wipers begin to move due to the check valves.
FakeHeader
Comments 19
I liked the wall hover, it really needs some work, it’s in the BZ, it’s very well watered, and the quality is up to par. First I really took it off, then I put it back on))
They stood like that, the brain is constantly floating... then half of the jet hits one side...(((I installed it from a Chevrolet Niva, the price of 95 rubles is much better... but look, time will tell...
Shnivovsky installed these ones. Everything is fine except fluid consumption. Compared to the standard ones - heaven and earth. VAZ-2123 windshield washer jet, GM pcs General Motors General Motors 00001-7504676-00-0
I put these on for 15 minutes and took off, g..., complete.
I tried to install the Chinese ones, to be honest, I didn’t like them, I installed the VAZ ones, it’s just brutal) such a mist of water falls on the glass, my wife saw it for the first time, and asked in surprise, “Is it raining or something?” I don’t like it, but I don’t remove it because they are still better than a regular stream )
I saw in the drive that they install from Volvo, but I couldn’t find them in the store.
Another thing)) They splash in different ways. Complete crap. Better get a new Chevy Niva (they are adjustable)
Do you have an article? I want to transfer them to the frill
There is no article. Look on the drive. They wrote a lot here
I’ve had fan-shaped ones for 4 years now, only a little different, there’s a calibrated hole - a vertical slot, not adjustable, they spray like crazy, I got them at a local parts store. The price is the same, 25 per piece, their only two advantages are that they do not clog and irrigate the windshield evenly. Good luck on the roads!) All the best!
The standard windshield washer jets (nozzles) for Lada models are jet. If you are not satisfied with the efficiency of their work, we suggest replacing them with fan ones. There are many varieties of such jets, but which ones are better to choose? Let's look at one of the simplest washer modifications.
Windshield washer nozzles fan spray (2 pcs) universal Typhoon
- 90 rub. /Set
- Description
- Reviews (6)
- Question answer
Windshield washer nozzles (nozzles) for all VAZ models (except 2110,2111, 2112) and foreign cars. Set of 2 pieces.
We recommend watching
A check valve for the windshield washer system, installed in front of the tee in the cut of the hose..
The glass washer return valve from a Hyundai car is installed in the car's glass washer system..
Original tailgate glass washer jet (nozzle) for Lada Kalina cars (hatchback, univ..
New items
Front caliper repair kit for Lada Vesta (except Vesta Sport) and Lada Largus. The repair kit is designed for 1 caliper. ..
Front caliper repair kit with piston for Lada Vesta (except Vesta Sport) and Lada Largus. The set is for 1 soup..
An effective product for quickly and carefully removing frost from car windows, headlights and mirrors. Doesn't leave streaks or marks..
Alternator belt (drive of auxiliary units) 6PK1039 for Lada Vesta (VAZ 21129 and 21179 engines with air conditioning), Lada I..
Set of 2 frameless wiper blades for Lada Xray. Includes brush XF350 length 350mm and brush XF650 length...
Fan windshield washer nozzles
Windshield washer jets installed at the factory do not always clean the surface properly. They clog quickly, and the performance itself leaves much to be desired. The best option is fan windshield washer nozzles.
Fan windshield washer nozzles
What are their features? How to choose these components for a car? What installation features are worth knowing about? Let's look at these points in more detail.
Part Features
As the name implies, these windshield washers do not supply liquid in a stream, but by spraying it in small drops onto a wide area of glass, in a “fan”. Accordingly, the entire windshield gets wet evenly and the wipers glide over the wet surface without scratching it or making noise. Fan nozzles differ from conventional nozzles by the presence of a narrow horizontal slot instead of holes.
Driving safety depends on the cleanliness of the windshield.
Advantages and disadvantages
The advantages of such a system are extending the service life of the wiper blades and the glass itself, as well as saving fluid. Disadvantages include a greater tendency to freeze and a short-term complete loss of visibility at the time of spraying.
Pros and cons of fan windshield washer nozzles
Before purchasing and installing fan nozzles, it is important to study their features, positive and negative qualities.
The advantages of the right injectors include:
1. Effective removal of contaminants from the glass surface. Thanks to high-quality spraying, it is easier for wipers to deal with dirt, dust and even dried insects.
2. Complete processing of the windshield, thereby reducing the risk of scratches. When jet jets are used, the wipers travel a certain distance across dry glass.
3. Reduced washer fluid consumption. When operating a car in the cold season, you have to buy “anti-freeze” - a special liquid that can withstand low temperatures. Fan nozzles allow you to reduce the consumption of expensive composition and save money in your wallet.
4. The first sweep of the wipers moves over a wet surface. As a result, contaminants are better removed and not smeared on the glass, as is usually the case.
Disadvantages of fan nozzles:
1. After the liquid is supplied through the nozzles, the glass is covered with many small drops. In this case, visibility deteriorates until the windshield wipers complete the first cycle. This feature, as a rule, irritates car owners who prefer jet nozzles. We must not forget that loss of control of the road situation, even for a split second, can lead to an accident.
Windshield jet nozzles
2. Fan-type jets freeze faster in the cold. This is why it is important for car owners living in northern regions to think about heated injectors.
Rules for choosing fan-shaped windshield washer nozzles
The best option is to purchase original jets that are suitable for use on a specific vehicle. A large number of companies produce such products, so choosing a jet for a specific model and brand is not difficult.
If the original part cannot be found, an alternative is available - universal fan nozzles. Their peculiarity lies in the possibility of installation on a whole group of brands and models of vehicles. In extreme cases, minor design modifications may be required.
As an option, purchase jets from Volvo or Ssang Yong manufacturers (catalog numbers - 30655605 and 7845009010). If you choose from two types, parts from the Korean brand boast greater versatility. Their advantages are low cost and the ability to install on a whole group of cars - Mazda, Toyota, Daewoo and others.
Which check valve to choose?
The factory design of the washer often does not include a check valve. The purpose of the mechanism is to protect against the flow of working fluid back into the washer reservoir when the power is removed from the pump. At the same time, the valve guarantees continuous cleaning of the windshield. Structurally, it is an ordinary ball with a spring, which blocks the exit from the nozzle in the absence of pressure.
It is possible to use fan nozzles without installing a valve. But in this case, an alternative solution is required - delaying the movement of the windshield wipers in relation to the fluid supply. It can be organized in two ways - using an electrical circuit or mechanical devices. Thanks to this modification, the washer fluid travels the distance from the container with the liquid to the jets until the moment when the wipers start working.
The following types of valves can be used:
- Check valves for VAZ-2108 or 2109.
- Foreign production (for Volvo or Toyota).
- Ready tee with valve from Mitsubishi.
- Check valve from an aquarium compressor. Advantages: reliability and efficiency.
The device is sold at a pet supply store. Here you can also purchase a piece of silicone tube to create pipes. This product can withstand elevated temperatures and has a long service life (even in comparison with the factory pipes installed on VAZ).
Replacement
To replace the elements yourself, you need to remove the old jets. Open the hood; if there is trim, it must also be removed and disconnect the water supply hoses to the injectors. By lightly pressing it from the inside rear side of the hood, it will come out easily. If difficulty arises, lightly pry the element from the outside. Reinstallation occurs in exactly the same way, only in reverse order.
To install fan nozzles to replace the old, standard ones, you need to buy a new set of fan nozzles. In addition, you will need a check valve, which is in the form of a spring ball, new hoses and a tee. It is definitely worth replacing the injectors with fan injectors if your car has standard ones.
How to install fan nozzles?
Contrary to popular belief, installing windshield fan nozzles is not difficult. The algorithm of actions is as follows:
1. Remove the upholstery (thermal insulation) mounted on the hood (if provided). Be careful not to break the fragile plastic caps. Remove them with a special tool or a pair of screwdrivers.
2. Remove the foam pads that are held in place with double-sided tape (you will need a new piece during installation).
3. Discard covers on plastic elements.
4. Remove the tubes through which fluid is supplied to the factory jets.
5. Remove old devices. They can be held on the frame or hood using plastic fasteners or nuts.
6. Install fan jets (without fastening) and connect pipes to them.
7. Connect the check valves to the pipelines and nozzles, and then fix them.
8. Make sure that the device operates normally and a stream of spray droplets falls on the windshield. Secure the jets.
Video on installing fan nozzles.
Please note that fan-shaped windshield washer nozzles for VAZ cars or other cars often require adjustment after installation, but they do not have an angle of inclination (it seems that now there are adjustable nozzles, who knows, write in the comments).
If you change the angle of inclination, height or direction, it is worth adjusting the base of the jets by filing, trimming or extending the base. This may require special gaskets made of plastic or rubber. It is important that as a result of adjustment, the liquid covers the glass and does not go beyond its boundaries.
What it is
We have already discussed washer nozzles for car windshields. But this time I would like to dwell in more detail on fan devices.
If you have noticed, recently many modern cars have been equipped with new, useful and simply interesting solutions. Even in the basic configurations of inexpensive cars you can find heated seats, a heated rear window, and a number of other devices and solutions.
Among them, it is worth highlighting the fan nozzles on the windshield wiper. Increasingly, they are being installed on cars by automakers.
A distinctive feature of the fan is the method of water supply. If conventional jet devices deliver 2-3 separate jets through special nozzles, then a continuous front of water droplets is created here. This allows you to cover most of the windshield at once. Outwardly, it looks like an open fan. Hence the corresponding name.
And here many people think whether they should buy a similar solution for Renault Logan or Megan, VAZ 2114, Hyundai Solaris, Renault Duster, Kia Rio or any other car. Not everyone understands whether they will be useful and how the behavior of the windshield washer will change after changing the nozzles.
But let's be honest. Toyota, Nissan, Volvo and many other modern foreign cars already have fans installed from the factory. Therefore, there are objective reasons for this. They are obviously better than regular jet sprayers. But even if you have a Priora, Kalina or Chevrolet Niva, no one will forbid you to change the injectors. In addition, there will be no need to make other major modifications to the windshield wiper system.
Advantages and disadvantages
Even in Moscow, driving a car with jet injectors is not a shame. Car owners should consider all the advantages and disadvantages of their decision before making it. After all, there is so much controversy surrounding car mini air conditioners.
Automotive innovations do not always justify financial investments in them.
Therefore, I propose to look at the strengths and weaknesses of fan nozzles. This will allow you to finally decide whether it is worth buying and installing them or not.
Removing the viburnum fuel rail
You will need: relieve pressure in the fuel system, prepare two “17” wrenches, a “10” socket, and a “5” hexagon.
- Disconnect the block with wires from the injector wiring harness by pressing the lock.
- Unscrew the ramp tube fitting with a 17mm wrench, holding the hose tip with the same wrench.
- Remove the rubber O-ring from the tip of the ramp tube.
- Remove the air supply hose to the throttle body.
- Unscrew the nut securing the clamping bar using a 10mm socket.
- Remove the clamping bar.
- Remove the fuel supply pipe by pressing the spring clamp on the tip.
- Unscrew the two screws securing the fuel rail to the intake pipe using a 5mm hex.
- Move the fuel rail so that all injectors come out of their seats in the intake pipe.
- Remove the Kalina fuel rail with injector assembly.
Installation of fan washer nozzles – Lada Kalina blog
Everyone knows very well that the factory washer nozzles that are installed on Kalina are far from shining with their efficiency. One jet from each jet is clearly not enough to properly clean the entire windshield. Therefore, many car owners install so-called fan nozzles, which during operation spray water along the entire perimeter of the glass and the wipers work much more efficiently.
You don’t need practically anything from a tool; you just need a flat-head screwdriver to pry up the plastic clips that secure the hood trim, and perhaps pliers to tighten the nuts of the jets themselves.
- The first step is to open the hood and use a screwdriver to remove the clips securing the hood trim in the places where the jets are located. It is not necessary to completely remove the trim; everything can be done by bending the edges.
- After this, we put our hand under the trim, bending it a little, and remove the hose from the washer nozzle, after which we remove the nozzle from the hood.
- We insert a new one, tighten the nut that secures it, in my case I needed a 12mm wrench, and put the hose back on.
- And this is what it looks like after installing these accessories.
These things are very convenient, since the direction of water flow is adjustable in all directions, unlike cheap options. By the way, I forgot to say about the price: I paid 120 rubles for a couple of these pieces. Adjustable with a thin screwdriver, as I already said, in all directions: right, left and up, down.
After setting up the sprinklers, the effect is simply amazing. Can't compare with factory sprinklers, which were no good at all. Now, when the washer is turned on, the entire glass is completely covered with water and is cleaned instantly over the entire area of the wipers. I think that in the video attached above, the difference between the standard and new fans is noticeable.
Adjustment
After installing the injectors, they may need to be adjusted and tuned.
Attention! DO NOT insert hard objects into the fan nozzles or try to move the nozzle - the device will be damaged.
They are adjusted in a vertical plane by sliding double adhesive tape or electrical tape under the nozzle seal with a plastic knife or spatula. By inserting the lining in the front, we direct the stream lower, and in the back - higher. It should be remembered that at speed the fan of drops from the nozzles tends to fall lower, so we direct the liquid approximately to the middle of the glass .