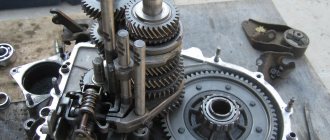
The VAZ 2109 and VAZ 2108 cars use the same shock absorbers. On newer models (2110, 2115, etc.) the suspension is similar and all elements are interchangeable. SAAZ shock absorber struts were installed at the manufacturer - oil double-pipe.
The quality of original elements depends on the year of manufacture of the car. The newer the car, the worse the shock absorbers. Owners of front-wheel drive Ladas are faced with replacing shock absorbers on average once every 3-5 years. This is exactly the resource at the racks.
Failures of these elements are almost always visible or audible - smudges appear, knocking noises when moving over bumps. This is fraught with the fact that the entire body becomes uncontrollable - when driving on an uneven road, the car begins to jump. Shock absorbers do not stop these vibrations, although ideally they should dampen them.
Note! The struts will have to be removed when carrying out suspension repairs - replacing cushions, silent blocks, protective casing, rod stroke limiter, etc.
Shock absorbers VAZ-2109 and analogues
The shock absorbers installed on the front wheels are divided into left and right - they are not interchangeable.
Not all motorists know that the front struts of the VAZ-2109 can be repaired. And its cost is lower than buying new shock absorbers. Any shock absorber can be disassembled, all rubber elements replaced and fresh oil added. Original spare parts produced by SAAZ are soft. Car enthusiasts prefer stiffer struts so that the car can handle corners with confidence.
Front shock absorber struts VAZ-2109, article numbers:
- Left – 21080290540303.
- Right – 21080290540203.
Both have a stem with a diameter of 22 mm, a body of 51 mm in circumference and a height of 360 mm. If you do not need to change elements, but repair them, then it is enough to purchase cartridge inserts. Spare part numbers – 21082905002 (for the left rack) and 21082905003 (for the right).
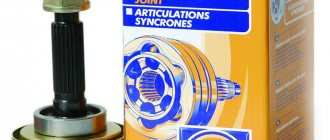
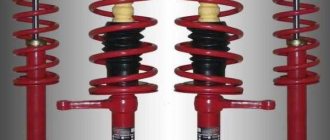
Due to the excessive softness and low quality of original spare parts, motorists prefer analogues. In this case, they are no worse, and even better, than the originals. List of analogues:
- SS20 – article number SS20102. Sold as a set.
- Hola 4.1 – article S426 (right), S425 (left).
- Fenox 3.5 – article number A61547C1 (right), A61546C1 (left).
The original earbuds can be replaced with better ones. After repairs, the racks must be pumped. We will tell you further how to pump up the struts on a VAZ-2109 with your own hands. The earbuds are not divided into left and right, they are the same:
- KYB 4.0 – article number 665059.
- Bilstein 3.7 – article number 21-030550.
IMPORTANT! The rear suspension has identical struts; there is no separation between left and right. They have the same article number.
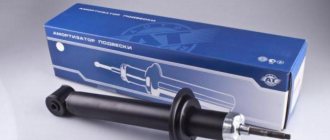
Unlike the front ones, the rear shock absorbers cannot be disassembled. Original elements produced by SAAZ (article 21082915004) are characterized by excessive softness, driving over bumps is not very comfortable.
Dimensions:
- Rod diameter 14 mm.
- Case diameter – 45 mm.
- Case height – 367 mm.
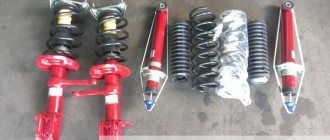
When replacing rear shock absorbers on a VAZ-2109, you need to answer the main question - which ones to install? There are several analogues that work better than their counterparts:
- SS20 – article number SS20122. Sold as a set of two shock absorbers.
- KYB 4.0 – article number 441824.
- Hola 4.1 – article number S422.
Based on the experience of drivers, the manufacturer Fenox produces the highest quality A-pillars. But Kayaba - rear struts of VAZ-2108 and 2109. Their cost is high, not everyone is ready to pay several thousand for one shock absorber. So if you're looking for good value for money, Hola is worth a look.
There are oil and gas shock absorbers, their operating principles are different. Motorists give preference to oil ones, since gas ones are too hard.
Mid-price racks SS20 (produced in the Russian Federation) are able to satisfy the needs of car owners. When driving at speeds of more than 50 km/h on uneven roads, they provide good stability.
Note! Shock absorbers are replaced depending on the mileage and their condition. The original racks can withstand a maximum of 50 thousand km.
Although the manufacturer of shock absorbers for the VAZ-2109 provides a guarantee of 30 thousand km. But the resource is influenced by many factors - from weather conditions to driving style. On old nines, produced back in Soviet times, the original struts worked perfectly even after 100 thousand km. But this is rather an exception to the rule. Replacing struts on VAZ 2108 and 2109 cars is done much more often.
General information about car struts
Replacing struts on a VAZ 2109 yourself
From a practical point of view, the VAZ rack performs the function of a mechanical stabilizer, being a kind of rational connecting link between the body and the track. Many motorists often confuse a car strut with a shock absorber. In this regard, the most logical solution would be to consider the functions and structure of the shock absorber and strut.
VAZ 2109 do-it-yourself replacement of front struts
Main functions of the rack
- ensuring stabilization of the car body during movement;
- accumulation of kinetic energy during vehicle movement;
- ensuring the correct orientation of the vases body in space;
- ensure not only the comfort of the vehicle, but also its safety.
Causes of shock absorber failure
If the struts unexpectedly fail, this indicates that its main elements - the oil seal and the valve system - have collapsed. The main reasons for the failure of any shock absorber:
- Accumulation of dirt and dust.
- Presence of corrosion.
- Damage to the protective boot.
- The presence of burrs and scratches on the rod.
- Breakdowns, leakage.
- Deformation.
You can also add the initially low quality of the shock absorber. If it is operated under harsh conditions - large temperature changes, driving on bad roads, traffic jams - this will lead to premature failure of the structure.
Therefore, when replacing the front struts of a VAZ-2109, you need to carefully select spare parts and check them for any, even the smallest, defects.
The lower shock absorber is mounted using two bolts to the wheel hub. And from above it is attached to the body by means of a support bearing. The entire load falls on this element, so they need to be changed more often than the shock absorbers themselves.
Before replacing struts, make sure the support bearings are in good condition. They can become deformed, and the rubber part often crumbles.
Sometimes the reason for the knocking lies in the weakening of the fastening. Monitoring the condition of suspension elements is the best way to delay expensive repairs. Carry out a thorough inspection and look for:
- Body swaying and poor vehicle controllability. The shock absorber rod moves without resistance - either the oil has completely leaked out or the liner is destroyed.
- Low stability when cornering and skidding.
- Excessive sagging during braking and acceleration.
- Excessive sensitivity when hitting potholes and holes.
- Shaking and increased vibration.
- Uneven and severe tire wear.
If one shock absorber malfunctions, you will have to replace two (on the same axis). It is imperative to install new support bearings - in this case, it will be possible to achieve high reliability of the suspension and increase the service life of the new shock absorbers. You will also feel that the car will become safer and more comfortable.
Repair or change?
Some motorists are faced with a completely reasonable question: shouldn’t they try to restore the old struts themselves, since the cost of new ones is quite high? The cheapest ones of unknown production and quality will cost no less than 1,500 rubles apiece. If you decide to repair them yourself, it will be at least three times cheaper. But there are several pitfalls:
- If the life of the old racks is already decent, then there may be strong wear on the rod, due to which it is sometimes impossible to achieve perfect sealing.
- It is unlikely that you will be able to fill the shock absorber with as much oil as is necessary for proper operation. If you make a mistake of a couple of grams on the smaller side, the shock absorber will not work. If you pour more than normal, the seals will break.
And the quality of the elements in repair kits often leaves much to be desired. Therefore, replacing the rack assemblies will be much more effective. Their resource will be much higher than that of restored ones.
How to check a shock absorber
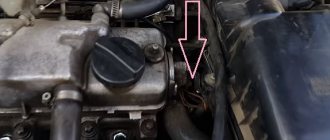
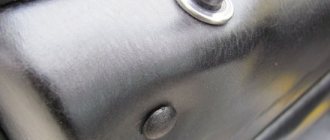
Before checking the operation of shock absorbers, you need to assess their condition visually.
Important! The presence of oil stains, even covered with a layer of dust, indicates that the inside of the case is empty. The stand will no longer work correctly.
Also pay attention to the presence of mechanical damage, the condition of the spring and other suspension elements. It is best to carry out diagnostics after a long trip, so that the oil in the struts (if it is still there) warms up.
There is no need to remove the stands. Sequencing:
- Place the car on a level surface.
- Vigorously swing one corner up and down, applying force to the top of the wing.
- Release and observe the behavior of the body. If the shock absorber is working properly, the car will swing up and down 1-2 more times, after which the body will stop. If three vibrations occur, this indicates that the rack is in good condition, but still it is not in very ideal condition and will have to be replaced soon.
All other shock absorbers are checked in the same way. Pay attention to the presence of dips, jamming, and extraneous sounds when swinging.
You can diagnose the removed shock absorber. To do this, you will need to fully stretch and compress it several times. If it is working properly, then it will pump without failures, smoothly. There should be no noise or looping. When stretching, you need to apply more force than when compressing - this indicates normal operation of the rack.
Shock absorber replacement procedure
Replacement of the rear struts on the VAZ-2109 is done less frequently than the front struts. They have a higher resource due to the fact that they are less loaded. Most of the car's weight falls on the front axle. The struts will have to be removed when replacing suspension silent blocks, shock absorber pads, protective casing, buffers, gaskets, as well as when dismantling the rear beam.
Tools and accessories
To carry out the work you will need the following tools:
- Key set to “8” (required open-end).
- Curved socket wrench "17". Instead, you can use a special wrench designed for unscrewing the rear shock absorber mounts.
- Socket wrenches “19” – 2 pcs.
- A device for compressing springs.
It is recommended to carry out work on an overpass or pit with an assistant. But if you don’t have such amenities, it’s okay. Spend a little more time, but there will be no problems during repairs.
Removing the shock absorber strut
If even one rack has become unusable, it is necessary to replace the second one on the axis. The same applies to suspension springs. Sequence of work:
- Hang the wheel and remove it. You can lift the entire rear part of the car at once, or you can replace the left shock absorber first, then the right one (or vice versa).
- It is recommended to pre-treat the bolts that secure the racks from below with a penetrating lubricant such as WD-40.
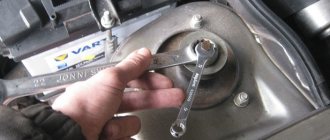
- Unscrew the nut on the rod. To do this, remove the rubber plug in the trunk and unscrew the nut using a “17” wrench. The rod may begin to rotate, so it needs to be held at “8” with an open-end wrench. If you are absolutely sure that you will throw out the shock absorber, then the rod can be held from below the car with an adjustable wrench. But for this you will have to call an assistant.
- Next, the nut needs to be removed; under it there is an engraving and support washer, a rubber cushion.
- Using a 19mm wrench, you need to unscrew the bolt that secures the stand to the beam. It will turn, so hold the nut on the other side with the same wrench. If penetrating lubricant does not help and the nut does not want to be unscrewed from the bolt, you will have to resort to using a gas torch or grinder.
Be careful - there is a gas tank nearby, so open fire is very dangerous. - After unscrewing the bolt on the lower mount, you can carefully remove the shock absorber. The rear shock absorber of the VAZ-2109 on the second side is removed in the same way.
Disassembling the rack
You cannot repair the rear struts of a VAZ-2109 with your own hands. They are not removable, unlike the front ones. Therefore, they will only have to be changed. Before this, you need to remove the spring - it will be placed on a new rack. All other elements are best used new. This applies to bumpers, boots, nuts and bolts. This is the only way you can ensure high quality repairs.
Installing a New Rack
The sequence of work to install a new rack on the nine:
- The top gasket must be secured to the spring using electrical tape. To accurately and reliably install the shock absorber, you need to put the spring in its place on the strut. If desired, the spring can be compressed using a special tool.
- The rod now needs to be pulled out all the way and a spacer sleeve and lower cushion must be put on it.
- Insert the rod into the bowl on the body. If there is no assistant nearby, you will have to fix the lower part of the shock absorber to the beam.
After this, you need to install a stop under the beam and slowly lower the body, controlling the accuracy of the rod hitting the cup on the body. From the top of the trunk you need to put on a cushion, support and engraving washers, and then tighten the nut. It is better to use a new one with a plastic thread locker.
The replacement is carried out similarly on the second side.
Do not rush to tighten all the fasteners; first install the wheels and remove the car from the jack. Afterwards, you need to press the rear of the car several times so that all the suspension elements take their place. Only after this can you tighten all the nuts and bolts of the fastenings.
We will need:
- Puller;
- Devices for compressing rack springs;
- Key for unscrewing the rod;
- Socket wrenches 24, 22, 19, 17 and 13;
- Pliers;
- Chisel;
- Hammer;
- Wheelbrace for further wheel removal;
- Workbench with a vice (optional)
- Jack
We begin replacing the front struts in the case of non-collapsible struts:
Non-collapsible stand
- Put the car on the handbrake and place wheel chocks under the rear wheels.
- Next, loosen the wheel bolts and jack up the car. Next, place supports under the bottom of the car (you can use wheels, put a board on them).
- Remove the wheel from the side of the rack being removed. Turn the steering wheel in the opposite direction until it stops.
- We take out the cotter pin and use a 19mm spanner to unscrew the nut securing the steering tip pin.
- Use a puller to press the finger out of the lever.
- If there is no puller, unscrew the nut not completely, insert the mounting blade into the spacer between the steering rod and the strut arm and hit the end of the strut arm with a hammer.
- Carefully remove the front brake hose from the strut holder. (the hose must not bend)
- Open the hood.
- Release the strut support bearing from the plastic plug.
- Loosen the shock absorber rod nut using a special wrench.
- Next, before unscrewing the “camber” bolt securing the strut to the steering knuckle, you need to mark its location.
- Using the “19” socket, unscrew the nut of the “breakup” bolt, holding the bolt from turning with a similar wrench. If you haven't done an alignment for a long time, this bolt may become so stuck that it will be difficult to move it. In this case, you can heat and pour all sorts of means. But it’s better to start preparing it for unscrewing in advance. A few days before repair, clean the bolt from dirt. And pour WD-40 on it at night, every evening - this may help you unscrew this bolt.
- Next, unscrew the lower mounting bolt.
- Next, use a 13mm spanner to loosen the three nuts between the car body and the A-pillar.
- We remove the rack.
- We install two spring ties diametrically opposite each other so that they capture five turns of the spring.
- After the spring pressure on the support cups weakens, unscrew the rod nut. Remove the upper support, the upper support cup, the spring with ties, the compression stroke buffer and the protective cover from the rack.
- We assemble in reverse order.