Cars admin26.02.2020
Tell me, the trunk lid does not close tightly! The gaps are so big that your finger can fit through! I didn’t notice it before! Maybe the subwoofer is bent? They say the trunk lid is somehow adjustable! How? The lock may need to be tightened! Don't know…
Comments 11
I have a Priora sedan from new, the trunk doesn’t close well, I have to slam it shut, if I’m sitting in the car and someone closes the trunk from the street, then the impact can make you go crazy, please help? Can this lower hinge be adjusted to what the lock clings to or something?
Do not touch the lock mate, remove the plastic trim on the trunk lid and there are 3 bolts there. First, mark the position of the lock with a marker before starting the adjustment, so that you can return everything to the way it was. Screw the rubber stops on the sides all the way and then adjust with the lock. But first, determine whether you need it. If the trunk is knocking or there is a lid lift with the rubber stops screwed in. Good luck!
One of the common malfunctions on a Priora with a hatchback body is a knocking or creaking of the trunk lid. This causes severe discomfort, especially when driving on a bad road. To fix the problem, it is necessary to adjust the trunk lock of the Priora hatchback or replace it. This can be done at specialized service stations or independently. The operations do not take much time and do not require special tools or special plumbing skills.
Causes of trunk lid knocking
If, when driving over bumps, a clanging, knocking or other knocking sound is heard from the trunk lid, the reasons may be as follows:
- The trunk seal rubber is worn;
- the rubber bands (rubber stops) into which the lid rests are worn out or not adjusted;
- the trunk lid hinges are loose;
- The trunk lock is poorly adjusted or broken.
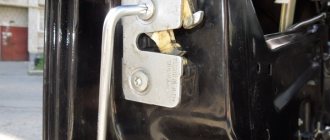
The condition of the seal located under the trunk lid and the rubber stops can be checked visually. Lyada hinges are quite reliable and can last a long time. The main cause of the noise is a misaligned or broken trunk lock, which does not hold the trunk tightly enough.
If the trunk is difficult to close or open, the cause is also a misaligned or broken lock.
If the trunk lock of a Priora hatchback is being replaced, then after installing the lock it must be adjusted. Therefore, first we will tell you how to change the lock on a Priora.
What tools will you need?
To replace or adjust the trunk lock, you will need:
- open-end wrench 10;
- open-end wrench 13;
- socket wrench 10;
- socket wrench 13;
- flat screwdriver;
- crosshead screwdriver;
- pliers.
After installation (before adjustment), the lock must be lubricated, so you also need to stock up on machine oil.
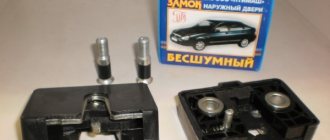
Installation of new silent locks is the only high-quality and democratic solution
Where can I get Priora silent locks? Locks of this kind are easy to purchase, both on the Internet and in any auto market. If we are talking about original locks, as evidenced by the code on the product packaging sticker, then their installation is the most optimal, and their use is durable.
Buy silent locks on Priora, namely “Silent locks Ptimash 4 pcs. with anthers,” can be purchased at a very reasonable price - 750 rubles. Certificate of conformity of goods: No. POCC KG.AYA52.V07363.
This set consists of left and right locks, anthers and silent fingers in the amount of 4 pieces. The kit is suitable for installation on VAZ 21170, 2171, 2172. Using the car after installing these locks will become much more enjoyable.
Replacing the trunk lock of a Priora hatchback
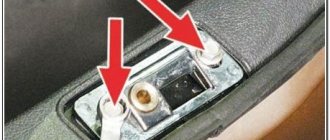
The Priora trunk lock is electrically driven, so before removing the lock, you must remove the ground terminal from the battery. If this is not done, a short circuit may occur during operation.
Removal, installation and adjustment of the ignition switch can be done even on the street. But it is better to do this in a garage, so that weather conditions do not interfere and dust does not get into the lock mechanism.
The procedure for removing the trunk lock is as follows:
- Using a flat screwdriver, carefully, so as not to damage the surface of the trunk lock lining and the plastic of the fastening pistons, remove the pistons;
- remove the trim covering the trunk lock;
- disconnect the wire block connected to the trunk locking gear motor;
- Unscrew the two screws securing the gearmotor to the trunk lid panel;
- Uncouple the gear motor rod from the lock lock drive rod;
- remove the gear motor from the vehicle;
- remove the rod from the trunk lock;
- Using a flat screwdriver, pry and remove the rod going to the trunk lock switch, uncoupling it from the drive;
- Using the same screwdriver, uncouple the rod from the trunk lock switch;
- remove the lock switch bracket by moving it to the left;
- remove the trunk lock switch from the hole in the lid's trim;
- mark the location of the lock on the trunk lid;
- loosen the screw securing the rod;
- Using a 10 mm socket wrench, unscrew the three nuts securing the lock drive to the trunk;
- remove the lock mechanism.
After dismantling, the trunk lock must be inspected for wear and damage, and the functionality of the parts must be checked. Depending on the condition, it can either be lubricated and reinstalled, or replaced with a new one. The moving parts of the new Priora hatchback lock also need to be lubricated before installing the unit on the car.
Installing the trunk lock is done in the reverse order.
Stages of removing the casing
Before removing the trim from the clips, you must remove all bolts, clamps and fasteners that are located in different parts of the door. It is most convenient to do this in a certain order.
From the front door
To remove the door trim on a Lada Priora, you need to get rid of all the fasteners. To do this, follow the following procedure.
Unscrew the button responsible for locking the door and remove it. Unscrew the screw on the inside door handle. Remove the handle by carefully moving it away with a flat-head screwdriver. Find the two screws in the special pocket that secure the power window control module. They can be hidden under a rubber mat. Unscrew both screws and remove the ESP module. Now you need to disconnect the connector with wires from it. Locate the three screws at the bottom of the door that secure the trim to the door. Turn them inside out. This way you got rid of all the screws and fasteners. Now you need to take a flat-head screwdriver and carefully pry off the casing at the bottom. Unsnap all eight clips, which are indicated in the diagram, starting from the bottom of the door
Be careful at this stage: broken fasteners are quite difficult to repair. Carefully remove the trim. If done correctly, you should encounter almost no resistance.
Location of the main screws that prevent the removal of the casing
As a result, your car door will look like this.
after you remove the trim, your door will look like this
To install the trim in place, place it against the door. Make sure the fasteners are in place. Insert and tighten the lock button. Thanks to this, you can pre-fasten the door components. Make sure the handle fits into its hole. Now you can snap all the clips into place and screw the screws back in.
Video: how to properly remove the trim from a Lada Priora car with your own hands
From the back door
The procedure for removing the trim from the rear door of a Lada Priora is not much different from what was given in the instructions for the front door. The exception is when working with window lifters: here they have a slightly different mechanism.
- Unscrew the door lock button and remove it.
- Using the same screwdriver, carefully press out the window lifter handle lock.
- Pull out the handle itself and its lock.
- Remove the screw holding the inner door handle trim.
- Remove the trim using a flathead screwdriver.
- Remove the two screws located in the small pen pocket under the rubber mat, and then remove the pen.
- Starting at the bottom of the door, remove the trim from the clips. The operating principle is the same as for the front door.
The rear door is assembled in the reverse order.
As you can see, the process of dismantling both the front and rear door trim of the Lada Priora is not particularly complicated and does not require many tools. A set of two screwdrivers will be sufficient. To avoid damaging the door, follow the main rule: not only unscrew the screws, but also remove the parts attached by them. All additional elements, such as door handles or window lifters, will greatly interfere with the process of removing the trim. If you strictly follow all the instructions, you can easily disassemble and reassemble the door trim without resorting to the help of specialists from car services.
Adjusting the trunk lock of the Priora hatchback
Adjustment of the installation position and length of the trunk lock mechanism rods must be performed in the following cases:
- the lock does not open electrically, although the gear motor works;
- the lock does not close well or does not close at all;
- The trunk door knocks while driving.
In the first case, it is necessary to adjust the length of the rod. In a couple of others, you need to correctly set the position of the trunk lock on the lid.
Also, if the lock is not working well, it would be a good idea to lubricate its moving parts with oil or grease that does not harden in the cold (which is important in winter).
Adjusting the trunk lock of the Priora hatchback is performed as follows:
- Using a flat screwdriver, carefully, so as not to damage the surface of the trunk lock lining and the plate of the fastening pistons, remove the pistons;
- remove the trim covering the trunk lock mechanism;
- loosen the screw tightening the lock opening rod;
- straighten the end of the rod, if it is bent, with pliers;
- loosen the three nuts securing the lock to the trunk lid;
- move the lock in the desired direction so that it fits well with the latch;
- lubricate the lock mechanism;
- tighten the screw securing the rod;
- tighten the nuts securing the lock on the trunk lid;
- make sure that the lock closes well (if it does not, repeat the adjustment);
- finally tighten the nuts securing the lock to the trunk lid;
- install the cladding in place and secure it with pistons. Another adjustment option is to change the position of the lock latch. If the lock knocks on the latch when closing and the lid closes with considerable force, it is necessary to change its position. To do this you should:
- loosen the bolts holding the clamp;
- move the lock forward or backward, depending on the required position;
- tighten the fastening bolts;
- check whether the trunk lid can be easily buried;
- if necessary, repeat the adjustment of the lock position;
- Finally tighten the bolts holding the clamp.
Another adjustment option is to adjust the length of the rod coming from the electric locking drive to the mechanism. To do this, you need to remove the lock from the car, as described above. The drive rod is screwed to the mechanism, so to change the length it must be turned several turns in one direction or another. After changing the length of the rod, the lock mechanism must be reinstalled and checked whether it opens electrically. If necessary, the rod length adjustment must be repeated.
Reviews
Delivery of goods is carried out throughout Russia and the CIS:
1. Russian Post (from 350 rubles and above)
Delivery to all regions of the Russian Federation and CIS countries
2. Transport Companies (from 350 rubles and above)
Delivery throughout Russia and the Republic of Kazakhstan
- TK Energy (nrg-tk.ru)
- TC Business Lines (dellin.ru)
- TC SDEK (www.cdek.ru)
- TK PEK (pecom.ru)
- TK KIT (tk-kit.ru)
3. Pickup
The order can be picked up at the office at the address Togliatti, Tupolev Blvd. 12a, TD "Voyage" 1st floor.
The waiting time for sending an order in our online store is approximately 2-7 working days, large orders 7-14 working days. days; color of bumpers, mirrors, body parts, spoilers, etc. 7-14 work. days; production of exhaust systems Stinger, STT, Dk-pro 7-14 slaves. days; sewing covers, upholstery, steering wheels, gear knobs, eva mats, etc. 7-14 work. days.
During this period, we will send you a tracking number by email. email to track the parcel en route.
What is the Priora trunk lid?
In a modern car, this element is no longer a flat piece of metal covering the rear compartment of the car. It is fully functional, with a beautiful design, carefully adjusted and even equipped with various electrical equipment. The types of trunk lid depend on the Priora model. There are three options:
These brands differ in body type: sedan, station wagon and hatchback. The most common and popular among Russian consumers is the sedan option. That is, LADA Priora VAZ 2170. Therefore, this model is worth taking a closer look at. What is included in the Priora trunk lid kit, except for the metal base itself:
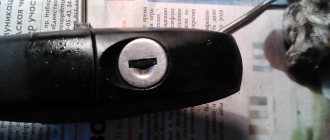
- Priora trunk lock. This is a mechanical device that locks the lid and prevents outside penetration. When not locked, the lock holds the trunk in the “closed” position and prevents it from opening spontaneously. It can be triggered either by directly pressing the button on the lid itself, or remotely from a key in the cabin or the control panel on the ignition key.
- Electric lock activator. This unit is made on the basis of an induction coil. That is, when electric current is supplied to the winding, the metal core is retracted, performing a certain job. In this case, the core pulls the lock lever, which opens.
- Trunk hinges. These are quite complex lever-type devices. It allows you to open the trunk completely without creating a risk of damaging the surface of the body.
- Return mechanism. This is a set of springs that forces the Priora trunk lid to rise on its own when the lock tongue is released.
- Sheathing and fittings. The trim is a decorative plastic panel attached to the lid from the inside. In addition to creating a pleasing sight to the eye, it serves the function of protecting the lock and electric drive units from foreign objects.
The trim is secured with plastic parts, which drivers call puckles. It is advisable to change them each time the casing is removed.
Lada Priora trunk malfunctions
After a well-spent weekend, the happy owner of the Priora finally returns home. Behind are kilometers of kilometers wound on wheels. Wonderful nature and leisure. True, on the way back I was somewhat irritated by a strange noise in the trunk area. But when it started to rain, it became less audible. The trip was a success. Now just take the equipment out of the trunk and into the house. But what is it? Everything that was lying there was very wet! How could this happen? And there’s something wrong with the lid itself. Where is the problem? We need to figure it out.
Priora trunk arrangement
The compartment at the back of the car is called the trunk. in the Priora with a sedan body, it is isolated from the passenger compartment. at the same time, on station wagon and hatchback bodies, the trunk is combined with the interior space.
however, this part, in the mentioned body models, is called not a lid, but a “door”. this is due to the fact that both the station wagon and the hatchback have a glazed window in this “door”. otherwise, all these cars have a similar device. this system includes:
- directly “door” (trunk lid).
- locking device.
- fastening loops.
- reclining springs (shock absorbers for station wagon and hatchback)
- wiring.
- electric lock activator.
- seal.
Malfunctions and their elimination
Most often, the electrical activator of the lock fails, or the wires supplying the signal to it fray. This breakdown can be determined using a control light. Insert the lamp into the activator connector and press the open button. If the light comes on, the electric drive must be replaced. It is secured with two bolts. If not, look for an open circuit.
In second place is the lock mechanism. Here you need to insert a screwdriver into the groove on the open trunk and simulate closing. Then press the open button. If closure does not occur, the lock is replaced. The next step is the loops themselves. Their failure is determined visually, and they require replacement in the same way as return springs if they break or are stretched beyond use. That is, when the spring end is put on the last adjusting bracket, but the cover does not fold back.
Alternative trunk opening for VAZ 2107
Many owners of domestic cars, due to the lack of opportunity to purchase a more expensive vehicle, are trying to make their cars more comfortable. One of the options for improving the functionality of the VAZ 2107 is to control the trunk lock from the passenger compartment. This can be done either using a button or using a cable, which eliminates the need to open the mechanism with a key.
Opening with a button
As the owner of the “Seven”, equipping the car with a device for opening the trunk with a button will not be difficult. The positive aspects of the electric drive include the following:
Installing a trunk lock control button allows you to control the mechanism from inside the car
Some motorists believe that such an option on the VAZ 2107 is useless, but it’s still worth trying and seeing the usefulness of such a device. If you have decided to install an electric trunk drive, then first you will need to prepare the necessary parts:
To install an electric lock on the trunk lid you will need an electric drive, wires, connectors, terminals and a button.
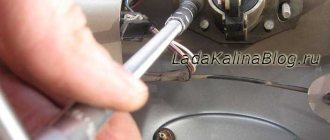
The activator is an electric drive, the operation of which is based on retraction or repulsion, depending on the installation diagram. First you need to remove the lock and install the drive rod. In order to be able to influence the lock tongue, you need to drill a hole in the side of the mechanism and bend the rod itself slightly. Once the rod is secured, the lock can be put in place. To avoid adjusting the mechanism, you should first mark its location with a marker or pencil. Next, you need to secure the electric drive, which will require 2 screws and a plate included with the device. Having fixed the product on the lid, proceed to the connection stage.
To be able to control the trunk lock from a button, you will need to connect the electric drive rod to the tongue, and attach the activator itself to the trunk lid
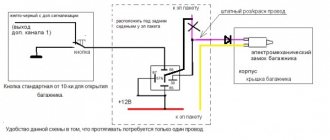
Before starting electrical work, remove the negative terminal from the battery and study the connection diagram.
Installation of the electric lock is carried out according to the electrical diagram
The electric drive device is supplied with power directly from the battery or through a fuse. Electrical installation consists of the following steps:
Video: installing an electric trunk lock on a VAZ 2107
Exiting the trunk lock cable to the passenger compartment
The trunk lock on the “seven” can be opened using a cable pulled into the car’s interior. To implement this idea you will need:
In order to be able to unlock the trunk lock using a cable, it is necessary to make holes in the mechanism to thread the cable and secure it to the tongue. Then they lay a cable from the lock to the driver's seat through the trunk lid, and install a suitable lever to open the mechanism. As a lever, you can use the hood opening mechanism from the VAZ 2109, on which the cable is attached. All that remains is to check the operation of the design.
Adjustment
This procedure is applied to several points on the Priora rear cover:
- Hinged fit. These devices have a certain margin in the mounting holes in order to be able to adjust the position of the Priora trunk lid. It is adjusted using the loosened landing bolts, after which the fasteners are securely tightened and fixed.
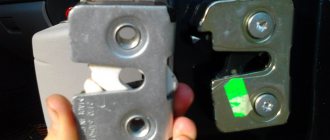
- Lock. The lock mechanism, which is held on by two bolts, has the same holes with a certain degree of freedom of movement. By moving it up and down, it is necessary to achieve a position in which the lock is activated with a slight pressure, and at the same time holds the lid without play.
- Electric drive. It is also regulated by moving the device body to a position that allows it to operate smoothly when you press the activating button.
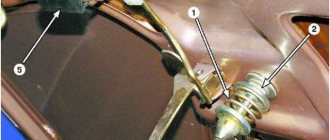
- Springs. Along the inner edge of the Priora trunk, at the base of the lid, next to the hinges, there are special gear rows. A return spring is attached to one of the teeth on each, causing the lid to rise when the lock is opened. As the springs wear out (stretch), the limit switch moves to the next tooth. Until the spring is replaced.
How to adjust doors on LADA cars
Some owners, after purchasing a LADA car, notice malfunctions in the operation of the doors. For example, the back door doesn't open well. You can cope with the problem yourself by adjusting the locks and door geometry. The defect can also be corrected under warranty from an authorized dealer.
Malfunctions that owners of LADA cars (and other car brands) encounter when the door locks are not adjusted:
- the door does not open or close;
- the door closes/opens poorly (tight);
- large gaps between the door and the body (water gets into the cabin, rattling and whistling appear at speed).
Door adjustment on all LADA cars (XRAY, Vesta, Largus, Granta, Priora, Kalina Niva 4x4) is performed in the same way. There are no fundamental differences.
Removing the trunk lid of a Priora
This is one of the simplest operations. You just need to open the cover, disconnect the electrical connector on the left side at the base and unscrew the 4 mounting bolts, after which you can remove this unit. True, it is better to carry out this operation together. The part is not heavy, but it is large, and it is inconvenient for one person to unscrew the bolts and hold it in place. And if it breaks, it can damage the paint of the body, which will cost a pretty penny later.
Instructions for dismantling and replacing the mechanism
- Buy a suitable device. You can choose the appropriate part for your Lada Granta car. This is a good option because it has an electric drive and a limit switch. Unfortunately, when installing a part of this option, you will have to install your own fastening; you can make it from a small steel angle, for example, 40 * 40 * 4 mm.
- The corner can be cut with a suitable tool, for example, a grinder. It is important to consider the size of the purchased device, as well as the location where it will be installed.
- The manufactured metal part must be coated with a suitable color.
- Then plug the hole from the previously installed lock. To do this, you can use the plug from the manual window lifter. It also needs to be painted the same color.
- If during installation of the product it was necessary to get rid of the wiper, you can use the wires coming from it and connect one to the drive of the part, and the second to the connector of the mounting block.
- Return the bracket and tighten the finished fixation device.
What to do if it thunders
The most unpleasant feeling. Constant rumbling noise in the rear while driving. It's the trunk lid rattling. The main reasons for this trouble are:
- Loose trunk lock.
- Worn or loose mounting bolts.
- Abrasion of the lid seal.
All these problems can be resolved quite easily. You just need to know how.
In the first two cases, the adjustment described above helps, with the replacement of worn parts. In the latter, you just need to change the rubber seal, which is a very simple task; it is not glued, but is simply put on the edge of the body in contact with the lid.
Video
For a method of adjusting the trunk lock on a Lada Granta, see the following video:
Unscrew the bolts
We take out the lever
It is necessary to lubricate the parts well
Tuning "Priors"
Many people are not satisfied with the appearance of the factory lining of the inside of the trunk. There is a whole tuning industry for this. If the owner does not want to carry out this operation in a service center, you can always purchase ready-made kits, which you can then install yourself in place of the standard ones. That is, pull out the button clips, remove the factory plastic and replace the trim to your taste and color.
The video shows the installation of improved trim on the Priora trunk lid:
Review of Daewoo Nexia 1.6 (2008)
In honor of the beautiful round number that indicates the mileage of my 5-liter (we smile and wave) monster, I decided to write a continuation of the review. A year and a half has already passed since the purchase, the car is running, for which it is honored and praised. The feeling of owning this car for 1.5 years is twofold (or even threefold), so let’s try to sort everything out. Yes, in the last part I wrote that I once drove a Passat B5 and on this wave I managed to take a Passat SS for family and weekend trips (read for my wife). Therefore, now there will be analogies with him. Over 18 months of continuous operation, a lot of things happened: I already wrote about the steering, lighting, clock - all this was fixed under warranty, all without any complaints. Servicing this car at OD is a separate song, and not a swan song, but a very dirge. They love and respect you only when buying a car and during maintenance. All. The rest of the time you are a microbe for them (you don’t drive a Porsche, after all). As a result of victories and defeats in the field of car warranty service, I can say the following - the engine did not break down (although sometimes it seems that it began to work harder than usual), the light fixtures did not break down and the window regulators did not break (at the front right door, although it lives its own life, here people wrote that the X5 is also jamming, so we’ll chalk it up to the highlight of the car, especially the east - it’s a delicate matter, Petrukha).
Car alarm connection points for Lada Priora 2011
Ignition switch: + 12V – brown Starter – red IGN – blue/black
Tidy: Tacho signal - brown/red Handbrake - brown/blue (For more details, see Diagram 1)
Connector X3 (See Fig. 1) BCM: Driver's door switch - blue/black Right front door switch - brown Rear door switches - gray/red Trunk switch - yellow/red Opening the trunk (low-current input, possible without a relay, additional channel directly to alarm) – blue/red
Connector X1 (See Figure 1) BCM: Turns – blue, blue/black
Ts.Z. - brown; The wire is located inside the driver's door, in the harness from the button block. (See Diagram 3 for details)
Hood end cap – white/black; Connector X2-17 (If an engine temperature sensor is used, then according to scheme 2)
The block is located behind the panel, near the gas pedal. To remove the block, remove the left and right panels, unscrew the two 10mm nuts, left and right, securing the block.
Classification of hood and trunk shock absorbers
Like any other suspension parts, shock absorbers also have their own classification. The main classification of hood and trunk lid shock absorbers is listed below.
According to the damping principle
In this case, the damping is hydraulic and occurs by decelerating the movement as quickly as possible.
The rod of the device must look down without fail. In this case, it does not matter at all in which direction the special rod of the device will be directed. The basic principle of the shock absorber in this case is the smooth opening and closing of the body element.
According to the substance inside the shock absorber
All shock absorbers differ individually in the mounting method. After all, a certain shape and rigidity of the hood is developed for a specific car model. With this in mind, special holes or brackets are made in it, which provide for the installation of additional devices for holding the hood or trunk. Therefore, when choosing a shock absorber, do not forget to indicate to the seller the make of the car. Most likely, he knows what you need.
In fact, mechanisms such as hood and trunk shock absorbers are very durable devices. With proper use, they can last quite a long time, which is why they need to be looked after as often as possible and treated with care when using them.
This is how a shock absorber is selected for the hood, trunk lid or rear door of a car. This process is not labor-intensive and will only require you to be attentive and one hour to think. After this, you can safely go to the store and make the appropriate choice.