The problem with the VAZ-2109 is that over time the door becomes loose and the operation of the locks is disrupted. In most cases, adjustment and adjustment of the lock is necessary. The situation is more complicated when the lock simply jams. This often happens on the driver's side. In this case, it is worth replacing the lock, but do not knock it out with a wheel wrench. As a temporary measure, the door lock cylinder on a VAZ-2109 car can be replaced.
Repair of interior door locks
Losing keys or jamming a lock is an unpleasant situation for any car enthusiast. Do not break the door or locking mechanism. Carefully open the door so as not to damage the rods and the body of the locking mechanism. After this, proceed to the rest of the work. Instructions for removing and replacing the Euro handle cylinder are as follows:
- Remove the door trim. This job won't take much effort, but be careful not to damage the material.
- Disconnecting the rods is one of the most difficult parts of the job. Pick up the bottom one with pliers and remove it from the handle. Then it is easy to insert it back. To remove the top one, press the screwdriver against the handle, thread the unnecessary wire through the rod and pull sharply. Without a screwdriver, the rod will bend.
- Using a 8 key, unscrew the handle.
- Before further work, remember the position of the lock. Pull out the pin from the side and remove the rod.
- Remove the spring and pull out the cylinder.
- Lubricate the groove where the cylinder was located with WD-40.
- The new cylinder is supplied with the key. Do not remove it until the lock is installed. Sometimes a new part needs to be carefully finished with a file. This happens if it is made in China or is simply of poor quality.
- If the pin does not fit into the hole freely, then you need to lightly file the place for it.
Assembly occurs in reverse order. Don't forget to connect the rods and check the lock's functionality before you lock the car for the first time. This work will take you no more than an hour. The trim is always installed last, after adjusting the locking mechanism.
Mechanism design
The lock on the trunk is arranged as follows:
A clamp and a plate are attached to the body. The lock body and rotor engage with them.
If any part is damaged, it is easy to replace it with a new one. If there is no visible damage, you can simply use lubricant and adjust the distance between the latch and the lock. If none of this helps, you will have to install a new device.
Features of door adjustment
The adjustment work involves changing the height of the rods. The rods are attached using plastic tips that have a ball joint inside. Correct adjustment of the door lock is carried out by pulling out the groove. Next, you will need to twist slightly counterclockwise or clockwise. The lock is adjustable by selecting the ideal length. So please be patient.
In conclusion
As you can see, replacing the rear door locks on a VAZ 2109 with your own hands is quite simple. All that is required for this is accuracy and patience. Especially when adjusting a newly installed mechanism. And if you have to replace the old locking mechanism with a new one, experts recommend installing a silent model. This will help avoid unpleasant metallic clanging noises when closing doors. And, of course, after installation, the part must be adjusted correctly and carefully.
Sources:
https://avtonovostnik.ru/info/kak-pomenjat-zamok-na-bagazhnike-vaz-2109/ https://p-ng.ru/zamok-bagaznika-vaz-2114/ https://chevroletcars.ru/ info/remont-zamka-bagazhnika-vaz-2109/
Replacing and adjusting the trunk lock
The work is carried out in the following order:
- The casing is removed.
- Replace the support mechanism. If the lock's supporting tooth breaks. Replace not only the cylinder, but also the new body. In general, this work is no different from what needs to be done to repair a door lock.
- Adjustment is carried out using the lower clamp. Unscrew the nuts and remove the washers. Assembling and disassembling the lock will help you adjust the lock. In this case, you need to act using the selection method. The desired result is the moment when the door closes effortlessly and does not vibrate when slamming and driving the car.
More extensive work is required if the retainer bushing is broken. If you are changing the lock assembly, then before its fasteners are fully tightened, you need to adjust the latch. Only after the lock closes perfectly can you tighten the fastening nuts to the maximum.
Main reasons
The most common reason why the trunk lock is jammed is that the mechanism is clogged with dirt or dust. Dirt can get into the lock directly from under the wheels of the car, because a so-called vortex appears in the rear part of the body while driving, which can pick up snow, water or dust from the road surface. And even a special lock protection screen cannot help you avoid trouble, because the particles are so small that they can easily penetrate inside and damage the mechanism.
Some vehicles are equipped with a central locking system, which is responsible for locking each door at once. And very often the reason for the inability to open the trunk lid lies in the malfunction of the electric drive, which is responsible for the operation of the latches of the lock mechanism. The problem in this situation can be solved in a fairly simple way. It is enough to insert a simple key into the keyhole and simultaneously turn it clockwise and press the button to open the luggage compartment. However, the same situation as described earlier may arise. Then to open the trunk you will have to get to the lock through the interior.
In addition, it may not be possible to open the trunk lid due to a banal failure of the lock mechanism itself. In such a situation, only skills and knowledge that allow you to unlock the door from the inside can help.
Typical faults:
- tightness of locking the door;
- increased noise when opening/closing;
- the central lock does not lock the door and does not respond to signals;
- unlocking is accompanied by a creaking, metallic grinding sound;
- While driving, the door vibrates, cracks are visible in the places of contact with the standard seal.
Common causes of premature wear:
- failure to comply with the deadlines for technical inspection, preventative maintenance, lubrication, and replacement of worn elements;
- third-party mechanical damage resulting in deformation of the door or lock;
- manufacturing defects at the factory;
- the lock has become loose due to loosening of the fastening;
- violation of the adjustment algorithm;
- human factor: systematically locking the door with force.
The defect is eliminated by replacing the constipation assembly.
This is interesting: Refinement of standard Lancer X acoustics
Possible problems
Sometimes, after installing a new lock on a VAZ 2109, the door may not close. The reason is due to errors made during assembly. Most often, people forget to put on the lock rod. In this situation, the lock simply will not open. Remove the lock and install the rod in place.
The lock may also need to be adjusted. This is done using a latch. It is loosened and the lock is moved in the desired direction, achieving optimal performance. Sometimes you have to lengthen or shorten the pull. Your task is to choose its length most optimally.
. If all stages of the work are carried out carefully and correctly, then you will not experience any difficulties. Replacing the door lock cylinder on a VAZ 2109 in this case will happen quite quickly. Once you have done this work, you will be able to repeat it much faster. The best option is to install new parts. Otherwise, you will soon have to disassemble the door again.
A reliable lock in a car is not only the prestige of the manufacturer, but also the car owner’s confidence in the safety of his car, and peace of mind for the safety of the contents in the car during his absence. Sometimes, for various reasons, there is a need to change it.
Replacing the front door lock on a VAZ 2109 is not a difficult task, and does not even require a mandatory visit to a car service center or the services of an expensive technician. Anyone can replace the lock with their own hands. The main thing is to be patient, prepare the necessary tools and not put off the replacement.
DIY installation
We adjust the cable tension for proper unlocking and locking of the trunk.
After that, we connect the button itself; for this purpose, there is a special place in the car panel under the instrument panel on the driver’s side.
It would be wrong to place a button near the cigarette lighter or a drawer for small items when there is a regular place for this in the car.
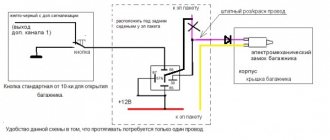
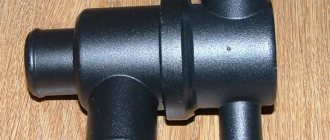
Rice. The simplest connection diagram for the electric drive of the trunk lock.
If you don’t have an additional brake signal, or for some reason you want to use it, then, as mentioned above, we pull a new wire to the bottom of the instrument panel on the driver’s side and connect it to the closer and to the battery through the fuse.
We make final checks and adjustments
You can also simultaneously open the rear door trunk lock using a button and using your alarm key fob (if your alarm has any additional channel) for this we need a relay. And the diagram of the alarm itself.
It is important that for normal operation of the electric trunk drive, when connecting to an additional alarm channel, you need to select a pulse length of 0.8 seconds.
Rice. Connection diagram of the trunk electric drive via a button and relay to an additional alarm channel
And here is the relay itself connected to the button and the additional alarm channel.
Hello friends! So I decided to share the installation of the lock from the viburnum! For those who haven’t done it yet, do it, you won’t regret it!
Now the solenoid easily opens the trunk lid in both winter and summer! There are many advantages: the trunk lid does not make a mess, it closes easily and softly.
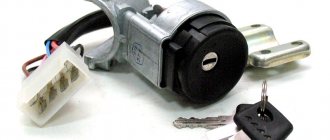
Changing the contact group
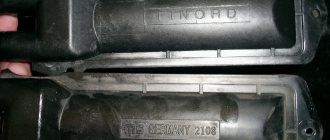
Exploded view of the lock
From a cost point of view, replacing one contact group is the least expensive:
- All our actions are repeated in principle, as in the case described above with removing the lock, you will have to remove the casing, and so on
- To avoid the common nuisance associated with mixing up contacts, it is recommended to number them (or otherwise mark them) before disconnecting them.
- This measure will save your nerves and time
- Some models of locks have a locking ring in their contact group, and here we need an awl to remove it
- It’s important not to forget to put it back in place later.
- Then everything is assembled back and screwed to the steering column
That's all, all that remains is to finish watching the video and calmly change any part of the lock.
Tools
To repair or replace a car lock, you need to prepare:
- flat-head and Phillips-head screwdrivers;
- pliers;
- socket wrench 8;
- silicone grease;
- larva
If desired, you can immediately replace the standard part with a European pen, which is purchased in advance.
Repair work is carried out in a well-lit room and at a comfortable temperature.