Device on the dashboard
It happens that you open the door of your car, sit in the driver's seat, insert the key into the ignition, start it, and liquid begins to drip from under the center panel. And sometimes it doesn’t just drip, but pours. If you are an inexperienced car enthusiast, you immediately wonder what happened. And if you don’t have much experience, then you know perfectly well that the interior heating system has become depressurized. Let's look at how to remove parts of the VAZ 21099 stove without the help of specialists for diagnostics, repair, and possibly replacement.
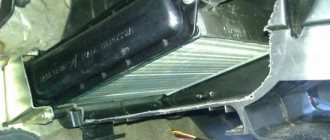
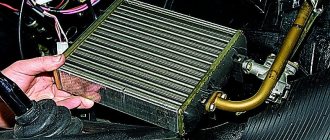
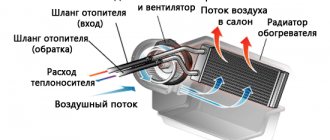
First, let's study the structure of this device. The stove on the VAZ 2108-21099 is located under the central panel, between the dashboard and the engine shield. It is attached with four bolts to the air supply box. Consists of two plastic casings - left and right. The heater radiator is located inside the casings. It consists of two rows of tubes, heat exchange plates and two plastic tanks, and is attached with three screws to the right casing. An electric fan is mounted on top of the heater; it is necessary to pump air into the cabin. It can be removed from the engine compartment side. There is also a stove tap - a miracle device that allows you to keep hot antifreeze out of the heater, as well as tap rods and pipes.
Sequence of actions when replacing a radiator
For most beginners, the question of how to remove a stove radiator is not such a difficult task. You should first prepare containers for small parts and liquid remaining in the hoses. The sequence of manipulations is as follows:
Dismantling
- Unscrew the bolts located on the hose clamps. After which the radiator is disconnected from them. Important! When removing the hoses, you need to be prepared for the fact that residual coolant may spill out of them. In this case, keep a special container on hand.
- Remove the glove compartment.
- Unscrew the fastenings to the floor.
- Next, unscrew all the screws securing the radiator to the stove.
- The fastening of the cable that regulates the windshield blower damper is unscrewed.
- The radiator is disconnected from the stove. At this stage, problems with the torpedo are possible. To lift it up, you should rest your torso against the lower part of the glove compartment.
Installation
Next, a new radiator is installed. Actions are performed in reverse order. The car radiator is carefully installed, the torpedo is lowered down, the screws are screwed in, and they take their rightful seat.
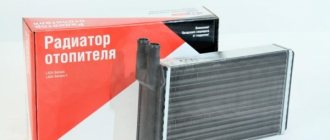
Choice
When choosing a new radiator for the stove of your VAZ 2109, you should understand what exactly you want to achieve and what budget you have.
Today, consumers are offered two types of units to choose from.
| Radiator type | Peculiarities |
| Aluminum | A relatively inexpensive radiator option, which is characterized by high thermal conductivity. However, such a device cannot be repaired, which is its main drawback. But in practice, repairs are not carried out so often, so few people pay attention to this disadvantage |
| Copper | If necessary and a leak is detected, the copper radiator can be repaired - soldered. Thermal conductivity indicators are slightly higher when compared with aluminum analogues. But at the same time, the price is quite high - both for repairs and for the radiator itself |
Aluminum unit
Due to unprofitability and high cost, most VAZ 2109 owners choose aluminum radiators. But it all depends on your personal decisions and preferences. When actively using a car in harsh winter conditions, a copper radiator is fully justified.
Copper unit
Features of replacing a radiator on various car models
When reinstalling the radiator, the following questions may arise:
Replacing the heater radiator on a VAZ 21099 with a high panel
If the radiator needs to be replaced, the high panel does not need to be removed. You will need to remove all the screws that secure the panel to the car body. Then the steering casing is removed and the right side of the panel is moved into the cabin.
Important! Before moving the panel to the side, you need to disconnect the ignition switch wires and the alarm system from it.
Replacing the radiator of a VAZ 21099 stove with a low panel
If the front panel is low, in order to replace the radiator, it must be completely removed. Then follow the previously described sequence of actions.
Replacing the radiator of a VAZ 21099 stove with a high panel without removing it
If you don’t want to remove the panel every time you replace the radiator, you can file it down and then reinforce it with self-tapping screws. In the future, they are unscrewed if necessary. When replacing the radiator on an injection VAZ 21099, you should be attentive to the relays located under the panel.
After replacing the radiator, it is important to check how the stove works. Those who have done all these simple manipulations, the next time problems arise with heating the car, will not have the question of how to independently change the heater radiator on a VAZ 21099. Everything is simple if you do everything correctly. The radiator service life is approximately 8 years. If used incorrectly, it will fail within 2–3 years. For preventive purposes, the radiator should be removed for cleaning twice a year. And then reliable heat is provided.
Principle of operation.
Before identifying a malfunction, you should know how the system operates. Only then can you judge a possible breakdown.
So:
- This unit has an electric motor with a fan. Which supplies hot air to the car interior;
- Then we have a button for on off;
- Resistance system, they provide the desired fan speed;
- There is a heater radiator through which the liquid passes.
That is, there are not many parts that can lead to failure. It could be a radiator.
Or liquid leakage occurs due to leaky connections.
How to choose a really excellent radiator for the VAZ 2109 stove.
When I went to an auto parts store, I learned that there are several types. Aluminum factory. non-factory aluminum and copper.
After consulting with friends who have been driving for several years and have encountered such a problem. I found out :
- A copper radiator costs 2 times more. than aluminum. but it's not very hot.
- A factory radiator costs around 1000 rubles and is worth taking. because It is reliable and heats as expected. Its design is stronger than the original VAZ radiator and has swirlers that slow down the coolant, which contributes to more heating of the radiator. With such a radiator, you will begin to feel warmth in the car already at 60 degrees of the engine.
- A non-factory radiator costs 500 rubles, but it’s not worth buying. First of all, it doesn't heat up. secondly, it may leak immediately after replacement. Thirdly, it does not have swirlers, so the antifreeze flies through the radiator without having time to heat it up.
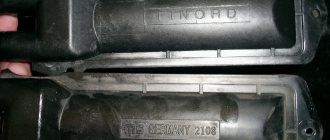
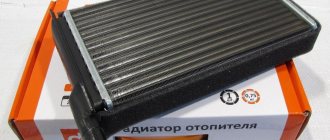
Having learned all this, I went to the store and bought an original DAAZ radiator, price 750 rubles. It looks like this:
Replacing the stove on a VAZ-21099 (high panel)
Now about the advantages of dismantling the heater on cars that have a high panel installed in the interior. There is absolutely no need to fiddle with disconnecting the choke and speedometer cables. To get to the heater radiator, you need to remove the plastic trim from the steering wheel, unscrew the dashboard, and then move it into the cabin. All. All elements of the car’s heating system are revealed to us in all their glory and free access.
It is worth suggesting to VAZ-21099 owners a more radical method of accessing the car’s heater elements. To do this, you need to carefully cut off the bottom of the panel that covers the stove, and then think of some kind of secret fastening or simply screw the bottom shelf with self-tapping screws. To access the parts of the device, it will be enough to simply dismantle it.
Features of the heating system
First of all, you need to understand on what principle heating works. Only after gaining basic knowledge can you judge a potential breakdown.
It is recommended to take the following features into account:
- the electric motor must supply hot air;
- the stove can be turned on and off;
- the fan must operate successfully at various speeds;
- a radiator is required for the successful flow of fluid used when operating the stove.
In fact, only if all the parts are in working order can you count on the successful functionality of the stove installed on a VAZ-21099 car.
Stove design
Stove structure: 1 – elastic bushing; 2 – spring nut; 3 – left fan casing; 4 – electric motor; 5 – impeller; 6 – right fan casing; 7 – windshield heating flap; 8 – damper for the foot airflow channel; 9 – heater control damper; 10 – right heater casing; 11 – bracket for fastening the heater casings; 12 – gasket; 13 – radiator; 14 – clamp; 15 – supply hose; 16 – outlet hose; 17 – tap; 18 – left heater casing; 19 – sealing cover; 20 – resistor; 21 – support for the heater control damper axis.
Structurally, the VAZ 2109 stove consists of several parts:
- The outer casing is made of several complex configurations of plastic parts that fit tightly together and have seals.
- Air ducts are large-diameter corrugated tubes through which air is delivered to the nozzles in the cabin (at the windshield, on the driver and passenger sides). The amount of flow is regulated by valves.
- Control valves - they are located both inside the dashboard and on it. The former are adjusted through traction cables, and the latter directly manually.
- The radiator is made of aluminum and plastic. Tubes and plates are metal. Plastic - storage tank.
- Fan - runs on electricity and is powered from the on-board network (12 V)
- Rubber tubes - connect the expansion tank, radiator, pump. Coolant is supplied and discharged through them.
- The pump is also electric, pumps antifreeze and provides more intense heat exchange.
- Thermal sensor - installed inside the radiator and controls the operation of the pump and fan.
- The tap is controlled by a special lever and allows you to completely shut off the coolant flow in the system.
- Control levers and rod system - displayed on the dashboard and transmit influence to internal dampers and switches
- The vernier for turning on and adjusting the fan speed is also located on the front panel next to the levers.
- Electrical unit - power wiring and loading resistors.
Part of the system that provides interior heating includes an expansion tank with antifreeze. It is into this that the antifreeze that has released heat from the radiator enters.
Important! A VAZ 2109 may have a high or low panel, when the stove does not heat well, its repair is identical in both cases.
How to choose a really excellent radiator for the VAZ 2109 stove.
When I went to an auto parts store, I found out that there are several types: factory aluminum, non-factory aluminum and copper.
After consulting with friends who have been driving for several years and have encountered such a problem, I learned:
- A copper radiator costs 2 times more than an aluminum one, but the heat is not very hot.
- A factory radiator costs around 1000 rubles and it’s worth taking this one, because... It is reliable and heats as expected. Its design is stronger than the original VAZ radiator and has swirlers that slow down the coolant, which contributes to more heating of the radiator. With such a radiator, you will begin to feel warmth in the car already at 60 degrees of the engine.
- A non-factory radiator costs 500 rubles, but it’s not worth buying. Firstly, it doesn’t heat up, and secondly, it can leak immediately after replacement. Thirdly, it doesn’t have swirlers, so the antifreeze flies through the radiator without having time to heat it up.
Having learned all this, I went to the store and bought an original DAAZ radiator, price 750 rubles. It looks like this:
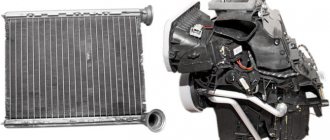
How does the heater work?
In order to understand how to correctly remove the device, for example, in the case when it is necessary to replace the body of the VAZ-21099 stove, it is worth familiarizing yourself with its design. In this car, the heater is located in the central part of the instrument panel between the engine shield and the dashboard on the air supply line, to which the heater is attached with four bolts. The design of the 99 VAZ stove is represented by two casings made of durable plastic (casing), between which there is a radiator. There is a fan on top of the heater housing that blows heated air to heat the interior. You can get to it through the engine compartment. In order to shut off the supply of hot coolant to the heater and turn it off during the warm season, a special tap is provided. The stove design also contains heat-conducting lines, pipes and rods.
How to remove the stove VAZ 21099 High Panel
Device on the device panel
Sometimes you open the car door, sit in the driver's seat, put the key in the ignition, start it, and fluid starts dripping from under the center console. And from time to time it doesn’t just drip, it pours. If you are an inexperienced car owner, immediately think about what happened. And if you have no experience, you know very well that the internal heating system does not work. Let's see how to remove parts of the VAZ 21099 stove for diagnostics without the help of professionals, repairs, and possibly modifications.
Let's first look at the design of this device. The VAZ 2108-21099 plate is located under the central panel, between the dashboard and the engine shield. Attach with 4 bolts to the air box. Consists of 2 plastic shells. left and right. There is a radiator plate inside the cases. It consists of 2 rows of tubes, heat transfer plates and 2 plastic reservoirs attached with 3 screws to the right shell. An electric fan is installed on the top of the heater; this is necessary to supply air to the cabin. It can be removed from the engine compartment. There is also a mixer for the stove. a miracle device that allows you to store hot antifreeze outside the heater, as well as draft and mixing pipes.
In the event of flooding in the cabin, you must first move the control knob to the last left position. This will save you from burns, engine overheating and the need to take another bucket of antifreeze. If the valve is closed, but coolant flows out from under the dashboard, this means that the pipes, hoses or valve have burst. In this case, you need to immediately brake, turn off the engine and either take the car to a service center, or remove the necessary tools from the trunk and begin repairs.
How to replace a VAZ 21099 radiator plate
To find out the scope of work, you need to find out the cause of the leak. First you need to look under the dashboard with a flashlight. The most common option is that if the inlet hose breaks, it will be immediately visible. Replacement takes minutes using a repair kit and a screwdriver. But the most common cause of leaks in the heating system is cracks in the radiator housing. Replacing the stove radiator. complicated thing.
In the engine cooling system, the interior heater is located immediately after the cylinder block jacket. All particles washed from the walls of the block enter the radiator tubes and become heavily clogged over time. The coolant enters the plate under enormous pressure, and the buildup causes this pressure to increase even more and break through the worn areas. Reality confirms the theory: where he is thin, where he breaks down.
Usually the motorist is accused of depressurizing the furnace, which was not checked, the device was not cleaned, and the hoses were not changed. This must be done without fail at least every 3 years.
First you need to figure out whether your car's center console is low or high. If the panel is low, then you are definitely out of luck. You have to sweat to take it off.
- First, turn the front wheels so they look straight.
- Then open the hood, remove the negative terminal from the battery, remove the suction cable from the choke lever, and disconnect the speedometer cable from the transmission.
- Remove the faucet handles.
- Remove by pulling the electric fan handle.
- Remove the 4 screws that secure the beard cover and put it on
- We disconnect all the plugs, marking or remembering which connectors will need to be connected later.
- Loosen the 4 screws that secure the control panel to the cooktop.
- Loosen the 2 screws that secure the visor to the instrument panel and remove it.
- Squeeze the clamps of the device panel and remove it from the dashboard.
- Disconnect the speedometer cable from the instrument panel and remove all plugs and fittings.
- Once you've pulled it out, remove the headlight levelers and instrument panel light switch.
- We unscrew the nuts for securing the headlight control and instrument panel lighting.
- Remove the steering wheel and change the jumpers.
- The ignition key is set to position “0” and disconnect the ignition switch connector.
- Unscrew the screws and remove the center panel.
VAZ 2108-2109-21099 FURNITURE REPAIR
Now we can move on to the details of the internal heating system. They must be removed.
- Look under the hood again. If there is a container or excess funds, we drain the antifreeze from the system.
- We find hoses in the engine compartment leading to the stove mixer nozzles. We remove them by loosening the clamps.
- Once inside the cabin, remove the hoses from the pipes under the dashboard. We unscrew the two nuts that secure the stove faucet and remove it.
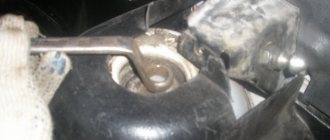
- To the right of the oven body, remove the screw that holds the stop clamp on the glass heating valve.
- We unscrew the three screws that secure the heater radiator and remove it.
- Now we are studying all the details. If we find an error, replace it.
Return to content
All stove mixers are the same, but heater radiators come in three types:
- copper;
- unique duralumin (DAAZ);
- Chinese duralumin.