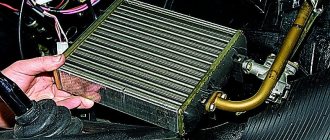
The “weak point” in the interior heating system of the VAZ Kalina is the heater radiator. The heat exchanger on this car is made of aluminum (tubes and honeycombs) and plastic (tanks), so the service life of this part is not that long. Over time, the radiator loses its seal and begins to leak, which can lead to serious problems. The designers placed the engine ECU under the heater housing. If the radiator leaks, the antifreeze flowing from it gets onto the control unit, which causes it to burn out.
There is only one way to solve the issue of a leaking heater radiator on a VAZ Kalina - replace the damaged heat exchanger with a new one, since aluminum heater radiators are not repairable. But here a second problem arises - how best to carry out the replacement. The heater on the VAZ Kalina was not designed well, so replacing the radiator is a complicated procedure.
According to the automaker's recommendation, replacing the heater radiator with a Kalina can only be done by removing the front panel from the car. Removing the panel is a labor-intensive operation due to the large number of fasteners, and at the same time it is necessary to dismantle a number of interior elements - the front seats, steering column, pedal unit. An additional negative factor in replacing the heater radiator on a VAZ Kalina with removing the front panel is the appearance of “crickets” after assembly.
The only advantage of the replacement technology recommended by the automaker is that no alterations or modifications to the heater are required to remove or install the heat exchanger. Car enthusiasts have come up with alternative methods for replacing the heater radiator without removing the front panel, but each option has disadvantages.
Design and principle of operation of the heating system
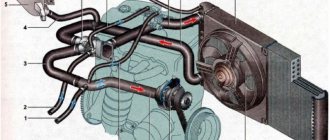
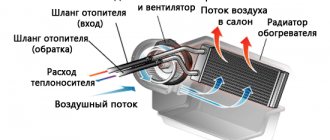
The Kalina's stove, like most other cars, is connected to the cooling system.
The device is a structurally complete unit consisting of the following elements:
- Fan motor.
- Heater radiator in a plastic casing with connection pipes.
- System of dampers, air ducts and regulators.
The principle of operation of the stove is as follows. Antifreeze circulates through the heater radiator connected to the engine cooling system. The flow intensity can be changed with the appropriate regulator. Heating directly depends on this. To remove heat from it, a fan is used, which is located in a separate housing and connected to the adjacent casing by an air duct. For greater efficiency, all joints are reliably sealed. The heater casing is unified and can be used both on cars with and without air conditioning.
The air for the heater can come from both inside the car and from outside; there is a corresponding switch for this. Most often, it is installed in the second position, which avoids fogging of the windows. The flow forced by the fan passes through the radiator and, already heated to a certain temperature, is supplied to the cabin. Here it can be distributed according to the wishes of the driver and the position of the corresponding dampers.
↑ Problem and solution
50 m. Initially, there was a timer to control the heater, which allows the heater to start at a set time, but for me it turned out to be useless. I don’t go anywhere regularly at the same time. The factory original key fob for Webasto remote start was immediately excluded from the solution options. The cost of a keychain starts from 10,000 rubles.
At first I decided to leave the timer and control the heater, simulating pressing the start button on the timer (closing a pair of contacts), then it was decided to completely abandon the timer, since when it was dismantled, the display burst (it turns out that this is their disease), and, in principle, I don't need a timer.
To control the heater, I decided to use a simple alarm system, which I found on Aliexpress and ordered online for a lot of money, about $16 with delivery.
I came up with a simple circuit in which the principle of turning the heater on and off is implemented based on two relays.
You can use any relays with a supply voltage of 12 V. The main thing is that one of the relays has a normally closed contact. I found two small relays in the bins.
Using electrical tape, I twisted them together and soldered the wires to the required legs. The result is a cable connecting the alarm unit with a relay, a button and a switch for manual control.
The button, operation indicator and general power off toggle switch are installed in a small recess located in my Orlando to the left of the steering wheel.
Feedback is implemented using an alarm sound: my car is not far from the window and I can hear it. When you press the closing button on the alarm key fob, the siren screams once and Webasta turns on. When you press the door open button, the siren screams twice and Webasta turns off. That’s all about the remote start.
Causes and symptoms of failure
In addition to the low quality of components and features of the car’s cooling system, the driver himself is often to blame for damage to the stove. Trying to save on consumables and operating materials, he significantly reduces the service life of the heater.
The main reasons for stove failure:
- Using low-quality antifreeze. This can lead to contamination of all channels, which will significantly reduce heat transfer and circulation.
- Faulty expansion tank cap. It causes increased pressure in the system, which will certainly lead to a “rupture” of the heat exchanger.
- Manufacturing defects.
- Using cheap antifreeze. Low-quality liquids are an aggressive environment for aluminum.
- Use in the cold season as a coolant (coolant), water or low-density antifreeze.
A number of symptoms can indicate the presence of a stove failure.
Signs of damage to the heating radiator:
- drops of coolant on the passenger seat mat;
- the smell of antifreeze in the cabin and a “greasy” coating on the glass;
- low heating of the radiator, provided that the remaining heater elements are in good working order.
Choosing a Kalina stove radiator
In practice, if we consider the Kalina heater, the stove is not the best and not particularly reliable. As a rule, if you do not change the antifreeze and do not flush the system, the heater radiator lasts 4-5 years, after which problems begin.
Failure also results from contamination of the main radiator, an increase in pressure and, as a consequence, breakdown of the heater radiator tube. For this reason, it is important to regularly maintain the cooling system, remove air locks, and also select the stove radiator correctly so as not to repeat the procedure for replacing it due to the installation of a low-quality element every 2-3 years.
We also recommend reading the article about why the VAZ 2110 stove does not heat or does not work. From this article you will learn about the reasons why the VAZ 2110 heater may not work correctly or completely fail, as well as ways to diagnose and repair the VAZ 2110 heater.
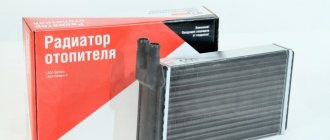
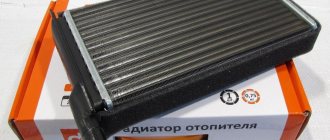
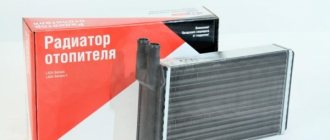
Often, many people purchase an original part to replace it. In this case, it is also quite possible to choose an option from analogues. Catalog numbers of the heater radiator for Kalina are 1118-8101060 (article number of the original heater radiator).
The original radiator is easy to install, without modifications or alterations. As for analogues, you can take Pekar 1118-8101060 or Fenox RO0001O7, as well as Luzar LRH 0118. You can also choose a Kraft stove radiator for replacement. In some cases, owners note that the analog may be better in quality than the original.
How to choose a new radiator
Before changing the heat exchanger, you need to select a new one. Particular attention should be paid to the material.
Based on this feature, radiators are divided into two types:
- Aluminum. Has lower thermal conductivity. If damaged, it cannot be soldered, but it costs much less. The vast majority of experts advise choosing this one.
- Copper. It is generally accepted that this heat exchanger is better. Its advantages are high thermal conductivity and maintainability. There is only one drawback - the price.
The heat capacity of the model does not play a decisive role; aluminum is more than enough to heat the interior. Maintainability, in modern times, is a dubious advantage; hardly anyone will solder. The quality of the radiators is approximately the same, so there is no point in overpaying for copper.
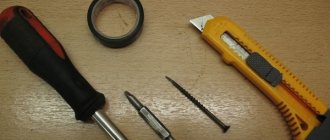
Required tools and accessories
For repair you will need:
- a set of screwdrivers of various lengths;
- socket wrenches;
- set of open-end wrenches;
- container for draining antifreeze from the cooling system;
- sharp knife;
- new radiator.
In the service, the replacement procedure costs a lot of money, and not every master will take on the job. It's not a matter of qualified repairs; anyone who knows how to hold keys in their hands can do it. It’s just that the replacement process is labor-intensive, requires accuracy and patience, and many parts are very inconvenient to dismantle.
You definitely need to put the Kalina in the garage, with the expectation that in the absence of proper qualifications, repairs may take several days. You should take care of lighting and, if possible, basic heating in advance if it is cold outside.
Main causes of malfunction
If, with the onset of cold weather, no heat is supplied to the interior when the heater is on, then you need to figure out what is causing this. The main causes of failure may be:
- Thermostat malfunction;
- Heater radiator leaking;
- Air in the cooling system.
The main cause of the malfunction is a leak in the heater radiator
The most dangerous breakdown is a leak, which can occur in several places simultaneously. It is detected by visual inspection of the system, as well as the connection points. A copper radiator can be repaired by soldering the leaking areas, but an aluminum radiator will have to be replaced.
Radiator replacement
The manufacturer recommends replacing the Kalina stove radiator by removing the panel. Despite the labor intensity, this method has its advantages. The main thing is: there is no need to make any changes to the design of the Lada Kalina. True, this method requires a lot of time, so creative domestic car enthusiasts have found the opportunity not to dismantle the dashboard (as the front panel is sometimes called). In this case, both methods will be considered.
This video shows the process of replacing the temperature sensor on a Lada Kalina.
Differences between the algorithm on a car with air conditioning
“Kalina” with air conditioning has two heater radiators and a temperature controller in the cabin that is different from models without climate control. There are two radiators, since air conditioning freon passes through one of them, and antifreeze passes through the other, as in a car without an air conditioner. Accordingly, the temperature regulator allows air to pass through one of the radiators, depending on its position. It will be more difficult to dismantle such a structure and replace the necessary elements yourself.
It is not immediately possible to understand that the stove has become unusable, since the leaking liquid quickly evaporates and reminds of itself only by a specific smell. When replacing a radiator, you must carefully place the parts being removed, do not deviate from the instructions and follow safety precautions.
Replacement with panel removal
Car enthusiasts do not like this method not only because of its complexity. They rightly believe that after disassembly, a large number of “crickets”, that is, extraneous sounds, will appear in the cabin of the Kalina. This is indeed true; factory assembly is difficult to replicate and, nevertheless, it is strongly recommended to use this method.
It must be remembered that dismantling the panel involves working with electricity, so first of all you need to disconnect the battery
Now you can proceed directly to the replacement process.
The sequence of actions is as follows:
- Remove the air filter along with the pipe, battery and decorative engine cover.
- Drain the antifreeze.
- Loosen the clamps and disconnect the hoses from the stove pipes. There is also a nut securing it to the partition of the engine compartment; unscrew it with a suitable 10mm wrench.
- In the niche where the wiper drive is installed, the decorative trim is removed on the right side, the cabin filter is dismantled, and 4 screws are unscrewed under it.
- All other work must be done inside the car.
- Bend back the latches and remove the decorative panels of the A-pillars. There will be screws under them, they need to be unscrewed.
- Open the 7 nuts securing the front panel to the body and unscrew them. Remove the air duct grilles, radio, and all knobs from the stove control panel.
- Remove the heater control panel; it is held on by two screws.
- Unscrew the screws of the steering column casing and remove it.
- Remove the light and wiper switches, as well as the ignition switch.
- After unscrewing the 2 nuts to 13, move the steering column to the side.
- The panel remained held on by 9 bolts, 4 of them large, on one and the other side of the dashboard.
- Now the panel can be removed, but it is better to do this with an assistant so as not to damage the wiring.
- Now you can easily dismantle the radiator; it is attached with two bolts to the body stiffeners.
- Replace the radiator with a new one, making sure that it sits exactly in its place and that there are no gaps left between the fins and the casing.
- Assembly should be done in reverse order.
On paper, replacing the radiator of the Kalina stove does not seem very difficult, but in practice it will not be easy, but it is better not to rush, even if the work drags on for several days. The bonus will be 6,000 rubles saved, which is exactly the cost of working in the service.
The sequence of replacing a heating unit element is shown in more detail in this video.
Features and nuances of the heater design
Note that problems during replacement are caused not by dismantling, but by installing a new radiator. There are two main nuances that make it difficult to fit the heat exchanger into the heater housing. The first one is the installation side. The radiator is pulled out towards the pedal block, and the pedals themselves prevent the radiator from “coming out”. But this does not cause problems during dismantling, since the leaking heat exchanger can be sawed and removed. But it’s impossible to install a new radiator because of the pedals.
The second nuance is the design of the radiator itself. The heat exchanger fittings for connecting the cooling system pipelines are long and pass through the engine shield. Thanks to this, the connection of the pipes with the radiator is carried out in the engine compartment and if the fastening clamps are loosened, the antifreeze flowing through the leak does not enter the passenger compartment. But due to the long fittings, you can only pull out the heater radiator by moving the heater housing toward the passenger compartment, and this is only possible with the front panel removed.
The replacement methods that car enthusiasts have come up with involve some modifications to the heater elements, allowing the installation of a heater radiator. In the future, these modifications make it possible to replace the heat exchanger without problems and in a short time.
Replacement without removing panel
For those who cannot live a day without a car and do not want it to sit in the garage, there is a faster way. The big disadvantage of this option is the violation of the car’s structural elements. It will be necessary to make a cut in the side wall of the heater, which is unlikely to add value to the car upon subsequent sale. In general, there are several replacement options without removing the panel, but in this case the less “barbaric” ones will be considered.
In addition to the tools listed above, you will have to purchase new hoses to connect the stove. You will need a grinder and a hacksaw.
Installation of a new radiator is carried out in the following order:
- The coolant is drained from the engine, be careful with the plug, it is very easy to damage the threads there, and then you will also need to replace the cooling radiator on Kalina, or at best, repair it.
- The heater hoses are removed and the nut securing it to the engine compartment is unscrewed.
- The steering column casing is removed.
- The steering column switches and ignition switch are removed.
- The steering column, along with the power steering, is disconnected from the driveshaft.
- Unscrew 3 bolts, remove the gas pedal, for greater convenience you can also remove the brake pedal.
- The decorative cover on the side wall of the heater is removed. The radiator is already visible, but it cannot be pulled out into the existing hole.
- The hole is expanded by cutting out a piece of plastic from the side wall, this is done slowly, using hand tools.
- The stove pipes are cut with a grinder.
- The radiator is removed and pulled out towards the dismantled gas pedal.
- The pipes of the new radiator are shortened by approximately 2 cm. It is glued around the perimeter with a foam rubber seal.
- The cut out fragment is pasted in.
- The hoses are connected and the clamps are tightened tightly.
- Assembly is carried out in reverse order.
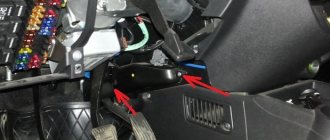
In order not to do unnecessary work later, it is advisable to immediately move the electronic control unit away from the heater radiator.
Malfunctions of the electronic gas pedal
Moving contacts and conductive paths are subject to wear, which makes their signals incorrect. As a result, the engine will operate unstably, “dips” will appear, and at idle the speed will “float”. If a malfunction occurs in the operation of E-gas, the Check Engine warning lamp on the instrument panel will light up, and the ECU will switch the system to a reserve mode of operation, in which the speed will increase slowly, even when the gas pedal is pressed sharply. Fuel consumption may also increase.
If both sensors fail, the ECU will switch the engine management system to emergency operation mode, the engine will only operate at speeds slightly above idle (1500 min-1). In this case, it is recommended to contact a service station to replace the failed parts under warranty.