The operation of the stove on the classic Niva traditionally causes complaints from most owners of this car. A frankly weak but noisy fan and poor design of the air ducts do not warm the interior properly. In addition, the operation of the heater is affected by the operation of the VAZ 2121, 2131 in difficult road conditions. The stove radiator, air ducts become clogged, and the pipes are destroyed. Therefore, understanding the operating principles of the heater and the ability to repair it with your own hands become an important task for the Niva driver.
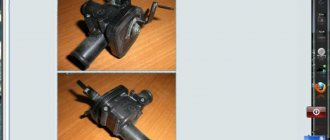
Radiator of the Niva stove
The heater radiator of VAZ 2121, 2131 is not a critical vehicle component. But in cold weather, driving a car with a faulty heater is unlikely to be a pleasure. In addition to the sheer coldness in the cabin, the windows may fog up, which leads to poor visibility, and this is a matter of safety for the driver, passengers and other road users.
Structurally, the radiator is a heat exchanger, or more simply put, a battery, whose task is to heat the air passing through its grille. Externally, it looks the same as a similar unit on other cars.
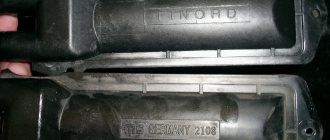
The same type of heater radiator is used for “Niva” and “classic” VAZs
The Chevrolet Niva radiator is not suitable for the VAZ-2121, 2131 family. This should be taken into account when selecting spare parts in the store.
Radiator location
The heater radiator on the Niva is located under the dashboard behind the center console between the driver and right passenger seats. This is the standard location for the heater in most cars. Compared to many other car models, access to the radiator in the Niva is quite simple. This will take about 10–15 minutes for a semi-skilled specialist.
Radiator design and functions
The stove radiator is a unit in which heat is transferred from the heated liquid to the surrounding air. It consists of two horizontal rows of tubes intersecting with vertical metal plates (ribs). On the sides, the structure is limited by panels that provide the functions of tanks. The incoming and outgoing pipes of the cooling circuit are connected to one of the tanks.
There are two unconnected cavities inside the tank. Antifreeze enters through the inlet pipe into the cavity connected to the upper row of tubes. On the other side of the radiator there is a return tank, through which antifreeze flows into the second row of tubes and moves in the opposite direction to the second cavity of the tank and the outgoing pipe. After leaving the radiator, the antifreeze enters the main cooling system of the car. Antifreeze circulating in the tubes ensures heating of the entire grille, thanks to which heat transfer from the radiator reaches maximum effect.
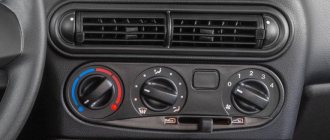
The radiator is installed in the instrument panel console in a plastic casing and sealed around the perimeter with foam tape. Air heating depends on the degree of opening of the valve that regulates the flow of liquid through the radiator. The valve is installed at the radiator inlet and is controlled by the upper lever on the center console.
Cold air comes from the external environment, passing through a hot radiator, heats up and enters the car interior
The main and only function of the heater radiator is to heat the air flow entering the cabin through the air ducts.
Radiators are made of aluminum or copper. The aluminum product does not hold temperature well. A copper radiator works more efficiently, but is more expensive. The advantages of a copper radiator include its maintainability: the ability to seal cracks in the tubes.
Possible heater malfunctions and ways to eliminate them
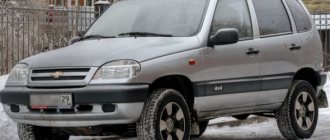
Cherry Niva Chevrolet
If the stove in a VAZ 21214 has stopped working, then, in principle, repairing it yourself is not a particularly difficult task.
The reasons for the malfunction why the Niva stove refuses to work are given below:
- Failure of the additional resistor. This element of the system is located behind the glove box and is designed to control the ventilating device for pumping warm air into the cabin. The problem is solved by replacement.
- Wear of pipes. Over time, the pipes begin to wear out, and temperature changes especially contribute to this. To detect worn hoses, each line must be carefully inspected. Wear may be indicated by cracks and other damage to the pipes through which antifreeze can escape.
- The heater valve is faulty. A breakdown of this component may be indicated by traces of a coolant leak in the vehicle interior. If the heater tap is being replaced, it is better to use a ceramic device; its service life is usually several times higher than that of traditional metal devices.
- Problems in the operation of the control unit. It is best to have this part repaired by a qualified electrician.
- The heater radiator has failed. On Niva 21213 you can easily replace it with your own hands, we will talk about this below (the author of the video is the OWNER G channel).
Typical radiator malfunctions
There are two main radiator malfunctions:
- Clogged grille and radiator tubes.
- Radiator leakage.
Since the Niva is often operated in difficult road conditions, the likelihood of contamination of the grille from dusty outside air is very high. Clogging of the cells reduces the heat transfer area of the radiator, and as a result leads to a decrease in the heat released from the air ducts into the passenger compartment. In such cases, the stove radiator is dismantled and washed under high pressure.
Lada 4×4 3D Karabas › Logbook › Moving the radiator to Niva 2121
Well, I finished this upgrade on my war horse! Moving the radiator to the place of the spare tire (under the hood). Many of you will say that this is complete nonsense, why, etc. Let's consider the advantages (if you disagree, speak up! 1) When moving the radiator, space is freed up for the winch. 2) In the event of an impact (against a tree, stump, stone, etc.), the radiator will not be damaged and you can at least sit in a running, warm car (waiting for help if your car cannot move on its own). 3) It doesn’t get clogged with dirt (and if you managed to get it clogged with dirt), then it’s easy to wash and blow out. 4) The radiator in this position becomes higher than the heater radiator (due to this, it is hot in the cabin when the heater is on). 5)… ITD…
Removing the radiator of the VAZ-2121 stove
The procedure for removing the heater radiator on a VAZ Niva does not require any special skills or abilities. It is important to prepare the necessary materials and tools in advance. Most instructions for repairing car heaters contain a recommendation to drain the coolant before starting work. In practice, many car enthusiasts limit themselves to draining only that part of the antifreeze that is located in the radiator itself and the nearby pipes of the cooling system.
Preparing tools
To replace the radiator, you will need the following tools:
- pliers;
- slotted screwdriver;
- Phillips screwdriver;
- a set of markers for identifying wires;
- spanner set to “7”;
- socket wrench set to “10”;
- socket wrench set to “7”;
- socket wrench set to "10".
Procedure for dismantling the radiator
All operations must be performed in the following sequence:
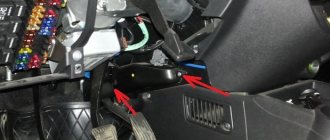
- Unscrew the left self-tapping screw securing the storage shelf.
The self-tapping screw is unscrewed with a Phillips screwdriver
The right side of the shelf is attached to the upholstery
The central part of the shelf is unscrewed from the front panel
The right edge of the shelf moves down freely
There is a special spike on the left side of the shelf
The lower part of the panel is also fixed with a self-tapping screw
The process is shown on the right side, the left side is similar
The panel is moved to the side
The wire blocks are detached to remove the entire radio panel
After disconnecting the wires, the panel can be easily removed
Loosening the clamp is shown using the example of the lower pipe; a similar operation is performed with the upper
The screws are unscrewed with a socket wrench with a “7” head
The removed seal allows you to remove the radiator pipes from the engine compartment
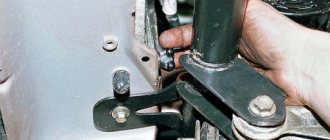
The fastening nut is unscrewed with a “7” key
The rod is removed from the crane lever
The rod is disconnected from the fan casing
The staples are pryed off with a slotted screwdriver
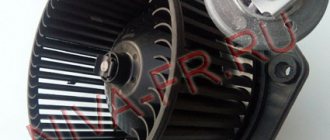
The casing with the fan is moved to the side
After removing the fan, the radiator is carefully removed from its compartment
The tap and pipes are turned off with a key to “10”
The removed tap is checked for leaks
The bottom nut often falls out and gets lost
Disconnect the outgoing pipe.
The two fastening nuts are unscrewed with a “10” wrench
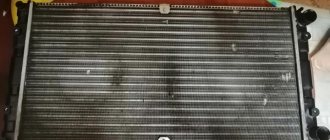
After dismantling, you should carefully inspect the radiator for blockages in the grille and leaks from the tubes. Based on the results of the inspection, a decision is made on the possibility of repair or installation of a new radiator.
Video: installing a radiator
The process of replacing the heater radiator on a classic Niva has been studied far and wide by many car owners. In fact, the procedure is similar to the entire family of AvtoVAZ classics. However, caution and safety precautions should be observed when working. After completing the repair, before driving on public roads, you must make sure that all components and mechanisms of the vehicle are operating normally. Only then should you begin daily use of the machine.
DIY tuning of Niva 2121 for off-road
Like many parts in the Chevrolet Niva, we change it ourselves, the radiator is no exception.
Points by which you can diagnose a breakdown of the Chevrolet Niva heater radiator:
- the amount of antifreeze in the tank has sharply decreased;
- reduction in the quality of heating of the car interior;
- the appearance of a thick, greasy film on the inside of the glass;
- there was a clear smell of antifreeze in the car;
- accumulation of antifreeze under the driver's mat.
Having discovered any of them, you need to diagnose the Chevrolet Niva heater radiator in order to determine the next steps for repair or replacement.
Before replacing a spare part, the system is completely emptied of coolant. Replacing a Chevrolet Niva heater radiator without air conditioning will not cause any difficulties and does not require special skills. You can carry out the work of replacing a Chevrolet Niva heater radiator even on a simple overpass.
If you cannot adjust the position of the regulator, the cable may have broken. For replacement, a typical set of wrenches or ratchets and a flashlight will suffice. It is most convenient to use a headlamp; this will allow you to repair the stove without difficulty.
Sequencing:
The driver's seat moves back as far as possible. Unscrew the bolts and handles located on the control panel. The panel is dismantled from the driver's side, i.e. at the bottom left. The latches that secure the cables are disconnected. To remove the cable, the fan damper is dismantled. When installing a new cable, pay attention to the fact that its ends on both sides must be twisted into a ring and securely fastened.
Assembly is carried out in reverse order
At the end of the work, it is important to make sure that the cable is working properly by checking
A little lower you will find a bracket holding the shell of the damper drive rod. You need to carefully pry it off with a screwdriver. Do the same with the other rods, ensuring that the control unit is completely disconnected.
You also have to disassemble the control unit when you discover that the heater of your Chevrolet Niva does not work or works with serious problems.
Very often the electronic control unit for the stove installed on your Niva fails. In this case, you will still have to turn to qualified electricians for help, since you can remove the unit, but you cannot identify the cause of the problem. To carry out such work, it is very important to have various tools, instruments, testers and devices, and it is also important to have good knowledge of electrical engineering.
So, if you are unhappy with the way the stove works on your Chevrolet Niva, you don’t like the fact that the car’s interior warms up slowly, then act boldly, look for the reasons, solve problems, armed with tips and necessary instructions, and enjoy the good performance of your car.
Improvement No. 1. We take air from the cabin
The main disadvantage of the Niva heater is that all the air into the heater radiator comes from the street, and when the air intake flap is closed, air circulation and heating stop completely. To eliminate this drawback, I disassembled the heater (I had to drain some of the antifreeze and disconnect the heater radiator pipes), and in the side wall of the heater housing, opposite the wall where the radiator tubes exit, I made a hole in the shape of a rectangular trapezoid. I did it in such a way that there was 1.5-2 mm of the body wall left to the boundaries of the plane in which I made the hole, and 6-8 mm from the side of the stiffener for attaching the petal valve. I made the hole using a drill, marked it, drilled along the contour of the small diameter holes, then connected the holes using a knife, then filed the edges of the resulting hole, giving it its final shape. The area of the resulting hole was approximately 25 square centimeters. It is through this hole, when the heater air intake flap is closed, that air is drawn from the passenger compartment.
Other details
The standard heater radiator and thermostat are also replaced. Preference is given to three-row copper radiators. They are more efficient in operation and leak less often. The thermostat is replaced with an analogue one or its thermal insert is modified.
Do-it-yourself modification of the stove on Niva 21213 with your own hands is quite labor-intensive and takes a lot of time. To modify the heating system of this car, you can find ready-made kits on sale that make this work easier. The procedure is presented in the video “Remaking the stove on Niva 21213 with your own hands: video instructions.”
Improvement No. 2. Increasing fan performance
I also slightly increased the efficiency of the standard heater fan. The fact is that the gap between the fan blades and the diffuser is about 3 mm, and the width of the diffuser is no more than 15 mm, while the width of the fan blades is more than 30 mm. Therefore, some of the air leaks back between the blades and the diffuser, preventing a large pressure difference from being created between the suction area and the discharge area.
To eliminate these shortcomings, I reduced the gap between the diffuser blades and lengthened the diffuser. I solved these problems by cutting out a strip 30 mm wide and equal to the circumference of the diffuser from an old plastic fender liner 1 mm thick. I inserted the bent end-to-end ring from this strip tightly into the diffuser and “sewed” it to the diffuser with a thin wire through the drilled holes, so that the fan blades did not cling to the strip or wire. Against the blowing windows, the width of the strip is trimmed to 20-25 mm.
According to my estimates, the efficiency of the fan increases by 10-15%, so you don’t have to bother with this problem.
Fan replacement
Experienced car owners recommend not stopping there and continuing to modify the stove by tuning the fan.
Some people suggest getting rid of the fan installed by the manufacturer and installing a figure eight fan instead.
If you also decide to carry out such a replacement, you need to additionally decide whether you will leave the original control of the stove or also replace it with a “eight” analogue.
Having decided on the second option, take care of purchasing the following additional items:
- fan speed switch;
- additional resistor for the stove.
So, after you have completely prepared all the necessary components, you can proceed directly to the process of modifying the fan.
Initially, you should dismantle the old air supply box. Unfortunately, despite the fact that this requires unscrewing only four nuts, it will not be possible to do this without outside help. Your partner will need to hold the screws under the hood while you unscrew them using a wrench.
After this, you can easily remove the air intake. Clean it if it needs it, and then cut away a small amount of the plastic to provide enough space for the new fan to operate.
Install the fan and carefully inspect for anything that may interfere with the operation of the installed fan. If you find such obstacles, carefully cut them off.
Once you are sure that there is nothing else that can prevent the fan from working, secure it with sealant. There are small gaps around the fan nozzle; it is important to eliminate them by covering them with any material. This will prevent warm air from escaping.
Now the assembled fan is being introduced back into the space in which its old counterpart previously “lived”. Everything is securely fastened and the closing and opening of the hood is checked. In some cases, after the introduction of a “foreign” fan, it is not possible to close the hood normally.
If everything is fine, reconnect all wires and install new controls. Upon completion of the work, be sure to check your results in action.
The stove should work perfectly, and warm air should spread very quickly inside the car.