Sooner or later, owners of a VAZ-21099 car are faced with the need to carry out repairs taking into account the requirements for the vehicle. At the same time, replacement of equipment can only be carried out taking into account numerous nuances that determine the effectiveness of the result. It is mandatory to first drain the coolant and disassemble the dashboard, and then replace the VAZ heater radiator. Such a phased implementation of the event guarantees the successful restoration of the heating capabilities of the car interior.
Sequence of actions when replacing a radiator
For most beginners, the question of how to remove a stove radiator is not such a difficult task. You should first prepare containers for small parts and liquid remaining in the hoses. The sequence of manipulations is as follows:
Dismantling
- Unscrew the bolts located on the hose clamps. After which the radiator is disconnected from them. Important! When removing the hoses, you need to be prepared for the fact that residual coolant may spill out of them. In this case, keep a special container on hand.
- Remove the glove compartment.
- Unscrew the fastenings to the floor.
- Next, unscrew all the screws securing the radiator to the stove.
- The fastening of the cable that regulates the windshield blower damper is unscrewed.
- The radiator is disconnected from the stove. At this stage, problems with the torpedo are possible. To lift it up, you should rest your torso against the lower part of the glove compartment.
Installation
Next, a new radiator is installed. Actions are performed in reverse order. The car radiator is carefully installed, the torpedo is lowered down, the screws are screwed in, and they take their rightful seat.
Heater modification
Refinement of the stove in a VAZ car: how you want real warmth...
As a rule, it is the GDP that causes the most complaints about the operation of the stove - a rare example blows normally into the legs and onto the windshield, and if the air is also hot, it’s a great success. Moreover, now some new cars are equipped with a “modernized” heater (also known as the “14th”), which, in addition to everything, blows cold air out of the side nozzles!
In reality, everything is not so scary - it can be treated, even the “14th” heater. The most disgusting thing is that you need to do this... There are plenty of manuals on this topic, one of the most complete is in FAK and belongs to the pen of the famous handmaker VIC78. I went through my stove using it, and the results were simply excellent. True, this happened a long time ago and there was not the slightest desire to take everything apart again for photographing.
Therefore, an action was carried out to upgrade the stove in the M(i)tenka car - VAZ-21093i 1999. with the “14th” heater on board. The fine-tuning of the stove was combined with noise insulation of the torpedo. I did not plan to make fundamental changes to the design of the heater, but only wanted to properly assemble and adjust it.
Disassembling the heater
First you need to drain the antifreeze - unscrew the plastic tap in the radiator (opposite the generator), but coolant will still remain in the heater radiator. Therefore, to drain it, a piece of hose with a funnel was used, which was placed directly next to the radiator hose. And if you pour the antifreeze into a clean container, then you can pour it back later...
First you need to drain the antifreeze - unscrew the plastic tap in the radiator (opposite the generator), but coolant will still remain in the heater radiator. Therefore, to drain it, a piece of hose with a funnel was used, which was placed directly next to the radiator hose. And if you pour the antifreeze into a clean container, then you can pour it back later...
To assess the misalignment of the heater output nozzles with the holes in the dashboard, you need to remove the air duct cover. As a rule, the stove is shifted slightly forward. If the misalignment is more than 50%, then the stove will have to be filed.
The torpedo will have to be removed. This procedure has also been described more than once, including in the magazine “ZR” No. 10 for 1999. Connectors for buttons and light bulbs can be labeled (with a felt-tip pen or on a piece of paper tape) so as not to be confused during installation. You also need to remove the steering wheel with pads and pull out the steering column switches.
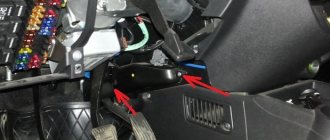
Next comes the turn of the stove. The heater itself is attached to the body with 4 nuts, which can be easily unscrewed with a 10 mm tubular wrench. The fan ground is pressed under the far right nut, next to the positive wire connector. There, the fan speed resistor connector is inserted into the stove body. Everything needs to be disconnected. Disconnect two chips from the lever block: the speed switch and the lighting lamp.
The hoses are disconnected from the radiator, and the cable latch at the stove tap is carefully unhooked. That's it, nothing else should connect the stove to the body of the car. Then the two screws securing the fan are unscrewed, but the rubber washers and the thrust bearing should not be lost.
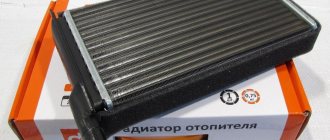
Radiator
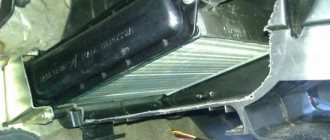
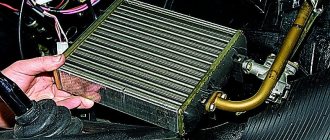
It is attached to the stove body with three self-tapping screws. You need to pull it out, but be careful: a little more antifreeze may spill out.
The car will be much warmer if the radiator has coolant “swirlers” (turbulators, hydraulic stops). These are plastic spirals that slow down the flow rate of coolant and increase heat transfer from the radiator when the engine is running at low speeds. According to VAZ employees, they should be present in most radiators, especially in new cars... If they are not available, then it is enough to cut aluminum or copper strips 1-1.5 mm thick and 5-6 mm wide (select according to the diameter of the tubes), one end Clamp it into the drill chuck, fix the other one and carefully curl it.
Features of replacing a radiator on various car models
When reinstalling the radiator, the following questions may arise:
Replacing the heater radiator on a VAZ 21099 with a high panel
If the radiator needs to be replaced, the high panel does not need to be removed. You will need to remove all the screws that secure the panel to the car body. Then the steering casing is removed and the right side of the panel is moved into the cabin.
Important! Before moving the panel to the side, you need to disconnect the ignition switch wires and the alarm system from it.
Replacing the radiator of a VAZ 21099 stove with a low panel
If the front panel is low, in order to replace the radiator, it must be completely removed. Then follow the previously described sequence of actions.
Replacing the radiator of a VAZ 21099 stove with a high panel without removing it
If you don’t want to remove the panel every time you replace the radiator, you can file it down and then reinforce it with self-tapping screws. In the future, they are unscrewed if necessary. When replacing the radiator on an injection VAZ 21099, you should be attentive to the relays located under the panel.
After replacing the radiator, it is important to check how the stove works. Those who have done all these simple manipulations, the next time problems arise with heating the car, will not have the question of how to independently change the heater radiator on a VAZ 21099. Everything is simple if you do everything correctly. The radiator service life is approximately 8 years. If used incorrectly, it will fail within 2–3 years. For preventive purposes, the radiator should be removed for cleaning twice a year. And then reliable heat is provided.
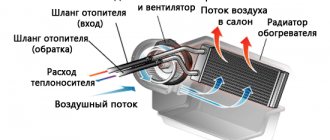
Principle of operation.
Before identifying a malfunction, you should know how the system operates. Only then can you judge the likely breakdown.
- This unit has an electric motor with a fan. Which supplies hot air to the car interior;
- Then we have a button for on off;
- Resistance system, they provide the desired fan speed;
- There is a heater radiator through which the liquid passes.
That is, there are not many parts that can lead to failure. It could be a radiator.
Or liquid leakage occurs due to leaky connections.
See:
Part selection
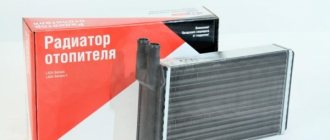
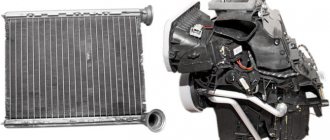
Before replacing, the first thing you need to do is select a radiator and purchase it. Aluminum and copper radiators are available on the market today.
Aluminum has the following characteristics:
- In the event of a malfunction, repairs are not possible.
- high thermal conductivity;
- low price;
Copper radiators are characterized as follows:
- The cost of repairs is also not cheap.
- the cost is slightly higher than aluminum analogues;
- unlike aluminum analogues, thermal conductivity is greater;
- in case of a leak, you can always pay in part;
The high price of copper radiators, as well as low demand, make copper radiators a rare item that cannot always be found in stores (a small number of manufacturers are engaged in production).
Which one to choose is up to you. In this article you will learn only reflective information on the basis of which you can make an informed choice. The main thing to note is that painted radiators are not purchased.
How to change the radiator of a VAZ-21099 stove with your own hands
Sooner or later, owners of a VAZ-21099 car are faced with the need to carry out repairs taking into account the requirements for the vehicle. At the same time, replacement of equipment can only be carried out taking into account numerous nuances that determine the effectiveness of the result. It is mandatory to first drain the coolant and disassemble the dashboard, and then replace the VAZ heater radiator. Such a phased implementation of the event guarantees the successful restoration of the heating capabilities of the car interior.
- Features of the heating system
- How to check the system
- How to replace a stove radiator
Checking the system
Before you start work, you need to make sure that it is the heater radiator that is to blame for the malfunction.
- We bend the center console where the computer is located. We disconnect the shield from the overhead torpedo, here we will see the body of the heater itself;
- We take a flashlight and look, it should be visible if water is leaking. We immediately check the tap and pipes.
- Let's look at the leaks. The fact is, if the leak is not large, you might not notice it in the cabin. Therefore, it is worth inspecting everything with sufficient quality.
You can watch the video on replacing the stove radiator on a VAZ 21099 on our website. But only after a thorough inspection can you begin to work.
Instructions for this topic are given below.
Disassembling the torpedo
First, we prepare a couple of containers; they will be needed for the machine parts. You can put plastic in one, and different screws in the other.
- In order for us to get to the torpedo bolts, we need to remove the trim, which is located in its upper part;
Attention: You should prepare and place empty containers nearby; they will come in handy if coolant suddenly starts leaking. Take the volume within 6=7 liters. It's better to have a reserve.
- The most important thing is to purchase a radiator. Before paying, inspect and check it for defects and only after that make a purchase;
- Prepare the necessary tools. Put in a set of sockets and screwdrivers. After this, take a flashlight and you can begin further work;
- Replacing the VAZ 21099 radiator heater begins with closing the tap, and the heater should be set to cold. The engine must also be completely cooled;
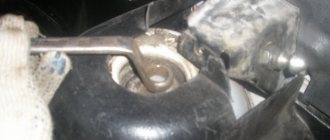
- We unscrew the radiator mount, which consists of three bolts, raise the rod, which is located above the radiator and remove the pipes;
- When you remove the first pipe, be careful to place the container. A little liquid should come out of it, about 200 grams. Use clean containers; after repairs are completed, you can use this antifreeze back;
- We plug the first pipe with something and remove the second one. In principle, liquid should not come out of it, if only a small amount comes out;
- Replacing the radiator on the VAZ 21099 stove continues by removing the radiator. Which moves without problems, quite easily, but on the way of movement we will be prevented from doing this by the edge of the torpedo. You can raise it slightly by resting your back against the bottom edge of the glove compartment. After that, we place it on the lower mount, which is located on the passenger seat side. After this, the stove will come out freely;
Removing a faulty device
First you need to determine whether your car has a low or high center panel. If the panel is low, then you are definitely out of luck. To remove it you will have to sweat.
- First, turn the front wheels so that they point straight ahead.
- Then open the hood, remove the negative terminal from the battery, remove the choke cable from the choke lever, and disconnect the speedometer cable from the gearbox.
- Remove the stove faucet handles.
- We take out, by pulling towards ourselves, the electric fan switch handle.
- Unscrew the 4 screws securing the beard trim and pull it towards you.
- We disconnect all the plugs, having previously marked or remembered which connectors they will need to be inserted into later.
- Unscrew the 4 screws securing the stove control panel.
- Unscrew the 2 screws securing the instrument panel visor and remove it.
- We squeeze the clamps of the instrument panel and remove it from the dashboard.
- Disconnect the speedometer cable, all plugs and fittings from the dashboard, and remove it.
- Pull it towards you and remove the handles for the headlight range control and the dashboard light switch.
- Unscrew the nuts securing the headlight range control and the dashboard light switch.
- Remove the steering wheel and steering column switches.
- Set the ignition key to position “0” and remove the connector with the ignition switch wires.
- Unscrew the fastening screws and remove the central panel.
Now we can get to the details of the interior heating system. We need to take them off.
- Let's look under the hood again. If you have containers or extra money, drain the antifreeze from the system.
- We find hoses in the engine compartment going to the heater tap pipes. We remove them by loosening the clamps.
- Moving into the interior, we remove the hoses from the pipes under the dashboard. Unscrew the two nuts securing the stove tap and remove it.
- To the right of the stove body, unscrew the screw that holds the clamp of the heated glass flap rod.
- Unscrew the three screws securing the heater radiator and remove it.
- Now let's examine all the details. If we find faulty ones, we replace them.
Return to contents