| The service life of the front pads on Priora is 30-50 thousand km. mileage However, for a number of reasons this consumable may change more often. The process of replacing pads on a Priora is quite simple, so even a novice car enthusiast can perform such car maintenance. |
Replacement steps
Replacing the front brake pads is not affected by the fact that the car has ABS or does not have an anti-lock braking system. The details are the same. This is important if you need to change the rear brake pads on a Priora.
Before carrying out work, you need to inspect and check the braking mechanism on the Lada Priora.
Carry out maintenance, check the condition of the pads and how worn they are. Analyze the performance of the braking system. Remove the wheels.
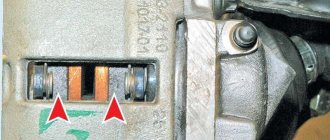
Examine the brake pad linings through the hole in the caliper.
Replacement is made if the thickness of the overlay elements is less than 1.5 millimeters.
Turn the brake disc. Check the working surfaces of the mechanism from all sides. It is important to record the absence of cracks and deep dents.
Using a caliper or micrometer, measure the thickness of the disc. The indicator should not exceed 17.8 millimeters. If the thickness is greater, both discs will have to be replaced.
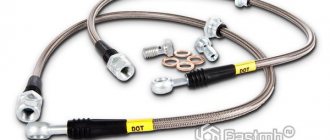
The photo below shows the brake system of the left front wheel. Elements are marked with numbers:
- 1 — bolt connecting the cylinder body to the caliper;
- 2 — brake hose;
- 3 — wheel cylinder;
- 4 — bleeding fitting for the braking system;
- 5 — caliper;
- 6 — pads;
- 7 — caliper guide pin;
- 8 — mini-corrugation for protecting the guide pin;
- 9 - guide;
- 10 — disk;
- 11 — protective casing;
- 12 — ABS speed device;
- 13 — punk retainer;
- 14 - screw connecting the cylinder to the guide pin.
If the brake mechanisms are faulty, the pads are changed as a whole, that is, all four at the same time. If you install only one new part, the car will wobble when braking.
Check the fluid level in the brake hydraulic reservoir. At the maximum mark, remove the liquid with a syringe, and only then change the pads. If excess is not removed, leakage will occur as the piston plunges into the cylinder.
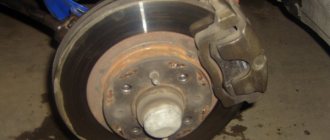
Secure the car to a support and remove the front wheel.
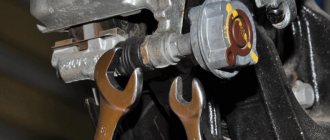
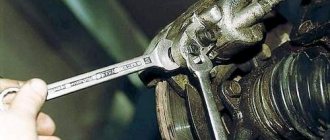
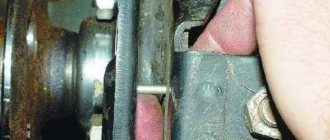
Using pliers, bend the edges of the retaining bar for the screw securing the cylinder to the lower guide pin.
Using a 13mm socket wrench, remove the bolt. Use a 17 mm wrench to support the guide pin.
Remove the screw together with the retaining bar.
Raise the bracket.
Remove the pads from the guide.
While the bracket is rotated relative to the guide, you cannot brake. If you neglect this rule, the piston will fall out of the cylinder.
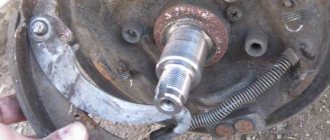
Clean the places where the pads were located from dust, dirt and rust.
Using sliding pliers, insert the piston deep into the cylinder, then install new pads.
Place a wide-bladed screwdriver or a mounting spudger into the caliper hole. Move the bracket by pressing the disc with the tools. Insert the piston into the cylinder.
When the parts are completely replaced, press the brake 3-5 times. This is necessary to set the distance between the discs and pads.
Check how much liquid is in the tank. If necessary, add to the established norm.
During operation, the coating of the brake system discs becomes distorted. The friction area between new and untested pads and discs is reduced.
Experts recommend moving carefully during the first 100 kilometers of driving after completion of work on replacing brake system elements. Since the new pads have not yet taken root, the car can slow down much longer.
The pads will get hotter than the old ones. There may be some smoke and odor, especially at high temperatures.
Just like on the first wheel, you need to replace the front brake pads on the second. It doesn’t matter whether the Priora will have ABS or without it.
Life hack: brake discs of a Priora car - malfunctions, removal and installation
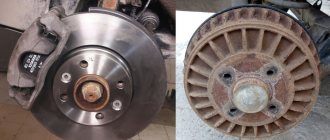
The brake discs on a Priora car, like any other, are an important part of the front suspension, which is the first to begin braking. There are two options for wheels on Priora - regular factory ones and ventilated ones.
The design of the Lada Priora brake system is such that “drums” are installed at the rear, and calipers at the front. This has been going on since 2101. However, it is possible to modify the rear brakes - that is, install brake discs with calipers and backwards, instead of drums. Spare parts for the brake system on Priora must be purchased and installed by the owner on time - the safety of travel depends on their “freshness”. The ventilated front disc has an advantage over a regular one; it is lighter and has plenty of holes, which means it cools down faster! The Priora, of course, brakes well in stock, but until you have driven a Ford or Kia, disc brakes are better there. The price of ventilated brake discs for a Lada Priora car starts from 4,000 thousand rubles and above, standard ones are cheaper than 1,100. In three years, my factory production has reached 2 millimeters.
Remember that the price of these spare parts is incomparable to the damage that you may incur if the braking time increases due to wear and tear of the components. Replacement must be done on time. On the Priora, front brake discs are installed in all trim levels, but the rear ones are a subject of tuning for daring car owners.
Reasons for replacement
AvtoVAZ recommends changing the front pads every 30-50 thousand kilometers. But you don’t always need to strive for the indicated numbers, since different cars are used in different modes.
There are drivers who constantly use the car on the highway, and there are also those who only drive around the city. When in city traffic jams you have to brake more often.
Regardless of operating conditions, it is important to inspect the pads monthly. If they wear too much, the brake disc is damaged. And this puts the driver of the vehicle at risk.
Parameters under which the pads need to be changed:
- overlay thickness less than 1.5 millimeters;
- the lining is unevenly worn or does not contact the brake disc tightly;
- the pressure spring is faulty;
- The lining is damaged, there are cuts and deformations.
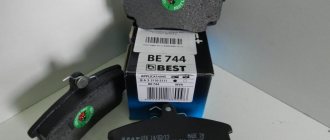
Depending on the manufacturer, the cost of the pads varies from 500 to 2000 rubles.
How much do standard brake discs cost on Priora - article number and price
The front braking system of the Lada Priora car consists of several parts - very close to the discs there are several more parts that are also important for proper braking, and the other part of the suspension is responsible for a smooth ride and minimizing jumps when passing obstacles. Before buying brakes for a Priora, inspect all the parts so that they do not wear out - if they are worn out, new rotors may not save you.
The standard part for the VAZ-2170 “migrated” from the tenth family, and therefore you can often find it in stores with the inscription “for the VAZ-2112”. Its catalog number is 2112-3501070-02, the price is from 1100 to 1500 rubles.
Adviсe
To ensure a smooth replacement, it is important to:
- check the functionality of the entire braking system;
- If the protective covers are cracked or otherwise damaged, replacement is required. It is better to use Uniol-1 lubricant or any high-temperature lubricant;
- Do not operate the car immediately after replacement. It takes time for the pads to get used to the discs;
- To make the grinding process complete faster, drive out onto a flat road and perform several stages of movement. Accelerate first and then slow down.
You can change the front brake pads on a Priora without ABS and with an anti-lock braking system according to the same principle as for all VAZ cars. There are no differences in the process of replacing parts.
To change the pads, you do not need to take the car to a pit or overpass. To work, you only need a jack, with which you can easily remove the wheel. After studying the detailed instructions, you can easily replace parts yourself and save on it.
It is necessary to change brake pads if:
- The thickness of the friction linings is less than 1.5 mm;
- The surface of the brake pad is oily or “polished” and braking is ineffective;
- The friction lining is cracked or peeling off;
- The pads have chips and grooves;
- An unpleasant grinding and squeaking sound is heard while driving.
Before replacing brake pads on a Lada Priora, prepare the following tools:
- Jack;
- Two keys for “13” and “17”;
- Flat screwdriver;
- Hammer and chisel;
- New brake pads;
- Rags, metal brush;
- Liquid WD-40.
Main faults and signs of wear
You need to listen carefully to your suspension - sometimes it is the sounds that are the first signs of wear, and only after them is followed by “sluggishness” of braking and passing obstacles. Any extra sound is a reason to think carefully and start diagnosing. Don’t put off the problem - as soon as you have free time, try to inspect the chassis of your Priora.
Signs of wear on the VAZ-2170 brake discs may appear as follows:
If you find one of these signs and then disassemble the front part of the chassis, you need to inspect the brake system. One part may interfere with the movement of another, and dirt may become clogged (after an off-road trip). Any malfunction should be corrected in a timely manner. The nature of these damages can indicate several facts:
Manufacturers and prices of analogues - which brake discs are better to install on Priora
The owners want to improve their Priora, including in terms of safety. Therefore, when choosing spare parts for a car, you can pay attention to several manufacturers who create analogues. As you know, the best brands are those whose products have been tested by other drivers. These include:
All models presented in the list come without ABS support. An exception is the BM - BD V 220 kit, which can work with ABS. Of all the above, the version for the sports Priora is especially praised, with components from the manufacturer Brembo in second place. As for the rear drums on the Priora, they differ from the front ones in that they have a technological window - it is necessary so that the ABS sensor can be connected.
Installing new pads on a car
Before proceeding with installation, it is necessary to thoroughly clean the seat of the bracket for the pads, as well as the caliper itself. The contact points between the outer part of the pad base and the caliper must be treated with copper grease. This will reduce vibration and extraneous sounds when braking.
Using the example of a caliper, the place where the lubricant is applied is clearly shown in the photo below.
We install new pads and put the caliper in place. If it does not sit all the way down, you need to push the brake cylinder all the way down. This can be done with a hammer, using its handle for emphasis, or with a regular mounting spatula.
Snapshot7
We remove the brake pads from their guide.
We remove the brake pads from their guide.
We remove the brake pads from their guide.
Attention! Once the caliper has been rotated relative to the shoe guide, do not press the brake pedal as the piston may come out completely from the cylinder.
We clean the pad seats in the caliper and the pad guide from dirt and corrosion.
Before installing new pads, it is necessary to move the piston as much as possible inside the cylinder. This operation can be performed in different ways.
Front brake
The picture below shows the front wheel brake mechanism. What does it consist of, names of parts, etc. This will be needed to understand the process of its work.
Brake mechanism of a front-wheel drive Lada car: 1 - bolt securing the upper part of the caliper to the base; 2 — brake fluid hose; 3 — brake cylinder; 4 — air bleeder when bleeding the brake system; 5 — caliper; 6 — front brake pads; 7 — caliper guide; 8 — guide boot; 9 — brake shoe guide shelf; 10 — brake disc; 11 — brake mechanism protection; 12 — ABS sensor crown; 13 — stop washer; 14 — guide fastening bolt.
When do pads need to be replaced?
Replacement is required if:
- When braking there is an unpleasant squeaking noise.
- There is a lot of oil on the surface of the pads.
- The friction lining moves away from the base.
- The thickness of the pads is less than 1.5 mm.
- Chips and deep grooves appeared on the surface of the linings.
To check, roll the Priora into the inspection hole. We need to find a special hole located on the brake shield. It should be covered with rubber. Remove the plug and inspect the brake pads. You can measure the thickness, which should be at least 1.5 mm. Cracks, scratches, chips and other defects are also visible through the inspection hole.
Brake discs for VAZ (Lada) Priora
for repair of VAZ (Lada) Priora
There was a replacement of brake discs at 150,000 thousand km, we decided to try the Brembo company, we drove 50,000 thousand on them so far the flight is normal)))
Since the discs beat terribly, on the advice of a friend, we bought TRW discs and pads, they seem to have broken in, the braking is consistently clear, but have not yet been used in hard mode.
The front brake discs, both Alnas and Avtoreal, are for**** me - complete crap! I've used three sets of discs in a year - enough for two months to keep them going.
These cost 14. It got better after winter and spring. The steering wheel is shaking, mom, don't worry. I won't buy this again.
Snapshot1
Using a caliper or micrometer, we measure the thickness of the disk, which should not be less than 17.8 mm.
Otherwise, both disks must be replaced. Using a caliper or micrometer, we measure the thickness of the disk, which should not be less than 17.8 mm. Otherwise, both disks must be replaced.
Using a caliper or micrometer, we measure the thickness of the disk, which should not be less than 17.8 mm. Otherwise, both disks must be replaced.