Currently, all LADA models (Lada XRAY, Vesta, Largus, Granta, Kalina, Priora, Niva 4×4) without exception are equipped with ABS (anti-lock braking system). During the operation of the car, many owners notice that the ABS and ESC lamps (if this system is available) light up on the instrument panel. Let's figure out how to solve this problem and improve the design.
Purpose of the ABS sensor and operating principle
The ABS sensor is one of the three main components of the system, which also includes the control module and hydraulic unit. The device determines the moment of wheel locking based on its rotation frequency. When this undesirable event occurs, the electronic control module receives the sensor signal and forms an effect on the hydraulic unit installed in the line immediately behind the main brake cylinder.
ABS sensor with wire and connector
The block reduces or even stops the supply of brake fluid to the locked wheel cylinder. If this is not enough, the solenoid valve will direct the fluid into the outlet line, relieving the pressure already in the master cylinder. When wheel rotation is restored, the control module removes the pressure from the valves, after which the hydraulic line pressure is transferred to the wheel brake cylinders.
Each wheel of the car is equipped with an ABS sensor.
Anti-lock braking system (ABS). Description
A car's Anti-lock Braking System is a system that regulates the brake fluid pressure in the brake circuits, which helps prevent the wheels from locking during braking. In other words, this system prevents skidding, which provides the following benefits:
- Increasing vehicle stability.
- Reducing braking distance.
- Saving rubber and preserving the studs on car tires.
In addition to its primary function, anti-lock braking system sensors and valves are used for many other vehicle systems. For example, exchange rate stability system or emergency braking assistance system. The stability control system brakes certain wheels during sharp turns or drifts, which significantly improves safety performance. Brake Assist keeps the brake pedal depressed until the vehicle comes to a complete stop.
Possible malfunctions and ways to eliminate them
What problems can occur in the operation of controllers:
- The Check Engine indicator on the dashboard comes on, and the ABS warning light may also come on. In most cases, the cause of this problem is related to malfunctions in the control module or damage to the electrical wiring. If the electrical circuit is damaged, the control module will not be able to receive signals from the controllers. In any case, damaged wires must be replaced; if the problem lies in the control unit, then it must be repaired.
- It is possible that the ABS system successfully performs self-diagnosis and then randomly turns off. With such a problem, the malfunction may lie in damaged wiring, oxidation of the controller contacts, or poor connection of the device to the circuit. Also, the reason may lie in the sensor shorting to ground. It is necessary to check the wiring itself, the quality of the connection (turn off and turn on the sensor again, while cleaning the contacts), and also clean the ground.
- The sensor has failed. This device cannot be repaired, so when it breaks, it must be replaced. There is nothing complicated about this, you just need to remove the wheel itself, disconnect the connector and dismantle the controller, and then install a new device in its place.
- Damage to the winding on the sensor itself. Some car owners practice repairing devices with such a problem by rewinding the wire. As practice shows, such repairs are sometimes advisable, in particular if the device has not yet reached the end of its service life.
ABS Lada Vesta error codes and their interpretation
Diagnosing ABS yourself is a rather difficult task if you do not have diagnostic equipment (cable, laptop, and software). If you have the ability to read errors, then by comparing their codes with the description, you can much faster determine the cause of the malfunction. The following are the errors that “light up” the anti-lock braking system malfunction light:
Thanks for subscribing!
- U0121 - no data from the ABS system controller
- U0122 - no data from ESP system controller
- U0415 - incorrect data from the ABS system controller
- U0416 - Invalid data from the ESP system controller
In most cases, the absence of data from the controller indicates a malfunction. If the diagnostics indicate errors U0415 or U0416, then there is a high probability of sensor malfunction or damaged wires. Also, do not forget that with different tire pressures, the control system may receive incorrect data from the controller and indicate the last two errors.
Change or repair
As a result of diagnosing the device, it is possible to determine which sensor node is damaged. If the tester readings tend to zero, this indicates a short circuit in the connection wires; “infinity” indicates a violation of the integrity of the coil winding. There is an opinion that repairing wiring does not cause any problems, but a faulty sensor is easier to simply replace. It’s hard to disagree with the first thought, but the next “point” can be disputed.
The fact is that the cost of some sensors reaches 14–18 thousand rubles, and you will have to wait for their delivery for a long time. Having certain skills, a reserve of patience and natural ingenuity, it will be much more useful and faster to repair the device than to pay for a long-awaited expensive order. Please note that this advice is only advisory in nature - the final verdict remains yours. If the decision to repair has been made, we will be happy to help you carry it out correctly.
Some nuances
Replacing sensors that are installed on the steering knuckles of the front wheels is much faster, since access to these parts is more convenient:
- The car is jacked up and the required wheel is removed.
- The bolts that secure the sensor are unscrewed, and the device is removed from the seat.
- The wiring fastening is released and the connector plug is disconnected.
- Installation of a new sensor is carried out in the reverse order.
Attention! When installing a new sensor, you must ensure that no dirt gets into the place where it fits.
Before replacing the sensor, reasons that could cause it to malfunction should be eliminated. Particular attention should be paid to specific problem areas found in each car model. For example, all FORD cars manufactured before 2005 suffer from interruptions in the operation of electrical equipment that occur as a result of frequent short circuits, and the pain point of the ABS system of these cars is the quality of wiring insulation. In this case, it will be possible to repair the sensor instead of completely replacing it.
Checking the old sensor
It may be that installing a new sensor is not required at all, because... the old one could simply become dirty and for this reason refuse to work. To fix this, you need to very carefully clean the sensor and check its electrical connection to the unit (you can use a screwdriver with an electrical indicator). It is worth noting that in the vast majority of cases, cleaning the sensor is quite enough to solve the problem of missing ABS or early activation of the system.
However, if cleaning does not help or the sensor has completely “died”, then it will need to be replaced
When choosing a sensor, pay special attention to the part model. Remember that the sensors differ not only on different models, but also in the location of installation “front-rear”
To install a new sensor, you may need additional tools - pliers and a piece of pipe (as a lever). Again, due care must be taken, since the ABS sensor is a rather fragile system. Having installed the sensor in its proper place, you need to screw in the mounting bolt. Then the wire going to the ABS control unit is fixed in place and connected.
Summarizing
It has been established that a properly performed check of the ABS sensor with a tester is the primary task when repairing the system. You can use any convenient testing method, but you should always remember that diagnostics alone will not solve the problem - you will have to replace the device or “repair” the electrical wires. In order for the ABS to perform its task during braking, it is very important to monitor the condition of the sensors, checking, repairing and replacing them in a timely manner. Let's hope that our review and this video can help you carry out this “operation” yourself.
Principle of operation
It works as follows: in the gearbox there is a special mark on the gear wheel, which, when this wheel rotates, generates an impulse using a speed sensor. It is by the frequency of these pulses that the speed of the Lada Granta is determined.
The DS on the Grant, like on many cars, is located quite low, so it is exposed to water and dirt. If we remember that the speed sensors themselves on domestic cars are not highly reliable, then it becomes clear why they fail so often.
Signs of a malfunctioning speed sensor:
- The speedometer needle does not react to speed in any way (it lies at zero);
- Electric power steering does not work;
- The speedometer readings change, but do not correspond to reality.
The abs light came on in the car
1200 rub. for the photo report
We pay for photo reports on car repairs. Earnings from 10,000 rubles/month.
Write:
Some car enthusiasts are afraid that when the ABS light is on, it somehow affects the operation of the braking system as a whole. They urgently begin to scour the entire Internet in search of an answer to why the ABS light is on and what to do. But don’t panic so much, the brakes on your car should be in perfect order, only the anti-lock system will not work , which, in principle, is not critical, although in some emergency situations it helps a lot. To understand the system, I recommend reading about ABS.
Main types
The ABS sensor is considered the primary measuring part of the anti-lock braking system.
The device consists of:
- A meter placed permanently near the wheel;
- An induction ring (rotation indicator, impulse rotor) installed on a wheel (hub, wheel bearing, CV joint).
The sensors are available in two versions:
- Straight (end) cylindrical shape (rod) with a pulse element at one end and a connector at the other;
- Angled with a connector on the side and a metal or plastic bracket with a hole for a mounting bolt.
Two types of sensors are available:
- Passive - inductive;
- Active - magnetoresistive and based on a Hall element.
ABS allows you to maintain controllability and significantly increase stability during emergency braking
Passive
They are distinguished by a simple operating system, but are quite reliable and have a long validity period. Does not require a power connection. An inductive sensor is essentially an induction coil made of copper wire, in the middle of which there is a stationary magnet with a metal core.
The meter is located with the core to the pulse rotor in the form of a wheel with teeth. There is a certain gap between them. The rotor teeth are rectangular in shape. The opening between them is equal to or slightly larger than the width of the tooth.
While the vehicle is in motion as the rotor teeth pass near the core, the magnetic field penetrating the coil is constantly changing, forming an alternating current in the coil. The frequency and amplitude of the current are directly dependent on the speed of the wheel. Based on processing of this data, the control unit issues a command to the magnetic valves.
Article on the topic: How to check the fuel pump relay yourself
The disadvantages of passive sensors are:
- Relatively large dimensions;
- Poor accuracy of readings;
- They begin to function when the car picks up speed over 5 km/h;
- Triggered by minimal wheel rotation.
Due to frequent errors, they are installed extremely rarely on modern cars.
Magnetoresistive
The work is based on the property of ferromagnetic materials to change electrical resistance when exposed to a constant magnetic field.
The part of the sensor that controls changes is made of two or four layers of iron-nickel plates with conductors applied to them. Part of the element is installed in an integrated circuit that reads changes in resistance and generates a control signal.
The impulse rotor, which is a magnetized plastic ring in places, is rigidly fixed to the wheel hub. During operation, the magnetized sections of the rotor change the environment in the plates of the sensitive element, which is recorded by the circuit. Its output produces pulsed digital signals that enter the control unit.
This type of device controls the speed, direction of rotation of the wheels and the moment they come to a complete stop.
Magnetoresistive sensors record changes in the rotation of vehicle wheels with great accuracy, increasing the efficiency of safety systems.
Based on Hall element
This type of ABS sensor operates based on the Hall effect. In a flat conductor placed in a magnetic field, a transverse potential difference is formed.
Hall effect - the appearance of a transverse potential difference when a conductor with direct current is placed in a magnetic field
This conductor is a square-shaped metal plate placed in a microcircuit that includes a Hall integrated circuit and a control electronic system. The sensor is located on the opposite side of the pulse rotor and has the form of a metal wheel with teeth or a plastic ring, magnetized in places, rigidly fixed to the wheel hub.
The Hall circuit continuously produces signal bursts of a certain frequency. At rest, the signal frequency is reduced to a minimum or dies out completely. During movement, magnetized areas or rotor teeth passing by the sensing element cause changes in the current in the sensor, which are recorded by the tracking circuit. Based on the received data, an output signal is generated and sent to the control unit.
Sensors of this type measure speed from the beginning of the vehicle’s movement and are distinguished by the accuracy of measurements and the reliability of their functions.
How the sensor works
Different manufacturers install different versions and implementations of anti-lock braking systems on their cars. There are several types of sensors. Some of them operate on the principle of the magnetoresistive effect, while others operate on the basis of the Hall effect. There are passive and active sensors.
Passive sensors are inductive speed sensors. The design and operating principle are extremely simple. It is based on an ordinary inductor coil wound using thin copper wire. A powerful magnet and an iron core are installed inside the coil - also magnetic. The end part of the coil with the core is installed opposite the magnetic ring mounted on the hub.
The sensor operates on the principle of electromagnetic induction. While the coil is at rest, there is no signal at the sensor outputs. When the car begins to move, a toothed ring rotor will move near the sensor core. This will change the magnetic field passing through the coil.
Due to the alternating magnetic field, an alternating current is generated in the coils, which is transmitted to the control unit. Such a system is not subject to interference and dirt, but begins to work only when the speed reaches 5-7 km/h.
An active analogue appeared in the 90s. The sensors operate on the principle of a semiconductor diode - the direction of the electric current changes under the influence of magnetic fields. Such sensors are called magnetoresistive. There is also a Hall effect sensor, where a current is generated in a resistor placed in a magnetic field.
The magnetic field is created by means of a special ring, which is attached to the car hub and rotates with the hub. In the case of passive sensors, any changes in the magnetic field lead to changes in the direction of the electrons - resulting in a change in resistance. These changes in resistance are recorded by the electronic module or ECU.
In the active sensor version, a changing magnetic field forces electrons to move to one end of the element. As a result, a voltage is generated that is transmitted to the ECU.
Is it possible to fix a faulty sensor?
If the winding of an element is damaged, some car owners get out of the situation by rewinding the coil. However, practice shows that it is not always possible to restore functionality in this way.
ABS sensor repair
If a faulty ABS sensor is detected, it is dismantled, after which the issue of replacement or repair is decided. The cost of the device is quite high, and often there is a long wait for its delivery, which makes repairs quite feasible. The work is performed in the following order:
1. The sensor is disassembled by cutting off the part in which the measuring coil is located with a hacksaw. The body is carefully filed in a circle so as not to damage the fasteners.
2. The plastic casing protecting the coil is removed using a sharp knife and the winding is unwinded from the frame.
3. Wind a new coil with a wire of the same diameter. The RES-8 relay winding is suitable for this. The number of windings must provide the required resistance value - 0.92-1.22 kOhm. The work is carried out very carefully, since the wire is quite thin, and if it breaks, the process begins again.
4. The ends of the wires are soldered to the terminals, and the coil is effectively insulated from moisture using silicone or wax sealant.
5. The sensor is assembled by restoring the old housing. If the shell is critically damaged, it is made independently from the body of an electrolytic capacitor, suitable in size, and epoxy glue. A hole is made at the bottom of the body for the coil rod. After placing the updated part there, glue is poured.
6. After the glue has dried, the capacitor shell is removed, and the sensor mount is glued to its original place.
7. After the repair is completed, the sensor body is ground with sandpaper to accurately fit the socket. During the installation process, observe the following rules:
- The core of the device is placed parallel to the teeth of the response disk and is controlled so that it does not overlap a pair of adjacent teeth;
- A gap of 0.9-1.1 mm is left between the tooth and the core.
At the end of the installation, check the functionality of the system by starting the engine and making sure that the ABS indicator goes out 6 seconds after the start.
What to do if the ABS light is on?
It is worth noting that the system works normally if the ABS icon lights up when the ignition is turned on and goes out after a couple of seconds. The first thing to do if the ABS light is constantly on is to check the fuse for this system, and also inspect the wheel sensors.
Quite often, the sensor connector on the hub either oxidizes or the wires fray. And if the ABS icon is on after replacing the pads or hub, then the first logical thought is that you forgot to connect the sensor connector . The presence of dirt on the sensor also causes the indicator to light up.
Quite often, car owners may be frightened by the appearance of an orange ABS icon after a good slip. In this case, you shouldn’t bother at all: brake sharply a couple of times and everything will go away on its own - the control unit’s normal reaction to such a situation. When the ABS light does not light up constantly , but periodically, then you need to inspect all the contacts, and most likely, the cause of the warning light can be quickly found and eliminated.
Choosing rear brake pads for Lada Largus
The rear pads on the Lada Largus with 8 valves have dimensions of 203x38 mm, Largus with a 16-valve engine is equipped with pads with dimensions of 228x42 mm.
| Manufacturer | engine's type | vendor code | approximate price |
| ORIGINAL | |||
| RENAULT (France) | 8V | 440601749R, 7701208111 | 2400 rub. |
| 16V | 7701210109 | 3000 rub. | |
| LADA (Russia) without ABS | 8V | 7701208111 | 2100 rub. |
| 16V | 7701210109 | 2500 rub. | |
| ANALOGUES | |||
| BOSCH (Germany) | 8V | 986487585 | 1300 rub. |
| 16V | 986487754 | 1800 rub. | |
| TRW (Germany) | 8V | GS8729 | 1700 rub. |
| 16V | GS8780 | 2000 rub. | |
| FERODO (Switzerland) | 8V | FSB519 | 1500 rub. |
| 16V | FSB4031 | 1600 rub. | |
| BREMBO (Italy) | 8V | S 61 520 | 1300 rub. |
| 16V | S 68 546 | 1900 rub. |
For safe operation of the machine, all pads on one axle should be replaced, regardless of the reason for the repair.
Procedure for removing the front wheel speed sensor
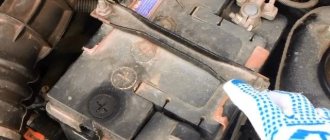
- Disconnect the negative battery cable.
- Disconnect the front wheel speed sensor connector.
- Raise the vehicle and place it on the supports provided for this purpose.
- Remove the wheel. Cm.
- Turn the steering wheel so that the wheel speed sensor is accessible. The sensor is located at the rear of the steering knuckle near the steering linkage.
- Remove the mounting bolt and the sensor itself from the steering knuckle.
- Remove the rubber bushing from the wheel arch through which the sensor wiring harness and hydraulic drive tube are passed. Remove the wiring harness from the rubber grommet so that the connector can fit through the hole in the wheel arch.
- Release the sensor harness from the bushing fasteners and clamps and pull it through the hole in the arch.
Checking the quality of work performed
After replacing the sensor, its functionality is checked. To do this, it is enough to accelerate to a speed of 40 km/h on a flat, safe section of the road and perform sharp braking. If the car stops without pulling to the side, vibration is transmitted to the pedal and a specific sound of brake pads being activated is heard - the ABS system is operating normally.
Today you can easily find and buy any ABS sensors - from expensive original devices to analog parts at an affordable price. Remember that proper selection of system elements plays an important role in its uninterrupted operation. When choosing a sensor, study the manufacturer's instructions and make sure that it fits the car, and this review will help you replace the device yourself.
I purchased a controller for DRLs with the ability to control it from a speed sensor. The manufacturer has a description of the installation with a pulse sensor from the box. Only cars with ABS.
What can you come up with to remove the signal from the wheel sensor?
Please explain how this ABS sensor works? Is it possible to test the health of the sensor with an LED?
- Incorrect speedometer readings on VAZ Largus - 3 answers
- Where is the speed sensor located and how to change it, Lada Largus? – 1 answer
- Is it possible to disconnect the speed sensor in Lada Largus? – 0 replies
If you are interested in the operation of the sensor itself, then briefly it looks like this.
The sensor is an inductive sensor that contains a generator - it refers to three wire sensors (inductive and Hall sensors, that is, active). When the sensor is located near a gear wheel, at the moment when a tooth appears next to the coil, the generation is disrupted. This disruption is converted by the electronic circuit into a rectangular pulse at the output.
If we consider the work further, the ABS system converts these impulses into wheel rotation speed, compares the rotation speeds and adjusts the braking forces without allowing the wheels to lock. Naturally, the algorithm of the system’s operation is much more complicated, but for a general understanding of the work, it makes no sense to delve into these jungles.
Front wheel speed sensor
This is what the sensor looks like in the hub assembly (steering knuckle): 1 – speed sensor mounting ring; 2 – inner ring of the front hub bearing; 3 – front wheel speed sensor; 4 – wheel hub; 5 – steering knuckle
Wheel bearing with sensor: 1 – magnetic bearing washer; 2 – speed sensor; 3 – hub bearing; 4 – speed sensor mounting ring
Jack up the car and place it on reliable stands, or place it on a two-post lift, apply the parking brake and turn off the ignition.
Remove the front wheel.
(Raise the car to a height convenient for performing work).
1 — bracket for fastening the speed sensor wiring harness; 2 — fender liner clamp; 3 — front wheel arch liner; 4 — front wheel speed sensor; 5 — bracket for fastening the speed sensor wiring harness on the front suspension strut; 6 - steering knuckle
Remove fastener 2, Figure 21-2, front wheel arch liner in the area where the speed sensor wiring harness is located (flat-head screwdriver).
Note: For ease of operation, you can remove the front fender liner (see here)
Remove the speed sensor wiring harness from the grooves in bracket 5 of the front suspension strut and from holder 1 on the mudguard of the engine compartment.
Remove insulating foam 1, Figure 21-3, from the knuckle speed sensor mounting socket (optional).
Figure 21-3 — Removing the front wheel speed sensor:
1 - insulating foam; 2 — front wheel speed sensor; 3 - latch
Remove speed sensor 2 from the mounting hole on the steering knuckle by using a screwdriver to press out the locking tab of sensor 3 (flat screwdriver).
Disconnect the speed sensor wiring harness connector from the front wiring harness and remove the sensor.
Attention. The wheel speed sensor insulating foam must be replaced.
Install insulating foam into the speed sensor mounting slot on the steering knuckle.
Connect the speed sensor wiring harness connector to the wiring harness
Install the speed sensor into the mounting hole on the steering knuckle until the latch engages.
Install the speed sensor wiring harness into the grooves of the front suspension strut bracket and into the holder on the mudguard of the engine compartment.
Secure the front wheel arch liner with the clamp.
How to bleed ABS brakes correctly and quickly
The procedure for bleeding the brakes is influenced by the design of the system, the location of components and the presence of additional electronic modules. You need to start by relieving the pressure in the hydraulic accumulator. To do this, you need to turn off the ignition (it is not necessary to start the engine) and pump the pedal.
A simple secret to quickly pumping brakes. Video:
Read how to bleed ABS brakes and stock up on the following materials, parts, accessories and tools:
- spanner;
- a rubber (possibly plastic) hose with a diameter corresponding to the thickness of the fitting tip;
- brake fluid;
- container (necessarily transparent) into which you will drain the old brake fluid.
Bleeding ABS brakes, where the components are located in one unit, differs little from the standard procedure. The only thing you need to do is turn off the system by pulling the fuse. This method works on domestic Ladas.
You can take advantage of the built-in pump. Then you will have to pump with the ignition on or even with the engine running. The procedure for bleeding the brakes starts with the right front cylinder and looks like this:
- disconnect the terminal of the level control sensor fixed on the expansion tank cover;
- remove the cover;
- open the brake reservoir;
- fill the reservoir to the brim with brake fluid;
- put the hose on the tip of the fitting;
- lower the end of the hose into a container to collect liquid;
- open the fitting by turning it a quarter or half a turn;
- to activate electronic systems, turn on the ignition;
- release the brake;
- wait until the pump expels the airy mixture;
- release the brake pedal;
- Tighten the fitting with a wrench.
The brake bleeding scheme is no different on any car. First, air is removed from the “far” circuit (for “left-hand drive” cars it is on the right), then from the “near” circuit.
To bleed a system with components located in different places, a diagnostic tester is needed. It connects to the car and allows you to control electronic components using a smartphone or computer. In this case, you will also have to unscrew the fittings and drain the airy liquid. However, no manipulation of the pedal is required. Instead, the valves and electric pump must be activated using the appropriate menu items. This way you can bleed the systems on the VW Passat B6 and other modern cars.
Bleeding the brakes using the Priora as an example
Before you bleed the ABS brakes, you will have to drive the car into a pit. This will allow easy access to the fittings on the rear working cylinders and will eliminate the need to remove the discs during operation. On the Priora, the procedure for pumping brakes with ABS does not differ from that adopted on simpler models. The only difference is that the work must be performed by first turning on the ignition. In this case, the solenoid valves will be in the open position.
Bleeding the brakes on a Priora. Video:
Replacing the ABS sensor
Almost all cars produced today have ABS, which has repeatedly proven its effective operation: when braking, the wheels spin a little, hence the high braking efficiency. In critical driving situations, this gives the driver of a car with ABS an additional chance to maneuver safely. Especially young drivers, whose skills are not yet sufficient to drive a car without additional safety systems, cannot do without ABS.
The operation scheme of ABS on VAZ cars is as follows: pulse signals from the ABS sensors enter the ABS control unit. If one wheel is blocked, the hydraulic modulator, based on a command from the control unit, limits the pressure in the corresponding channel.
Scheme of work
First you need to remove the wheel. Consider in advance the safety of your operations. The car should not roll or fall off the jack during repairs! The wheel has been removed. The sensor is located behind the brake caliper. Looking behind it, you can see what size keys are needed to remove and replace the sensor. Since the sensor is located at a fairly low point in the car (also in constant contact with dirt and water), the threaded connections can simply “sour”. Various means such as WD-40 liquid will help in the fight against this problem.
You can go a slightly different route and remove the caliper and brake disc. This way you can also access the sensor.
Next, you need to hold the metal part of the ABS sensor with suitable pliers and, swinging it in a pendulum motion, pull it towards you. Be careful - slipped pliers can damage the plastic protection of the sensor (which can lead to contamination of the sensor). When removing the part, you can use a flat screwdriver (or better, two). If a hole forms between the sensor body and the caliper, a screwdriver must be inserted into this hole and, prying the part in a circle, try to remove it. A partner can be a great help in this process if he also uses a screwdriver, but on the opposite side of the part (this way it will come out faster and more evenly). If you managed to remove the part by 5 mm or more, then you can put the tools aside and try to remove the sensor with your hands using rotational or pendulum movements. The ABS sensor has been removed.
Next, pay attention to where the wiring from the sensor goes and find where it is connected
Why does the ABS light come on?
Based on the ABS device, we can come to the conclusion that the system malfunction indicator may light up for the following reasons:
- Problems with sensors installed on wheels;
- Malfunctions in the ABS system control unit;
- The cables between the elements that transmit information about their status are faulty;
- There are problems with the crown on the hub.
All the described malfunctions can appear while driving. For example, vibrations on rough roads often lead to wire breaks. When driving off-road, dirt may stick to the sensors or sand may become clogged with them, which will not allow them to transmit the correct information to the system control unit, and it will indicate a malfunction by turning on the ABS light on the instrument panel.
The role of the ABS sensor in a car
The ABS sensor is used to accurately determine the moment at which a particular wheel locks, based on its rotational speed. In addition to sensors, the anti-lock braking system includes a hydraulic and control unit.
When the wheel is about to lock, a signal is sent from the electronic unit to the valve body. The hydraulic unit reduces and sometimes completely shuts off the supply of working fluid to the working brake mechanism of a blocked wheel. If for some reason this is not enough, a special valve will be activated and the liquid will be redirected along the outlet line.
When the wheel begins to rotate again, the electronic control module, using a signal, will remove the influence from the solenoid valves and pressure in the hydraulic line will again be supplied to the brake cylinders on the wheels.
ABS turns on randomly, the light blinks or lights up periodically
One of the most difficult forms of breakdowns is the constant blinking of the ABS light bulb. This means that the anti-lock braking system sensors send incorrect signals to the computer, which, in turn, issues other incorrect commands to the vehicle's systems and modules. In such cases, many people prefer to simply turn off the anti-lock system, since unpleasant incidents may occur. For example, turning on ABS at a speed of 90 kilometers per hour with light braking can damage the chassis of the car and contribute to a complete loss of control over control. It's better to do this:
- bring the car to a service center for diagnostics, find out the reason for the chaotic operation of the equipment;
- for domestic cars equipped with a primitive anti-blocking device, it is better to immediately disable the system;
- complex designs and on-board electronic systems of foreign cars will have to be reflashed for repair;
- on some machines it will be easier to find the problem and fix it than to disable the anti-lock;
- you need to keep in mind that this particular system is not always the cause of the ABS light coming on; the problems can be different;
- During the diagnostic process, it is better to check the entire on-board electrical system and equipment.
By paying a certain amount for a car inspection, you can get the right answers to important questions. Sometimes a light that comes on on the panel can develop into a full-fledged repair of important units and components of the car, so you will have to spend a lot. But in most cases, this problem is not so expensive to solve. The cost of repair work depends, of course, on the make and model of the car, and on the price of spare parts. If an ABS sensor for a domestic car costs from 600 rubles, then a Japanese SUV will cost more than 10,000 rubles to replace one such sensor. We suggest watching a video about solving a similar problem using computer diagnostics:
Basic malfunctions of the ABS system
Any driver who has ever had an ABS light come on in a Priora will tell you about the sensor. But it could be worse - if the ABS in Priora does not work. There are several options in which to look for the source of the problem:
- wiring damage;
- mechanical damage to the brake fluid pressure valve block;
- failure of speed sensors.
The first thing you need to do when you see the light (ABS lights up) is to read the error symbols using a special diagnostic scanner. Each item in the ECU is indicated by a corresponding code:
- C0040 – the speed sensor (DSC) of the right front wheel is faulty;
- C0035 – DSC of the left front wheel is faulty;
- C0050 – DSC of the rear right wheel is faulty;
- C0045 – DSC of the rear left wheel is faulty;
- C0065 – front left valve (intake);
- C0060 – front left valve (exhaust);
- C0075 – front right valve (intake);
- C0070 – front right valve (exhaust);
- C0085 – rear left valve (intake);
- C0080 – rear left valve (exhaust);
- C0095 – rear right valve (intake);
- C0090 – rear right valve (exhaust);
- C0161 – the braking signal does not turn off;
- C0121 – power to the valves does not turn on;
- C0110 – electric return pump.
- C0550 – error in the “brains” - ECU;
- C0245 – error in receiving data from sensors;
- C0800 – power surges.
The solution may be simpler: an ABS sensor is installed under the fender liner. Dirt often gets into this area; an unprotected piece of wiring near the DSC connector can be damaged. Replacing it will help.
What can you check yourself if the ABS light comes on?
The first thing you can do on your own in such a situation is to go to a car wash and ask for a good wash of the rims. Often, this intensive pressure washing can clean the ABS sensors located near the brake discs. On your way to the car wash, you can perform another simple test. Accelerate to a speed of 80-90 kilometers per hour, close the windows and turn off the music. If in this driving mode you hear a slight or annoying hum in the area of the wheels (front or rear), the likely cause of the light is a failure of the wheel bearing. There are several other things you can do:
- inspect the fuse box and replace the module that is responsible for the operation of the anti-lock braking system;
- if possible, read the diagnostic error code and read about it on the forums;
- to a specialist, describing your situation, and then try to correct the error yourself;
- get to the ABS sensors yourself by jacking up the car and removing the wheels to check their cleanliness;
- inspect the electronic control unit located under the hood, check that there is no liquid in it or on it;
- the best solution is to go to a service station and pay for diagnostics of the car’s anti-lock braking and electrical systems.
DIY sensor repair
After diagnostics and detection of a faulty element, the device must be dismantled for further repairs. The process of removing it is similar to the first stage of replacing the ABS sensor and is not particularly difficult.
How to fix: step-by-step instructions
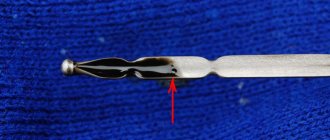
Having finished dismantling the device, we proceed to repair work:
- We disassemble the sensor, cutting off with a hacksaw the part of it containing the measuring coil inside. Carefully saw through the body of the device in a circle, trying not to damage the fasteners.
Carefully separate the part with the fastener
This sensor element will be the subject of repair work.
In order to rewind the damaged wire, you need to remove the coil casing. The reel is completely cleared of old wire
The number of turns of the wire must be controlled by measuring the resistance
The copper winding of the coil must be carefully insulated
The capacitor shell can be used to fill the new coil housing.
This is what a new sensor housing made of epoxy glue looks like
The sensor mount can be glued to the part with quick-drying glue
The device is ready for installation on the seat
The repair of the sensor is completed, you can mount it on the hub, grinding the new housing with sandpaper for a better fit to the mounting socket. When installing a repaired device, be sure to comply with the following conditions:
- We position the sensor core parallel to the teeth of the response disk, making sure that it does not overlap two adjacent teeth.
- Leave a gap between the tooth and the core of 0.9–1.1 mm.
The final stage of repairing any of the ABS elements is to check the functionality of the system. We perform it by starting the car engine and making sure that the controller on the dashboard goes out 3-5 seconds after the start.
Note that some sensors produced by the foreign auto industry can be disassembled without fundamentally compromising the integrity of the structure - the upper shell of the part can be removed by pre-heating it with a hair dryer or a blowtorch. An example of repairing such a device is presented in the video.
Preparing to replace the brake fluid of a car with ABS: conditions and necessary tools
When servicing a vehicle's deceleration system, free access to the working cylinders of each wheel is necessary. Therefore, the most suitable place for work is an inspection ditch or overpass.
When performing the procedure, you will need an assistant and a set of equipment:
- set of open-end wrenches;
- a large-volume medical syringe and a hose about 10-15 cm long corresponding to the diameter of the tip (an alternative is a pear);
- container for extracted brake fluid;
- tube 20-30 cm long; diameter – slightly smaller than the diameter of the fitting on the brake cylinders (to ensure tension).
Signs of a malfunctioning ABS sensor
The first sign of an ABS malfunction is a lit indicator on the instrument panel that does not go out for more than 6 seconds after turning on the ignition, or does not turn on when driving. A system breakdown is detected when the vehicle is moving at a speed of more than 25 km/h. There are quite a few problems that can happen with the anti-lock braking system, but the most common ones include the following:
- ABS sensor wire is broken or the controller unit is damaged. In this case, an error is displayed on the instrument panel, the system is turned off, and signals about changes in angular velocities are not given.
- The wheel sensor of the system has failed. When turned on, the system performs self-diagnosis and detects an error, but continues to function. The cause of the breakdown may be oxidation of the contacts, poor power supply to the sensor and a short circuit to ground.
- Receipt from an additional device of information about different angular speeds of wheels at different tire pressures or different tread patterns, when the wheels brake differently.
- Mechanical failure of elements - hub bearings, play and fracture of the rotor on the wheel sensor. In case of such failures, the system does not start. This also includes ABS pump failure.
The most vulnerable element of the system is the wheel sensor, which is located next to the rotating hub and axle shaft. Exposure to dirt and play in the hub bearings can damage the device, completely blocking the operation of the ABS. Along with the indicator signal on the instrument panel, the following signs indicate a sensor failure:
- The on-board computer displays an ABS system error code.
- There is no characteristic vibration or sound when pressing the brake pedal.
- The wheels lock during emergency braking.
- Appearance of the parking brake signal when it is disabled.
The need to replace the device
Malfunctions in the ABS system are indicated by a warning lamp located on the dashboard of the car. In normal mode, the indicator lights up when the engine starts and goes out after 3–5 seconds. If the controller behaves incorrectly - it turns on while the engine is running or blinks chaotically when the car is moving - this is the first sign of a sensor failure.
The ABS indicator should go out 3-5 seconds after starting the engine
Also, a possible device malfunction is indicated by:
- an error code appears on the on-board computer display;
- continuous wheel locking during heavy braking;
- absence of characteristic vibration on the brake pedal when it is pressed;
- the parking brake indicator lamp has been activated when the handbrake is off.
If any of these problems occur, the device should be fully diagnosed. It is not at all necessary to trust this question to highly paid car service technicians - checking the ABS sensor yourself takes little time and is done without expensive equipment. If diagnostics reveal that the device is broken, it will have to be replaced with a new one.
ABS repair — Lada Priora Hatchback, 1.6 l., 2008 on DRIVE2
So I continued to look for the cause of the ABS malfunction. To begin with, I decided to make an appointment with the officials and carry out diagnostics. Moreover, I also got involved in a promotion where the entire car was shaken up for just 640 rubles. They ordered both front sensors to be replaced. Another problem was immediately discovered that was not related to my visit to the service. The right CV joint boot is torn. Since I crawled under the car a couple of days ago and everything was intact, and the tear looked fresh and clean, we decided to make do with replacing only the boot itself. Satisfied with the timely repair and diagnostics, which put everything in its place, I went home.
Then the search began for these same sensors. I was still haunted by the thought of whether it was possible to bring him to his senses. It’s just strange that a sensor of this type broke down, and on both wheels. I googled, read brilliant manuscripts on how to restore sensors, of course, according to reviews, they are not durable, but once again I climbed in the wheel arch in search of a hidden break or wear, and re-measured their contacts with new ones. A break and that's it. So the restoration plans failed. I started looking for new sensors. The price tag generally varies from 1400 to 1600 kopecks, which is somehow not at all budget for this car. The cheapest thing we could find was from the same officials for 1200 and in another store, the officials will deliver it only by the middle of the month. So I decided to buy it from the store.
I drove it, took it, well, I think you’ll make money from me in a minute. I was too lazy to change it myself because the weather is complete trash with snowfall, and it’s well known how these sensors get damaged. So I decided to entrust this disgrace to trained people. I went to the service. As it turned out, it won’t be easy for them to change these sensors either. Plus, it turned out that on both wheels the mounting brackets for these same sensors were bent, as a result of which they rubbed against the comb and stopped showing signs of life. I had to remove the calipers and brake discs in order to get to the bracket bolts. When removing it, it turned out that the left caliper bracket was held in place by one bolt, and the second was simply in place, but there was no thread there. So I splurged another 600 rubles for the bracket and 600 for the brackets. Well, here’s a photo of the removed brackets and sensors.
Well, after that, of course, everything came together perfectly. Upon startup, the ABS fault icon immediately went out and the brakes started working as they should.
Issue price: 4,000 ₽
www.drive2.ru
How to fill brake fluid correctly
The brake reagent on the Lada Granta should be replaced after every 45 thousand kilometers traveled or after 2-3 years of use. It should be said that the replacement can be done with your own hands.
It must be said right away that the reagent is replaced on Grant, which is initially installed on the overpass. First you need to unscrew the cap from the neck of the tank to fill the liquid. Then the spent working fluid is pumped out. This is best done with a syringe or rubber bulb. Only after this is the previously unused brake fluid poured into the container.
During the process of filling brake fluid, you need to be as careful as possible and take special care. If liquid gets on painted surfaces, it will need to be cleaned up quickly as it may damage the paintwork.
Then the hydraulic drive is pumped, through which the brake fluid flows.
Pumping is carried out until the moment when a liquid lighter than the used liquid comes out of the fittings on all pumped working cylinders. Bleeding is carried out with the engine turned off, first on one circuit, and then on the other.
The replacement procedure is as follows:
- The first to bleed is the brake system located on the right side of the rear wheel.
- Then the left front wheel mechanism is cleaned of the spent reagent.
- Next comes the turn of the left rear wheel system.
- The pumping mechanism ends with the right front wheel.
Before you begin the process of cleansing the system of old brake fluid, you need to check the volume of brake fluid that is in the brake hydraulic reservoir. If the fluid level is insufficient, it needs to be topped up. You will need one more person to bleed the brakes.
First, you should clear the fitting of the right rear wheel from debris and dirt. To clean, first unscrew the cap located on the fitting. Then it is equipped with a hose, and the other end is lowered into a container containing brake fluid. At this time, the partner presses the brake pedal all the way once or twice and leaves it held.
Then you need to unscrew the bleeder fitting halfway, but not completely. At this time, the used brake fluid will flow out.
The assistant must continue to press the brake pedal until the fluid disappears. All this must be repeated until new, clean brake fluid appears. Then the hose is removed, the fitting is thoroughly wiped and the cap protecting it is returned to it. Next, the entire procedure is repeated to free the left front wheel mechanism from the clogged working fluid. The same sequence of pumping the brake mechanism of the next circuit. The only thing you need to monitor is the presence of liquid in the container.
You can replace the brake fluid with another, simpler method. For this procedure, finding a partner is not required. However, the brake fluid supply must be at least a liter.
Replacing the used fluid can only be done on a Lada Granta, which is located on an overpass or has space to approach the tank. The brake fluid is first removed, then new fluid is added to the maximum level, and to make the pumping procedure faster, hoses are put on all branches of the cylinders being pumped.
The free ends of the tubes are in prepared containers. Usually the pumping process ends if 200-250 ml of the reagent used has spilled out. Then the fittings are wrapped well, the protective caps are returned to their place, and the amount of brake fluid in the master brake cylinder is recorded.
After this, the car owner pays attention to the level of brake fluid in the reservoir and understands how much brake fluid still needs to be filled
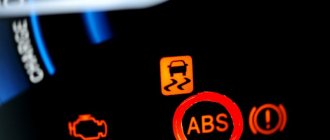
The ABS light on the LADA came on, how to fix the problem
10 April 2022 LadaOnline 68 579 Currently, all LADA models (Lada XRAY, Vesta, Largus, Granta, Kalina, Priora, Niva 4×4) without exception are equipped with ABS (anti-lock braking system). During the operation of the car, many owners notice that the ABS and ESC lamps (if this system is available) light up on the instrument panel. Let's figure out how to solve this problem and improve the design.
Why does the ABS and ESC light come on?
ABS malfunction may be caused by:
- failure of wheel rotation sensors;
- malfunction of the hydraulic valve block;
- damage to the wiring.
If the ABS malfunction indicator light comes on, you must contact a service station as soon as possible for diagnostics (read error codes) and repairs.
The most common cause of ABS failure is damage to the wiring near the ABS sensor connector. It is located under the fender liner, but is still not well protected from moisture and dirt.
As a result, the wires oxidize and break, and the ABS lamp lights up.
How to repair wiring
We remove the wheel, and then the locker (for the front wheel, turning out the fastening screws) or the protective shield (for the rear wheel, turning out the two fastening nuts “10”). Press the latch and disconnect the block with wires from the ABS sensor. We inspect the connector and make sure there is no corrosion or damage. In case of damage, we restore the integrity of the wires:
We treat it with a special means for cleaning electrical contacts (for example, graphite grease) and clean the contacts from oxides. We clean the wheel speed sensor and the surface around the sensor from dirt.
Attention! Keep ABS sensors away from magnets as this may cause damage.
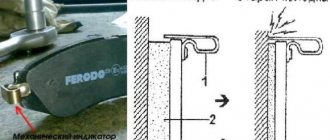
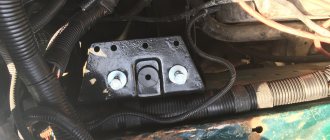
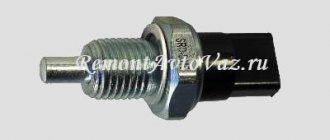
Replacing ABS sensors
If the cause of the malfunction is not in the wiring, but in the ABS sensor itself, we replace it. To do this, first unscrew the fastening screw with a Torx T30 key, and then remove the sensor wiring harness from the bracket. The photo shows a Lada Vesta car; on other Lada models the work is performed in a similar way.
Instructions for replacing the front wheel ABS sensor:
Instructions for replacing the rear wheel ABS sensor:
How to modify the design
To protect the wiring harness from the environment, you can use a D-shaped seal. We lay the wires in it and wrap it with electrical tape. We put everything in the corrugation. We glue the cover covering the ABS sensor connector around the perimeter with the same sealant. This will prevent moisture and dirt from entering the area where the sensor and connector are located.
Attention! If the ABS fails, the brakes remain operational, but the braking efficiency is reduced, which is especially dangerous on some surfaces. See why
Photo: MATUR777 in-flight magazine
Keywords: lada xray sensors | Lada Vesta sensors | Lada Largus sensors | Lada Granta sensors | Lada Kalina sensors | Lada Priora sensors | Niva sensors | safety lada xray | safety of Lada Vesta | safety of Lada Largus | safety of Lada Granta | safety of Lada Kalina | safety of Lada Priora | Niva safety | Lada Xray brakes | Lada Vesta brakes | Lada Largus brakes | Lada Granta brakes | Lada Kalina brakes | Lada Priora brakes | Niva brakes | universal article
7 0
Found an error? Select it and press Ctrl+Enter..
Similar materials
- Reasons why the backlight of the Niva instrument panel does not light up (VAZ 2121, 2131)
- Description of the instrument panel Lada Priora and Kalina
- Why does the speedometer not work on Lada Granta, Kalina or Priora?
xn--80aal0a.xn--80asehdb
How the ABS status indicator should work
The ABS system can be divided into several functional blocks to make it easier to understand the problem that causes the corresponding indicator on the instrument panel to light up. Note that the anti-lock braking system consists of:
- Rotation sensors. Usually there are 4 of them - one on each wheel;
- ABS module;
- Devices for monitoring the correct operation of the ABS module;
- ABS indicator on the instrument panel.
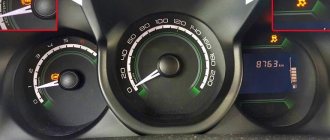
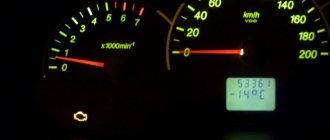
If the anti-lock braking system light on the instrument panel lights up after starting the engine or while the car is moving, the ABS system is disabled. Many drivers mistakenly believe that when the ABS light is activated they have problems with the braking system, but this is not at all the case. The corresponding indicator is responsible for diagnosing the brakes on the car.
In the first seconds after the engine starts, all indicators on the instrument panel should light up. If the ABS light does not light up at this moment, it means it is faulty.
Front Wheel Speed Sensor Installation Procedure
- Install the wheel speed sensor to the steering knuckle. Secure the sensor with a bolt.
- Insert the sensor harness into the hole in the wheel arch, insert it into the rubber bushing and secure the bushing in the hole.
- Secure the harness using the bushing fasteners and clamps to the wheel arch.
- Install the wheel.
- Lower the car.
- Connect the front wheel speed sensor connector.
- Connect the negative battery cable.
Finishing touches
This completes the replacement of the ABS sensor. With proper installation quality and compliance with the necessary requirements for parts (including their quality - beware of fakes), the car’s on-board computer should not display any information about a malfunction of the ABS. Before installing the wheel, you should turn on the ignition and check the on-board computer for such errors. And only after making sure that there are no errors can you install the wheel in place.
Driving along a snow-covered road, the ABS indicator came on, there was 15-20 centimeters of snow on the road, I was driving along the right side, while the left side was following a well-worn track. Because I have ABS, then this is not just a contact closure. I looked into Google, the most common breakdown of this unit (if there is ABS itself) is a break in the wiring from the sensor plug. I was tormented for a month by the fact that the ABS indicator was on. But when I looked in, I didn’t notice anything suspicious; I didn’t want to take it to the service station, there was no hole. But somehow it caught fire and decided, after lying around in the snow, to find what was wrong, I got down on my knee, once again looking under the car, and there was the plug, hanging right under the right threshold, one wire had broken off from the plug, the insulation of the second had burst.
The cable itself had to be fixed to the brake pipe. Perhaps the snow tore it from the fastening and then tore off the wiring. A couple of weeks ago, anticipating this malfunction, I tried to find such a plug in several stores, but I couldn’t find it.
Looking at the plug itself, I realized that it was dismountable, bit off the remaining wiring and went home to disassemble it. Using two needles and a thin screwdriver, I disassembled the entire plug.
The copper on one of the contacts has oxidized and the wire has turned black - the salt is doing its job, although it would seem that everything is sealed, the seals are made of silicone.