Today after starting the car the battery light started blinking. — The car was driving as usual. After a while, the charging light began to glow more than blinking. — The car was driving as usual.
I drove around the city, or rather to the shops (i.e. stopped, turned off and started the car) for about 2 hours - the car started and drove normally - only the charging light was on somehow intrusively.
In the evening, just when all the shops were closed, at the entrance to the house all the lights on the instrument panel began to light up one by one, including. the check engine…then the EUR failed…there were 500 meters left in the pits to the house…and I couldn’t stand it and turned off the car (the check engine probably had an effect on me, since the engine had 16 bugs).
And the car no longer started, indicating that the battery was completely dead.
I removed the “+” terminal from the battery - it stood smoking for about 30 minutes. I put the terminal on after 30 minutes... it started... I barely made it the 500 meters home - it died right in the parking space.
Conclusion: If the charging light on the instrument panel is on or flashing, go immediately for repairs! Don’t rely on “I’ll figure it out today and figure it out tomorrow”
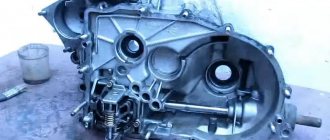
Ps tomorrow I’ll decide whether to change the diode bridge with a brush or a completely new one. The fact that it was the gene that was broken is 100%
PS1 Still, VAZs have some kind of heroic feature of taking the owner home with all their might. The former 9 gave this to me. Now here’s Kalina.
5 days passed... The conclusion was not correct - I just decided to somehow spray it with liquid insulation (www.drive2.ru/l/3223919/#a62473826) and did not wipe off the excess oil... in the circuit the current did not reach where it needed to go. Those. If all the lights on the instrument panel are on, first of all, go into the mounting block + into the fuses at the gearshift knob - well, check them and, if necessary, clean or replace what is needed.
Well, now I have a 115a priority generator under the hood in exchange for 4000 rubles. First I replaced the generator - the problem did not go away. Cleaned the mounting block - everything became good
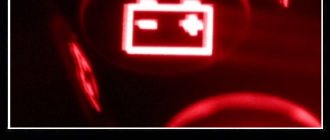
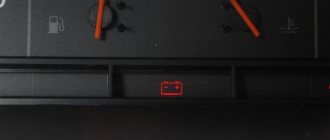
Hello everyone, today I want to tell you why the battery on a Lada Kalina car does not charge. If the red battery indicator lights up, then this is already a reason to sound the alarm, since most likely the car is running only on the battery and is not receiving a charge.
Now a little joke: “Do you know why the battery can’t go down? Yes, because he can only sit down.” So, let’s go.
How to find out why the battery charge indicator is on
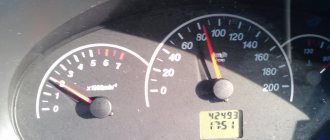
And the first thing worth checking is the tension of the generator belt . The minimum speed at which charging begins is 1500 rpm, and if the belt is loose, it will slip, as a result of which the light with the image of the battery will blink or light up at low speeds. But if everything is in order there, then the reason clearly lies somewhere inside the generator or the wiring itself. The easiest way to determine if the generator is faulty is to look at the intensity of the lighting of all the other lamps that are lit on the instrument panel, in addition to the battery light. And to find out if there is a problem with the power supply of the car battery, you need to:
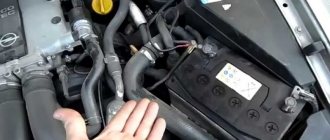
- The old-fashioned way of checking is to remove one terminal from the battery while the engine is running, and if the car, despite this, continues to work normally, then everything is in order with the generator and it does not need repairs. This method is strictly prohibited on injection engines.
- The second thing you need is to measure the voltage at the battery terminals with the engine running - it should be about 14.2 - 14.7 V. If the charge is lower, then the cause is clearly a faulty generator. But first, you should clean all the terminals with sandpaper.
Let's sum it up
As you can see, there are many reasons why problems arise with battery charging. In this case, the battery icon on the panel may often light up constantly, blink, or, conversely, not light up. To detect the cause, it is necessary to check individual elements step by step as discussed above.
If the battery is normal, there are no other hidden reasons for its discharge, then often the culprit is the generator, relay - regulator or bad contact. Moreover, after conducting qualified diagnostics, it is possible to identify, localize and efficiently eliminate the malfunction.
Why does the “check engine” light on the instrument panel light up: the main reasons. What should a driver do if the check light is on in the car? Useful tips and tricks.
Icons on the dashboard: symbols and explanation of car instrument panel icons. Types of icons and indicators, what do the lights on the panel mean.
Why the oil pressure light comes on after the engine warms up: the main reasons. What should a driver do if the oil pressure comes on when the engine is warm.
Why does the check light light up on the dashboard? Is it possible to continue driving a car if the check engine light is on? What should you check first?
An exclamation mark on the dashboard lights up: what does an exclamation mark on a yellow background mean, an exclamation mark on a red background, diagnostics.
Why the starter may not work after turning the key in the ignition. The main causes of starter malfunctions: bendix, traction relay, brushes, winding.
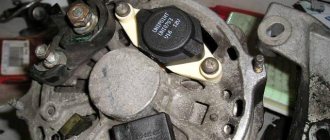
Causes of malfunction in the generator
The battery icon light may be constantly on when the brushes, diode bridge, contact rings of the commutator are worn out, also when the generator regulator relay burns out or there is a break in the armature field winding (a break is most unlikely).
Graphite brushes contribute to the generation of electricity, and like all auto parts, they are subject to wear due to friction against the slip rings on the shaft.
The regulator relay (chocolate bar) supplies a current of a certain voltage and when it burns out, the charging current stops flowing or the battery is overcharged.
List of faults that cause the lamp to light up
So, if you notice that the battery icon on the instrument panel is on and does not go out, you can conclude that it is not charging. There may be several reasons for this:
- the charge is either completely absent or so small that its value is less than the potential difference at the battery terminals;
- the lamp control relay has failed;
- the contacts of the circuit elements are burnt, oxidized or weakened (on the battery itself, on the ground wire, on the generator).
Let's look at these cases in more detail.
Generator
Among the main reasons for the unpleasant fact that the battery icon constantly lights up red on the dashboard of the car may be malfunctions related to the generator:
- the drive belt breaks or is severely weakened - such cases are monitored by the sensor and reported to the on-board computer;
- due to wear of the slip rings or generator brushes. If the wear is not too severe, the light will come on when power consumption increases significantly. Diagnosing such a malfunction requires dismantling and disassembling the generator;
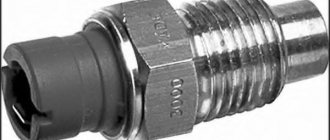
- The battery lamp may also light up if the voltage regulator, which is responsible for maintaining the battery charge level in the required range, fails. As soon as the battery charge voltage drops below the lower threshold, the battery indicator lights up. If too much current flows to the battery, this risks overcharging, boiling of the electrolyte and rapid failure of the expensive element. To check the functionality of the battery lamp monitoring relay, you will need any power source with a voltage regulator. You can, for example, use a laboratory power supply;
- break in the excitation winding circuit. Determined by the tester by “testing” the winding;
- A malfunction of the diode bridge is usually manifested by the blinking of the battery check lamp. Diagnosis is carried out with a multimeter, which must be switched to resistance measurement mode. If it turns out that the diodes are broken, the bridge will need to be replaced.
Diagnostics of charging current value
Usually, to find out why the battery light is on, you should check the battery charging voltage. Here, too, you can’t do without a multimeter, which is set to DC measurement mode (denoted as DCV). In test mode, the engine must operate at idle speed, and the on-board network must be loaded to the maximum, turning on a large number of current consumers. The voltage on the device should not fall below 13.4 V. If you reduce the load on the on-board network to a minimum, the voltage should be in the range of 14.0-14.2 V.
Battery lamp control relay
In many passenger car models, the battery charging circuit has a special relay connected to the battery charging sensor. So, the VAZ classic has a control relay that, when the ignition is turned on, does not interrupt the circuit, as a result of which the battery sign lights up. As soon as the generator starts working, the relay opens and the lamp goes out.
A faulty relay will always be in a closed working state, so the lamp will constantly signal that the battery is undercharged. The most common cause is loose/contaminated external or internal relay contacts.
Poor contact
Very often, the reason why the battery check light is on is due to poor contacts in the generator-battery electrical circuit. The trouble is that a malfunction can occur anywhere. The result is the same - the battery is undercharged when the generator, relay, sensor and other circuit elements are fully operational. Diagnosed with a multimeter, it can be eliminated by cleaning the contacts with sandpaper and tightening them.
How to find out the reason for the lack of charge on the road
Naturally, such checks cannot be done on the road, so you should focus your attention not on the generator itself, but on its wiring. You need to check the contacts, perhaps they have oxidized or become loose. It is also worth checking the insulation of the wire going from the generator to the battery; perhaps it was damaged due to some repair work under the hood, and the copper wires inside were covered with salt, which is why they rotted or lost contact.
If you cannot find the cause of the malfunction on your own, and there is no visible reason why the battery light came on, then you should still go to the nearest auto electrician.
Improve contact
If the wiring from the generator to the battery is damaged, it is necessary to inspect it and, if necessary, replace the wire with a new one. In parallel with this, it is imperative to clean all contacts, both on the generator and on the battery (terminals). It is necessary to clean the contacts of the diode bridge on the generator and its positive output contact.
If the contact areas of the generator brushes have become oxidized, then they must be cleaned at the same time. At the same time, pay attention to ensure that the graphite does not spread from the brushes to other elements of the generator. If the brushes are worn out, they need to be replaced with new ones. Sometimes it is enough to improve the “chocolate” contact.
Add a comment Cancel reply
You must be logged in to post a comment.
We have already complained more than once that today it is becoming more and more difficult for drivers to diagnose their own cars, especially while driving. The toolkit is constantly shrinking. Let's say that voltmeters have disappeared from dashboards like mammoths, and the driver learns about all problems with charging after the fact from a message from a laconic warning light. But even with the lamp, not everything is so rosy, they don’t talk about it in driving schools, in the instructions for the car there is only the phrase “contact the service center.” Most drivers roughly imagine that it is responsible for charging, but how exactly and what exactly it shows is something that not everyone understands.
So, the reasons why the battery light is on
The first thing to understand is that the cause is not necessarily related to a malfunction of the generator or its poor performance; in fact, the cause may turn out to be quite trivial and easily fixable. However, sadder scenarios should not be ruled out.
- Fuse . In case of fuse F16 blown or poor contact (oxidation, burnout, etc.). This fuse is also connected to other indicators on the instrument panel, so if there is a problem with this fuse, other lights will also light up.
- Zero break . A break in the “neutral” wire circuit will lead to power interruptions in the instrument cluster.
- Battery terminals . Check the condition of the terminals, the quality of the contact, and whether there is oxidation on the terminals. Because of such “little things,” it is quite possible that there will be problems with charging the battery and, as a result, the appearance of a corresponding indicator on the panel.
- Egnition lock . A malfunction of the ignition switch, or rather wear and tear of the ignition switch, often causes the battery light to remain on continuously. However, in this case, the battery indicator will also be lit more than once.
- Weight . Poor contact of the ground wire can cause the battery light on the panel to light up. Check the condition of the contact, and if problems are found, fix them.
How does a generator work?
Before you understand why the battery charging light comes on, you need to understand the principle of operation of the generator. Any car has two power sources. This is a generator and battery. They are connected in parallel. Therefore, when the engine is running, the generator supplies voltage to the battery and charges it. Moreover, there is one peculiarity. Regardless of the speed, the voltage at the generator output is always the same.
To stabilize it, a relay regulator is installed. Older cars used electromechanical-type designs. Modern ones use exclusively semiconductor ones. The lamp, which is installed in the dashboard, is included in the power circuit of the voltage regulator. It essentially serves as a fuse. To understand the essence, it is necessary to thoroughly study the principle of operation of the voltage regulator relay.
Voltage regulator
Generators have two windings – rotor and stator. Moreover, the first one performs the functions of the excitation winding. We need to remember the theory: without a moving magnetic field, generating electricity is impossible. Therefore, it is enough to apply voltage to the rotor winding to obtain a magnetic field. Well, since the rotor is a moving part of an electric machine, it becomes clear that the magnetic field will rotate. And if the battery charging light periodically lights up, this indicates that there is a minor defect in the generator.
But why install a voltage regulator specifically in the power circuit of the excitation winding? After all, it is necessary to carry out stabilization in the stator circuit. This is true, but it’s worth remembering the theory: the output voltage depends on the magnitude of the magnetic field. Everything is very simple. It is enough to stabilize the power supply in the rotor winding circuit so that there are no oscillations at the output. It is much easier to stabilize small currents than large ones (can reach several tens of amperes).
Troubleshooting
Let's say that after starting the engine you notice that the battery charging light comes on. VAZ is susceptible to this problem, and it is relevant for any model. The following components need to be checked:
- Voltage regulator described above. On some vehicles it may be installed under the hood rather than inside the alternator.
- Diode bridge. One or more semiconductors may fail.
- Generator drive belt. It may be poorly tensioned, or it may have broken or slipped. If you hear a whistle, then you can judge that the bearing in the front cover is broken.
Signal lamp
On many domestic cars, for example, VAZ 2109, VAZ 2110, VAZ 2114, VAZ 2115, an old type lamp with a filament is installed as a battery warning lamp. On these models, it is possible to change this lamp when dismantling the instrument panel if it fails.
However, some car enthusiasts, due to inexperience or ignorance, install an LED lamp instead of an incandescent lamp. This leads to the fact that after starting the engine and idling, the lamp (at a voltage of just over 12 Volts) continues to burn. However, if you force the engine speed up to about 2000 rpm, the battery light goes out.
Tools for repairs
If the battery charging light comes on at rpm, most likely the belt is slipping due to low tension. But if everything is fine with this, you need to arm yourself with the following tools:
- Multimeter (preferably a dial voltmeter with a wide scale).
- A control light of 12 volts and 2-3 W power.
- Flat and Phillips screwdrivers.
- Pliers, sandpaper, knife.
With these tools on hand, you can begin repairs if the battery charging light comes on or there is another breakdown in the generator.
Diode bridge
The diode bridge is used to convert alternating voltage to direct voltage. If at least one of the diodes breaks down, the device stops coping with its tasks, which is why a voltage that does not correspond to its parameters begins to flow into the on-board circuit of the machine. That is why the rectifying bridge must be checked in the case when the battery charging light is on, but there is charging (VAZ 2107, 2106).
You can also determine the health of the diodes using a multimeter in the appropriate mode. Turn on the tester and connect the red probe to the positive terminal of the bridge, and the black probe to one of the contacts marked “AC”. The threshold (pass) voltage for silicon diodes ranges from 400 to 1000 mV. If the device shows you a value that does not fit within the specified range, the bridge must be replaced. It is impossible to repair it.
View gallery
Breakdowns and their elimination
Let's say a voltmeter is installed in a car. And it shows that there is charging. The battery charging light also comes on periodically or does not light up at all. Measuring the voltage directly at the battery terminals shows exactly 12 volts. But the capacity is lost, the starter does not rotate, and the tape recorder has difficulty working. First of all, clean all the thick wires through which the battery is charged. Measure the voltage at terminal “30” of the generator. If it is larger than what is on the battery, strip the terminal or change the wire.
If the voltmeter on the dashboard shows the presence of charging, but the lamp does not light up, and the battery is discharged, despite the normal voltage in the on-board network, carry out a couple of simple steps. Turn on the maximum number of consumers and see how the voltmeter behaves. If the voltage drops sharply, tighten the alternator belt. It begins to slip because, under load, the rotor EMF counteracts the stator one. And it takes a lot of effort. In addition, one of the pulleys may simply wear out. Then even installing a new belt will not help.
Troubleshooting methods
Now that all the causes have been identified, we can begin to consider troubleshooting. But, before we begin, it is worth noting that a car enthusiast needs to have an idea of the design features of the engine if he wants to fix the problem himself. Otherwise, go directly to a car service center, in order to avoid other problems that, due to lack of experience, car enthusiasts usually create for themselves.
Sensors
Often, the reason why the check light on Kalina may come on is the failure of one of the sensors. Possible ones that are worth checking right away include: mass air flow sensor, idle speed control, crankshaft position sensor, oxygen sensor and coolant temperature sensor.
You can determine the cause by going through each sensor separately and using a tester to check their functionality.
But, there is a simpler and more effective way to determine the malfunction of a particular sensor, namely connecting to the electronic engine control unit. Here you can look at the errors and, by deciphering them, determine where the problem is.
Throttle
A clogged throttle valve can often cause the check engine light to come on because not enough air is supplied to the power unit. The solution to the problem is cleaning. This process can be carried out using carburetor cleaning fluid or VD-40 fluid.
The part is removed from the car and cleaned, after which it is installed in place. It is also recommended to check the throttle position sensor, which may have failed.
Injectors
One of the common reasons for the “check” icon to appear on the dashboard is a malfunction of one or more injectors that do not spray the fuel mixture properly. So, it is worth dismantling all the elements and checking them using a special stand.
If there is none, then you can use the traditional method by pouring flushing fluid into the fuel supply pipes and activating the injectors using the battery. This way it will be clear which injector is not working well. But, experienced auto mechanics recommend cleaning and checking the nozzles on a stand, since the effectiveness of the procedure is higher.
Fuel pump and filter
Another cause of the malfunction may be a malfunction of the gasoline pump or its filter. Lack of power or contamination of the filter elements leads to the fact that an insufficient amount of fuel will enter the power unit to form an air-fuel mixture.
This can also cause such a well-known automotive effect as engine tripping.
The malfunction can be cured by checking the functionality of the gasoline pump, as well as by replacing the filter inside the gasoline pump. It is also worth looking at the fuel filter, which could become clogged when pouring low-quality gasoline.
Air filter
A clogged air filter can cause insufficient air in the combustion chambers. So, to check this element, it must be dismantled, which is done quite simply. By inspecting the filter element, you can find out how dirty it is and whether the product needs to be replaced. So, after replacement, the check signal from the dashboard may disappear.
Spark plugs and high voltage wires
Wiring is also often the reason why the check icon lights up on the panel. This happens when the spark plug is inoperative or there is a breakdown in one of the high-voltage wires.
It is recommended to check spark plugs on a special spark plug stand. But, if there is none, then you can use the generally accepted “old-fashioned” methods. But high-voltage wires are checked using a conventional multimeter, where the resistance along each wire should be about 5 ohms. If a broken part is found, it must be replaced.
Petrol
But, in addition to the above reasons, the problem may lie on the surface. Thus, ordinary low-quality gasoline can cause the “Check Engine” icon to appear on the car’s dashboard. To eliminate the breakdown, it is necessary to drain the low-quality fuel and flush the fuel supply system. But, if you drive for a long time on such fuel, the batteries may fail, which should also be checked when flushing.
The last reason is the accumulation of errors or “failed” firmware of the electronic engine control unit. To fix this problem, it is recommended to contact a professional car service center. Also, with the help of “brain” errors, you can determine why the check engine light came on. But where can I get the codes deciphered? Let's look at what code that means:
- 0102 Low signal level of the mass air flow sensor
- 0103 High signal level of the mass air flow sensor
- 0112 Low level of intake air temperature sensor
- 0113 Intake air temperature sensor high level
- 0115 Incorrect coolant temperature sensor signal
- 0116 Incorrect coolant temperature sensor signal
- 0117 Coolant temperature sensor signal low
- 0118 High signal level of the coolant temperature sensor
- 0122 Low signal level of the throttle position sensor
- 0123 Throttle position sensor signal high
- 0130 Incorrect signal from oxygen sensor 1
- 0131 Low signal level of oxygen sensor 1
- 0132 Crankshaft sensor 1 signal high
- 0133 Slow response of oxygen sensor 1
- 0134 No signal from oxygen sensor 1
- 0135 Oxygen sensor 1 heater fault
- 0136 Oxygen sensor 2 short to ground
- 0137 Low signal level of oxygen sensor 2
- 0138 High signal level of oxygen sensor 2
- 0140 Oxygen sensor 2 break
- 0141 Oxygen sensor 2 heater fault
- 0171 Mixture too lean
- 0172 Mixture too rich
- 0201 Open injector 1 control circuit
- 0202 Open injector 2 control circuit
- 0203 Open injector 3 control circuit
- 0204 Open injector 4 control circuit
- 0261 Short to ground injector 1 circuit
- 0264 Short to ground injector 2 circuit
- 0267 Short to ground in injector 3 circuit
- 0270 Short to ground in injector 4 circuit
- 0262 Short circuit to +12V injector 1 circuit
- 0265 Short to +12V injector 2 circuit
- 0268 Short to +12V injector 3 circuit
- 0271 Short circuit to +12V injector 4 circuit
- 0300 Many misfires
- 0301 Misfire in cylinder 1
- 0302 Misfire in cylinder 2
- 0303 Misfire in cylinder 3
- 0304 Misfire in cylinder 4
- 0325 Open circuit of the knock sensor
- 0327 Low signal level of the knock sensor
- 0328 High signal level of the knock sensor
- 0335 Incorrect crankshaft position sensor signal
- 0336 Crankshaft position sensor signal error
- 0340 Phase sensor error
- 0342 Low phase sensor signal
- 0343 Phase sensor signal high
- 0422 Low neutralizer efficiency
- 0443 Canister purge valve circuit malfunction
- 0444 Short circuit or break in the adsorber purge valve
- 0445 Short to ground of the canister purge valve
- 0480 Cooling fan 1 circuit malfunction
- 0500 Invalid speed sensor signal
- 0501 Invalid speed sensor signal
- 0503 Speed sensor signal interruption
- 0505 Idle air control error
- 0506 Low idle speed
- 0507 High idle speed
- 0560 Incorrect on-board voltage
- 0562 Low voltage on-board network
- 0563 High voltage on-board network
- 0601 ROM error
- 0603 External RAM error
- 0604 Internal RAM error
- 0607 Detonation channel malfunction
- 1102 Oxygen sensor heater resistance low
- 1115 Faulty oxygen sensor heating circuit
- 1123 Rich mixture at idle
- 1124 Lean mixture at idle
- 1127 Rich mixture in Partial Load mode
- 1128 Lean mixture in Partial Load mode
- 1135 Oxygen sensor heater circuit 1 open, short circuit
- 1136 Rich mixture in Light Load mode
- 1137 Lean mixture in Low Load mode
- 1140 Measured load differs from calculation
- 1171 Low level CO potentiometer
- 1172 High level CO potentiometer
- 1386 Detonation channel test error
- 1410 Canister purge valve control circuit short circuit to +12V
- 1425 Canister purge valve control circuit short circuit to ground
- 1426 Canister purge valve control circuit open
- 1500 Open circuit in the fuel pump relay control circuit
- 1501 Short circuit to ground of the fuel pump relay control circuit
- 1502 Short circuit to +12V fuel pump relay control circuit
- 1509 Overload of the idle speed regulator control circuit
- 1513 Idle air control circuit short circuit to ground
- 1514 Idle air control circuit short circuit to +12V, open
- 1541 Fuel pump relay control circuit open
- 1570 Invalid APS signal
- 1600 No connection with APS
- 1602 Loss of on-board voltage to the ECU
- 1603 EEPROM error
- 1606 Rough road sensor incorrect signal
- 1616 Rough road sensor low signal
- 1612 ECU reset error
- 1617 Rough road sensor high signal
- 1620 EPROM error
- 1621 RAM error
- 1622 EEPROM error
- 1640 EEPROM Test Error
- 1689 Invalid error codes
- 0337 Crankshaft position sensor, short to ground
- 0338 Crankshaft position sensor, open circuit
- 0441 Air flow through the valve is incorrect
- 0481 Cooling fan 2 circuit malfunction
- 0615 Starter relay circuit open
- 0616 Starter relay circuit short circuit to ground
- 0617 Starter relay circuit short circuit to +12V
- 1141 Faulty oxygen sensor heater 1 after the converter
- 230 Fuel pump relay circuit malfunction
- 263 Injector driver fault 1
- 266 Faulty injector driver 2
- 269 Injector 3 driver fault
- 272 Faulty injector driver 4
- 650 Check Engine Lamp Circuit Malfunction
Internal breakdowns
The above situation can occur when a semiconductor diode fails. If there is a break in the stator winding, a voltage drop under load is also observed. Disassemble the generator and diagnose the semiconductors. They have one-way conductivity. Ring the stator windings to identify a short to the housing. It is worth noting that a break can be found with a multimeter, but a bad contact is unlikely. For this purpose it is better to use a megohmmeter.
It is worth inspecting the generator brushes as well. If the battery charging light comes on at low speeds when the light is on, this also indicates the presence of the breakdowns described above. A lot depends on the brushes too. If they are 5mm or less in length, you can safely throw them away. And if the battery charging light comes on due to brush failure, the fault is very easy to find.
How to understand what exactly caused the light bulb to burn? How to fix the problem?
If the battery light is on while the engine is running, do not turn it off, open the hood and check the voltage at the battery terminals. If charging is supplied to the multimeter, the voltage should be 13.5-14.3V. If there is no charging, the voltage will be much lower - approximately 12V.
- Two screwdrivers (flat and Phillips);
- “Control” (12V light bulb);
- Multimeter;
- Pliers, a knife and sandpaper to clean the contacts.
In fact, there are many reasons why the battery light comes on and does not go out. These include:
- Loosening of the belt tension on the generator, its wear or damage;
- fuse blown or deterioration of contact quality in the connectors of the mounting block;
- breakdown of the relay regulator, diode bridge, additional diodes;
- the appearance of a break in the generator excitation circuit;
- decreased quality of contact at the battery terminals or generator output;
- generator brush wear;
- lack of high-quality contact of the ground wire.
What to do if the battery charging light is on?
First of all, get out of the car and, with the engine running, measure the voltage at the battery terminals (do not remove the clamps under any circumstances).
If charging is in progress, the voltage should be at 13.6-14.2 Volts. In the absence of charge, the voltage level will be much lower - about 12 Volts.
To fix the problem, prepare the following tools:
- twelve volt indicator light,
- two screwdrivers (flat and Phillips),
- multimeter,
- pliers,
- knife,
- Use sandpaper to clean contacts.
1. The readings of the on-board voltmeter indicate the presence of a charge, the charge signal lamp on the dashboard does not light up, there are about 12 Volts at the battery terminals, and the battery itself is almost discharged.
In such a situation, clean the wire connections on the power source itself. If these measures are useless, measure the voltage level at terminal “30” of the generator itself.
Place one multimeter probe on this terminal, and the other on ground. If the voltage here is much higher than at the battery, then strip the thirtieth terminal. If necessary, replace the wire from the generator to the battery.
2. The voltmeter on the dashboard and the lamp show the presence of a charge, but the battery is discharged.
The voltage on the battery is normal (about 14 Volts). Turning on a load (for example, headlights) causes the charge arrow to shift to the extreme left position.
The main reason is weak belt tension on the generator pulley (tension the belt, and if it is damaged, replace it).
This problem can also be caused by a breakdown of one of the diodes, as well as a break in the stator phase winding. Turn off the ignition and check the diodes with a multimeter. In case of breakdown, replace them.
Check the generator brushes. To do this, take them out and measure the length. If it is less than five millimeters, then it is better to replace the brushes.
3. When you turn the key in the ignition, the charge warning lamp does not light up, the charge sensor does not work, and there is no charge on the battery. The reason is a blown fuse.
Its designation is F10, rating is 10 Amperes. If installing a new fuse does not produce results, then the reason must be sought in the ignition relay or the lock itself.
4. After turning on the ignition, there is no charge, all devices work, the control warning lamp does not light up.
The check is simple - remove the wiring from terminal “sixty-one” of the generator and connect it directly to the “minus” (car body). If the light comes on, then the cause of the problem is the generator field winding.
The second option is bad contact in the connector. If after cleaning there is no result, then there is a risk of the lamp itself burning out.
5. When you turn the key in the ignition switch, the charge lamp lights up, and after starting it continues to light up. In this case, there is no charging or appears periodically. The reason is insufficient contact of the wire at the connector with the dashboard (it may oxidize).
Finally, check the relay regulator. To do this, apply voltage from the battery to its contacts. If there is 12 volts on the brushes, then the relay is working properly. If not, the device must be replaced.
If you have problems charging the battery (the warning light does not go out or does not light up at all), then check all versions.
But, as a rule, the problem is always on the surface, and the cause is poor contact, a burnt out light bulb or a faulty relay regulator. Good luck on the roads and of course no breakdowns.
Welcome, friends, to the DIY auto repair website. When you turn the ignition key, a number of warning lights come on on the dashboard. They signal that the system is working properly and the engine is ready to start.
The battery charging light is on
One of these indicators has an image of a battery. When you turn on the ignition, it starts to light up, and after starting the engine, it goes out.
This indicates that the battery is charging. But what if this does not happen? Why does the battery charging light stay on even after starting?
So let's get started:
- Low tension of the alternator belt, slipping or critical wear of the alternator belt. Check the condition of the belt, its tension, if necessary, replace the generator belt and check the urgency of the problem.
- Maximum wear of generator brushes. Replace the brushes and brush holders, and then make sure that the problem has gone away. Also check the diode bridge.
- Bearing. A malfunction of the generator bearing leads to an increase in the rotational resistance of the generator rotor, which results in “undercharging” or complete jamming of the bearing. The solution is to replace the generator bearing.
- Oxidation of contacts. If the slip rings are oxidized, the battery will charge intermittently, and as a result, the battery light on the panel will light up. Slip rings are washed using flushing fluid or WD-40.
- Voltage regulator. If it is damaged, it must be replaced.
As you can see, there are quite a few reasons, and even banal oxidation of contacts can lead to this problem. However, you should not be too careless, as soon as you see that the battery light is on, immediately take measures to eliminate this problem. Otherwise, you risk being left alone with your problem somewhere in the middle of the night forest.
If, in the process of step-by-step diagnostics, it was possible to identify the cause of the battery light being on, then the unit malfunction is eliminated:
- The obvious reason is that a completely discharged battery is put on charge, or the engine is started with a starting charger, making sure that the generator is running and the light goes out.
- Corrosion or traces of oxidation on various contacts and terminals are cleaned with sandpaper, wiped dry and treated with an anti-corrosion compound.
- The generator belt is adjusted using mounting fasteners to normal tension. If even minor delamination is detected on the working surface of the material, it should be replaced.
- Broken wiring is replaced in areas of breaks, taking into account the voltage. The high-voltage wire is selected only in accordance with the technical parameters of the unit.
- The burnt relay and fuse must also be replaced with new ones. When inspecting the fuse box, the cause may be a weak connection - sometimes it is enough to simply insert it into place in the socket.
- A worn-out generator must be repaired by a specialized service center or replaced.
After fixing the problem, when the battery light on the dashboard stops lighting, you need to let the engine idle for 10-15 minutes and take a new reading of the generator output voltage.
When you start the engine, many different lights come on on the dashboard, one of them is the battery charging light. Ideally, it lights up as soon as you start the engine and goes out after a while. This indicates that the generator and all its circuits are fully operational and the battery receives a charge of 13.7-14.3 Volts, that is, it is charging.
However, various breakdowns often occur due to which the light bulb continues to glow, glows dimly, or does not light at all. To deal with such malfunctions, you need to understand a little about the design of the generator and the principle of its interaction with the battery.
A little theory
On our website Vodi.su we have already described in detail the design of a car generator. Let's just say that electricity is generated in it by the rotation of the crankshaft. As the speed increases, the voltage also increases, but it must be within the limits indicated above, otherwise the battery will be overcharged, which threatens the electrolyte boiling and sulfation of the plates.
To prevent this from happening, a relay regulator is installed in the rotor excitation circuit, thanks to which a stable voltage is supplied to the battery.
The signal from the generator to the warning lamp is transmitted through a fuse, which is also located in the generator itself. Accordingly, the light stays on until the generator starts working and transmits voltage to the battery.
The charge from the generator passes through:
- diode;
- regulator;
- generator brush;
- slip rings;
- winding and wiring.
Thus, if at least one of these elements does not work correctly or fails, the readings of the light bulb cannot be trusted, although charging may be supplied to the battery.
Why is the battery charging light on?
There can be a lot of reasons. So, if after starting the engine the warning light continues to burn at full intensity, most likely the alternator belt has stretched and needs to be replaced. At the same time, you can hear characteristic sounds from the engine. On Vodi.su we have also already told you how to tighten or change a belt.
The second common cause is poor contact at the battery terminals or at the terminals from the generator. Contacts oxidize over time and need to be cleaned.
Failures in the mechanical part of the rotor: the bearing fell apart, the bushings flew off. You will have to completely remove the generator, disassemble it and replace broken parts. Fortunately, you can always find a repair kit of three bushings for a VAZ-2107 or other domestic cars on sale.
Failure of the diode bridge, relay regulator. In this case, you need to check them with a multimeter, or contact a specialist. Repairs often cost more than purchasing a new generator.
A few more common breakdowns
But most often it happens that the battery charging light does not light up, but there is a breakdown. Moreover, if the lamp itself burns out, the voltage on the excitation winding disappears. It is easy to identify a malfunction - you need to check the filament of the lighting fixture itself. But most often the lamp blinks and may light up briefly. Often the cause of this behavior is a broken contact in the power supply circuit of the field winding. To resolve, clean all connectors using a knife, sandpaper, or use a penetrating lubricant such as WD-40.