The instrument panel of the VAZ 2114 car helps the driver to timely monitor all the necessary data on the state of the power unit, the availability of fuel, the time period of the journey, and the speed of the vehicle. It is important to keep the panel in good condition so that the driver can easily see the readings of all indicators located on it. If the panel malfunctions, emergency situations may arise, since the driver will not be able to monitor the condition of all vehicle systems, including car alarm equipment, the operation of the brake system, will not be able to take into account engine speed, determine the speed of the vehicle, etc.
The panel also shows time, temperature, and indicates the operation of signal and light lamps. That is why you should always monitor the serviceability of this device.
Instrument panel lighting VAZ 2114
Diagnostic procedure
In order to remove the instrument panel, you will need a set of screwdrivers and two wrenches - 8 and 21.
The entire procedure is performed in the following order:
- Unscrew the three screws and remove the trim.
- Unscrew the five screws on the right side of the console and remove the screen.
- Disconnect the negative cable from the battery.
- Disconnect the wiring harness that goes to the cigarette lighter.
- Disconnect the heater fan mount.
- Unscrew the bolts responsible for fixing the steering block brackets.
- Remove the light bulb sockets, light guide and decorative insert.
- Remove the lamp responsible for illuminating the hydraulic corrector.
- Unscrew the screws of the top and bottom rows of the panel and completely dismantle it.
At this point, dismantling the panel can be considered complete. Now you can move on to finding the reasons why the instrument panel of the VAZ 2114 does not light up.
Once the panel is completely removed, you should cover the electrical circuit of the wires with protective material to prevent dirt and debris from getting on it.
Checking the electrical panel backlight system is performed as follows. First, all light bulbs are checked for functionality. If they are in good condition, all connector contacts are cleaned of oxides (they can be treated with kerosene or WD-40). After this, the serviceability of the wiring itself is checked - to do this, it is necessary to “test” it using a multimeter.
If the test results show that all elements of the system are operational, but the backlight still does not work, then the problem lies in the fuse box - it should be checked and replaced with a new one (if necessary).
The fuse block is replaced only with a similar factory-made block. Using instead blocks designed for a different amperage, as well as various homemade spacers, is strictly prohibited. This can not only cause the failure of all electronics, but also lead to a fire.
It is also worth noting that replacing the fuse box should be done very carefully, without jerking, using special dielectric tweezers.
Solutions
First of all, you need to check the backlight bulb; if it does not work, it needs to be replaced. Also, the reason that the instrument panel does not light up in the VAZ 2114 may be a violation of the integrity of the wiring. She should be called. A damaged fuse and electrical circuit, as a rule, cannot be repaired - they simply need to be replaced. Let's look at quick ways to solve these problems.
One or more light bulbs do not light up
One of the most common reasons why the instrument panel lighting on a VAZ 2114 stopped working is burnt out light bulbs. The electrical circuit in this model is designed in such a way that if one light source fails, all of them stop working. To determine exactly what is broken, you will need to ring the entire system using a tester. Another reason for the lack of lighting may be the independent installation of LEDs instead of standard incandescent lamps. In this case, an error is often made in the distribution of power or the electrical parameters of the led elements are calculated incorrectly.
Wiring
Damage and rupture of wires in the power supply system of the on-board network is not uncommon on a VAZ 2114 car. To locate the disconnection point, it is necessary to test all possible wires that can be found surrounded by the instrument panel illumination. In addition, the light bulbs may not light due to the formation of oxide deposits on the pads. To fix the problem, you will have to dismantle it and clean the entire contact group.
Fuse
Before you start calling the electrician of the VAZ 2114, the fuse box must be dismantled. Otherwise, the diagnostics will not be complete and will not reveal a complete picture of faults in the instrument panel lighting system. The cause of breakdowns should be sought both inside the electrical wiring distribution system and outside - in the seat. If during testing it is determined that the module is faulty, it should be replaced with a new one, since such equipment simply cannot be repaired.
The board is damaged
A violation in the electrical circuit of the dashboard system board on the VAZ 2114 is the most serious problem of the above. Despite the fact that many radio enthusiasts still repair and eliminate this defect, in practice it is better to immediately replace it with a new one. The main reason that the backlight does not light in this case is a previous short circuit in the circuit. External signs of this will be as follows:
- If the light source is an incandescent light bulb, the wiring connection to the board will be black.
- If LED elements are installed, a darkened junction between them and the base will indicate the destruction of the microcircuit.
Do-it-yourself overexposure of buttons on a VAZ 2114
What to do if the instrument panel backlight on a VAZ-2114 does not light up
Replacing the standard button backlight on a VAZ 2114 will require the preparation of certain tools, materials, as well as some time. To work you will need the following list of necessary things:
- soldering iron with a thin tip;
- solder;
- tweezers;
- small knife or flat screwdriver;
- LED elements of the desired color.
Which LEDs and in what quantities should I buy?
The buttons installed on the dashboard of the model in question come in old and new styles. In the first case, small light bulbs or LEDs are used as a backlight element, and in the second, boards with sealed SMD LEDs are used.
Bulbs, LEDs and SMD elements can be used as backlighting elements in buttons.
Each button is equipped with two LED elements: one is responsible for illuminating the button itself, and the second indicates the activation of a particular function. The exception is the low beam headlight button - it does not have a power indicator LED. Therefore, if you plan to replace the LEDs on all five buttons, you will need to purchase 9 backlight elements. The type of the latter can be determined only after disassembling the button. The old model requires 12 V LEDs with a diameter of 3 mm. The new sample uses elements marked 0805. When using standard LEDs, it is recommended to additionally install a resistor with a resistance of 500 Ohms to 1 kOhm along the power circuit (directly in the button), which will prevent the element from burning out.
To prevent the LED from burning out, it is recommended to install a resistor in series
How to remove buttons
To remove the buttons on the front console, do the following:
- Remove the negative terminal from the battery.
- We take out the plug of the on-board computer or the BC itself, if it is installed. To do this, just hook it with your finger and pull it towards you.
- We put our hand into the hole formed and feel the back of the buttons.
- Carefully press the buttons out.
- We remove the blocks with wires.
- Having completed the necessary actions with the buttons, install them in the reverse order.
Replacing the backlight of the front panel buttons
Since replacing LEDs on old and new button versions is somewhat different, each process should be considered separately.
Overexposure of old-style buttons
After removing the buttons from the instrument panel, perform the following sequence of actions:
- Pull the top of the button and remove the lid that is pressed.
- Insert a flathead screwdriver into the button and remove the inner part. You need to remove it carefully so as not to lose the springs.
- Use a multimeter to determine the polarity of the LEDs.
- We bend the leads and dismantle the LED element.
- We bend the leads of the new LEDs and insert them into the button body, observing the polarity, after which we shorten the leads with side cutters to the required length.
- Reassemble the button in reverse order.
Overexposure of new buttons
On modern buttons we change the LEDs this way:
- We disassemble the button, as in the previous paragraph.
- After opening we find a board with installed LEDs. We determine the polarity of the elements and solder them with a soldering iron with a thin tip.
- In their place, we carefully install new SMD LEDs of the desired glow color.
- We reassemble the button.
Video: overexposure of VAZ 2114 buttons
Modernization of the buttons for turning on the headlights and low beam
The buttons for turning on the headlights and low beam headlights are made as a single element. The absence of an LED indicating that the headlights are on low beam causes inconvenience to many motorists. This is due to the fact that it is often unclear whether the headlights work or not. To solve this problem, they resort to modernizing the button. In addition to the tools listed above, you will need a similar button from which the necessary parts will be removed. The finalization process itself consists of the following steps:
- Remove the button from the panel.
- Using a minus screwdriver, we pry up the keys, take them out and see that the LED is initially missing.
- We disassemble the button housing by pressing on the latches with a screwdriver. At this stage the buttons should be in the pressed position.
- We remove a couple of pins and contacts from the spare button, and then install them in the body of the element being modified.
- We take out the board with two LEDs from the spare button and replace it with the board with one LED element.
- Using a soldering iron, we connect the board to the new terminals.
- To supply power to the new contacts, we connect the contacts with copper wire according to the photo.
- Using a sharp knife or screwdriver, make a hole in the button cover.
- We assemble the part in the reverse order and install it in place.
Instrument panels VAZ VDO (LED)
You can install a more beautiful and convenient panel with LED indicators, the so-called VDO panel. Here VDO is the panel manufacturer.
| Connecting VDO on a Kalina car | ||
| 1 | Pink-white | To electric power steering |
| 2 | Blue and white | To the hazard warning indicator |
| 3 | Gray-blue | To emergency oil pressure sensor |
| 4 | Brown blue | To the parking brake switch |
| 5 | Yellow-blue | To the immobilizer control unit |
| 6 | Black | To the airbag control unit |
| 7 | Yellow | To the outside light switch |
| 8 | Blue | To the right turn signal switch |
| 9 | Blue with black | To left turn signal switch |
| 10 | White-blue | TO ECU |
| 11 | . | To brake pad wear sensor |
| 12 | . | To seat belt sensor |
| 13 | Black | To the traction control control unit |
| 14 | Red-blue | "RESET" key on the steering column switch |
| 15 | Pink-blue | To brake fluid level sensor |
| 16 | Black | To ABS |
| 17 | Green | To the high beam switch |
| 18 | White | To the instrument cluster light control |
| 19 | Brown | Panel weight |
| 20 | White-red | Terminal "30" |
| 21 | Orange | Terminal "15" |
| 22 | Yellow-red | To fuel flow sensor |
| 23 | Orange-white | MK key "forward" |
| 24 | White black | MK key "back" |
| 25 | Black and white | Outside temperature sensor (-) |
| 26 | Yellow-green | Outside temperature sensor (+) |
| 27 | Pink | Fuel level sensor |
| 28 | Grey | Speed sensor |
| 29 | Green-white | Coolant temperature sensor |
| 30 | Brown-red | Tachometer (low voltage) |
| 31 | . | Official. Panel diagnostics. |
| 32 | Brown-white | Terminal “L” of the generator relay regulator |
Functional testing steps
The exclamation mark is lit on the instrument panel of the VAZ 2114
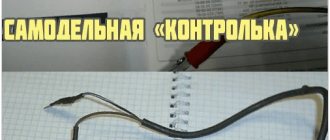
Before purchasing an LED strip, all buyers have a justified desire to check its performance. To do this, you need to have a battery with you, for example a “krona”.
Checking the tape using a crown.
The product will not light up at full brightness. To test a long section, you will need a large battery, for example, which is used in an uninterruptible power supply for a computer. It is suitable because it has 12 volts at the outputs. One of the best options is a car. To test individual LEDs, use a multimeter or a 3-volt battery.
Causes of malfunctions
There are a number of reasons why the instrument lighting of the VAZ 2114 may stop working correctly.
The most common of them are:
- light bulbs have burned out or diodes have failed (with LED backlighting);
- contacts and connectors have oxidized;
- fuses are blown;
- damage has occurred in the wiring itself;
- the integrity of the common contact board has been compromised;
- Lost contact with the “mass”.
In order to find out the exact cause, you will have to perform dismantling work and carry out diagnostics. You don’t need any complicated tools for this—it’s enough to have a simple tester (multimeter) or voltmeter.
Bulb
Designation of icons on the instrument panel of the VAZ 2114
The principle of triggering the light elements in the cabin is simple. There are limit switches on the body pillars on all sides.
When the door is opened, this small part causes the contact to open, which gives a signal to turn on the lighting. When you open the door on 2114, only the main lamp turns on. Frequent opening of the door and constant activation of the light bulb leads to its gradual wear.
As soon as the life of the light bulb runs out, it burns out. You can check the integrity of the light bulb yourself. It is enough to lift the plastic cover of the main light source and the insides of the illuminator will be before your eyes.
The driver's light has a slightly different form of light bulb with a socket - r5w with a power of 5 Watts.
It's a little more difficult to change. It is necessary to use a screwdriver to pry off the body of the fisheye, and then remove the wire block. Next, press the latches on both sides of the case and remove the r5w base.
If after the replacement procedure the interior lighting of the VAZ 2114 does not work, check the wiring.
The light in the interior of the VAZ-2115 does not work: possible reasons
Lighting in the VAZ-2115 is one of the most important components of comfortable movement by car at night. If the interior light does not work, the driver faces a lot of inconvenience.
The light emitted by street lamps will not help you find the desired item in the glove compartment, therefore, it is best for the driver to take care in advance that all the light bulbs and other components of the car’s electrical equipment work stably and reliably. But what to do in a situation if the lighting fixtures in the interior of a VAZ-2115 for some reason refuse to fulfill their duties?
The main reasons for the lack of lighting in the cabin
Inside the VAZ-2115, the manufacturer often installs one lamp located directly on the ceiling and individual lamps. It is attached using fasteners and is activated when the doors are opened. Drivers have been familiar with this principle of operation of a lighting device since the “classic” times. The lamp can also be turned on and off manually using a switch located on its body.
The lampshade and other lighting fixtures are part of the electrical system, therefore, if any malfunctions occur with the light, you should start looking for the problem from the electrical circuit diagram. Most drivers prefer to have their car electrically repaired, but such a nuisance can be fixed on your own. To do this, you need to arm yourself with a minimum set of tools and the circuit itself.
The main reasons for the lack of lighting inside the car are:
- Burnt out light bulbs;
- Breakage inside the lampshade;
- Relay or fuse problem;
- Breakdowns in the wiring.
When the reason why the lighting fixtures have stopped functioning properly has been determined, you can safely move on to fixing the problem yourself. As a rule, such work does not cause any particular difficulties for novice drivers. All you need is basic knowledge of how automotive electrical equipment works.
Reasons for turning off the dashboard on the VAZ 2114
Turning off the dashboard lights does not bode well for either the driver or the car. Because this malfunction is usually followed by others. Therefore, the backlight should be repaired immediately.
You should also understand that if the lights on the dashboard go out, then the problem must be looked for somewhere in the on-board electrical system. This means you can’t do without a multimeter, a soldering iron and electrical tape. Here are the main reasons for turning off the backlight:
- fuse burned out;
- the light bulbs have burned out (or LEDs - in later VAZ 2114 models the panel is illuminated by them);
- the wiring in the on-board electrical network is damaged;
- The common contact board of the instrument panel burned out.
Let's consider these points in more detail.
Burnt fuse
80% of cases when the backlight turns off is due to a blown fuse. It is located in a safety block installed under the steering column of the car. Usually the fuse indicated in the documentation as F10 is lit.
It is he who is responsible for the dashboard lighting, side lights and license plate lighting. On early VAZ 2114 models, fuse F10 was brown or red.
On later cars they started putting green ones. It is not difficult to understand that the fuse has blown. It's enough just to inspect it. The housing of a blown fuse may be slightly blackened or melted, and the conductor inside the housing may be severed. The faulty fuse is replaced with a new one. Typically this solves the problem.
Burnt out light bulbs
Dashboard lights operate under less than ideal conditions. They are regularly exposed to shaking, power surges in the car's electrical network and temperature changes. All this significantly reduces their service life. Especially if these are not LEDs, but ordinary incandescent lamps, which were equipped with the first VAZ 2114 models. There are a total of 19 lamps (but this number also varies depending on the year of manufacture of the car, and the number of lamps should be specified in the technical documentation for the car).
Another reason for light bulbs to burn out is their improper installation. This is most often observed on early VAZ 2114 models, where drivers decide to independently replace obsolete incandescent lamps with new LEDs, making some changes to the electrical circuit. Without proper qualifications, this operation is not so easy to perform. Here's what the sequence for replacing light bulbs looks like.
- The steering column is lowered to the bottom position until it stops. Above it is the dashboard cover with four mounting screws. They are unscrewed with a Phillips screwdriver.
Video: changing light bulbs in the dashboard of a VAZ 2114
Wiring damage
Problems with electrical wiring are the worst case. To figure this out on your own, the driver needs to have serious knowledge of electrical engineering. In particular, he must be able to read automotive electrical circuits well. Not all car enthusiasts can boast of such skills. It is for this reason that it is better to entrust the search for a damaged section of on-board electrical wiring to a qualified auto electrician.
His actions boil down to the following: he determines the key sections of the circuit and sequentially “rings” them using a multimeter until he finds a broken section of the wiring. Completing this work may take several minutes or several hours - it all depends on where exactly the circuit break occurred.
Panel contact board problems
If all of the above measures do not lead to anything, the last option remains: damage to the contact board in the dashboard. This part is a combination of several microcircuits. It is not possible to repair it in a garage without special diagnostic equipment. So the car owner has only one option - to replace the entire board. You can purchase it at any auto parts store. It costs about 400 rubles. Let us list the stages of its replacement.
- First, all the steps mentioned above in the paragraph on replacing light bulbs are performed.
- But instead of unscrewing the bulbs, you should unscrew the four bolts at the corners of the rear wall of the dashboard.
- The back wall is carefully removed along with the board, which is attached to the wall with plastic latches.
So, the owner of a VAZ 2114 can solve most problems with the dashboard lighting on his own. All that is required is the ability to use a screwdriver. The exception is the case of damaged wiring. It is strongly recommended that you contact an electrician to identify the damaged area. This will save a lot of time and nerves, which, as we know, are not restored.
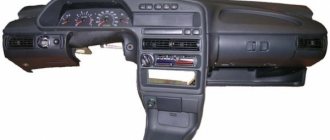
Removal instructions
Sequencing
Using a Phillips screwdriver, remove the 3 screws that hold the left side of the panel near the gearshift lever.
After removing the screws, you should pull the bottom edge of this panel out of the bracket in which it is located. You need to act carefully, since there is a high risk of breaking a fragile part. The right side of the panel near the gear lever is secured with 5 self-tapping screws. They also need to be unscrewed with a Phillips screwdriver. It is better to hold the panel itself.
The panel can now be removed. During the process, you need to make sure that it does not get caught on the wires located behind it. At this stage, the mass is necessarily disconnected from the battery. If the car has a radio, it must also be disconnected from the rest of the wiring by removing the terminal block. If not, then the wires are simply removed from their regular places. It is also necessary to turn off the cigarette lighter and remove the light bulb for illuminating the ashtray (it is most convenient to remove it together with the socket). Now you should remove the handles from the heating throttle control levers. The best way to do this is to pry them off using a flathead screwdriver.
Next, remove the stove fan handle. You just need to pull it towards you.
Now, using a Phillips screwdriver, unscrew the screws that secure the dashboard to the brackets. There are 4 self-tapping screws - 2 on the left, 2 on the right.
There is a plug on the upper right corner of the dashboard. It should be carefully pryed off with a flat blade screwdriver, removed, and then unscrewed the screw located behind it. It is also necessary to unscrew the 2 screws on the trim to the right of the steering wheel (they hold the lower part of the trim). After removing the cover, the switch wires will become visible.
All these wires should be disconnected (and at the same time it is very important to remember where which wire was located, or even better - to mark them with something).
There are several bolts on the steering wheel bracket. We unscrew them. Now you need to release the lower bracket fastening
It is attached to bolts that can be unscrewed with an 8-mm open-end wrench.
Use a Phillips screwdriver to unscrew the screw holding the light guide. Now you can remove the fastener that contains the vehicle heating control unit. After this, you can remove all the decorative inserts on the dashboard and the lighting for the hydraulic corrector. Now you can get to the screws on the upper and lower panel fastenings. The cross member also unscrews from the left side of the steering wheel. Once the bolts are removed, the VAZ-2114 dashboard can be removed.
Video: Removing the tidy on a VAZ-2114
https://youtube.com/watch?v=F-FEZZiQ31Y
As can be seen from this article, the designers did a disservice to car owners. On the one hand, the dashboard has really become more ergonomic. On the other hand, it has become much more difficult to remove it. But if you use the instructions suggested above and be patient, even a novice car enthusiast will be able to do this task.
Wiring damage
The last and most undesirable cause of a malfunction is a broken switch wiring. In the absence of visible damage to the wiring, it is difficult to find the location of the break without checking. If you can find a break, you should completely replace the wire, and not try to glue it with electrical tape, because shortening the wires leads to a change in resistance.
Another reason for incorrect operation is oxidation of the contacts inside the light housing. It is enough to clean and return all the plates to the factory position. To replace the wiring of the lighting assembly, you will need a wiring diagram for the interior light. Below we present the diagram in detail.
To fully analyze the circuit, let’s look at the notation:
- X1 – lighting lamp;
- SW1 - factory backlight mode switch;
- SW2-SW5 – limit switches in the doors;
- F – fuse.
Checking the malfunction should be done by examining the fuse and light bulbs. Only after this should you look for the cause of the problem in the limit switches and wiring.
Why lamps burn out or stop working: causes and consequences
Burnt-out lamps complicate driver control over car instrument readings
We recommend: Car wheel balancing
The backlight operating conditions are not ideal: shaking, temperature changes, possible power surges in the on-board network, and so on. When driving, you must turn on low beam headlights. Along with it, the instrument lighting also turns on. This can shorten the life of the lamps, and over time, not the entire panel is illuminated evenly.
The main danger of lamps burning out in the instrument cluster is that some of them are control lamps. In this case, you may not know about the failure of individual machine components. And uneven illumination looks ugly.
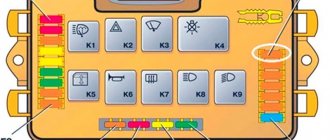
Fuse box
The VAZ 2114 car has a total of two mounting blocks.
The first and main one is installed in the engine compartment above the windshield on the left. Relays and fuses are located there. Actually, largely because of this, it is often called a fuse block rather than a mounting block.
The unit cover is held in place by special plastic clips, which makes it easy to snap and remove. On the inside of the cover there is a fuse diagram, the rated current of each individual charger.
Under no circumstances should you install a charger into the mounting block whose current strength exceeds the rated values provided for in the circuit. This may lead to electrical equipment failure.
In the image above you can see that there are tweezers in the corner of the block. It is specifically included in the design, since it is used to dismantle and install new fuses.
In total, the power supply includes 17 active fuses (F1-F16) and four more backup fuses - F17-F20.
Also for the VAZ 2114 there is a second block with fuses. It is located inside the cabin under the glove compartment and shelf. This PSU includes the following fuses:
- For fuel pump. Rated current -15A;
- For fan relay, speed sensor, mass air flow sensor and oxygen sensor. All of them have a rated current of 7.5A;
- To protect the ignition unit and electronic engine control unit. Their normal current is also 7.5A.
Purpose of the memory
In order to quickly resolve issues with failed fuses, VAZ 2114 owners should figure out which charger is intended for what. This will make it much easier for you to navigate the notations. Use a special table.
Protection for the lamp and turn switch, hazard lights, white reverse lamp, instrument unit power supply, trip computer, alternator winding, low oil pressure warning light, parking brake, brake fluid and low battery
If the engine becomes unstable, electrical problems arise, light bulbs burn out, or electrical appliances stop working, the first step is to check the effectiveness and integrity of the fuses.
To do this, the following activities are performed.
- Determine the location of fuses that may fail. You already know the diagram, the designations are also familiar to you. Therefore, it remains to be understood that the charger should be looked for under the hood or in the block inside the cabin.
- Be sure to turn off the power to the car. To do this, simply remove the negative terminal from the battery.
- Remove the plastic clips that hold the plastic cover of the mounting block in place. This is how you can easily remove the block.
- Remove the tweezers from the mount, which are located directly inside the mounting block next to the fuses and relays.
- Use tweezers to grab the device that you suspect is broken and pull it out.
- Now you really need to make sure that the fuse is blown and not working. To do this, visually inspect the fusible element. If it comes off or is deformed, it means that the protection has worked, and therefore the fuse will have to be replaced.
- But it is not always possible to detect a memory failure using the visual method. In this case, you will have to use a tester.
- Having reached the truth, that is, having determined that the protective device has failed, it will be enough to replace it with a new one.
Today, a new fuse, depending on its type, costs around 150-300 rubles. If you need to completely replace the entire fuse box, then you will have to spend about 2,000 rubles.
Safety regulations
Now a few more safety rules:
- Under no circumstances insert homemade devices and jumpers in place of broken chargers;
- Never install fuses whose rated current exceeds the values indicated on the housing cover. This may result in a short circuit and fire in the vehicle;
- Do not use metal screwdrivers or other metal tools when working with the mounting block. This even applies if the car is de-energized, that is, the battery is disconnected.
What else is this fuse responsible for?
If the instrument backlight fuse on a VAZ 2114 blows, the left side lights, license plate lights, ashtrays and other above-mentioned elements should also not work. To diagnose a malfunction, you need to find this fuse in the mounting block and inspect it. Often the defect is clearly visible externally.
You can also check it with a multimeter. If there is voltage at one end of the part, but not at the other, it has failed. Replacing an element with a known good one also helps diagnose a breakdown. If everything works after this, the reason has been established correctly. The fusible element is cheap. Therefore, you should look for the cause of the breakdown by replacing it. This usually helps solve the problem. If this does not help, you need to consider other faults.
Manufacturer's choice
The second important factor when choosing low beam lamps for Ford Focus edition 3 is the manufacturer. Initially, branded light sources from the Osram line are used in the basic configuration. However, often as an alternative, car users use analogues of brands such as:
- Philips.
- Koito.
- Behr hella.
Osram H7 Original
Original halogen lamp in low beam optics for the 3rd generation Ford Focus hatchback. Its power consumption is 55 W at an operating voltage of 12 V. The luminous flux reaches 1.5 thousand lumens at a temperature of 3200 K. The guaranteed service life is 6 months. To correctly replace it with a similar new one, you must follow the installation rules - do not touch the flask with your bare fingers. Otherwise, the fatty marks left behind will significantly reduce its durability.
The lamp is used as an analogue of the standard one installed in the low beam optical system on the Ford Focus 3, and therefore has similar parameters. The only difference is a 60% stronger luminosity at the same color temperature - 3.2 thousand K. The use of such a lamp allows you to extend the visibility horizon and improve the comfort and safety of driving a car.
Koito Whitebeam h7
The lamp belongs to the category of high-temperature lamps with a rating of 4.2 thousand K. With a power consumption of only 55 W, it produces a luminosity of 100 W. At the same time, the low beam combines softness and richness - qualities that do not overstrain the driver’s vision. Installing them on standard Ford Focus-3 optics does not lead to problems with deformation of the headlight housing and burnout of the wiring. Durability with average use reaches 2-3 years.
Another standard halogen lamp for installation in the low beam optical system on a Ford Focus 3. A characteristic feature is a white-blue tint. Other advantages include low cost and long service life.
How to choose lamps
According to current rules, tampering with a car's structure is punishable by a fine or even deprivation of a license. Therefore, only an equivalent replacement with the same lamps used by the manufacturer is considered acceptable. However, the attitude of traffic police officers towards the dashboard lighting is more loyal. This is explained by the absence of danger for drivers of oncoming cars.
Most car owners use LED analogues instead of conventional incandescent lamps. This choice is explained by the significant advantages of LED devices compared to traditional lamps:
- long service life;
- low power consumption that does not drain the battery;
- no heating that negatively affects plastic parts.
All lamps are selected according to the following parameters:
- cartridge type - 2W2;
- supply voltage - 12 V;
- power - 12 W.
Sometimes you have to change all the lamps. When purchasing, you need to know how many light bulbs are in the dashboard of the VAZ 2114. For a complete replacement, you will need to purchase:
| Purpose | Quantity |
| Panel lighting | 3 pcs. |
| Bottom row warning lights | 12 pcs. (usually not everyone is involved) |
| BSK (on-board control system) | 6 pcs. |
| Battery discharge indicator | 1 PC. |
Usually LEDs are initially installed in the BSK, since it comes as a separate unit. When purchasing replacement lamps, it is not necessary to purchase sockets; they remain operational for a longer period than the lamps themselves. A total of 8 light bulbs need to be replaced. They are the same; when purchasing, you should be guided by the type of cartridge, supply voltage and power.
Tips for motorists
If on a VAZ-2114 car on the instrument panel none of the indicators installed on it work (speedometer, odometer, tachometer, fuel level and coolant temperature indicators), then the first thing the driver will have to do is check the integrity of fuse F3, which is located in the mounting block. If it has burned out, then before replacing it, you need to find the reason why it burned out, otherwise the newly installed new fuse will have the same fate as the previous one. Most often, fuses burn as a result of a short circuit.
Even if the fuse is intact, then do not be lazy to take it out and check the condition of the contacts. There are cases when the contacts oxidize, and the electrical circuit in this place is interrupted. After making sure that the fuse is intact, the next step is to check the ignition relay, which is located inside the car to the left of the steering column. It is attached to a pin upside down. In the block where this relay is inserted, you can try to short-circuit the power wires using a jumper. If the instrument panel comes to life, the ignition relay will have to be replaced.
If the ignition relay is working properly, there are only two possible reasons for the instrument panel not working: the ignition switch and the mounting block. Before installing the ignition relay on the VAZ-2109 car, the lock contacts burned quite often, and they had to be cleaned by disconnecting the contact group from the lock itself. After changes were made to the principle of supplying voltage to the ignition switch, its contacts began to burn very rarely, but the likelihood of this phenomenon still remained. On the mounting block, in its board, tracks may burn out; in order to see this, the mounting block will have to be removed from the car.
In addition to the reasons listed above, which can lead to failure of the instrument panel, it is also necessary to check the reliability of fastening the ground wire.
Hello! Today, on the 14th, I changed the main lighting bulbs in the cabin and after that the instrument readings stopped showing readings of revolutions, speed, fuel level and fluid temperature... I replaced the F3 fuse as written on your website and everything began to show. But the lights still don’t light up in the cabin. Thank you!
the person clearly explained the problem +1 to him. I also accidentally shorted the interior lighting contacts.....
The car starts, but the instruments do not respond! + Turn signals and wipers do not work. The relay and front are normal. Give me some advice ;)
I had the same thing! did you find the reason?
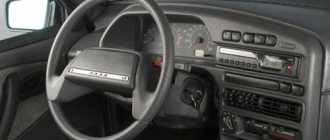
On every car, there is such a thing as: an instrument panel. It helps the driver determine the current speed of movement, the number of kilometers traveled, the speed of rotation of the crankshaft, and on more modern models, the level of necessary fluids and the condition of some systems. On a VAZ 2114 car, the instrument panel includes four dial indicators, twelve indicator lights, and two small screens.
For better visibility of the signs, especially at night, a backlight is installed that illuminates the entire shield. As practice shows, the instruments on the dashboard, including the backlight, break down quite rarely, but still, what should you do if this suddenly happens to your VAZ 2114?
MAIN PANEL ELEMENTS
The main place on the dashboard is reserved for the tachometer and speedometer, the fuel quantity sensor and the current fluid temperature in the cooling system. Let's look at the main symbols on the VAZ 2114 panel in more detail.
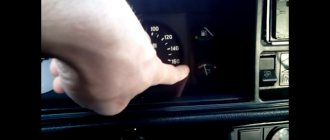
Tachometer
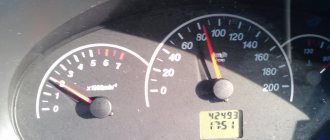
The VAZ 2114 tachometer is a pointer device, the signal to which is sent by the on-board computer of the fourteenth. The tachometer displays data on the number of revolutions of the crankshaft at the current time. The tachometer is divided by scales into 5 units, every second of which is digitized. The maximum numerical value of revolutions is 80.
To find out the actual engine speed when the car is moving, the tachometer indicator must be multiplied by 100. For example, if the arrow is located at 40, then the crankshaft is performing 4000 revolutions per minute.
The manufacturer has indicated a critical speed value, upon reaching which the engine of the fourteenth may fail due to excessive load. It is highlighted on the device with red shading; this value ranges from 6000 to 8000 rpm.
Under the tachometer there is an electronic window, which displays data about the current time and ambient air temperature.
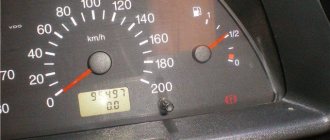
Speedometer
The fourteenth has an induction dial speedometer, which is located on the right side of the dashboard. The speedometer is also divided into sectors, the division size is 10 kilometers. The maximum mark is 200 km.
The speedometer operates from a speed measurement sensor located inside the gearbox. It is worth considering that all induction speedometers, including the one installed on the fourteenth, have an acceptable error level of 5 km/h.
At the bottom of the speedometer needle there is an electronic screen on which you can see data on the total mileage of the car and the mileage from the last starting point. The driver himself can set the starting point; for this, under the number 200 on the speedometer there is a manual switch that resets the current mileage count to zero.
Gasoline quantity sensor
On the right side of the instrument panel of the VAZ 2114 (the instrument panel of the VAZ 2114 and the designation of the indicators on the instrument panel of the VAZ 2113 are completely similar to the fourteenth model) there is a dial gauge for the current amount of fuel in the gas tank.
The sensor scale is divided into three marks: 1 – full tank, ½ – tank half full, 0 – empty tank.
Next to the sensor there is a color indicator - a light bulb that lights up orange when the fuel level is close to a critical minimum. When the light comes on, you need to refuel the car within 20-30 kilometers.
Cooling system fluid temperature sensor
The coolant temperature sensor is divided into gradations of 20 units. The minimum temperature is 50, the maximum is 130 degrees. The critical temperature zone starts at 105 degrees and is marked with red shading.
If the coolant of the fourteenth boils, then you must immediately stop the car and turn off the engine, since driving in this mode is fraught with serious troubles, even complete engine failure.
If the temperature sensor on the VAZ 2114 dashboard does not work, you need to check the wiring through which the sensor is connected to the coolant container. It is also possible that the sensor contacts may oxidize; they must either be wiped with a solvent or the sensor replaced with a new one.
Replacing the backlight
In analysis
To improve the quality of your dashboard lighting, it is advisable to install new LEDs in place of the old ones. They provide excellent illumination, consume minimal energy, and guarantee a high level of data reading.
- Buy a set of LED lamps, having previously calculated the number of devices needed for each sensor.
- After removing the block, install the resistors and lamps in specially designated places on the VAZ 2114 - in the sockets. To dismantle the cartridges, they are carefully unscrewed counterclockwise. New sockets are installed in their place and light bulbs are inserted. Respect the polarity and position the LED heads. They will have to be carefully ground off.
- Connect the power and check how the new backlight works.
- Reassemble step by step. Be sure to route the wiring to the board and carefully secure it to it. This way, the backlight components will not interfere with the reassembly process.
- Make sure the instrument panel arrows are positioned correctly. When trying to quickly complete a job, they often become deformed and bent.
- The backlight structure is fixed with screws.
- The power for the LEDs is connected to the power supply for the light bulbs, the arrows are put on and set to zero.
- Using the on-board computer, check the operation of each sensor and device. If the IDs are functioning correctly, return the instrument panel to its original condition. That is, assemble the entire assembly.
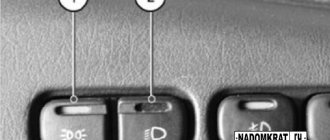
Welcome! The light bulbs in the instrument panel play an integral part; when it is dark in the car, the buttons should be illuminated at least somehow, and if the buttons are not backlit, then firstly it will not be very convenient in the dark, since the buttons simply will not be visible even in -secondly, the appearance of the panel will be more modest, you will agree that when the buttons light up, the panel looks much more interesting, but besides the buttons, there are other elements in the panel that are also illuminated, one of the most important such elements is the instrument cluster, there are also light bulbs inside it are present, thanks to them the entire instrument cluster is illuminated, all the indicators in it, you can see all this in more detail in the photo below, let's move on, all lamps have the ability to burn out and therefore it is not uncommon for button lamps or lamps that are in combinations are installed, after that at night the panel no longer looks as beautiful as it should, and if the lamps in the instrument cluster fail, such as the oil pressure lamp, for example, then in this case you will generally need to sound the alarm, because when not such essential panel indicators are working, operating the car is simply dangerous, and this is easy to understand, if we talk specifically about the oil pressure indicator, then it should light up when the key is turned to the start position and when starting the engine it turns off, if it does not turn on at all, then either the sensor is faulty, or the lamp itself is faulty, but as a rule, the lamp for such important indicators rarely fails, because they burn for a very short time.
Note! In this article, we will analyze all the lamps that are in the panel and explain how to replace them, for this you will need: A screwdriver, new lamps and time with patience, because such work is not done in two minutes (If we are talking about the instrument cluster), and much longer, since in this case the floor of the torpedo will still have to be disassembled; by the way, you may also need thin pliers, because in the instrument cluster there are several sockets with lamps, which are very difficult to reach (They are in the depths) and if your fingers are large, then There is no way you can remove the cartridge except pliers!
Where are the light bulbs located in the instrument panel? In cars of the Samara 2 family, there are quite a few light bulbs in the dashboard, but although in cars such as the VAZ 2110, Priors, and so on, there are no less of them, you already understand everything about the buttons and the instrument cluster, but in addition to these elements, light bulbs are still present in cigarette lighters and stoves, all these light bulbs can be found on the reverse side, for example, to find the stove lamp, you will need to remove the plastic antennae that are on the levers, then pry off the plastic itself and completely remove it from the dashboard, thereby you will get to the stove lamp , the situation is similar with the cigarette lighter, the lamp with the socket is in the back of it, but you won’t be able to get it, so to change the lamp, you will need to remove the side trim on the driver’s side and there you can find both the cigarette lighter socket and the lamp and replace them , we will talk about this in more detail in this article (It will be a little lower).
The dashboard of the VAZ 2109 does not light up
Common instrument panel faults
The instrument cluster on the VAZ 21099 or 2109 is a fairly reliable unit. However, even this can fail over time.
The main malfunctions characteristic of the VAZ instrument panel:
- The lights on the instrument panel of the VAZ 2109 stopped lighting. If only a few light bulbs refuse to work, then most likely the reason lies in their burnout. If the instrument panel lighting stops working completely, then most likely the problem is a poor power supply. As practice shows, power problems are usually caused by either damaged wiring or oxidation of contacts at connections and connectors. If this is the case and the backlight does not light up due to oxidation, then you can get rid of this problem by cleaning the contacts or replacing them. If the problem lies in the lighting sources, then replacing the lamps will solve it.
- Another problem, oxidation on the circuit board, is common in older vehicles or vehicles that have moisture. Due to oxidation of the board, the backlight and some instruments may not work, in particular, fuel level and coolant temperature controllers, tachometer, etc. If the needles do not rise on the tachometer, speedometer, fuel consumption sensor and generator voltage, or they work chaotically, then you need to carry out a full check of the dashboard.
- VAZ 2109 cars are characterized by the problem of a non-working speedometer. As a rule, it appears as a result of wear of the cable connected to the box, or due to repairs to the device and its incorrect connection. If the cable is worn out, then you just need to replace it, there is nothing complicated about it. The main thing is to connect the cable correctly so that its tip fits exactly into the groove on the tidy speedometer.
- Damage to the board itself. Such a malfunction occurs quite rarely, but, nevertheless, it should not be forgotten. If the structural board fails, the shield will have to be repaired, but if this does not help, then it will need to be replaced.
Instrument panel pinout
VAZ 2109, 21099 cars can use low and high center consoles, as well as Europanels. Depending on the type of torpedo, the combination of the instrument panel and its pinout, as well as the position of the indicators, will be different. Below are photos and symbols of components on instrument panels with different torpedoes.
Photo gallery “Designation of indicators on dashboards”
If you decide to tune your instrument panel, then most likely you will be interested in knowing what options exist for doing it. The tuning shield, as you know, pleases the driver’s eye, so this issue is relevant for many car owners.
Fuse box tracks burnt out
In a situation where the device “blinks” and periodically turns off completely, you should check the condition of the tracks in the fuse box. A short circuit, moisture and dirt getting into the block body - all this can lead to breakdowns on the tracks. The photo below shows a typical picture of a faulty fuse box in the “four”.
Because the price of a new block board exceeds 2000-3000 rubles; it is much more profitable to try to re-solder the tracks yourself. This problem is not critical, so if you have the skills to use a soldering iron, you can restore damaged tracks. For prevention, you can treat all contacts to remove oxides and dirt. It is also possible to treat contacts with dielectric grease.
If one of the lighting bulbs blinks, check the reliability of its contact. When driving on a bad road, the contacts in the device may come loose. The introduction of new lighting elements instead of standard ones is an intervention in the design. If new diode lamps are installed incorrectly, problems may occur with other components of the panel. Of the problems listed in the article, the “easiest” one is a blown fuse, while the most undesirable one is a malfunction of the board and mounting block. In any case, the availability of new and used spare parts for the “four” makes this problem insignificant.
Signs of trouble
As mentioned above, the reasons why the dashboard does not light up are electrical circuits. But where exactly? For example, in:
- fuse;
- wiring;
- damage to the board;
- problem with the fuse box.
You can also look for a fault in the backlight bulbs and their electrical circuits.
It is up to the owner to decide whether to take the car to a service center or do it yourself. If the choice fell on the second option, the problem must be found and fixed.
Hug the bronze dog
A Basset dog named Bobka is a legend of the Kolomna fire department, which is still located not far from Susaninskaya Square. In the 19th century, the dog lived in the Fire Tower, was a member of the fire brigade and helped save Kostroma residents from fire. The whole city spoke about her exploits: Bobka became such a noticeable phenomenon that she became the hero of a story by local writer Leonid Kolgushkin.
In memory of the brave rescuer, a bronze monument was erected in 2006. In winter, this absolutely charming bronze figure is decorated with a scarf so that Bobka does not freeze
The dog continues to help the townspeople today: he guards a piggy bank in the shape of a ball, where you can throw coins and bills. All money raised goes to help a shelter for homeless animals. And if you sit on a dog’s back and pet it, they say your most cherished wish will come true.
Control panel design
The main symbols include the fuel level, speedometer, tachometer, and sensors for cooling the liquid. The temperature sensor is indicated by an arrow on the left side of the panel.
If the sensor needle is in the zone from 105 to 130 degrees, you should immediately stop the car and wait until the engine cools down, otherwise the engine will simply boil. The tachometer is presented in the form of a dial scale on the instrument panel.
Engine speeds from 2 to 5.5 thousand per minute are considered the norm. If the needle falls into the red zone, fuel consumption may increase sharply, and the load on engine parts will become greater. The panel must have a speedometer.
With its help, the driver controls the speed, which directly affects road safety. The speedometer is an important part and should show clear data.
The sensor is located in the form of an arrow, which shows the fuel level in the car tank and is usually located on the right side of the device. Although it will not measure exact data about gasoline, you can find out the approximate fuel remaining at any time.