| Are there problems with starting the engine, or the car does not pull, or maybe the speed fluctuates? You can determine the cause of illnesses very simply if you install a computer on Kalina . |
An on-board or otherwise trip computer can perform many useful functions and their number depends on the model. Among car enthusiasts, the Kalina State computer is considered the most popular, here are the instructions for installing it:
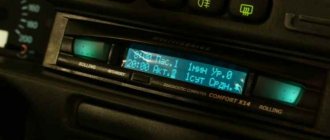
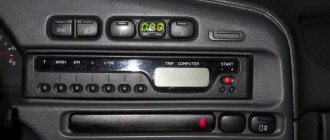
Lada-Kalina on-board computer
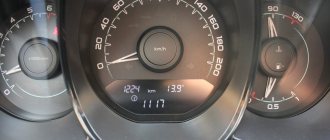
The LCD of the on-board computer is located on the dashboard and contains two lines:
- the top line displays the total/daily mileage counter;
- the bottom line displays: current time;
- outside air temperature;
- car driving time;
- average fuel consumption;
- instant fuel consumption;
- approximate remaining power reserve;
- average car speed;
- amount of fuel consumed.
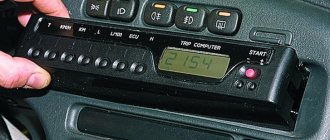
To switch between display modes of the bottom line, use the keys on the steering column wiper switch: the keys located at the end of the switch switch functions “in a ring” forward and backward; The “Reset” key located at the bottom of the switch resets the values to “zero”.
The top line readings (total/daily mileage) are switched by a button located on the right side of the dashboard (under the fuel gauge). If the daily mileage counter is displayed, then to reset it, you must press and hold the button for 3 seconds.
The procedure for setting the clock on the Lada-Kalina:
- To switch from the current time indication mode to the setting mode, you must press and hold the “Reset” key for more than 3 seconds, while the hours and minutes will begin to flash;
- The minutes are set by pressing the “ring forward shift” key located at the end of the steering column wiper switch;
- The clock is set by pressing the “ring back shift” key located at the end of the steering column wiper switch;
- When you press the key once, the minutes/hours value increases by “1”; to change the values faster, you need to press and hold the key;
- When setting the minutes, the seconds counter is reset to zero (setting the hour counter does not affect the seconds counter);
- To return from the installation mode to the indication mode, you must briefly press the “Reset” key or, in the clock setting mode, do not press any key for 1 minute.
Detailed information about the displayed functions (their ranges) of the Lada-Kalina on-board computer:
- current time
(hour, min) - 0:00-23:59 (resolution 1 minute); - outside air temperature
(°C) — -40°C..+70°C; (resolution 1°C); - vehicle driving time
(hour, min), defined as the time during which the engine has been running since the last reset - 0:00-99:59 (resolution 1 minute; to reset, you must hold the “Reset” key for 3 seconds) - average fuel consumption
(l/100km) - 0.0-19.9 (resolution 0.1l/100km; after zeroing, the first 500 meters of the distance traveled are not indicated); - instantaneous fuel consumption
(l/100km) - 0.0-19.9 (not displayed if the speed is less than 1 km/h); - approximate remaining power reserve
(km) - 999-30 (resolution 5 km); - average car speed
(km/h) - 0-250 (resolution 1 km/h; after zeroing, the first 500 meters are not displayed); - amount of fuel consumed
(l) - 0-9999 (resolution 1 l; to reset, you must hold the “Reset” key for 3 seconds).
Top of page
Installation of an on-board computer in Kalina State X1-M
The on-board computer State x1 is very compact and is designed to be installed in the place of the button plug. Despite its size, it is capable of working at full capacity and performing many functions, each of which is in demand by the car enthusiast (for example, fault diagnosis, cooling system fan control, drying and warming up spark plugs, etc.).
The low price (750 rubles), functionality and ease of installation make the x1 staff very popular.On-board computer instructions Lada Kalina
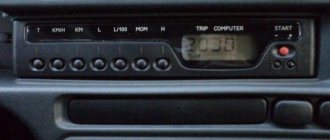
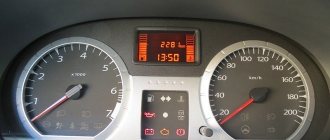
Lada Kalina is equipped with a simple on-board computer, the functions of which are quite sufficient for normal use. The on-board computer displays 9 readings on the screen - one, in the top line, is shown constantly, the rest, in the bottom line, can be selected. Next, we will consider all these indications in more detail.
The top line displays the total mileage of the vehicle in kilometers.
In the second line, display information can be selected. This process is controlled using 3 buttons located on the right steering column lever:
The “RESET” button can reset some parameters, the other buttons are responsible for scrolling through them (up/down).
The first parameter is the time in 24 hour format. To set the clock, hold down the “RESET” button until the dial starts flashing. Now, scrolling down, we set the hours, and up, we set the minutes. After setting, briefly press “RESET” to exit to the main menu.
The next parameter shows how much fuel the car consumed during the last trip. This parameter must be reset before leaving. I didn't reset it for about a month, so it read 140 liters.
The next item on the on-board computer is the average speed of the last trip. It also needs to be reset. If you do not do this, it will calculate the average speed for the entire time since the last reset. On average, this figure is 30-40 km/h.
The next parameter displays the number of kilometers that you can travel with the remaining gasoline in the current driving mode.
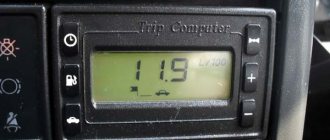
Next comes the instantaneous fuel consumption reading. Readings from 0 to 19.9 liters. When stopped, the computer will display dashes.
Next comes the average fuel consumption. It can also be reset.
The next indicator shows the time spent on the road. The countdown starts from the moment of the last reset.
Well, the last parameter shows the outside air temperature.
Installing an on-board computer on Kalina
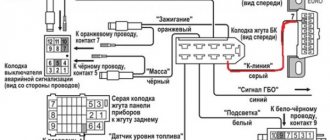
Connection diagram for the Kalina computer from the State company:
Before starting the connection, you need to disconnect the negative terminal of the battery.
Connection to the emergency signal block . Unscrew the 4 screws securing the ashtray and remove it.
- An orange wire goes to pin 7 of the emergency flasher block. Remove this contact from the block, and in its place, install a contact with the red-white wire from the BC harness, and connect the removed contact to a single connector on the red-white wire in the harness.
- A red-black wire goes to pin 10 of the emergency flasher block. Remove this contact from the block, and in its place, install a contact with the red wire from the BC harness, and connect the removed contact to a single connector on the red wire in the BC harness.
- The black wire goes to pin 5 of the emergency flasher block. Remove this contact from the block, and in its place, install a contact with the black wire from the BC harness, and connect the removed contact to a single connector on the black wire in the harness.
- A white wire goes to pin 8 of the emergency flasher block. Remove this contact from the block, and in its place, install a contact with the white wire from the BC harness, and connect the removed contact to a single connector on the white wire in the harness.
Connecting the fuel level sensor : Remove the mounting block. Behind it, in the depths, there is a gray 33-pin connector for the instrument panel harness to the rear harness. You will need to connect the pink wire from the BC harness with the pink wire (factory) with a clamp. The wire goes to the 13th pin of the gray 33-pin block. It is convenient to lay the wire behind the instrument panel:
Connecting the BC to the Kalina K-line : Connect the gray wire of the BC K-line to the ODB II diagnostic block.
Connection to DSA and SRT is not necessary if the K-line operates stable.
- Connecting the fuel consumption signal (CPT): connect the orange wire of the BC with a clamp to the yellow-red wire of the instrument cluster block.
- Connecting the vehicle speed sensor (VSA): connect the brown wire of the BC with a clamp to the gray wire of the instrument cluster block.
Connect the 9-pin block to the BC and check the operation of the on-board computer. After this, install the BC instead of the standard plug for the Kalina floor tunnel. Now let's look at a couple of examples of such a setup:
On-board computer for VAZ-1117 … 1119 (LADA Kalina)
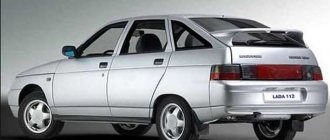
Attractive and modern design. High technical characteristics and safety. It is a masterpiece. A masterpiece called “Kalina”. Lada 1118 Kalina is a car that erased the border between Russian and European cars, and became a great achievement. But where was this border?
The car comes standard with built-in airbags that actually work and save lives. The interior is comfortable, and there is enough space for everyone - a fairy tale.
A fundamentally new model was launched into production in 2004. Since that moment, the Kalina car has been actively displacing competitors and predecessors from the market. And to speed up the process, several modifications were released into the world. The five-door sedan became a breakthrough in Russia, as it has everything that was missing in older models. European appearance, powerful high-quality engine that runs on 95 gasoline, comfortable interior. The relatively small size of the car allows you to feel better in urban conditions. Sitting in the cabin, you will not believe that this is a car from AvtoVAZ. High-quality tightly fitted plastic panels, finishing materials that can create coziness and comfort, modern appliances that are pleasing to the eye. There is plenty of landing space. Tall people can easily fit in the cabin both front and rear, and wide exterior mirrors and large window openings guarantee excellent visibility.
In 2010, the car underwent a slight modernization, receiving a basalt interior color and a standard audio system. In 2012, a general restyling of the car was carried out and some components of the model were modified.
Nowadays, you can see four modifications of the car on the roads: VAZ 1117 (station wagon), VAZ 1118 (Sedan), VAZ 1119 (hatchback) and VAZ 1119 (hatchback) Sport.
In 2008, they tested the Lada Kalina Sport model, which by and large is a tuning version of the VAZ 1119 model. It was in this test that Vladimir Putin, (then Prime Minister of the Russian Federation) took part. He was driving a car, participating in a rally on the new Chita-Khabarovsk road. In total, three such cars took part in the race, one of which was sold at the Moscow International Motor Show, and two were presented to an AvtoVAZ employee and a builder who participated in the construction of the track.
By the standards of the European classification, the Lada Kalina car is classified as class “B”, and it deserves special attention, and its high popularity speaks for itself.
About replacing the device and the list of required tools
Which computer should I install? There are models of trip computers on sale that are specially adapted for the LADA Kalina electronic control system and have more advanced functionality. Manufacturers include instructions with the controller, which are an indispensable assistant during installation.
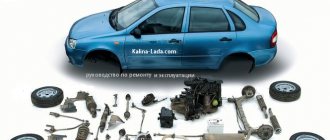
To quickly and efficiently install (replace) a new device in the LADA Kalina panel, you will need to acquire the following set of traditional tools:
- keys
- pliers;
- screwdrivers;
- soldering iron
The instructions provide detailed information regarding the functionality of the new device and techniques for its correct installation. A detailed diagram of all electrical connections is also provided. We recommend that you carefully follow the manual while performing the entire list of installation procedures. After installation, the owner of a LADA Kalina car receives more detailed information about the state of important systems that are included in the overall electronic complex of the car. The instructions also describe in detail how to use the device.