The belt is necessary to connect the generator and crankshaft pulleys, and on front-wheel drive classic models, the water pump pulley also takes part in the connection.
It is not so difficult to independently replace a torn or stretched alternator belt in a VAZ-2107 with an injector-type engine that has an additional carburetor.
For this you will need:
- a mounting spatula, which can be replaced with a crowbar or a strong flat stick;
- wrenches 17 and 19.
This is quite enough to carry out repairs. Of course, if you at least have an idea where this very belt is located.
How to replace the alternator belt on a VAZ 2107
The quality of such a Soviet, and now Russian car, as the VAZ 2107 has been proven over the years. Over time, during the operation of any car, including foreign cars, the need arises to replace some important wearable elements. These engine elements include the alternator belt of the VAZ 2107 car. How to determine that the VAZ 2107 alternator belt needs to be replaced, what is required to carry out such a procedure, as well as the purpose of the device, we will find out in the material.
Generator care
The most important thing is to understand that the generator, like all components of the car, must be monitored and serviced in a timely manner. Change brushes in a timely manner, do not allow large amounts of dust and dirt to get in, not to mention water. Ensure that the alternator V-belt is properly tensioned so that it is neither loose nor overtightened.
It is recommended to check the technical condition of the generator every 15,000 km. mileage Typically, with proper care of the generator, it can last up to 160,000 km. mileage and repairing the generator with your own hands is simply not necessary, you just replace it and that’s it.
But in order for a car generator to last for so long, you need to learn how to properly maintain it, and you can’t do this without disassembling the generator.
The need to replace the belt
Initially, it is important to note that the generator and its drive on a VAZ 2107 car, both injection and carburetor, are absolutely similar. The only difference between an injector and a carburetor is that the injector is equipped with a crankshaft position sensor. When it is necessary to replace the alternator belt on an injection-type VAZ 2107, this sensor must be removed.
During the operation of the VAZ-2107 car, the part in question wears out. The need to replace an element can be determined by the following signs:
- the appearance of cracks;
- whistling when starting the engine, or when sharply pressing the gas pedal, or after driving through a puddle;
- disheveled;
- sagging.
It is important to know! If the alternator belt breaks on a VAZ 21074, the engine will quickly heat up, which can lead to boiling. The battery remains without recharging, so after a short period of time it will run out.
The device in question, unless of course it is a defect, has a certain resource during normal operation of the vehicle. This resource is usually 50-60 thousand kilometers, after which the belt should in any case be changed. How to do this not only correctly, but also quickly, we will consider in the material.
Instructions for replacing the alternator belt
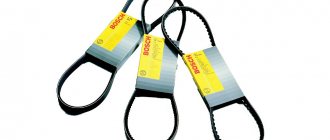
You must initially purchase a new item. Which belt is best to install on a VAZ 2107 depends on the amount of finances available to the owner of the “Seven”. Experts recommend not saving on such an important element and purchasing a Bosch brand part. Products of this brand are of good quality, which is actually necessary to achieve a long service life of the main components of the car.
The belt cannot be repaired, so at the first sign of wear, it must be replaced.
At the next stage, you will need to make sure that you have the necessary list of materials: open-end wrenches for “17” and “19”, a pry bar and a screwdriver. Only after this we begin to replace the product:
- First, loosen the nut that secures the generator itself to the adjustment bar.
- After this, you need to use a pry bar to press the generator to the motor. On injection "sevens" it is necessary to remove the crankshaft sensor.
- Now we remove the old element and put a new one in its place.
- To tighten the belt, you will need to use a pry bar to move the generator. After the device is in place, you can fix the nut.
- If you tighten the belt, then accelerated wear of the pump bearings and the generator itself will begin, which will have a bad effect on the service life of these devices. Also, the belt itself can break very quickly.
After completing the replacement procedure, it is imperative to tension the alternator belt. We will learn further how to tighten the alternator belt on a VAZ 2107 car.
In order to perform tension, you will need to check as follows:
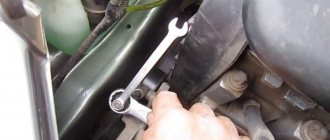
- To begin, take a screwdriver in your hand and then press on the gap between the pulleys, as shown in the figure above.
- After this you will need to pick up a ruler. If the deflection does not go beyond the limits, then the work can be considered completed. How to tighten the belt if necessary?
- To do this, you need to unscrew the nut securing the generator, and then move it in one direction or the other, depending on what you need to do: tighten or loosen the tension. We tighten or loosen the device, after which the tensioner nut is fixed.
Changing the strap on the “seven” is not particularly difficult. In this case, there is no need to contact specialists at a service station, because the work can be done independently.
To check the length of an element it is not necessary to remove it. Periodically during vehicle operation it is necessary to check the belt tension.
If the size of the element in question meets the standards, then it is possible not to replace it until its service life has come. Only with timely replacement of the product can unforeseen consequences in the form of element breakage on the road be avoided.
Source
Generator repair
First, you need to clean the generator from dirt, oil, dust and everything that has accumulated on it over the entire period of operation.
Unscrew the pulley nut, placing the generator so that the pulley rests on the floor, and then put a 19mm wrench on the nut. While holding the pulley from turning, it is necessary to make several strong and accurate blows on the key. It is unlikely that you will be able to clamp the pulley tightly with your hand, but your efforts may be enough to tear the nut out of place.
Using a 10mm wrench, you need to unscrew the 4 bolts of the tie rods that assemble the generator device into one whole. Using a chisel, knock out the key. This can be done by installing the generator with the shaft up. Place the chisel against the key and start knocking it out with a hammer. Once you have knocked out the key, remove the front cover of the device. If it goes too hard, you need to try to knock it out by weight.
Belt whistles
Often, when a certain malfunction of the VAZ 2107 appears, you can hear an extraneous sound, which allows you to confidently diagnose the problem. One of the malfunctions may be the belt slipping, resulting in a whistle from friction against the pulleys. This problem leads to unstable operation of the generator and lack of battery charge.
Due to the fact that the generator always has the same type of drive, the problems are always the same. The main difference between injection and carburetor models is the presence of a crankshaft position sensor, which must be removed when replacing the belt.
In fact, you can determine the cause of a belt whistling without any problems by eliminating it without the help of professionals. It is only necessary to determine the diagnosis. Among the main causes of slipping are the following:
- generator bearing failure;
- insufficient tension;
- contamination of fuels and lubricants.
In all these cases, self-repair takes little time and does not require special tools. You will need two wrenches and a pry bar.
How to tighten the belt?
Low tension may be due to the fact that the belt has stretched during operation and began to slip on the pulleys. If its length does not exceed the permissible limit, you just need to tighten it. Otherwise you will have to change it. To tighten it yourself, you should do the following:
- using a 17mm wrench, loosen the nut that secures the generator to the bracket;
- loosen the generator rod nut;
- if you cannot tighten it manually, you need to use a pry bar;
- Having fixed the position with a nut on the adjusting bracket, you should check the degree of tension.
Checking the tension is easy. You need to press the belt between the crankshaft and the pump. The deflection should be within 12-17 mm, and between the generator and the pump - 10-17 mm. After tightening the belt, taking into account these requirements, you need to tighten both nuts in order to prevent spontaneous loosening.
Bearing problem
If the cause of slippage is related to difficult rotation of the VAZ 2107 generator pulley caused by bearing failure, repairs will be required. It is necessary to dismantle the generator and replace the bearings. After this, you should install the device in place and tighten the belt as described above. Not every motorist can replace bearings on their own, so it is often better to immediately contact a workshop. This way you will avoid problems with the generator in the future. The last reason for slipping is a dirty belt. Perhaps the problem can only be solved by replacing it, since you are unlikely to be able to completely clean the belt of dirt without damaging it.
Sometimes, especially in the cold season when the engine is not warmed up, a whistle may be due to the poor quality of the belt, which has become stiff in the cold. After the engine warms up, the whistle disappears. This is a normal phenomenon, that is, no repairs are required in this case. You just need to make sure that the drive belt is intact to avoid it breaking on the road.
Video:
Video:
Video:
How to replace the VAZ-2107 injector alternator belt
The belt is necessary to connect the generator and crankshaft pulleys, and on front-wheel drive classic models, the water pump pulley also takes part in the connection.
It is not so difficult to independently replace a torn or stretched alternator belt in a VAZ-2107 with an injector-type engine that has an additional carburetor.
For this you will need:
- a mounting spatula, which can be replaced with a crowbar or a strong flat stick;
- wrenches 17 and 19.
This is quite enough to carry out repairs. Of course, if you at least have an idea where this very belt is located.
What to do if your belt whistles
After the VAZ-2107 generator has been disassembled, you can troubleshoot problems that have arisen in the operation of the device. But the serviceability of the unit itself does not always suffer; it happens that the breakdown lies in something completely different. For example, when you feel a squealing noise caused by the belt rubbing against the pulleys, it is not surprising if the alternator stops working at full capacity.
When comparing a carburetor and an injector, the main difference in cars is the presence or absence of a crankshaft position sensor, which is removed when the belt is replaced. Why does the whistle appear? There may be several reasons for this:
- The bearing related to the VAZ-2107 generator is faulty.
- Insufficient tension level.
- Contamination in fuel and lubricants.
You can tighten the belt yourself; it’s easy to do:
- Take a 17mm wrench and lightly unscrew the nut securing the generator to the bracket.
- Loosen the generator rod nut in the same way.
- If manual tightening does not produce results, then use a pry bar.
- After fixing the control bracket, check the tension level. To do this, press the belt between the crankshaft and the pump. Ideally, the deflection should be from 12 to 17 mm, and the distance between the generator and the pump should not exceed 17 mm, but a value less than 10 mm is considered detrimental. Tighten both nuts well; this is the only way to avoid spontaneous loosening of the tension.
DIY belt replacement process
To remove the belt, you will need access not only to the upper front part of the car, but also to the lower one.
Therefore, if a crankcase protection is installed, you will need to remove it. Some craftsmen, for convenience, to facilitate access to the belt, also remove the battery. Once you have access to the required element, inspect it. If there is no visually visible damage to the canvas, just check the tension, it may have weakened. This is easy to do, just press the belt with your fingers, simulating a pressure of approximately 10 kg, and by the distance of deflection you can determine whether the element is in acceptable tone. The maximum standards in a narrower place are 10-15 mm, and in those where the space between the pulleys is wider - 12-17 mm.
You only need to remove the belt from the pulleys if it is completely replaced; you do not need to do this to retighten it. At the bottom of the car, unscrew the nut securing the generator underneath by one turn. In the engine compartment, loosen the upper fastening nut of the same device a few turns. Under no circumstances should you completely unscrew the fasteners, just loosen them until they begin to turn freely.
To remove the belt, you will need to press the alternator slightly against the engine, but under no circumstances do this with your bare hands. Then remove the belt. You need to start with the top pulley, and then with the rest. Only in this order will it be easy to remove the element. On injection car models, you will also need to remove the crankshaft position sensor, otherwise it will interfere with the removal of the belt.
To adjust the blade tension, place a previously stored spatula or a flat piece of crowbar between the engine and the generator, using it as a lever. Having moved the generator in this way, without releasing the blade, but holding it in this position, tighten the nuts of the upper and lower fastenings, after which you can release the “lever”. It will be easier if someone helps you with this.
After the manipulations have been completed, check the belt tension again using the previously described method.
To put on a new belt, you need to know some of the nuances of this process. For example, one of the most important points: you need to put the belt on, starting with the crankshaft pulley, then on the generator pulley, and only finally on the pump pulley.
Thanks to the video instructions, you can learn in more detail and clearly how to change or tighten the alternator belt if you plan to do it yourself for the first time.
Source
Diagnostics of the voltage regulator
Replacing the alternator belt on a Chevrolet Niva without air conditioning
You can check it in several ways. Start the engine and let it run until its temperature reaches operating temperature. Turn on the low beam headlights and fog lights (if any). Arm yourself with a multimeter and measure the voltage on the battery. The maximum value should be 14.8 Volts. If you observe an excess of this value, then you need to change the voltage regulator relay. This is the easiest way to diagnose a device.
The one in which you need to remove the regulator from the generator will be a little more complicated. True, for this you need to do very little. Using a Phillips screwdriver, unscrew the two bolts, disconnect the wire and remove the device along with the brush assembly. This way the voltage regulator is removed on VAZ 2108 and similar models. If it is installed in the engine compartment, as in the VAZ 2106, then removing it is much more convenient.
For diagnostics, you will need a regular light bulb designed to operate at 12 Volts. It is desirable that its power be no more than three watts. The regulator has two terminals, designated by the Russian letters “B” and “V”. With their help, the device is powered from a DC source. A light comes on between the contacts that go to the brush mechanism.
If the output of the power source is no more than 14 Volts, then the light should be on. If it rises above 15 Volts, the lamp should go out. If in both cases the light bulb lights up or does not light up at all, then there is destruction of the semiconductor elements. Then only a complete replacement of the regulator will help.
And so the saga with the on-board network continues. Last year I changed my native generator to a 372.3701 55A generator from a VAZ 2108 (I bought it used, www.drive2.ru/l/1322019/), my native one gave, in principle, normal voltage, but when driving at night the light flickered at XX the voltage dropped and everything dimmed, after replacing it with a new generator everything became normal, but the voltage was a little low, it didn’t reach 14 without load, but the battery was charging and there were no problems, but I want perfection!
I purchased a Three-level voltage regulator produced by Energomash (67.3702-01), read a lot of good reviews about it, in the fight against low voltage, here it is:
a little theory about it: Switching of regulated voltage levels is done by a three-position toggle switch built into the regulator, depending on the following conditions: “Minimum” level - 13.6 Volts for operating the car at air temperatures above +20 ºС, long climbs, etc.; “Normal” level "— 14.2 Volts for operating vehicles in temperature conditions of 0 ºС — +20 ºС; “Maximum” level — 14.7 Volts for operating vehicles at subzero air temperatures; when turning on numerous additional current consumers; after long-term parking; after a significant discharge of the battery caused by connecting devices (radio tape recorder, TV, refrigerator, etc.) while the engine is not running.
more details here______________________________________________________________
Well, let's move on to the installation, first I measured the voltage with the old regulator under load and without load, at XX, as we see, “not so hot”
Then I removed the generator, I wanted to unscrew the old regulator in place, but the bolts were stuck, I had to remove it, I unscrewed the old regulator with brushes and screwed in the brushes from the new one
It would seem that the matter is ready, BUT when I turned on the ignition, the relay that went to the charging lamp immediately started rattling (after all, the system was built for 2108), after reading the forums I found a solution to the problem in 2 options:
1. We pull off 2 wires (double orange and yellow) from the charging relay and connect them to a light bulb (12V 3-4W), this light bulb will also serve as a battery charge indicator lamp.
— BUT in this situation, the indicator on my panel will not work and it will only be under the hood, and why do I need an indicator under the hood)2. I liked the second option better! — We remove the Yellow and Black wires from the Relay, connect them together (I re-crimped one wire from mom to dad), and insulate them, then we removed the Relay and put it away, insulated the orange wire and laid them to the wiring harness so that they do not dangle, that is, we connected the Black and Yellow a I hid the orange one (I didn’t cut anything because I’ll have to install the original one)
P.S. I bought it a long time ago but never got around to installing it, the price was about 90 UAH, at the moment the price of the regulator is about 140 UAH.
The VAZ 2106 voltage regulator relay ensures the normal functioning of important vehicle mechanisms and devices. In particular, the adequate operation of the car’s ignition system and its generator, as well as the condition of the battery, depend on it.
How to replace the VAZ-2107 injector alternator belt
The belt is necessary to connect the generator and crankshaft pulleys, and on front-wheel drive classic models, the water pump pulley also takes part in the connection. It is not so difficult to independently replace a torn or stretched alternator belt in a VAZ-2107 with an injector-type engine that has an additional carburetor. For this you will need:
This is quite enough to carry out repairs. Of course, if you at least have an idea where this very belt is located.
The purpose of the timing chain and its length
To understand the purpose of the timing chain, it is necessary to outline what the engines of classic VAZ models are. All these engines are overhead engines. That is, the timing shaft (aka timing) is located in the upper part of the engine, above the crankshaft and above the oil pump shaft.
The timing chain is the main connecting link in the VAZ 2107 engine
https://youtube.com/watch?v=kx3VxkUlNsQ
Replacing the alternator belt on a VAZ 2101-VAZ 2107
Welcome! This part links the alternator pulley to the crankshaft pulley and the water pump pulley on classic models. On front-wheel drive vehicles, the pump pulley connects the timing belt. A broken alternator belt on a classic will cause poorly functioning devices, because the energy will come only from the battery, and accordingly, if the charge is poor, the devices will malfunction. On the contrary, if the battery is powerful and sufficiently charged, then the devices will not go out for some time and you may not even notice that the belt has broken. And here you need to remember about the pump and pay attention to it. Since the belt binds it, a rupture will lead to the cessation of coolant circulation in the system and the car will begin to overheat.
Note! you will need the following tools: a mounting spatula (a convenient thick stick or a small metal crowbar will do), you will need wrenches for “17” and “19”.
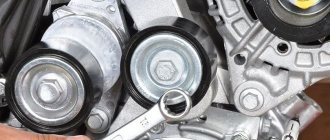
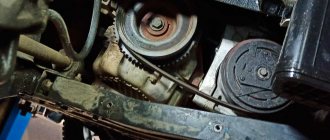
Belt location
Located in the front of the car. In the photo, the red arrow shows the radiator of the cooling system and the bar on which the battery sits (now removed). The belt connecting the three pulleys is indicated in the photo with a blue arrow.
When to change the belt?
The main reason is wear: various kinds of cracks, worn edges, worn teeth. We do not recommend delaying the replacement of the belt, otherwise a rupture will lead to overheating of the engine and even boiling during extreme heat. The battery will quickly discharge in the absence of support from the generator, which will stop spinning and giving out energy.
Checking and adjusting the tension of the generator drive belt
Checking and adjusting the tension of the generator drive belt
Repair and operation manual - Electrical equipment VAZ-2101 - VAZ-2107 - Checking and adjusting the tension of the generator drive belt Checking and adjusting the tension of the generator drive belt and replacing it Insufficient tension of the generator belt impairs the charging of the battery and leads to increased wear of the belt. If the alternator belt is too tight, the alternator and water pump bearings may fail.
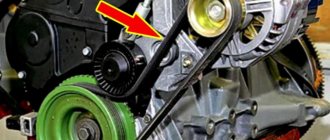
This is what the alternator drive belt looks like from the top right of the engine compartment. The generator drive belt 2 is installed on the pulleys of the generator 1, water pump 3 and the crankshaft (not visible in the photo).
NOTE Checking the tension of the generator drive belt is performed from above in the engine compartment.
Tension is characterized by the amount of deflection of the generator belt between the pump and crankshaft pulleys (deflection B) or the generator and pump pulleys (deflection A) when a force of 98.1 N (10 kgf) is applied in the middle of the distance between the pulleys. Deflection A should be 10-15 mm, deflection B -12-17 mm.
USEFUL ADVICE It is more convenient to check the deflection A.
To adjust the tension and replace the alternator belt on a VAZ car, you will need: keys “17”, “19”, and a mounting blade. Adjust the belt tension on a VAZ vehicle mounted on a lift or inspection ditch. The belt is adjusted by moving the generator relative to the engine.
Scheme for checking the tension of the VAZ generator drive belt: 1 - generator pulley; 2 — pump pulley; 3 - crankshaft pulley.
1. Remove the mudguard.
2. From the bottom of the VAZ car, loosen the nut of the lower mounting of the generator by about one turn.
3. From the top of the car from the engine compartment, loosen the nut securing the generator to the tension bar by about one turn.
USEFUL TIPS For easy access to the nut securing the generator to the tension bar, remove the battery from the car. To loosen the nut securing the generator to the tension bar, use a socket with a universal joint and an extension.
4. To increase belt tension, move the generator away from the engine.
WARNING When moving the generator to increase belt tension, apply force only to the generator housing, placing a mounting blade between the housing and the engine.
5. To reduce belt tension, move the generator towards the engine.
NOTE To reduce belt tension, move the generator by hand.
6. Without changing the position of the generator, tighten the nut securing the generator to the tension bar and the nut of the lower mounting of the generator.
NOTE Tightening torques: — nuts securing the generator to the tension bar 28.08-45.3 N•m (2.9-4.6 kgf•m); — nuts for the lower mounting of the generator 57.3-72 N•m (5.95-7.35 kgf•m).
7. Install the mudguard in the reverse order of removal.
8. To replace the generator belt, follow steps 1, 2 and 4 (taking into account the recommendations thereto) provided for adjusting the tension of the generator belt.
9. Remove the generator belt first from the pump pulley, then from the generator pulleys and crankshaft.
10. Place the new alternator belt first on the crankshaft pulley, then on the alternator pulley.
11. Place the new alternator belt onto the pump pulley.
HELPFUL ADVICE
If the new alternator belt is tightly placed on the pump pulley, and the alternator is pushed all the way towards the engine, carefully turn the pump pulley by hand or slowly turn the crankshaft until the belt is completely seated on the pulley. Have an assistant turn the crankshaft.
12. Follow steps 3, 5-7 (taking into account the recommendations thereto) provided for adjusting the tension of the generator belt.
Quote
In what situations is replacement necessary?
Wear of the element is characterized by such manifestations as cracks or tears in the blade, worn teeth and uneven edges. If you ignore such a deplorable state of a very important element, it will come back to haunt you with overheating and boiling of the engine, independent operation of the battery, which will lead to its rapid discharge.
If the belt is severely worn, it also shows signs of noise to the owner - it begins to whistle, especially at low speeds. Another reason for a whistling belt may be moisture getting on its surface, which occurs due to worn-out pipes of the cooling system - antifreeze begins to leak.
Some belts - oak - whistle when the car is started in frosty weather, and after warming up the sound disappears. A weak tension is expressed by a whistle, but in this case it is enough to simply tighten it.
Checking the removed voltage regulator
To clarify the condition of the regulator, it must be removed. It is better to test the device complete with brushes and brush holder. This will allow you to immediately detect:
- poor contact between the terminals of the brush holder and the voltage regulator;
- breaks in the output conductors of the brushes.
A voltmeter or a 12 V lamp with a power of 1–3 W is connected to the brushes of the device removed from the generator 37.3701. For the regulator from the G-222 generator, the connection is made to terminals “B” and “W”. The “plus” of the power supply is connected to the terminals “B”, “C” (when they exist), and the “minus” to ground. First, a voltage of 12–14 V is applied, and after that – 16–22 V. A sign of the device’s serviceability will be the lamp lighting up (deviation of the voltmeter needle) in the first case and going out (zeroing the voltmeter) in the second.
When the lamp lights up in both cases, this means that there is a breakdown in the device. If in both cases the lamp does not light, then there is no contact between the regulator terminals and the brushes, or there is a break in the device. Another cause of improper voltage regulation can be worn or stuck brushes. They must protrude from the housing of the electronic device or the brush assembly of relay regulators by no less than 5 mm.
DISMANTLING WORK
It is recommended to remove the generator from the “seven” after the engine has cooled down. It is not recommended to work with vehicle components immediately after driving due to high temperatures and the risk of injury.
Immediately before removing the generator, you will need to remove the right front wheel, since the installation can only be reached from under the bottom of the car through the right fender.
It is imperative to securely fix the position of the car with a jack and auxiliary devices (hemp, stands) in order to eliminate the risk of the car falling during operation.
The jack must be rested against the beam of the car.
The progress of work comes down to the sequential implementation of the following actions:
- Find the generator housing in the mechanical structure of the car, feel for the bar that secures it to the engine.
- Using a wrench, unscrew the fastening nut halfway.
- Unscrew the nut on the bracket, but do not remove it from the stud.
- The generator housing can be pulled and moved in any direction - this will become possible due to the loose fastening.
- Remove the belt from the landing pulleys and remove it from the work area.
- Disconnect all incoming wires to the generator housing.
- Unscrew the fastening nuts completely.
- Pull the generator towards you and remove it from under the body.
Immediately after dismantling work, you should inspect the generator landing site. All joints and fastenings must be cleaned of dirt and, if necessary, treated with acetone.
Accordingly, installation of the new generator will need to be carried out in the reverse order, paying special attention to tensioning the new belt.
VIDEO: INSTRUCTIONS FOR REPLACING THE GENERATOR ON A VAZ 2107
Article: 2107-1308020Р, additional articles: 10х944, 2101-1308020
Order code: 006113
- Buy with this product
- show more
- Buy analogues
- Passenger cars / VAZ / VAZ-21011 drawing
- » href=»/catalog/vaz-3/legkovye_avtomobili-30/vaz_2101-3/privod_vodyanogo_nasosa-113/#part2694″>Belt Cooling system / Water pump drive
- There are no reviews for this product yet.
Today, the next article in the series “Crystal VAZs or typical breakdowns of domestic cars” is dedicated to the “classics”: VAZ-2101, 2103, 2104, 2104, 2105, 2106 and 2107. These cars have been driving along our roads for decades and, despite Despite all the shortcomings that we will talk about, their popularity is still high.
DIY belt replacement process
To remove the belt, you will need access not only to the upper front part of the car, but also to the lower one. Therefore, if a crankcase protection is installed, you will need to remove it. Some craftsmen, for convenience, to facilitate access to the belt, also remove the battery. Once you have access to the required element, inspect it. If there is no visually visible damage to the canvas, just check the tension, it may have weakened. This is easy to do, just press the belt with your fingers, simulating a pressure of approximately 10 kg, and by the distance of deflection you can determine whether the element is in acceptable tone. The maximum standards in a narrower place are 10-15 mm, and in those where the space between the pulleys is wider - 12-17 mm.
HOW TO CORRECTLY TENSION THE BELT ON THE GENERATOR
When installing a generator on a VAZ 2107 yourself, the most difficult moment is considered to be proper belt tension. After all, it is through the belt that the generator mechanism will be launched, therefore, any errors and miscalculations when tensioning the rubber product will affect the performance of the car.
The belt tension is performed as follows:
- Place the new generator in its regular place, placing it on the studs.
- Tighten the fixing nuts only halfway, without over-tightening.
- Use a pry bar to install into the gap formed between the generator wall and the pump. Secure the mount in this position.
- Place the new belt on the alternator pulley.
- Hold the pry bar and begin tensioning the belt.
- Tighten the fixing nut in the upper part of the mounting of the generator unit housing.
- Afterwards, carry out a preliminary diagnosis of the degree of tension - the rubber product should not sag downward much.
- Tighten the lower stud nut until it ends without overtightening.
The diagram shows places for tension quality checks
Next, the quality of the belt tension is checked. Using two fingers, press firmly on the free part of the belt and measure the existing deflection. Normal sagging should not be more than 1.5 centimeters.
The service life of a typical belt for a VAZ 2107 generator is usually 80 thousand kilometers. However, it is recommended to change the belt drive earlier if the generator set is being replaced.
Installing a new timing belt
To install a new timing belt, you must follow the steps below.
- First, we install the camshaft pulleys according to the marks, after which we securely fix them from accidental rotation.
- To align the crankshaft to the mark, you need to open the inspection window in the clutch housing. Only if all marks match is the correct installation of the new belt drive guaranteed.
- After aligning the timing components according to the marks, we install new rollers (tension and bypass).
- The belt itself is threaded through the pump and is first located on the crankshaft pulley.
- Installing the belt on the camshaft pulleys occurs last.
- The position of the tensioner, pre-lubricated on both sides with machine oil, is adjusted using a special key and counterclockwise*.
- Further installation is carried out in reverse disassembly sequence. If the marks are accidentally lost, they must be set again.
- At the end of the work, you should start the engine and listen for any extraneous noise. If there is any rustling or humming coming from the timing belt, this most likely means that the belt is too tight and needs to be loosened a little.
*For proper tension of the timing belt drive, it is necessary that the part of the belt between the shaft pulleys rotates 90° without applying any serious force. If this is done with little to no force, then greater belt tension is required. If the belt cannot be turned at all, then the tension should be loosened.
How to replace the generator on a VAZ 2107
Replacing a generator set is required in cases where the device no longer produces the required amount of current for consumer systems. The most common reasons for replacing an installation are the following malfunctions and breakdowns:
- burnt winding;
- interturn short circuit;
- deformation of the generator housing;
- resource development.
It is almost always easier and more profitable to replace the generator with a new one than to repair it.
Tool preparation
To dismantle and subsequently install the generator on a VAZ 2107, you will need a standard set of tools, which every driver usually has in his garage:
- wrench 10;
- wrench 17;
- wrench 19;
- a pry bar or a special shovel for installation work.
No other devices or devices are required.
Dismantling works
It is recommended to remove the generator from the “seven” after the engine has cooled down. It is not recommended to work with vehicle components immediately after driving due to high temperatures and the risk of injury.
Immediately before removing the generator, you will need to remove the right front wheel, since the installation can only be reached from under the bottom of the car through the right fender.
It is imperative to securely fix the position of the car with a jack and auxiliary devices (hemp, stands) in order to eliminate the risk of the car falling during operation.
The progress of work comes down to the sequential implementation of the following actions:
- Find the generator housing in the mechanical structure of the car, feel for the bar that secures it to the engine.
- Using a wrench, unscrew the fastening nut halfway.
- Unscrew the nut on the bracket, but do not remove it from the stud.
- The generator housing can be pulled and moved in any direction - this will become possible due to the loose fastening.
- Remove the belt from the landing pulleys and remove it from the work area.
- Disconnect all incoming wires to the generator housing.
- Unscrew the fastening nuts completely.
- Pull the generator towards you and remove it from under the body.
Photo gallery: main stages of work
Immediately after dismantling work, you should inspect the generator landing site. All joints and fastenings must be cleaned of dirt and, if necessary, treated with acetone.
Accordingly, installation of the new generator will need to be carried out in the reverse order, paying special attention to tensioning the new belt.
Video: instructions for replacing the generator on a VAZ 2107
Article: 2107-1308020Р, additional articles: 10х944, 2101-1308020
Order code: 006113
- Buy with this product
- show more
- Buy analogues
- Passenger cars / VAZ / VAZ-21011 drawing
- » href=»/catalog/vaz-3/legkovye_avtomobili-30/vaz_2101-3/privod_vodyanogo_nasosa-113/#part2694″>Belt Cooling system / Water pump drive
- Passenger cars / VAZ / VAZ-21031 drawing
- » href=»/catalog/vaz-3/legkovye_avtomobili-30/vaz_2103-106/privod_vodyanogo_nasosa-84/#part10866″>Belt Cooling system / Water pump drive
- Passenger cars / VAZ / VAZ-21051 drawing
- » href=»/catalog/vaz-3/legkovye_avtomobili-30/vaz_2105-6/privod_vodyanogo_nasosa-89/#part17423″>Belt Cooling system / Water pump drive
- Passenger cars / VAZ / VAZ-21071 drawing
- » href=»/catalog/vaz-3/legkovye_avtomobili-30/vaz_2107-8/privod_vodyanogo_nasosa-128/#part24598″>Belt Cooling system / Water pump drive
- Passenger cars / VAZ / VAZ-21311 drawing
- There are no reviews for this product yet.
Today, the next article in the series “Crystal VAZs or typical breakdowns of domestic cars” is dedicated to the “classics”: VAZ-2101, 2103, 2104, 2104, 2105, 2106 and 2107. These cars have been driving along our roads for decades and, despite Despite all the shortcomings that we will talk about, their popularity is still high.
The VAZ generator belt has a size of 938(940)-8.5 x 8 art. 21070-1308020 and can be used on VAZ 2101-2105, 2106, 2107, NIVA 2121, 2131 cars.
The price for the VAZ 2101-2105, 2106, 2107, NIVA 2121, 2131 alternator belt is indicated when purchased in cash or by prepayment for bank transfer. Are you interested in the price of an alternator belt for VAZ 2101-2105, 2106, 2107, NIVA 2121, 2131, but are you a little doubtful or not entirely sure?
Don't hesitate to call tel. +375 (44) 738-86-88 and find out: how you can buy an alternator belt for VAZ 2101-2105, 2106, 2107, NIVA 2121, 2131.
You can buy a VAZ 2101-2105, 2106, 2107, NIVA 2121, 2131 alternator belt , as well as other related VAZ spare parts in Rechitsa (Gomel and Gomel region) by simply calling or leaving a request on the website, as well as in our store at st. Lunacharskogo, 39, off. 4.
In our store you can purchase VAZ 2101-2105, 2106, 2107, NIVA 2121, 2131 alternator belts, as well as other VAZ alternator belts at very competitive prices:
- Alternator VAZ 2108, 2108-2110 toothed belt 713
- Alternator belt 738 VAZ 2110-2112, 2170 poly-V-ribbed (injector, without power steering)
- VAZ 1118 poly V-ribbed generator belt 883, 2190 Granta generator
- V-ribbed generator belt 1113 with power steering VAZ-2110-2112, 2170, 2190
an alternator belt for VAZ 2101-2105, 2106, 2107, NIVA 2121, 2131 without any difficulty in our store for cash or by bank transfer.
We hope that you will positively evaluate cooperation with us and become our regular customer!
Installing the VAZ 2101-2105, 2106, 2107, NIVA 2121, 2131 alternator belt on a car, position 2:
Step-by-step replacement instructions
Replacing the alternator belt on a VAZ 2107 is a very simple job and can be done in normal garage conditions without the involvement of a specialist.
Tools
To change the belt, we need:
Keys of required sizes
Stages
- Next, use a pry bar to move it towards the motor block.
- If the power unit of your car is fuel-injected, then you need to remove the crankshaft sensor.
- Remove the old belt.
- We install a new one and tighten it on all the pulleys.
- In order to tighten the belt using a pry bar, move the generator. Having reached the required tension, tighten the fixing nut.
- Do not allow it to be overtightened, otherwise it may rupture during operation.
- Tension is checked in the following way. Take a screwdriver and use it to press on the branch, as shown in the photo. Next, measurements are taken using a regular ruler. If the deflection is within the normal range, then the work can be considered completed. If not, then unscrew the nut and move the generator in one direction or another to obtain the tension we need.
As you can see, everything is quite simple and there is no need to contact a service station to fix such a malfunction. If you have any questions, watch the video or leave a comment below.
Sorry, there are no surveys available at this time.