Bearing and working hydraulic clutch Lada Largus with JR5 gearbox (removal, replacement)
are described in detail in the manual. However, their repair is of interest to many car owners. Replacing the bearing becomes important when noise appears when you press the pedal. And the need to replace the working cylinder arises when there is a fluid leak.
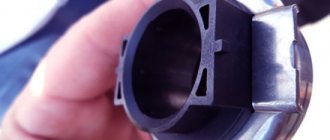
It should be noted that the JR5 Lada Largus gearbox is equipped with a hydraulic clutch drive. This means that the bearing and the working hydraulic drive are combined into one unit. Thus, they will be subject to replacement at the same time. However, this circumstance makes the task easier.
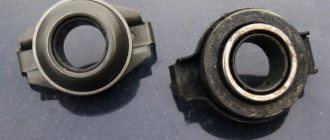
• For work you will need a flat screwdriver and a TORX E12 socket head; • It is necessary to remove the gearbox; • Now you need to unscrew the bolts securing the unit; • Carefully remove the bearing with the cylinder from the clutch crater; • Before installation, it is recommended to check the bearing - the part should rotate easily, have no play and not make noise; • The bearing should move easily along the cylinder guide, without jamming or problems; • A bearing should be installed together with the working cylinder assembly; • A pipeline must be connected to the cylinder; • At the final stage, all that remains is to install the gearbox and bleed, that is, remove air from the system.
As for pumping, air removal is required for any depressurization of the system. By the way, during the procedure it is recommended to check the condition of the drive disk spring petals. If severe wear is noticeable, the disc should also be replaced. Moreover, during work, it is advisable to carefully inspect all parts and assess their condition. If necessary, worn elements must be replaced!
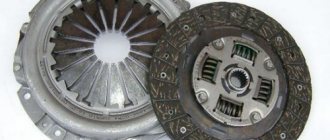
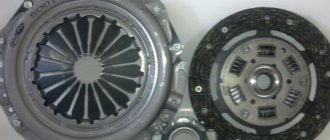
If the Lada Largus clutch fails, we recommend replacing all its elements at the same time (driven and driven discs, clutch release bearing), since replacing the clutch is labor-intensive, and the service life of damaged clutch elements has already been reduced, so if they are installed again, they may need to be reinstalled replacing the clutch after a relatively short mileage.
Removing and installing clutch discs of a Lada Largus with a JH3 gearbox
We remove clutch discs when they wear out and when replacing the rear crankshaft oil seal and flywheel, as well as when repairing the engine.
The clutch discs can be removed without completely removing the gearbox, but only unscrew it and move it away, securing it at the same time. In the same article we will look at removing discs and clutch parts with the gearbox removed.
We prepare the car for repair.
We install the car on a lift or inspection ditch.
We disconnect the negative terminal of the battery and remove the gearbox, as indicated in the article - “Removing and installing the JH3 gearbox.”
If the clutch basket will not be changed, then you need to mark the relative position of the flywheel and the basket in order to install the basket in place.
Using a socket 11, we sequentially unscrew the six bolts securing the clutch basket (Fig. 1).
The bolts must first be tapped using a soft metal drift.
First unscrew each bolt one turn so as not to deform the basket body.
When unscrewing the last bolt, you need to hold the clutch basket (Fig. 2) so as not to drop the driven disc.
You can insert a mandrel to center the disk for insurance.
We take out the basket along with the disk.
We inspect and defect the flywheel for cracks and wear (Fig. 3).
Pay attention to the wear of the flywheel ring teeth.
During installation, the driven disk must be oriented with its protruding part towards the drive disk, as shown in the figure (Fig. 4).
We orient the driven disk together with the basket using a centering mandrel (Fig. 5).
We insert the mandrel into the input shaft bearing.
Holding the basket with one hand, attach six bolts securing the basket (Fig. 6).
Tighten the bolts crosswise with a torque of 20 Nm.
When tightening, the bolts also need to be tightened evenly so as not to deform the basket body.
We remove the release bearing (Fig. 7) and check it for defects.
Of course, based on experience, when the driven or drive disc wears out, the entire clutch assembly needs to be replaced.
Having removed the plug, we also inspect it for defects (Fig. 8).
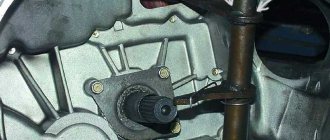
We degrease the surface of the guide bushing and inspect the bushing (Fig. 9).
The bearing is a closed type and is not lubricated. The bushing should also not be lubricated, since the lubricant may subsequently get onto the clutch discs.
We install the parts in place and assemble them in reverse order.
Tightening torques for main clutch parts
Clutch housing mounting bolt and nut – 44 Nm
Bolt securing the clutch housing to the flywheel – 20 Nm
The fastening points for the gearbox are discussed in the article on removing the gearbox.
Why does the ESD detect error “p0830”, video explanation
Praise to the author! I am also a terrible car enthusiast, albeit with little experience... I also had right-hand drive ones, but unfortunately, they are not convenient with our traffic. I now have probably the most boring Toyota model. For almost 2 years of owning this car, I had no problems at all, it burned out once a light bulb in the foot, and I changed the brakes and oil according to plan, despite the fact that the car is 8 years old, the mileage is about 150 thousand. It accelerates quickly, drives smoothly, and is maneuverable. spacious trunk and for its size a very comfortable and spacious interior, dad feels completely comfortable in the back seat, and he is a large man. After a night in a windswept parking lot at minus 35, it started up and didn’t even sneeze once. The stove heats perfectly, the air conditioner cools quickly, the consumption is 6-7 liters of 92 in the city. engine 1.5. 106 horses, with its size it will fit into any hole in the parking lot. In short, the car is just great. )))
I've been meaning to adjust the clutch on my Grant for a long time. I made a printout of your article. Tomorrow I’ll arm myself with the necessary tools and go to the garage to do everything with my own hands step by step, as described in the article.
Open the hood, under the air filter there is a clutch foot. It is equipped with a cable with a plastic screw. Lightly pressing the foot, remove the cable to the side. We adjust the cable screw and put it back on the foot.
When accelerating, the engine roars slightly when the leveler revs up
Clutch needs replacement! It's slipping!
When starting off there is jerking, what could be the problem?
Replacing clutch parts without removing the gearbox (discs, bearing, fork)
A typical clutch replacement job and other information are shown here.
When replacing clutch parts, you don’t have to completely remove the gearbox (since this requires removing the subframe, which is very labor-intensive), but only move it away from the engine to the required distance.
Disconnect the terminal from the negative side of the battery.
Remove the left wheel drive (see here).
We unscrew the bolt securing the left subframe bracket to the body and loosen the nut securing the bracket to the suspension arm (see here).
Disconnect the clutch cable from the clutch fork and the bracket on the gearbox (see here).
We disconnect the gearbox control rod from the switch on the gearbox (see here).
Remove the speed sensor.
Remove the crankshaft position sensor.
Disconnect the wiring connector from the reverse light switch.
Disconnect the ECM wiring connector from the wiring block of the control oxygen concentration sensor.
Remove the sensor block from the holder on the gearbox and remove the wiring harness from the holder.
Unclench the holder on the gearbox housing and remove the wiring harness from it. We unscrew the four bolts securing the engine oil pan to the gearbox (see here).
We place adjustable stops under the engine and gearbox. We remove the rear and left supports of the power unit (see here and here).
We disconnect the ground wires from the gearbox, unscrew the bolts and nuts securing the gearbox to the cylinder block (see here).
Questions (24)
- Most useful
- The newest
Alexey Revin
, editor of the magazine “Behind the Wheel” (automotive information department):
— If the nature and frequency of the knock is similar to the sound produced by large gaps in the valves, then this is the knock of hydraulic compensators. On the K4M engine, the valves are driven by rockers with rollers. And the gaps are compensated by hydraulic supports of the rockers. Although more often they say hydraulic compensators. Since you have been driving with the defect for a long time, of course there is no talk about the fact that the devices are not pumped. Most likely, one or more hydraulic compensators are faulty. The seal of the working volume is broken, and they do not hold the rocker in the desired position. A gap appears, which generates a knock.
I advise you to prepare a valve cover gasket sealant, flushing fluid and find a company where you can purchase hydraulic compensators. I recommend replacing the timing belt at the same time, since it still needs to be removed.
Having removed the cylinder head cover, we try to press the hydraulic compensators by hand. Those of them that are pressed easily are faulty. By raising the camshafts, you can remove the rockers and remove the hydraulic compensators. Then they can be washed or replaced immediately. Hydraulic compensators are quite reliable, and if problems arise with them, then perhaps you once filled in bad oil or installed a fake filter. Dirt particles jammed the hydraulic compensators.
For someone who likes to do everything themselves, the operation will take a whole day. The service will charge from 4,500 rubles for such work. One hydraulic compensator costs from 350 rubles.
Alexey Revin
, editor of the magazine “Behind the Wheel” (automotive information department):
— If you place the indicators in the same way as we did, that is, on the lining of the floor tunnel, then it is most convenient to take the power from the wires suitable for the cigarette lighter socket. There voltage appears when the ignition is turned on. This is necessary for the operation of both devices. At the same time, the current consumed by the indicators is small and will not overload the cigarette lighter power circuit. To operate the engine hour meter, you don’t need anything else, but to operate the temperature indicator, you need to stretch the sensor wires through the engine compartment to the front bumper. And there, in a shaded and ventilated place, fix the sensor as far as possible from the radiator of the cooling system and the air conditioner heat exchanger.
Removing and installing the Lada Largus clutch
Place the car on a two-post lift, apply the parking brake, turn off the ignition, open the hood and disconnect the ground wire terminal from the battery (electro-hydraulic lift type P-3.2G with a lifting capacity of 3.2 tons, wrench 10).
Remove the gearbox
Install the flywheel retainer (flywheel retainer Mot. 582-01) to the engine cylinder block.
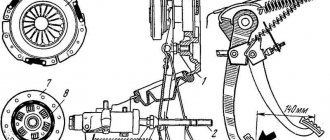
Unscrew the six bolts 1, Figure 3-1, securing the clutch pressure plate to the flywheel and remove the pressure plate 2 and the driven clutch discs (replaceable head 13, extension, knob).
Figure 3-1 — Removing the clutch:
1 — pressure plate mounting bolt;
2 - clutch pressure plate
Checking the clutch driven discs
Driven clutch discs for vehicles with K4M and K7M engines have different damper spring stiffnesses. To distinguish the clutch driven discs, marks are applied to the damper springs with paint, Figure 3-2.
Differences between clutch driven discs:
Inspect the driven clutch disc.
Figure 3-2 — Clutch driven disc marks on a car with a K4M engine:
If there are cracks, dents, broken damper springs and cracks or delamination of the friction linings, the disc must be replaced.
Figure 3-3 — Clutch pressure plate
Preparing for installation
Check the surface of the engine flywheel in contact with the clutch driven disc. There should be no scratches or signs of tarnish on the surface of the flywheel.
Check that the engine crankshaft main bearing is not seized.
Check the tightness of the engine and gearbox seals and replace if necessary.
Check the free movement of the clutch driven disc along the input shaft.
Check for signs of wear on the clutch engagement bearing guide sleeve and the clutch engagement fork.
Clean and rinse the flywheel surface in contact with the clutch driven disc, the splines of the gearbox input shaft and the splines in the driven disc hub (white spirit, consumption rate 10 g)
Install the clutch assembly onto the flywheel without tightening bolts 1, Figure 3-1, securing the pressure plate (replaceable head 8, knob and extension).
Install mandrel 1 into the driven disk hub, Figure 3-4, and center the clutch driven disk relative to the flywheel (clutch driven disk centering mandrel Emb. 1518 or Emb. 1780, or 67.7823-9702 L).
Figure 3-4 — Centering the clutch driven disc:
1 — mandrel for centering the driven clutch disk
Alternately tighten the bolts 1, Figure 3-1, securing the clutch pressure plate crosswise. The tightening torque of the clutch pressure plate mounting bolts is 20 N.m (2.0 kgf.m) (replaceable head 13, extension, wrench, torque wrench):
Remove the flywheel retainer.
Install the gearbox
After installing the gearbox, check the amount of travel of the clutch release fork (for cars with a cable drive) and the absence of air in the clutch hydraulic drive (for cars with a hydraulic drive).
If necessary, adjust the travel of the clutch release fork (for vehicles with a cable drive) or remove air from the hydraulic clutch system (for vehicles with a hydraulic drive)
2283-4-22-02 (Copy)
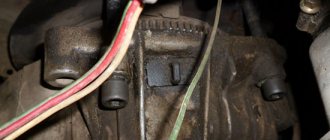
Then, if we talk about 16 valves, it is better to remove the "intake muffler". The plastic box, when there is no corrugation, can be immediately moved to the side (Fig. 3).
The cable ends with a tip-rod on which a weight is attached. This detail was hidden from us by the corrugation.
Clutch cable end
We will unscrew the nuts:
- Take two “10” wrenches and unscrew nut 1, holding nut 2. If the thread is “sour,” clean it with a solvent;
- Unscrew nut 2, holding the pressed part of the tip with a “7” wrench.
Now the weight will be easy to pull out of the slot.
Know that replacing the clutch cable on a Renault Logan can be done without unscrewing anything. The cable is pulled towards itself, the lever with the slot is pushed back, etc.
Replacing the Lada Largus clutch (VAZ Largus)
If the Lada Largus clutch fails, we recommend replacing all its elements at the same time (driven and driven discs, clutch release bearing), since replacing the clutch is labor-intensive, and the service life of damaged clutch elements has already been reduced, so if they are installed again, they may need to be reinstalled replacing the clutch after a relatively short mileage.
Operations for removing and troubleshooting clutch parts Lada Largus
The work is shown using the example of a car with a K4M engine.
On a car with a K7M engine, the clutch is removed using completely similar techniques. 1. Remove the gearbox
If you are installing the old pressure plate, mark in any way (for example, with a marker) the relative positions of the disc housing and the flywheel in order to install the pressure plate in its original position (to maintain balance). Subsequent operations are shown with the engine removed for clarity.
This is where the bolts securing the clutch housing to the engine flywheel are located.
3. Remove the clutch pressure and driven discs from the flywheel, holding the driven disc.
4. Inspect the clutch driven disc. Cracks on the parts of the driven disk are not allowed. Check the degree of wear of the friction linings. If the rivet heads are recessed by less than 0.2 mm, the surface of the friction linings is oily or the rivet joints are loose, then the driven disk must be replaced.
If the driven disc linings are oily, check the condition of the gearbox input shaft oil seal. It may need to be replaced.
5. Check the reliability of the damper springs in the driven disk hub sockets by trying to move them by hand in the hub sockets. If the springs move easily in their seats or are broken, replace the disc.
6. Check the axial runout of the driven disk if warping is detected during visual inspection.
If runout exceeds 0.5 mm, replace the disc. 7. Inspect the working friction surfaces of the flywheel and pressure plate, paying attention to the absence of deep marks, scuffs, nicks, obvious signs of wear and overheating. Replace defective components.
8. If the rivet connections A of the casing parts and the pressure plate are loosened, replace the pressure plate assembly. Using an external inspection, evaluate the condition of the diaphragm spring B of the pressure plate. Cracks on the diaphragm spring are not allowed. Places B of contact between the spring blades and the clutch release bearing must be in the same plane and have no obvious signs of wear (wear should not exceed 0.8 mm). Otherwise, replace the pressure plate assembly.
9. Inspect the connecting links A of the casing and disk. If the links are deformed or broken, replace the pressure plate assembly. Using an external inspection, evaluate the condition of the support rings B of the pressure spring. The rings should not have cracks or signs of wear. Otherwise, replace the pressure plate assembly.
10. Before installing the clutch, check that the driven disk moves easily along the splines of the transmission input shaft. If necessary, eliminate the causes of jamming or replace defective parts. 11. Apply refractory grease to the drive hub splines.
12. When installing the clutch, first install the driven disc using a mandrel...
Install the driven disk so that the protruding part of the disk hub (shown by the arrow) is directed towards the clutch housing diaphragm spring.
13 then install the clutch pressure plate housing on the three centering pins. After this, you can screw in the mounting bolts.
14. Screw in the bolts evenly, one turn of the key each, alternately moving from bolt to bolt along the diameter. The tightening torque of the bolts is 20 N*m.
15. Remove the mandrel.
16. Install the gearbox. 17. Remove air from the hydraulic clutch release system of a vehicle with a JH5 gearbox.
4500 rub.
The clutch on a car is used to temporarily disconnect the engine from the chassis to change gears and when starting to move. The clutch life depends very much on the driver’s driving style, and on average is 150-200 thousand km.
Replacing the Lada Largus clutch, along with a major engine overhaul, is considered one of the most complex and responsible car repair procedures. To replace the clutch, you need to disassemble a large number of units and components of the car, which in itself is a very difficult task.
Description of design
Clutch Surely, while in a driving school, everyone took a course on the design of transmission components, but it’s unlikely that everyone went into all the details and, I must say, in vain. Knowledge of the design and principles of operation will allow the owner to identify a breakdown at an early stage, take measures to eliminate it and avoid large costs for major repairs. Therefore, let’s briefly consider the components of the clutch of a Lada Kalina car:
- casing;
- release bearing;
- pressure disk;
- driven disk;
- drive cable;
- fork lever;
- cable length adjustment mechanism.
The type of friction clutch used on this model is single disc, dry with a diaphragm type spring. The aluminum casing is integral with the gearbox. Modifications involve the installation of two types of transmission components - with a diameter of 190 and 200 mm. You can determine which one is used in a particular car by the number of starter mounting bolts: two – 200 mm and, if there are three bolts, then – 190 mm.
The clutch housing is secured to the flywheel with six screws. Three pins on the flywheel fit into corresponding holes in the housing, thereby centering it. As the linings wear out, the cable length changes automatically and does not require intervention from the owner.
Signs of a bad clutch
It's not every day that a clutch breaks. It happens that you don’t immediately realize that the clutch on Largus is failing. This can be easily understood by the following signs:
- When you press the clutch pedal or in the neutral position of the gearshift knob and release the pedal, you hear an extraneous noise - grinding, squeaking, howling or rattling
- Some gears are difficult to engage or do not engage at all
- The clutch does not completely disengage when the pedal is pressed, the clutch moves
- The clutch slips and does not fully engage when the pedal is released and the gear is engaged
When to contact a specialist
If the clutch fails in the middle of the road while driving, you must immediately head to the nearest car repair and maintenance station
Usually the clutch fails at the most inopportune moment while driving on the road.
If this happens, the main thing is to get to the garage or service station.
You can call a tow truck or put the car in gear with the engine off, and then start the car and drive at low speed.
You should contact a specialist if you have absolutely no knowledge of car repairs. Dismantling a gearbox is quite a difficult job. In addition, it is very difficult to perform the adjustment correctly without experience. You should also contact a specialist for a complete inspection of the clutch if the car has a mileage of more than 100 thousand km without replacing the kit.
In some cases, you can fix a car clutch problem yourself. The main thing is to correctly find out the cause of the breakdown.
Incorrect adjustment and excessive wear of the clutch elements can lead to failure of the entire assembly. Consider what is meant when they say “the clutch is moving”, and also in what cases the malfunction can be fixed with your own hands.
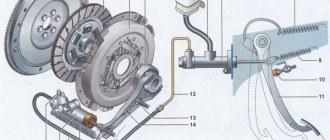
Features of replacing the Lada Largus clutch
Lada Largus is equipped with two types of manual gearboxes. On the 5-seater passenger version with an 8-valve engine, a JH3 gearbox with a cable drive is used. The remaining modifications are equipped with a JP5 gearbox with a hydraulic clutch drive.
Gearboxes differ only in the drive principle. The entire mechanical part is completely identical. Accordingly, JH3 is equipped with a conventional release bearing, and JP5 is equipped with a bearing combined with a hydraulic cylinder.
When repairing a clutch, we strongly recommend replacing the entire set of parts: the release bearing, the clutch basket with the pressure plate and leaf spring, the driven disc with friction linings and damper springs. Our technicians will definitely check the condition of the pressure fork. If it is worn out, it is also better to replace it.
After dismantling the gearbox, we make sure to inspect the crankcase. If there are signs of oil leakage from the oil seals of the gearbox input shaft or crankshaft, they must be replaced. They cost pennies compared to the cost of dismantling and installing the gearbox.
Experienced technicians at our technical center specialize in replacing Lada Largus clutches. The work is carried out in full compliance with the manufacturer's standards. It takes about 4 hours of working time. You can wait this time in a comfortable rest room or go about your business. All work will be performed professionally, efficiently and on time.
Articles
For all cables suitable for cars of the first and second generation, the Renault catalog contains two article numbers - 8200215961 and 6001546867. We are talking about different designations of one part.
Substitutes
3074 600 294 - the most common option for replacing the original spare part
3074 600 294 in Exist
We list analogues suitable for machines from the first two generations:
- CABOR 10.2890
- TRISCAN 8140 25250
- ATE 24372810312 or 591031
- AUTOMOTOR FRANCE AVC6867SAE1 or AVC6867
- BAV DISAN96
- CAUTEX 28439
- ADRIAUTO AD41180, AD410180, 41180, 410180
- CEF RT01186
- CMB AN96
- QUARTZ QZ-154-6867
- FRANCECAR FCR210148
- COFLE 102890
- FTE FKS20023
- KAWE RT01186
- HI-DRIVE CC708
- MALO 26545
- NPA NP51105151
- SPJ 911112
- QH KA93657
- TRW GCC109
- TIMMEN 01441528
- SACHS 3074600294 (pictured above)
- MASTER-SPORT 6001546867PRPCSMS
- ABS K27640
- ASAM 30360 or 31071
- HELLA 8AK 355 700-921
- BRECKNER BK19004
- SEIM 401712
- KAGER 192756
- LEX TR2193
- RICAMBIFLEX 01441528
- METZGER 102890
- TEXTAR 58013900
Change the release bearing on a Lada Largus car
- have holders and other tools for installation and dismantling
- be able to prepare a seat
- it is necessary to check the new bearing for play. You need to make sure that it rotates freely and does not jam. Installing a defective part is throwing money away
To eliminate any risks, it is easier to find a technician who has gained experience and has dealt with replacing a hydraulic or roller clutch bearing, including on a Lada (VAZ) Largus.
When replacing the release bearing in the clutch, it is necessary to partially disassemble the gearbox, which on a foreign car Lada Largus is carried out according to a certain technological scheme.
Reviews about replacing the friction clutch yourself
Largus owners who changed the clutch themselves note the following:
- It is difficult to do the work yourself; it is better not to try without the skills, conditions, tools and knowledge.
- You can't do it without helpers. But even in this case, it may take all day to replace.
- As long as the clutch works and does not cause concern, there is no point in changing it.
Judging by the reviews, it is better to entrust clutch replacement to specialists, especially since the price of the issue is not so high. Conscientious craftsmen provide a guarantee for their work and bear financial responsibility for it. If you replace it yourself, all actions are performed at your own peril and risk.
Source
Replacing the clutch basket (pressure plate)
- preliminary determination of the need to change the basket
- using professional tools specially designed for this purpose
- compliance with the sequence of events
This part of the mechanism is important, since it is where all the clutch parts are located. So that the unit can operate without violating the principle of operation, the pressure plate should be changed only by a qualified technician and where they have real practice in changing the clutch basket.
It is common practice in car service centers to replace the basket assembly. This type of work is considered the most acceptable and high-quality, since it becomes possible to change the casing. Accordingly, the result will be of higher quality.
Clutch adjustment on Lada (VAZ) Largus
After an unsuccessful or simply incorrect adjustment of the clutch pedal or pressure plate, you may find that the problems have only increased - third-party, clearly unnecessary sounds and noises appear. What happens to the Lada (VAZ) Largus unit itself at this time is unclear, and how the adjustment performed will affect its working life is also unclear.
Usually, experienced car owners adjust the clutch themselves, and they do this on a wide variety of foreign cars. However, this approach is not always successful, especially if the car is new or the owner has no experience.
It is possible to carry out this type of work with a qualified approach for a small amount in a car service center, where the work is performed by a master.
Sign up for a technical center
We suggest you choose which method is appropriate for you - an electronic form (then you will be contacted after some time), or directly by telephone.
A preliminary agreement with the company is an undoubted convenience, because you yourself determine what time or day it will be convenient for you to arrive. You can make an appointment for the day of the call and for other days.
By the time you specify, the service station will provide a technician and a place in the work area. There will be a free lift and equipment available. In addition, you will be served out of turn.