I read the above text with hope when purchasing new Markon brake pads. But first things first. After looking at the caliper that I had pads from the 16 valve version, I started searching.
There is a chain of stores “Ferodo” in our glorious city (far from advertising). I called and asked if Ferodo FDB 1617 pads were available. The sound in the handset was wheezing for a couple of minutes, then he answered, “Yes, 870 rubles.”
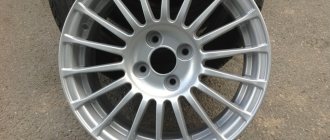
After work, I happily went to Pokhodnaya to get some wheels, by the way, the wheels are also 16 bug proof, ventilated. I took Fenox wheels.
Then I went to get the pads. The store is located on Okruzhnaya 55. I walked in and said, “I called you on the blocks, FDB 1617.”
This rooster frantically looks at the monitor, then goes somewhere and brings me pads with the words “This is not only Ferodo, but a very good analogue.” I think it’s a miracle... Okay, I think maybe I’ll get lucky. I bought it and went to change it.
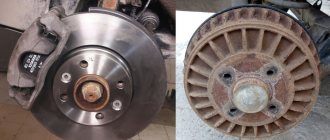
I changed the discs and pads, everything fit perfectly. Of course, I was shocked by the discs that were removed. They devoured them during my 40,000 km mileage. vhlam! Below are the photos:
Well, here's a photo of the replaced brake discs and pads:
The replacement was made 3 days ago and today I am writing reviews about these very miracle pads from the company MARKON! Friends, never take these pads under any circumstances! They creak more than the previous TRWs.
In the morning I went to one of the online stores and ordered the same FERODO 1617 without any similar originals.
One of these days I’ll go again to Okruzhnaya (no advertising at all) and throw the removed pads in the face of this fat devil who swore to me about their unsurpassed quality.
Now I’m driving like an old cart, I’m squeaking with marcon and I’m looking forward to the arrival of my normal pads. Next week I’m finally planning to change shoes to R17
Lada Largus cars are in great demand. Driving safety not only in these, but also in cars of other brands is ensured thanks to the braking system. You can extend its service life and the operation of your car by monitoring the condition of the brake system, and in particular the brake discs.
Checking the brake discs
ATTENTION: Those discs that have grooves, burrs, are completely worn out or warped must be replaced or machined.
Before measuring disc axial runout, ensure that the front wheel bearing runout is within the limits specified in the manufacturer's specifications.
• Raise and securely support the vehicle. When lifting only the front of the vehicle, apply the parking brake and block the rear wheels.
• Remove the brake caliper and secure it to a wire outside the working area. Do not disconnect the brake hose, but do not allow the caliper to hang on the hose. For more information, see Replacing brake discs
• If the disc comes off easily from the hub, install the bolts and tighten them slightly more than hand-tight. Make sure that the tightening torque for all nuts is approximately the same.
• Install the dial indicator with a magnetic or universal holder on the car body so that the indicator needle touches the side surface of the disc at a distance of about 13 mm from its outer edge.
• Set the indicator to zero. Rotate the dial one full revolution and record the maximum axial runout reading. Compare the resulting value with that indicated for your car.
• If the axial runout exceeds the maximum permissible value, the disc may need to be reinstalled. If the disc comes off easily enough, remove it, clean the contact surfaces of the disc and hub, and reinstall the disc in a new position. Measure the runout again. If this time the runout is within the specifications, then the problem is solved. If not, replace or sharpen the disc.
The thickness of the disc significantly affects its ability to withstand heat and provide adequate deceleration force. Each disc has a minimum thickness allowed by the manufacturer.
Markings indicating the minimum acceptable thickness are indicated on the brake disc itself. In this case it is 19.8 mm
This minimum thickness must not exceed the limits specified in the technical requirements. A disc that is thinner than necessary may crack when braking.
If at least any part of the disk is less than the minimum thickness, it must be replaced
Thickness and thickness variation can be measured using a micrometer. All measurements must be carried out at a certain distance from the edge of the disk; a bead is formed on the edge. Take measurements at four points symmetrically located on the circumference of the disk, and write down the measurement results. Compare them with the minimum values given in the technical requirements. Disc thickness unevenness of more than 0.025 mm may cause brake pedal vibration and/or vibration in the front of the vehicle during braking. A disc that does not meet the technical requirements for thickness or uneven thickness must be replaced.
The new disk has a smooth, even surface that changes quickly during operation. Sometimes very fine concentric grooves (similar to the sound tracks on a music record) appear and develop on the surface of the disc, which are formed as a result of exposure to dust and small solid particles that enter the disc from the brake linings. This slight roughness is normal, but if any of the grooves are so deep that your fingernail can catch on them, the disc should be replaced.
If tarnish appears, metal discoloration, severe rust, or even chipping occurs, the disc should be replaced. If anything is in doubt during inspection, replace the disk. Front brakes are a very important system and must be 100% efficient.
The brake pads should be replaced at the same time as the disc, as their surface must be perfect. Since the brake linings are replaced as a set (on both wheels), it is necessary to replace both discs, even if only one is damaged.
Front wheel brake disc - removal, installation, checking technical condition
Note: Part numbers for brake disc and related parts can be found here.
Loosen the wheel bolts and place chocks under the rear wheels. Apply the handbrake. Using a jack, lift the front of the car, place it on reliable supports, and remove the wheel.
If the work is done on a lift: place the car on a two-post lift, apply the parking brake and turn off the ignition. Remove the front wheel. Raise the car to a height convenient for performing work.
Clean the front brake parts (metal brush).
Unscrew and remove the two bolts securing the front brake guide to the steering knuckle (replaceable head 18, extension and wrench) (for details, see Removing the brake caliper),
Remove the front brake (caliper) assembly and hang it on the suspension spring. There is no need to disconnect the brake hose, but make sure that it is not overtightened or kinked.
Figure 11-1 — Removing the brake disc: 1 — front brake mechanism; 2 — front brake disc; 3 — brake disc mounting screws
Unscrew and remove two screws 3, Figure 11-1, securing the brake disc to the front wheel hub (replaceable Torx T40 attachment, extension, ratchet wrench).
To keep the disk from turning, you can screw the wheel fastening bolt into the threaded hole of the hub and insert a mounting blade between the bolt and the hub shoulder.
... and remove the brake disc.
Checking technical condition
See Complete inspection of brake discs
Attention. Brake discs cannot be ground. If there is significant wear or deep scratches, the discs must be replaced.
Attention. When replacing a brake disc on one side, be sure to replace the brake disc on the opposite side.
Attention. When replacing brake discs, be sure to replace the brake pads.
Brake disc parameters
Markings indicating the minimum acceptable thickness are indicated on the brake disc itself. In this case it is 19.8 mm
| Parameter | R90 | F90 | |
| Brake disc diameter, mm | 259 | 260 | 260 |
| Nominal brake disc thickness, mm | 20,6 | 22 | 22 |
| Minimum brake disc thickness, mm | 17,7 | 19,8 | 19,8 |
Reinstall the brake disc and secure it to the hub with two screws. The tightening torque of the screws is 14 N.m (1.4 kgf.m).
Attention. After removal, the bolts securing the guide to the steering knuckle must be replaced, since the bolts are fixed with an adhesive applied to the threaded surface of the bolts. Reuse of bolts is not permitted.
Install the front brake assembly on the steering knuckle and secure it with new fastening bolts, first apply “High-Strength Locking Compound” to the threaded surface of the bolts in an amount of 1 g per bolt. Bolt tightening torque 105 Nm (10.5 kgf.m) (replaceable head 18, extension, wrench, torque wrench, “High-strength locking compound”, spare parts number 77 11 230 112).
Install the front wheel.
Press the brake pedal 2-3 times, check and, if necessary, bring the brake fluid level in the brake hydraulic reservoir to normal.
Check the effectiveness of the service brake system.
Addition:
Brake discs are a separate and important topic. The greatest danger is represented by disks that have already exhausted their service life, so it is advisable to control their thickness at each thematic maintenance. What are the dangers of excessive production? Cracks, for example, and, as a result, a jammed wheel at the most inopportune moment. In the case of non-ventilated discs, they can generally be brought to an absurd level of wear - when the pad falls into the gap between the caliper and the disc, the pressure in the system drops, and with it the brakes as a whole fail, and such cases also happen. So checking the thickness of the disc from time to time is vital.
Now about the problem of disk “beating”. Of course, it is better to buy proven products, preferably with a certificate from TUV, otherwise the disc may start to break right from the first day of use. But it also happens differently when a branded product begins to annoy you with vibrations over time. What's the matter? In the temperature difference - for example, I drove for a long time at a good pace, with acceleration and braking, and then suddenly I drove through a deep puddle. There are many opinions on the topic of re-grooving brake discs, however, based on experience and science, we can say that if re-grooving helps, it will only be for a very short time. In the event of a serious temperature difference during operation, the disk will “behave” - it will change its structure in accordance with the well-known iron-carbon diagram, and not completely, but in places. So grind it, don’t grind it, it will continue to lead. By the way, the world leader in the production of braking systems, the BREMBO company, agrees with this widespread opinion, and it knows a lot about extreme braking.
Much has already been written about components for brake systems, including consumables - discs and pads, but it would be useful to recall a number of key points about where, how and what spare parts are best purchased. Naturally, it’s ridiculous to overpay 30-50, or even 100% for a cardboard box with the automaker’s logo, especially since they don’t produce brake systems themselves, they use third-party services: BMW, for example, usually prefers Jurid, Mercedes-Benz - Textar, and so on . You can purchase consumables directly from the catalogs of the manufacturers themselves - suppliers to the assembly line, if you are such a perfectionist, but usually it is easier to do, selecting a certified product of appropriate quality. I would like to remind you that it is better to purchase spare parts in well-tested places, since even the manufacturers themselves admit that in Russia the amount of counterfeit products is simply off the charts, and from the point of view of appearance, it looks impeccable. However, this problem is not new and is not limited to Russia.
Replacing brake discs Lada Largus (VAZ Largus)
If the brake discs are worn out enough and their thickness becomes less than acceptable, they must be replaced with new ones. Since Lada Largus cars are equipped with different types of engines, the braking system may differ slightly. And these differences will be in the thickness of the brake disc, namely, for engines:
- K7M = 12 mm (1.6 8-valve)
I think there is no need to explain once again that the more powerful the engine, the better the brakes should be. That is why on 16-valve engines the thickness of the discs should be greater. As for the minimum permissible thickness, it is:
If during measurement it turns out that the above figures are greater than in reality, then the parts must be replaced.
To perform this repair we will need the following tool:
- Ratchet and crank
- Hammer
- 18 mm head
- Torx bit t40
- Bit holder
- Metal brush
- Copper or aluminum grease
How to choose the right discs and drums in Largus
Selection of spare parts is an important event when repairing the brake system of a car.
Quality parts can last for years, while poor parts can break down in the next month or not work properly.
Table of catalog numbers:
| Type of spare part | vendor code |
| Disc 260 mm – set 2 pcs. | 7701207795 |
| Disc 259 mm – set 2 pcs. | 7701206339 |
| Drum without ABS bearing | 432001316R |
| Drum with ABS bearing | 432001501R |
It is worth noting that the 260 and 259 brake discs are interchangeable. The difference when replacing them is not significant. The car owner will not feel any difference when braking.
But drums with or without ABS are different. Since the wheel bearing is pressed inside, you should be careful when selecting spare parts, as there is a risk of buying something completely wrong due to the presence or absence of a magnetic tape.
How to remove and replace a brake disc on a Lada Largus
So, the first thing you need to do is remove the wheel bolts, and then jack up the front of the car. Next, remove the wheel and caliper assembly. After this, you can begin to carry out this repair directly.
For greater clarity, it is worth looking at the report below.
Video review of replacing brake discs on Largus
The video clip below is embedded from my YouTube channel, so it’s better to first familiarize yourself with it, and only then carefully read the article itself. Well, below everything will be presented in standard form.
Photo report of the work done on removing and installing brake discs on Largus
So, when the caliper is removed and nothing else bothers us, we need to unscrew the two screws that secure the disc to the hub using a torx t 40 bit.
If the disc is stuck to the hub, which often happens, then you need to tap the contact point with a hammer, as shown in the photo below.
When the disk has already moved away from its place, you can remove it without any problems:
Before you start replacing the discs, you must thoroughly clean the junction with the hub with a metal brush.
And also apply copper grease, which prevents vibration during braking, and also allows you to easily remove the disc in the future.
And now you can install the new Largus brake disc in its place. The minimum price for these Lada Largus parts is from 2000 rubles per unit. Accordingly, the kit can cost you from 4,000 rubles. Of course, the original will cost around 4000-5000 rubles.
Procedure
- First, we purchase suitable pads. The set of front consumables consists of 4 pieces (2 pieces on each side).
- We control the brake circuit fluid level in the corresponding reservoir (under the hood) using the marks on its body. If the level reaches the maximum level, then it will need to be taken with a syringe, since after installing the new pads there will be a natural (due to the greater thickness of the pads) rise.
- We loosen the tightening torques of the bolts of the front wheel from which the replacement is supposed to begin.
- We hang this part of the car with any available device designed for this purpose. We remove the wheel. Don't forget about safety supports (if a jack is used).
- We take a screwdriver, which we insert between the pad and the disc, and with a pressing force we move it towards the cylinder. The rod is hidden in the cylinder, which provides free space for removing the pads.
- Now we loosen the tightening torque of the caliper bracket, and then move it up.
- We remove the old pads.
- We inspect the springs of the clamping mechanism for their deformation and breakage. If this fact is obvious, then we change it.
- We check the integrity of the rubber covers on the caliper guides. We lubricate the guides themselves with a special compound. This will prevent them from souring, and the bracket will move freely during the exit or entry of the piston.
- We carefully clean the seats for new pads.
- The linings on “fresh” pads are thicker than on old products, so the piston must be recessed to the full extent of its stroke. This will provide enough space for the correct installation of consumables.
- After installation, perform the assembly process in reverse order.
Replacement of front brake pads is completed. We repeat the entire list of these manipulations on the other side of the LADA Largus.
If there is a need to replace the rear pads, then the principle of operation is similar, with the exception of some nuances.
Why is it important to buy original brake pads?
The only way to protect yourself from counterfeit or low quality goods is to buy an original product. Usually, having bought a fake, a motorist is faced with the following popular problems:
- the alloy is too soft - increased wear of the product occurs. Friction linings “live” several times less than the stated period and often wear out after 10 thousand kilometers;
- if the alloy turns out to be too hard, this is even worse, since now it is not the linings that will wear out, but the disc itself, and these are completely different, more serious costs and labor costs for repairs;
- * the overlay plate does not dampen high-frequency nasty squeaks and vibrations when braking the pads;
- Some pads may even be sold without a vibration damping plate, which leads to extremely high caliper wear.
Therefore, you should think seriously about the quality of the purchased product. After all, the problem can result not only in increased wear, but also in more serious financial costs for repairs, as well as severe discomfort when driving and braking. All that remains is to buy brake pads for Largus from trusted dealers.
How to operate the car after replacing the pads?
After installing new pads in a Lada Lagrus with a 16-valve engine, you should not rush to drive onto roads with heavy traffic. The first presses on the brake pedal can cause inefficiency of the entire system, because consumables require time to grind into the working surfaces of the discs. Contact during this period does not occur over the entire surface, which explains the low performance of the pads. Over time, the situation will normalize. To properly “break in” the LADA Largus pads, we recommend choosing road sections with no heavy traffic. Once the process of grinding the pads to the discs is complete, you can observe the effectiveness of the brakes. At first, we recommend avoiding sudden braking to prevent excessive heating of the new linings. In “quiet” mode you should travel at least 100 km.
Useful tips
The first thing that worries every motorist during the next technical inspection of the caliper and brake lining is what its maximum wear margin is. A friction lining thickness of less than 1.5 mm should not be allowed. It is also very important, when changing pads, to also measure the degree of wear of the brake disc.
Lada Largus brake pads can last up to 50 thousand km. mileage during quiet driving. Aggressive driving style greatly reduces the actual life of the product. Therefore, it is better to monitor the degree of their wear every 10-20 thousand km. mileage
It is important to understand which structural elements are responsible for reliable braking. If the car’s braking distance has noticeably increased and obvious signs of a malfunction cannot be determined, the following possible problems can be identified:
- If the wear of the friction linings is within normal limits, but the brakes are working frankly poorly, check the condition of the brake fluid. Perhaps it absorbed too much moisture and lost its performance characteristics;
- if the brake pads are worn unevenly, this is a clear sign of problems with the caliper, in particular, acidification of the guides and working cylinders. It is also necessary to inspect the caliper;
- Excess oil in the caliper guides can get onto the brake disc, which will also increase the distance required to brake the car.
2283-14-02-08 (Copy)
Similarly, we replace the pads on the other side of the Lada Largus car. After replacing the pads, press the brake pedal several times to set the gaps between the pads and discs. We check the fluid level in the tank and, if necessary, bring it up to normal.
During operation, the surface of the brake disc becomes uneven, as a result of which the contact area of the new, not yet worn-in pads with the disc decreases. Therefore, during the first 100 km after replacing the pads, until the new pads have broken in, be careful, as the car’s braking distance may increase. In this case, the pads may become hotter than usual, up to the appearance of slight smoke and odor, especially in hot weather.
How to change front brake pads (Lada Largus)
Now that you can easily qualitatively assess the condition of the brake system thanks to the recommendations in the previous section, you can proceed directly to the replacement process. Installing a new product will most likely not take you more than half an hour. If you only have a general idea of the required algorithm of actions, then this information will be very useful for you. It is proposed to act in the following sequence:
This factory block lasted up to 40 thousand.
Mileage 46,000. Tired of the creaking noise, I decided to replace everything.
This is China, 5-6 thousand mileage.
Discs with a diameter of 260 mm can be installed at 259.
Immediately, at 40 thousand, I changed the pads, installed some Chinese ones, they were enough for 5 thousand mileage. The factory pads were enough for 40 thousand, but they ate up the disc. To replace, you need keys for 13, 15, 18. sprocket 40 and you also need to replace the lubricant of the guide supports, it is special.
Lada Largus: replacing the brake pads of the front wheels
We replace the pads of a Lada Largus car in case of maximum permissible wear of their linings - the minimum thickness of the pad, including its base, must be at least 6 mm.
The pads also need to be replaced when the brake disc is replaced, the linings are oily or have deep grooves, cracks and chips on them, as well as when the linings detach from the base of the pads. We carry out the work on a flat area, inspection ditch or overpass.
Attention! The brake pads of the front wheels must be replaced only as a set - all four pads. Replacing the pads of only one brake mechanism can lead to the car pulling to the side when braking.
If the fluid level in the hydraulic brake reservoir is at the MAX mark, then before installing new pads, use a syringe or rubber bulb to pump out some of the fluid from the reservoir. This operation must be performed so that when the piston is pressed into the wheel cylinder of the brake mechanism while installing new pads, fluid does not flow out from under the reservoir cap.
We remove the front wheel and securely fix the car on a factory-made support stand. Before installing new pads, it is necessary to move the wheel cylinder piston as much as possible inside the cylinder.
What front brake discs can be installed on Lada Largus
This type of brake has an important advantage - they are more efficient. At the same time, they require constant attention. The pads wear out much faster than on drum brakes. The situation is similar with disks. Replacement is usually required every 60-120 thousand km. It all depends on the quality of the part.
They can be divided into two main categories: original and lecterns. The former have better quality and power reserve. The second ones are much cheaper. But in most cases they are of lower quality. You need to make a choice based on your driving style, available budget and other nuances.
Let's sum it up
Since the LADA Largus brake system has a significant impact on the safety of movement, the elements require increased attention and timely replacement of the front brake pads. We do not recommend allowing excessive levels of wear on the working surfaces. The specified consumable components that have become unusable should be promptly replaced. Buy products only of decent quality, which will allow you to gain confidence in the stable functioning of the brake unit only in normal mode, but also in emergency situations.
Original
Purchasing original brake discs will not cause any problems. But their cost is an order of magnitude higher than their analogues. At the same time, their service life is an order of magnitude longer than their analogues.
The Russian market offers an extensive list of different brands that produce brake discs for this car. Moreover, there are both high-quality analogues and various low-grade crafts. The latter should be avoided. They can make unpleasant sounds when braking or simply moving. And even cause an accident.
Another disadvantage of a low-quality analogue is that it may simply not fit in overall dimensions. We'll have to sharpen it, adjust it. Parts from well-established brands do not create such problems. The following are suitable for replacing front discs:
There are both more expensive and cheaper analogues. It is important to indicate the item number correctly. Since for 8 valves, 16 valves the sizes will be slightly different.
What rear brake discs can be installed on the Lada Largus
An important advantage of this car over analogues in this price category is the presence of rear disc brakes. It is important to carefully choose a replacement for the original ones - if it is not possible to purchase the first ones. When selecting, you need to focus on several different indicators. First of all, on the driving style.
Each disk comes with a specification. It allows you to determine its hardness. If the driver practices an aggressive driving style with frequent braking at high speeds, purchasing ventilated models would be a good solution. They cool faster. As in the case of the front ones, analogues and original ones are presented.
What types of brakes are there?
- tape;
- drums;
- disk.
Through “evolution,” the band brake was replaced by a drum mechanism. The principle of operation is the simultaneous rotation of a hollow drum with a wheel, which is bursting inside with pads. This slows down the car. This type of brake has proven itself well, but it also has disadvantages. With frequent heavy use, the drum overheats, since the ventilation in this closed system is not the same as that of a disk mechanism.
The disc brake system is the most reliable mechanism that eliminates the above-mentioned disadvantages of previous systems. Disc brakes work by rotating the disc simultaneously with the wheel, and when you press the brake pedal, the pads jam the rotation of the disc from the outside. Unlike the drum, the disc is ventilated, so it is less susceptible to overheating than the drum. The discs do not retain moisture and damaged parts. The operating principle of this system is based on the ability to work under heavy loads. Therefore, you can stop your car faster with disc brakes.
Due to the fact that the drum mechanism costs much less than the disk mechanism, today both disks and drums are used.
Replacing front discs
- the wheels of the car are turned to the side - after which they are removed, the car is raised on a jack;
- to remove the caliper, you need to press the bottom of the working cylinder with a slotted screwdriver - it is important to control the fluid level in the expansion barrel;
- The caliper is completely removed using a 18mm socket - you need to unscrew a couple of bolts from the reverse side;
- the disc is secured with two T-40 bolts on the hub, you will need to unscrew them;
- This completes the removal.
Collection should be carried out in reverse order. It is necessary to lubricate all threaded connections with graphite lubricant. This will allow you to avoid “souring” in the future.
Checking the level and replacing fluid in the Lada Granta hydraulic brake reservoir
8mm curved box spanner Hose Syringe
Parts and consumables:
- Technical capacity
- Brake fluid
- Rags
Replace the brake fluid in accordance with the maintenance schedule - every 45 thousand km or three years (whichever comes first).
The supply of hydraulic brake fluid is located in the reservoir located on the master brake cylinder.
To monitor the level of working fluid, a sensor is built into the tank lid.
When the level drops below the permissible level (MIN mark on the reservoir body), the fluid level indicator in the brake system hydraulic reservoir lights up in the instrument cluster.
If there is no fluid leak in the brake system, then the fluid level in the reservoir decreases due to an increase in the volume of the hydraulic system. The volume increases when the pistons extend from the working cylinders of the front (and to a lesser extent rear) wheels when the thickness of the brake pad linings decreases as a result of lining wear.
1. Visually check the level of brake fluid in the reservoir, despite the presence of a sensor; during operation of the vehicle, a malfunction may occur, both of the fluid level sensor itself and of the fluid level indicator in the reservoir, located in the instrument cluster or their electrical circuits. The tank has MIN and MAX marks, between which the working fluid level should be located.
Do not allow the fluid level to drop below the MIN mark.
2. To add working fluid to the reservoir, unscrew its cap counterclockwise and, without disconnecting the wiring block from the sensor, remove the cap along with the sensor.
3. Add hydraulic fluid to the reservoir up to the MAX mark and replace the cap.
If brake fluid gets on your car's paintwork, plastic parts, or wiring, it can cause damage. Remove it immediately with a clean rag. If the level of brake fluid in the reservoir is constantly decreasing, then there is most likely a leak in the system. In this case, it is necessary to check the tightness of the brake system hydraulic drive and eliminate the malfunction.
4. To check the serviceability of the brake fluid level sensor, with the ignition on, press the central part of the sensor’s protective cap with your finger.
5. At the same time, the liquid level indicator in the tank should light up in the instrument cluster.
6. When replacing, pump out the old fluid from the tank with a syringe or rubber bulb and fill in with new one.
7. Bleed the brake system hydraulic drive until new fluid (lighter) begins to come out of the bleeder fittings of all working cylinders. After pumping, bring the fluid level in the tank to normal and close the tank lid.
Replacing rear brake discs
The process for replacing rear discs is similar. First of all, the car is raised on a jack, the wheels must be removed. As in the first case, you need to use a screwdriver to push the cylinder all the way in - which will allow you to remove the caliper.
Using a 13-mm open-end wrench, you need to unscrew the fastening bolt - you need to hold the caliper guide pin. An open-end wrench is also used for this, but at 15. It is necessary to turn the brake caliper, but there is no need to disconnect the hose
Next, you will need to unscrew the two bolts that hold the brake disc in place. After which it can be easily and quickly removed. If for some reason the part does not give in, then you can use a hammer. Simply tap lightly on the back of the disc. Assembly of the unit must be carried out strictly in the reverse order.
If possible, it is also advisable to change the brake pads. It is best to buy parts (disc, pads) from one manufacturer. This will allow you to avoid many difficulties and difficult situations. Related to fitting parts to each other. The installation process for replacing the disk is as follows:
Replacing brake discs on the front and rear wheels is a simple but time-consuming process. It is best to place the car on a pit or a lift. Having access to the back of the wheel will make it easier to remove the caliper.
Replacement procedure
First of all, drivers should know that such pads are replaced in pairs. Experts do not recommend doing this separately, because this can lead to destabilization of the entire car during a gradual or sudden stop. However, only the front elements of the system of the same name require frequent attention, although in many ways everything is justified by a specific malfunction.
Step one
The procedure for replacing the pads is carried out only in a set of 4 parts, 2 pieces on each side. First of all, you should check the brake fluid level in the tank of the corresponding cylinder. If it approaches the maximum, then the fluid needs to be pumped out, because after installing new pads this level rises significantly.
Step two
Next, the wheel bolts are loosened, from which the replacement of the pads begins. The corresponding part of the car is raised with a jack, reliable supports are installed and the wheel itself is removed. Using a screwdriver, the existing pads are removed from the disk, that is, the piston is pressed all the way into the bottom of the working cylinder.
How to easily determine brake disc wear by visual inspection
Hi all! I think every motorist is interested in maintaining his own vehicle in good condition. Moreover, special attention should be paid to the braking system. That is why the topic of our conversation will be how to determine the wear of brake discs.
People are also often interested in the question not only about the degree of wear of discs, but also pads. This is true more on cars, although the braking system is present on a motorcycle and even a bicycle. Let's immediately agree that the conversation will be about brake discs, not pads, and only strictly about cars. By the way, I separately talked about replacing brake pads in an article that you can read at the link.
The purpose of the brakes is to ensure timely stopping or reducing the speed of the machine. Moreover, the brake must respond instantly to the driver pressing the corresponding pedal. The speed at which a car brakes directly depends on the current condition and serviceability of the brake system components in the form of pads and discs. The stopping of the machine is due to the work of the friction force. To ensure that the discs do not wear out during friction, high-quality and durable materials are used for their production. But they are not eternal either. Wear and tear comes sooner or later.
Signs of pad wear
The instruction manual for a Lada Lagrus with a 16-valve engine, as a rule, contains very detailed information regarding this issue. It also displays all the parameters that characterize the front brake pads. The degree of wear of these consumable components is determined by the residual thickness of the friction linings, which come into direct contact with the discs or drums during braking.
In this regard, gradual and natural abrasion occurs. Many experts are inclined to believe that front brake pads are the most intensively worn consumables. Here you should not wait until the end of the scheduled service life, expressed in mileage (20-30 thousand km), but observe the level of wear with sufficient frequency, and then make a decision on replacement. It is no secret that failed front brake pads provoke increased wear on the working surfaces of discs or drums. Replacing the front brake pads in a Lada Lagrus car is very expensive, so it is not recommended to “bring” the car to this condition.
Some of the most common signs of wear include the following:
- the appearance of a squeak when the brake is activated;
- spontaneous change in direction of movement from a straight trajectory;
- the brake pedal vibrates when pressed;
- it is impossible to lock the wheels with the handbrake, even with the drive cable fully tensioned;
- reducing the thickness of the disc beyond the limit of 21.8 mm;
- the thickness of the friction linings on the pads has approached the critical value of 2 mm;
- the working surface of the pads is dotted with grooves and chips.
Regular inspection followed by replacement of worn-out components allows you to eliminate the manifestation of these factors.
Wear limit
Each brake disc has its own limited resource. It is set by the manufacturer from the factory, and resource wear is affected by mileage, braking intensity, the condition of the entire braking system, the characteristic features of the vehicle itself, etc.
When buying a new set of brake discs for his car, the driver must always follow the recommendations of the car manufacturer. Therefore, first we look at the instruction manual, or according to convenient catalogues, based on the characteristics of our particular machine, we select a part via the Internet. If you take a high-quality kit from a trusted manufacturer, you can be sure that wear will not occur very quickly, and when braking hard, the car will definitely stop, as you expected. The same applies to buying new pads.
There are international norms and standards for the production of such components for passenger cars. They oblige all manufacturers to make appropriate engravings or markings on products.
The essence of the engraving is to indicate information that relates to the maximum permissible degree of wear.
There is such a thing as the thickness of the brake disc. And it has a certain maximum wear limit.
To obtain the relevant information, you should look at the end part of the product. It is there that, according to international standards, all manufacturers of certified parts are required to display data regarding the wear of the brake part. Information about the initial thickness, as well as what thickness is considered minimal, should be located here. As soon as the disk reaches this value, it must be replaced. In fact, the manufacturer thereby relieves itself of responsibility. If a driver wears a disc below normal and causes an accident, he will not be able to blame the brake manufacturer or auto company for this.
There is an interesting feature here. When the question arises about when to change brake discs, many people look at the end side of the old product, but find nothing there.
This happens, but only on products that have not been certified or are counterfeit. It is strictly not recommended to buy such parts without information about wear.
How to choose the right brake system for LADA Largus
Any conscious owner of LADA Largus, who wants to drive without risk to life and with maximum comfort for himself and his passengers, will take seriously the purchase of spare parts for the brake system.
Their functionality and durability directly determine whether the driver will be able to control the movement of the car, park normally and not get into an accident due to problems with braking. The following signs indicate that something is wrong with the brakes and one or another part needs to be replaced:
- extraneous sounds: creaks, squeals and loud noise;
- increasing the duration of the process of stopping the machine;
- untimely operation of the system (wear of the pads or other elements is indicated by both too slow and too fast a reaction).
You should not hesitate to replace individual elements or the entire system, otherwise there is a risk of sudden brake failure while driving. It may also be necessary to change the system as part of a comprehensive tuning, when the driving parameters of the Lada Largus need to be improved.
Selecting brake discs
Most often, motorists need to replace discs that wear out due to frequent or intensive use or due to excessive loading of the car.
Regardless of the cause of the failure, it is important to restore the system to functionality as soon as possible, and for this you need to find disks with optimal characteristics.
Let's see what models for LADA Largus are currently on the market:
- perforated - ideal for connoisseurs of fast driving, they are characterized by fast response, but are somewhat more expensive than usual (but they last longer!);
- ordinary ones - they attract with an affordable price, but are not suitable for variations with powerful motors. They tend to quickly overheat and reduce the effectiveness of the brakes;
- with ventilation is a good option, but such wheels are not suitable for all models in this series (you can check by studying the registration certificate of the car).
Additional items
Considering the importance of the function of the braking system, the selection of each of its parts must be taken very carefully. In particular, no cylinder will function properly if its hose is leaking. In addition, high-quality pads are a must.
To make your car safe and well-driving, it is better to use original spare parts - they can be easily purchased online, for example, in a specialized store https://www.auto-tech.ru/. Among the things you will definitely need to buy, it is worth noting the parking brake cable, brake reservoir and brake booster, hoses and tubes, as well as repair kits for ABS calipers. Select a specific variation depending on the modification of the car and taking into account the manufacturer’s recommendations.
Source: https://autolynch.ru/lada/kak-pravilno-podobrat-tormoznuyu-sistemu-dlya-lada-largus
Determining the degree of wear
You have received basic information about the maximum and permissible wear. Now you need to find out exactly how the wear of a part is determined and what is required for this.
Not a single specialist or auto parts manufacturer can say 100% exactly how long a brake disc will last or how many kilometers it can travel. There is only a calculated resource, which is influenced by many additional factors. Yes, for starters it’s worth focusing on the quality of the disc itself, the raw materials used and adherence to technology. This is a question for the manufacturer. It's definitely not worth saving on brake discs. It is better to give preference to more expensive, but reliable and proven parts from leading manufacturers.
But there are other factors that provoke gradual or rapid erasure of the disk, exceeding the calculated values. These are driving style, condition of the brake unit, pad wear, climatic conditions, road surface condition, etc.
Stages and features of diagnosis
The measuring stage of the test involves the use of a caliper, which will help make thickness measurements. At approximately 5-8 points, moving around the disk, measure the thickness. If it varies along the radius of the part, there are signs of curvature and uneven wear.
Check the information from the manufacturer to understand whether the wear limit has already reached or not. I cannot say which indicators are correct and which are not, since different discs have their own wear limits.
Then a visual inspection is carried out. The disc should be examined for cuts, chips, dents, scratches and other defects on its surfaces. If they are, the spare part will have to be replaced.
Do not forget about the rule of pairwise replacement on the same axis. That is, when the left front disc is changed, the front right one also changes at the same time.
If you want to assess the condition of the elements without removing the wheels, this can be done by checking while driving. With severe wear, characteristic signs appear:
- the car brakes jerkily;
- a grinding sound appears;
- there is a squeaking sound when you press the brake;
- other extraneous sounds are heard;
- the driver feels a beat on the steering wheel;
- the beating is also felt in the gas pedal;
- When the brake pedal is pressed, the braking system is locked.
I strongly do not recommend waiting for such symptoms to appear. It’s better to periodically do simple diagnostics in your garage through visual inspection and measurement. This is usually done every 10-15 thousand kilometers, if wear symptoms do not appear earlier.
That's all for me.
Thanks to everyone who reads us! Subscribe, leave comments and ask relevant questions!
( 2 ratings, average: 5.00 out of 5)
Why the handbrake does not work on the VAZ 2107
Like any other part or mechanism, the handbrake cable tends to wear out and become unusable. The parking brake on the VAZ 2107 is activated using a lever located in the middle part of the car between the driver and passenger seats.
We recommend: Why doesn’t the heater on a Niva Chevrolet blow at your feet?
Periodically, the handbrake cable should be tightened, as it becomes weakened, which leads to a decrease in the efficiency of the device. The reasons why the handbrake on the “seven” may not function are due to the following factors:
- Excessive cable stretch.
- Damage to the cable.
- Malfunction of the brake mechanism in the rear wheel drums.
During prolonged use of the car, when the handbrake is constantly used, owners are faced with the need to periodically restore the cable tension. Over time, the device in question stretches, and there is nowhere to tighten it. The only way out of the situation is to exchange the product for a new one. It is recommended to carry out work on replacing the handbrake cable in an inspection hole, but you can do without it.
Changing the handbrake cable
Replacing the handbrake cable on a VAZ 2107 car begins with the fact that it is first necessary to dismantle the brake drums of the rear wheels
After dismantling the brake drums, you should pay attention to the condition of the rear brake pads and working cylinders. The presence of traces of fluid leakage will indicate that the mechanisms also need repair
Each owner of his car decides individually when it is necessary to change the handbrake cable. It all depends on the degree of wear of the cable. The procedure for replacing the parking brake cable is divided into 2 stages: dismantling and installation, as well as adjusting the tension.
The replacement algorithm is as follows:
- After the rear wheels and brake drums are removed, you need to go down into the inspection hole and find the tension adjusting rod. This rod is equipped with a spring, which must be removed using a screwdriver.
- Both nuts are unscrewed, after which the adjustment bar is removed. Next, the rear and front handbrake cables are dismantled.
- Using a wrench, you need to unscrew the two nuts securing the two brackets. These brackets prevent the cable from falling. There are screws under the nuts that prevent them from unscrewing on their own.
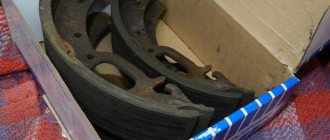
- After this, you should remove the rear brake drums and remove the springs that secure the brake pads. The pads can also be replaced if they show excessive wear.
- Next, you need to pull the cable to disengage it from the bracket against which it rests.
- The brake pads are removed. There is no need to remove both pads on the wheel. To replace the rear cable, you only need to remove one rear brake pad.
- Now you should unscrew two fixing bolts from the back of the brake shield of both wheels. With their help, the cable tip is fixed. After unscrewing these two bolts, you should pull the cable, as shown in the photo below.
- Using a 10mm wrench, you need to unscrew the front cable mounting brackets. After unscrewing the bolt, carefully remove the roller. To remove the roller, you need to roll it forward in the direction of the tip.
- To remove the front part of the device, you need to pull on the product to remove it from the bracket and intermediate support structure.
- After this, you need to get out of the hole and go into the car interior. When performing work, the handbrake must be in its lowest position. Inside, unscrew the two screws securing the handle trim.
- There are 4 bolts under the cladding that need to be unscrewed. After unscrewing them, you will need to remove the handle along with the front cable.
- To disconnect the cable mount from the handle, you will need to use pliers to remove the small cotter pin that secures the device to the handbrake handle.
- After this, the device can be completely removed from the car and a new cable installed in its place. The installation process of both products is carried out in the reverse order of removal. After this, you should secure them and begin the tension adjustment procedure.
Adjusting the hand brake VAZ 2107
Adjustment of the handbrake should be performed not only periodically when the parking brake is lost, but also after replacing the cable. In order to adjust the cable tension, you will need to take the following tools:
- pliers;
- two keys for 13;
- a can of WD-40 lubricant.