15 August 2022 36,434
Among owners of Lada Granta and Lada Kalina cars, one of the suspension modifications is very popular. It is notable for the fact that there is no need to redo anything, and for little money we get a tangible effect. Let's figure out what you need to buy and install yourself for this.
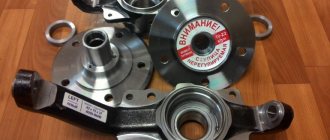
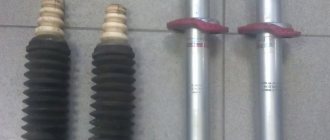
The point of the modification is to replace the standard disc suspension limiter with a rubberized one from Peugeot
. You can read the reviews at the end of the article.
Reviews
Review #1 (author)
The suspension became very quiet, the banging noise disappeared, I’m very pleased with the result! The factory washers are metal, and when the struts are released, they hit the rubber and you get unpleasant knocks, but the Peugeot washer is rubberized, and in this case, rubber on rubber knocks much quieter.
Review No. 2 (author)
The effect is amazing, soft and very elastic suspension, the suspension has become much quieter and more pleasant. Now only the rack needs to be repaired, it rattles like a nightmare, and the washers transmit this noise well to the body.
Review No. 3 (author)
Review No. 4 (author)
Alas, in urban driving conditions in slushy snow, no changes in the suspension performance were noticed. On the recumbent stands, they hit the rebound just as vigorously as they hit, especially the right one. The only thing is that on small irregularities, it seems that less vibrations are transmitted to the body, but again, everything is at the level of nuances.
Causes and signs of failure, diagnostics
The node takes a dynamic (variable) load, and failure, as well as replacement, is usually required for several reasons:
- Part wear, time to failure (service life);
- Accidents, frequent driving in potholes, aggressive driving style;
- Contamination of the support bearing from the inside, ingress of moisture and dust;
- Malfunction of suspension (shock absorbers, springs).
The main sign that a support bearing will need to be replaced is that the Granta is rattling and creaking under the hood or near the struts. This appears after 80-100 thousand kilometers, under appropriate operating conditions of the car.
The design of the “support” and the front pillar is complex; the following elements can fail:
- The entire support, including the body (rarely) – position 4;
- Support bearing (more often) – position 8;
- Rubber gaskets wear out (more often) - position 9.
Diagnostics of support bearings
To diagnose a breakdown, do the following:
- Raise the hood, find the front supports;
- Place your hand over the knot;
- Start to strongly rock the car from bottom to top (or ask an assistant);
- If you feel a knock or hear, as well as other incomprehensible sounds, it means that there are problems. It is worth disassembling or replacing the front support mechanism.
- Watch the diagnostic video:
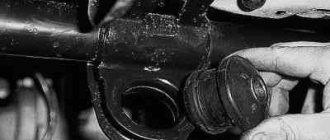
What to do about the knocking?
If you do not pay attention to the problem and do not change the silent blocks on the grant, the knocking will become increasingly stronger. Therefore, it’s time to drive the car into the pit, remove the engine protection, and look at all the details. You can swing the car from the desired side, whether you hear a knock or not, but it will happen if the silent block on the grant has become completely unusable. If the problem is in the stretcher, then you need to pull it too, the resulting knock will be proof that the cause of the breakdown has been found.
You can replace the silent blocks with grants, the price of which seems reasonable, right in the pit, without the need to remove the levers.
Procedure for replacing the front strut support bearing - Lada Granta
Removing the front pillar
- Before raising the car on a jack, loosen the hub nut with a 30 mm wrench.
- Don’t forget to first straighten the jammed collar at the locknut.
- Next, we also loosen the wheel bolts, only then raise the front of the car.
- We remove the wheels and proceed to dismantling the brake caliper.
- We unscrew the caliper fastenings, before unbending the protective brackets. Immediately remove the brake hoses from the strut.
- If you have an ABS sensor, do not forget to disconnect it by unscrewing the fasteners. We release the caliper from the fastenings, remove it and put it aside. Be sure to remember the position of the pads.
- Then we loosen the fastening of the steering tip with a 19 key, first disconnecting the cotter pin.
- We install a special removable device for tips.
- We press it out, tightening the thread, as shown in the photo.
- Thus, the tip can be easily removed without using a hammer.
- Under the brake disc we find two ball screws.
- First we loosen them and then unscrew them with a ratchet.
- As a result, the rack is disconnected from below. We take out the structure from the CV joint and place a support under it.
- The upper part of the rack holds three 13 nuts, unscrew them.
- Carefully pull out the stand from below. This completes the dismantling.
Hello. Chassis repair is perhaps the most common work that a car owner has to do, or more accurately, “our” car owner has to do. These constant knocks and squeaks seem impossible to completely “defeat”, and after one is put in order, another goes out of order. In general, this is not strange, given the state of the roads in Russia. Constant loads and driving on uneven roads have the most unfavorable effect on the chassis. In principle, it would probably be wrong to blame the roads alone; part of the problem certainly lies with the designers of AvtoVAZ, who, despite problems with the roads, continue to produce cars with flimsy suspension and chassis. Well, enough of the ranting, I think, we need to get to work.
How to check support bearings on Kalina
Before replacing the support bearings on the Lada Kalina, you should make a diagnosis and make sure that the “support” has failed , so check out the signs of failure:
- Clicks, knocks of Kalina’s “supports” (audible under the hood, when the shock absorbers are operating);
- A cracking sound is heard from the front side under the hood (when turning);
- Handling deteriorates, play at the steering wheel increases;
- You can feel the bumps in the road through the steering wheel.
If such signs are present, then there is a 99% chance that replacing the support bearing of the Kalina front strut is inevitable, but first make a diagnosis.
- Place the car on a flat surface and open the hood.
- Find the upper support, press this place with your palm.
- Rock the car from bottom to top so that Kalina's front strut supports and shock absorbers work.
- If you feel or hear knocking noises, it means it's time to replace the support bearing.
- Ask an assistant to rotate the steering wheel and listen to how the unit works; when in good condition, the “support” functions silently.
Attention:
Watch a video of clicks and knocks from the “opornik”, as well as how to perform diagnostics.
Device
Let's first analyze its device.
Here is a picture of a thrust bearing. In its upper part there are three studs for its fastening and one central fastening through the inside of the support.
This video was created to explain the essence of installing a support bearing, the purpose of which for some reason most car enthusiasts forget. They only know the purpose of shock absorbers and springs, although the support is an equally important element in the car’s suspension.
Video
https://youtube.com/watch?v=5Yveq%2520%E2%80%B3%26gt%3B
Scheme for assembling struts for Granta vehicles
The video above (see pictures) shows:
• Attaching the upper part of the rack to the body mudguard;
• The stand itself is disassembled with a spring and upper support;
• Support bearing (there are several types).
The upper support serves to smooth out the loads coming from the wheels through the shock absorber onto the car body and distribute them evenly.
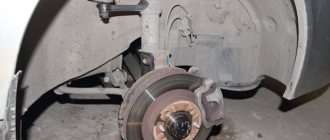
Support bearing wear
With use, the support bearing wears out and grinds, creaks, knocks, and the most dangerous thing is when play appears. All this is reflected in the condition of the rack itself and the entire wheel assembly.
So, if you lift the car on a lift and move the wheel sideways, right/left, you will notice a large free play of the entire assembly, which will tell us that the support bearing requires replacement.
If you look from above, where the shock absorber rod is attached, you will notice its movement from side to side. You can also place your hand on the top of the shock absorber where the rod nut is located. In this place the play is clearly felt.
When the bearing balls wear out, the load on the front suspension elements increases and the vehicle's handling deteriorates. Consequently, all this negatively affects overall traffic safety.
Replacing the rack support
https://youtube.com/watch?v=VLNGuUsv4DM
To replace the support bearing, the strut must be removed from the car, disassembled, after compressing the spring with special ties. The faulty support is removed, a new one is installed, the rod fastening nut is tightened, the ties are removed and the stand is installed on the car.
After replacing the supports, it is recommended to check the wheel alignment on a stand to check the wheel alignment angles.
That's all, write comments. Goodbye!
In this article we will get acquainted with a small but very important component of a car's suspension - this is the front strut support bearing (in common parlance, a support bearing).
Let's try to find out why it is needed, what threatens it, and how to determine that a part requires replacement.
There is not a single unnecessary part in the machine, so if at least one of them fails, this can pose a threat to its overall performance. As a rule, a harbinger of malfunctions can be:
- changes in vehicle behavior;
- the appearance of extraneous sounds and knocks;
- unusual vibrations.
There is a common point of view - a good knock will always appear, although the fruits of such a result often turn into expensive repairs or more tragic consequences.
Malfunctions
The main sign of a failed support bearing is a knocking sound (dull knocks) in the area of the shock absorber strut. It may indicate that:
- the rubber gasket is damaged or deformed;
- The bearing itself is damaged.
Failure of the support bearing may occur due to:
- resource spent;
- penetration of dirt and moisture;
- exceeding permissible loads;
- mechanical damage due to shock absorber malfunctions.
How to identify a malfunction
To diagnose a support bearing failure, open the hood and remove the “cup” cover. Place your palm on the shock absorber housing and rock the front of the car. If you hear a knock and feel the corresponding vibration with your hand, the bearing is clearly faulty.
When to change
The service life of the “supports” is on average 50-100 thousand km, depending on the conditions in which the car is operated. After this resource has expired, it is recommended to change them. Replacement is also necessary if any malfunctions are detected.
Late diagnosis, as well as ignoring bearing failure, threatens to destroy the shock absorber structure and other suspension elements.
What is this?
It is not uncommon for owners of the domestic “fourteenth” VAZ model to notice that a knock occurs in the A-pillars. The reason for its appearance is failed support bearings.
Support rod brand SS20
But you don’t need to start replacing right away. The first priority is to check the condition of the support. And only then take appropriate actions.
In analysis
There are several types of supports:
- A bearing with an integrated inner or outer ring. No clamping flanges are required for its installation. There are corresponding holes for installation;
- With detachable outer ring;
- With detachable inner ring;
- Finishing and cutting structure, the characteristic feature of which is its strong rigidity.
How to change a support bearing without a wheel alignment on a Lada Kalina
Replacing the support bearing on Kalina without removing the strut is impossible, or will not be correct, but replacing the part without further camber is still possible. In this case, the technology for removing the rack will change:
- After removing the wheel, unscrew the hub lock nut.
- Disconnect the steering knuckle from the ball joint and steering rods.
- Then we remove the steering knuckle from the CV joint with the strut and shock absorber spring, this way you will not break the camber bolts.
Why you shouldn’t delay repairs
When the OP has completely crumbled, you can continue moving. But driving with a damaged bearing dramatically accelerates the wear of other suspension parts. In addition, usually with this breakdown the geometry is disrupted - alignment and camber. This not only causes accelerated tire wear, but can significantly reduce the car's handling. This increases the risk of an accident. Therefore, it is not recommended to drive for a long time with damaged bearings.
Every car owner needs to know this.
The supports themselves do not require maintenance and last a long time. But it is necessary to change the worn-out part on time. A serviceable car is the key to safety on the road!
Replacement
- jack;
- wheel wrench;
- open-end wrench 19;
- open-end wrench 17;
- socket wrench 13;
- pliers;
- ring wrench 22 and open-end wrench 9;
- special puller for tie rod ends;
- 2 special spring ties.
Execution order
- We park the car on a level surface and put it in gear.
- We jack up its front part on the desired side and remove the wheel.
- Using pliers, unscrew the nut securing the steering tip to the strut and unscrew it with a 19 mm wrench.
- Using a tip remover, remove the tip pin from the shock absorber strut. As a last resort, the finger can be knocked out by prying it up with a small pry bar and carefully tapping it from below.
- Using a 19mm wrench, unscrew the 2 nuts securing the strut to the steering knuckle. If necessary, hold the bolt heads with a 17 wrench.
- Using a 13 mm socket wrench, unscrew the 3 nuts securing the support to the body.
- We remove the entire shock absorber.
- We install two ties on the shock absorber spring and compress it until the upper part of the shock absorber is released.
- Using wrenches 22 and 9, unscrew the upper support nut on the upper side of the shock absorber.
- We remove the support, disassemble it, and remove the worn support bearing.
- We install a new one in its place.
- We install the shock absorber in the reverse order.
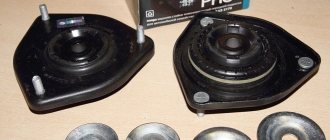
Upper front strut support for Kalina - features of choice
As practice shows in most cases, the upper support assembly is replaced. There are three models of “supports” on sale, which you should pay attention to when purchasing.
The photo below shows original sets of supports from three companies: SEVI. SS20 (SS20), ASOMI (ASOMI). The cost of products varies from 2000 rubles. up to 4000 rub. depending on the configuration.
Watch the video on spare parts review: Comparison of Lada Granta support bearings with EUR
Replacement strut support for Lada Kalina
How to replace support brackets on Kalina yourself
To replace the bearing, in addition to a standard set of keys, you will need special pullers to remove the support and spring tensioner.
Unscrew the support and remove the stand
So, in order to unscrew the support we need a special key. With its help, we can easily unscrew the fastening nut as shown in the photo below.
We put a special wrench on the support nut; for ease of unscrewing, we will need a larger lever (a regular one with a diameter will do). We begin to unscrew the support as shown in the photo.
If you don’t have a special tool at hand, then take a regular 22mm socket wrench and put it on the nut, use a 9mm wrench to hold the rod from turning and unscrew the fastening nut. After we have unscrewed the nut, we proceed to remove the shock absorber strut.
Disconnect the brake hoses that are attached to the strut. Next, unscrew the two bolts securing the strut to the steering knuckle. To easily unscrew them, we recommend spraying them with penetrating lubricant or WD40 and letting them sit for a couple of minutes. After this, you can easily unscrew the bolts without fear of stripping the threads.
Next, unscrew the nut securing the steering end to the strut. This can be done either using a special puller as shown in the photo, or knocking the tip out of the rack with a hammer. Now all that remains is to unscrew the 3 upper bolts securing the strut with the support to the body and pull it out.
Removing the old and installing a new support bearing
After we have removed the strut, we take two spring ties, put them on the spring and begin to tighten them until we can unscrew the nut. After unscrewing the top fastening nut, you can easily remove the support along with the bearing, cup and rubber band. If the anther is intact, you can leave it alone.
We take a new support bearing, put it on the stand and assemble it in the reverse order. Instead of factory rubber bands, you can install sound insulators from SS20, which are said to prevent squeaking. After we have assembled the rack with the new support, we remove the spring ties and install it in place.
Article rating:
Which support bearing is better to put on a viburnum Link to the main publication
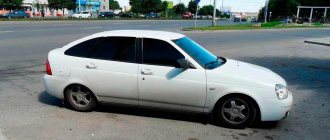
Ways to increase the clearance of Largus
The domestic station wagon is very popular due to its unpretentiousness and reliability. One of the important indicators is solid ground clearance. Transporting goods with these vehicles is a common occurrence. And this inevitably leads to an increase in the load on the suspension, namely on the shock-absorbing struts, which sag due to weight, resulting in a decrease in ground clearance.
We must not forget the quality of Russian roads. It is sometimes impossible to move through potholes and potholes without damaging the suspension. In any case, the amount of ground clearance in this regard is crucial. Because of these factors, many Largus owners try to increase the ground clearance with their own hands. Today there are several ways to do this inexpensively and quickly.
Increasing ground clearance with your own hands
In order to increase ground clearance (suspension lift), car owners use several basic techniques:
- installation of wheels or tires with a larger radius;
- installation of special spacers for shock-absorbing struts;
- replacing the springs with stiffer ones, as well as installing extended shock absorbers.
Some people use air suspension for these purposes. From the point of view of rationalism (and Largus is mainly used by people who prefer the practicality of a station wagon), this is unjustified. Firstly, the equipment is expensive, and secondly, not every car owner can install air suspension with his own hands. Plus, the compressor and receiver will take up useful space in the trunk, which is again impractical.
Overview of the main shock absorber manufacturers
By default, hydraulic ones from SAAZ (Skopovsky Automobile Plant) are installed from the factory. They are not particularly distinguished by their quality, but with moderate use they can last up to 60,000 km.
- Kayaba : Japanese, characterized by high quality, reliability, and long service life. When purchasing, be careful, as some of the products are made in China.
- ASOMI: domestic manufacturer for GAZ, VAZ, LADA models. One year warranty from the date of installation. Judge the quality for yourself.
- SS (SS): also a domestic manufacturer of racks for VAZs. Quality guarantee for two years, according to the owners' reviews, they are not bad, a little harsh.
In general, all shock absorbers are divided into three categories:
- Highway;
- Standard;
- Sport.
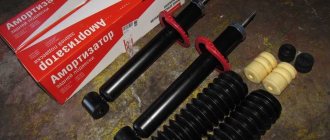
Sequence of actions when replacing the front shock absorbers of a Lada Granta with your own hands
We prepare a set of tools, rags, WD-40 fluid, a set of new racks, and other components for related repairs.
- We place the car within the perimeter of the repair area, jack it up, and secure the rear row of wheels with wheel chocks;
- We remove the wheel, disconnect the tie rod end, the ball joint;
- We loosen the rod (key to “9”), while holding the main nut to “22”;
- With a key set to “13”, unscrew the three nuts securing the upper support;
- In order to minimize the violation of the camber angle - wheel toe, we use a chisel to mark the relative placement of the steering knuckle and the bracket;
- Unscrew the bolts at the bottom of the fastening (key set to “17”);
- We remove the Grant shock absorber assembly;
- Use a puller to compress the spring several turns.
Removing the shock absorber strut and disassembling it
We remove and disassemble the shock absorber strut when it is necessary to replace the upper support, bearing, spring, and telescopic strut. The telescopic stand is non-removable and cannot be repaired. We carry out the work on an inspection ditch or overpass, but you can get by on a flat platform. There are two options for removing the shock absorber strut. The first allows you to avoid subsequent adjustment of the steering wheel alignment angles, the second method requires less work, but after it requires adjustment of the steering wheel alignment angles. We replace the telescopic stand according to the second option. In the first option, remove the strut together with the steering knuckle, without loosening the nuts of the upper (adjusting) and lower bolts securing the strut to the steering knuckle. At the same time, disconnect the tie rod end from the swing arm of the shock absorber strut (see below). We disconnect the ball joint from the steering knuckle (see “Removing the ball joint”). We remove the outer CV joint from the wheel hub (see “Removing the front wheel drives”), and also remove the pad guide with the caliper and cylinder (see “Replacing the front wheel brake disc”).
Algorithm for self-replacement of rear struts of Lada Granta
- We fix the front wheels with wheel chocks and engage first gear;
- We fold the back row of seats for ease of maintenance;
- We pry off the rubber plug of the rear glass and remove it;
- Unscrew the upper shock absorber fixing nut;
- Jack up the rear wheel and remove it;
- We hang the side of the car at such a height that the beam has free movement;
- Unscrew the lower fastening, remove the eye from the seat;
- Remove the shock absorber assembly;
- Using a crab puller, compress the spring and remove the boot.
Replacing the Lada Grant strut with a new one, assembling the parts in the reverse order. When moving the rod in the upper position, it will be difficult to get into the hole; an assistant may be needed.
Replacing support bearings without removing the strut
- Jack up the car and remove the wheel;
- Using a crab puller, compress the spring several turns;
- In the engine compartment, unscrew the three nuts securing the support bowl to the glass;
- Unscrew the steering tip and unscrew the nut;
- Lower the shock absorber assembly down;
- We remove the support bowl and replace the Granta strut bearing.
The repair is completed by reassembling in the reverse order.
Grant strut spacer. For what. What is the price
The strut of the rear struts of the Grant is carried out by analogy with the front ones. The cost of the budget option is from 850 – 900 rubles. More complex designs from 1500 rubles. Everyone determines their effectiveness independently.
Repair, pumping of racks or replacement with new ones. Is there any reason
The difference in cost between replacement and partial repair is only 30 - 35%. If you have a very limited budget, then give Grant shock absorbers for pumping. If you have sufficient funds, buy new ones.
Reupholstering does not always give a positive result; sometimes the service life is several thousand kilometers.
Oil or gas-oil as a filler for racks
Reviews
| № | Positive |
| 1. | Mikhail, 36 years old : I’ve been using the car for two years now, no comments. The chassis and suspension work properly, everything is original, nothing has been changed. I've heard some negative things about the racks, but I don't agree. |
| 2. | Kirill, 33 years old : recently carried out maintenance, the master recommended replacing the rear struts. I didn’t invent anything, I bought my native SAAZ. |
| 3. | Vasily, 41 years old : the car is old, since 2011, I repair it myself. The other day I replaced the suspension - all four shock absorbers and springs. Since the old ones lasted a long time, I bought similar ones from SAAZ. |
| 4. | Gennady, 32 years old : I’m leaving my positive review on the original racks for Grant. Those who spoke negatively may have gotten into trouble, but everything is fine with me. My advice. |
| Negative | |
| 1. | Martin, 39 years old : after the first 50,000 km. The original shock absorbers fell off. I didn’t make a mistake the second time, I bought a HOLA SH22-270G. I ride, enjoy, no problems. |
| 2. | Victor, 34 years old : I don’t trust standard shock absorbers, I replaced them immediately after buying the car. I heard negative things and decided not to try it. Installed Trialli AH01510. |
| 3. | Vitaly, 29 years old : I work as a taxi driver, driving a car day and night. Two months ago I replaced the racks with the same original ones. Already dissatisfied, they began to rattle, no quality. I will change to Pilenga. |
| 4. | Konstantin, 27 years old : on the advice of a friend, I replaced my original shock absorbers with BOSCH ones. I didn’t try my luck; I heard a lot of negative things. |
Conclusion
Is it possible to save money when purchasing
Trying to save money on shock absorbers is not a wrong concept, especially if the driver is neat and takes good care of his car. Why not purchase non-original spare parts, especially since the price difference is significant with Chinese products. Of course, manufacturers from China have recently greatly improved the quality of automotive components, but you shouldn’t rely on estimates, it’s better to calculate and check everything.
How often should shock absorbers be changed?
So, let’s take the Japanese brand KYB as the original; one Excel-G shock absorber from this company costs 2.5 thousand rubles, together with the installation of steam it will cost 7 thousand. In defiance, we take the Chinese equivalent for a thousand rubles, a pair will cost 4 thousand. In total, we saved 4 thousand. The service life of Chinese shock absorbers is 25 thousand maximum, that is, in a year and a half they will have to be changed again, and that’s 4 thousand again, plus adjustment and balancing. Japanese is enough for 4.5 years. During this time, 12 thousand will be spent on cheap shock absorbers, plus the cost of adjusting the suspension and balancing.
It is necessary to regularly check your shock absorbers for calm and safe movement on our roads.
Your car has traveled more than 80,000 km and you have never checked the shock absorbers?
Do your car tires have worn out areas and the slopes wear out very quickly?
Does your car “sag” when passing sharp turns?
Did you begin to feel every bump and hole while driving and the car began to behave uncertainly?
Are the shock absorber body and rod coated with oil?
If you answered “yes” once to any of the questions, immediately check yours and find out when you need to change the shock absorber.