The car engine is equipped with a special element that supports the system as a whole - this is a phase sensor. Its location is an area on the engine head, on the left side. Function – determination at a specific moment of the rotating angle of the camshaft Kalina 8 valves (or 16). While carrying out its activities, the device wears out and becomes unusable, so it has to be replaced. This happens for many reasons. To understand how to choose a new product, dismantle a broken one and install a new part, you need to study the information below.
If the mechanism is not replaced in a timely manner, problems arise with the correct functioning of the engine. This leads to additional waste and resulting problems in the system.
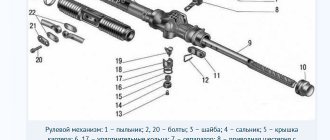
Replacing the phase sensor on a Lada Kalina with your own hands
First of all, a little about the tools that will be needed to perform this type of repair. Fortunately, here you can get by with just a 10mm wrench. But it is best to use a socket with a crank, or even more conveniently, a ratchet. It will just be quite inconvenient to do this with a regular key.
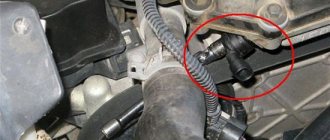
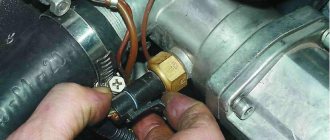
First, it’s worth showing clearly where all this is located:
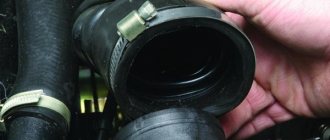
So, first you will need to disconnect the power plug, after first squeezing the plastic latch and lifting it up a little:
Then use a ratchet to unscrew the bolt securing the Kalina phase sensor:
And now you can freely remove it by pulling it towards the windshield:
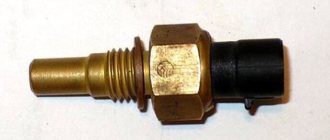
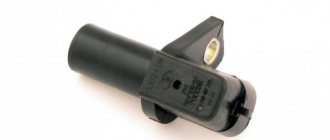
And this is what this part looks like when removed from the car:
After this, we replace the camshaft sensor and put the new one in its original place. There are absolutely no difficulties during the work process.
Its retail price ranges from 250 to 300 rubles, depending on where you buy it. Of course, this part fails quite rarely on Kalina, but still, these instructions will not hurt anyone.
About the so-called phase sensor on Kalina with 8 cells. 1.6 liter engine. Mileage 180 thousand. The engine is in perfect order. The signal indicating a malfunction of this particular sensor came on (the tester did not detect any more problems). First, CHECK went out after 10-15-20 minutes. drive. Then this time extended to half an hour, an hour. But still - it went out. Now it doesn't go out at all. I've been driving like this for about two to three months. I just did the diagnostics yesterday. Why ? The car has moved! The dynamics have clearly improved in all (.) modes. Fuel consumption decreased from 8.3 to 8.0 liters. The driving mode is standard and does not change from year to year. It is clear that it is now closer to summer, and consumption should decrease. But according to the physics of the matter, if the dynamics can improve, it is really due to an increase in fuel consumption. Reference: the average (multi-month) consumption has never fallen below 8 liters. What kind of standby modes are these that, in fact, seem to be better than the standard one? A friend, an excellent motor mechanic, albeit on marine diesel engines, suggested that due to the lack of afterburning (or whatever) exhaust in the cat. neutralizer - because the standard one has fallen apart, and naturally there is an empty collector in its place - the engine is well fed, everything is good, and everything that it doesn’t need goes straight into the atmosphere, without any extra hassle. Diagnostics does not show a malfunction of the lambda probe. He is the only one in the state, naturally on site. Straight up, miracles. Or would you say, replace this sensor? Should I go even better? But I repeat, the driving mode is absolutely standard and less than 8 liters. Over the 10 years of operation, the display showed very rarely, and not for long.
Camshaft and crankshaft sensors on Lada Kalina (8 valves): description and replacement nuances
The camshaft sensor Kalina 8 valves becomes unusable from time to time. This can happen for various reasons, but the result is the same - the part needs to be replaced. The situation is similar with the crankshaft position sensor. You will learn in the article how to dismantle old and install new elements of a car of this type.
Phase sensor (camshaft position)
Camshaft Sensor You will find this part on the left side of the cylinder head. The operating principle is quite simple. There is a special pin on the camshaft itself. When it passes by the sensor, but sends a signal to it. This moment corresponds to compression of the piston of the first cylinder.
The controller determines the camshaft angle. This is important information for machine systems and sensor failure has certain consequences. The information is sent to the vehicle's ECU, which uses it to control the ignition and fuel supply to each cylinder.
In what situations is replacement required?
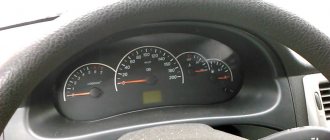
If this part fails, you will see a “Check” indicator on the vehicle’s instrument panel. This is how the ECU signals the driver that the engine needs to be checked. At the same time, the fuel supply pattern changes - it goes to all cylinders simultaneously and, as a result, consumption increases.
The cause of the breakdown may be mechanical damage, as well as other things. There is no point in trying to repair the old unit itself - it costs little and you will waste more nerves and time.
In the video below you will find instructions for replacing this part (the author of the video is Alexandr V).
Replacement instructions
To replace the camshaft sensor, you only need a "10" key. It is better to use a socket with a collar or a ratchet. It will be inconvenient to work with a regular key, although it is still quite possible.
The dismantling and installation procedure is as follows:
- First, disconnect the block with wires by pressing the latch and slightly pulling it up;
- now, using the key, unscrew the part itself;
- it can be pulled out by slightly pulling towards the windshield;
- installation is carried out in the reverse order of steps.
There are no difficulties in this process, but be careful not to damage both the block with wires and the connector for the controller itself on the cylinder block.
Crankshaft position sensor
Crankshaft position corrector separately Although this controller fails quite rarely, its failure can lead to the most unpleasant consequences. You may simply end up in the middle of the road with no way to continue driving.
This element is installed on the oil pump cover. The DPKV transmits information to the ECU so that it can synchronize the fuel supply. Inductive type sensor. As mentioned above, it rarely fails, but this becomes a big problem.
In what situations is replacement required?
If this DPKV is completely out of order, you will not be able to start the engine at all.
But even if it just works intermittently, this can be recognized by a number of signs:
- poor engine starting;
- unstable work;
- power reduction;
- detonation with increasing load.
If you notice such signs and there are no other reasons for them, change the sensor. You can check it by testing the resistance of the windings. If the ohmmeter readings differ from 550-570, then the part is faulty. Fortunately, it costs little and replacement can be done very quickly.
Replacement instructions
To replace this part, you will again need a "10" key and nothing else.
- Turn off the ignition. Then disconnect the wire block by pressing the latch.
- Now, using a wrench, unscrew the fastening bolt.
- All that remains is to remove the old DPKV and install the new one in the reverse order.
avtozam.com
What is the sensor for?
Using the phase sensor on the Kalina, it is possible to determine the engine operating cycle and generate a certain signal. This device is an integral element, in other words, it contains a sensing component and a signal converter. The working part of the sensor operates on the Hall effect. It responds to changes in the magnetic field. The secondary circuit contains a bridge circuit, as well as a special operational amplifier and a transistor stage. And the latter is carried out according to an open collector circuit.
Using a phase sensor (VAZ-2114 or on any other model), the moment of fuel injection is selected only into the first cylinder, and based on this, into all the others. The camshaft makes it possible to determine which valve is in the open position and which phase of operation is taking place. If the sensor malfunctions, an error light appears on the on-board computer, and engine operation goes into emergency mode. Work is carried out only according to the signal that comes from the crankshaft position sensor.
Design and types of camshaft position sensors
In cars you can find three types of phase sensors:
- based on the Hall effect;
- induction;
- optical.
American physicist Edwin Hall discovered in 1879 that if a conductor connected to a direct current source is placed in a magnetic field, then a transverse potential difference arises in this conductor.
A DPRV that uses this phenomenon is usually called a Hall sensor. The device body contains a permanent magnet, a magnetic circuit and a microcircuit with a sensitive element. A supply voltage is supplied to the device (usually 12 V from a battery or 5 V from a separate stabilizer). A signal is taken from the output of the operational amplifier located in the chip and sent to the ECU.
The design of the Hall sensor can be slotted
In the first case, the teeth of the camshaft reference disk pass through the sensor slot, in the second - in front of the end.
As long as the magnetic field lines are not overlapped by the metal of the teeth, there is some voltage on the sensitive element, and there is no signal at the output of the DPRV. But at the moment when the reference crosses the magnetic field lines, the voltage on the sensitive element disappears, and at the output of the device the signal increases almost to the value of the supply voltage.
With slotted devices, a drive disk with an air gap is usually used. When this gap passes through the magnetic field of the sensor, a control pulse is generated.
As a rule, a toothed disk is used together with the end device.
The reference disk and the phase sensor are installed in such a way that the control pulse is supplied to the ECU at the moment the piston of the 1st cylinder passes the top dead center (TDC), that is, at the beginning of a new cycle of operation of the unit. In diesel engines, pulse formation usually occurs for each cylinder separately.
The Hall sensor is most often used as a DPRV. However, you can often find an induction-type sensor, which also has a permanent magnet, and an inductance coil is wound on top of the magnetized core. The magnetic field changing as the markers pass creates electrical impulses in the coil.
Optical-type devices use an optocoupler, and control pulses are generated when the optical connection between the LED and the photodiode is interrupted when passing the reference points. Optical DPRVs have not yet found widespread use in the automotive industry, although they can be found in some models.
A malfunction in the crankshaft position sensor leads to jerking of the car in different modes, to failures and difficulty starting the engine. These malfunctions can also occur for numerous other reasons, which can be identified using diagnostic devices. But the main signs of a faulty DPKV on a fuel-injected car are prolonged engine starting or lack of starting.
Over time, the wires going to the DPKV chip wear out. Located in the lower part of the engine and not far from the front wheel, as a result, dirt, snow, oil, and aggressive chemical media in the form of salt get on the DPKV and its chip and settle, which leads to slow oxidation of the wires on the chip and subsequently to their breakage. Since the wires from the chip are combined into a single bundle, when replacing it, a repair chip is provided with protruding two wires 15 cm long. Having removed the damaged chip, install a new one with a twist. The twist points are insulated using heat shrink or electrical tape.
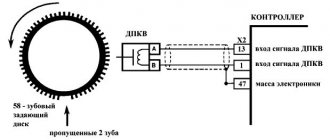
From the diagram below it can be seen that their pinout is not complicated and two wires are directly connected to the signal input contacts in the control unit, passing along the entire length of the harness. The polarity of the connection between the signal wires of the sensor and the control unit must be observed. If the polarity is reversed, the synchronization system will not work. To restore the operation of the DPKV, you simply need to swap the wires and check the functionality by starting the engine.
vote
Article rating
Features of phased injection
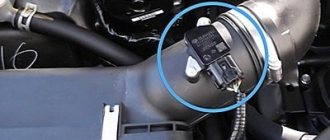
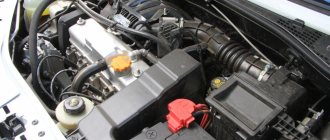
The phase sensor on the Kalina and Priora engines is located in the upper part. It's next to the air filter housing. The operation of phased injection is characterized by the following features: an impulse is sent from the phase sensor to the electronic engine control system. The latter controls the fuel supply, as a result of which the injector opens and the fuel-air mixture enters the combustion chamber immediately before the intake valve begins to open. As soon as the valve opens, air is sucked in and the fuel mixture enters the combustion chamber.
How can you tell if the sensor is faulty?
The following symptoms will help identify device malfunctions:
- When you try to start the engine, the starter rotates for 3-4 seconds. Only after this the engine starts, but the error message comes on. The bottom line is that when you try to start the engine, the sensor is polled, but the electronic control unit does not receive the signal and switches to work using only the data received from the reader in the crankshaft.
- Fuel consumption increases.
- The car's dynamics deteriorate. Be sure to carry out diagnostics, as the fault may also be in the mass air flow sensor.
- Failures occur during self-diagnosis of the control system.
Smart choice
The Lada Kalina 8 valve has certain differences from the 16 valve engine. However, automotive specialists sometimes install a mechanism with 8 valves to 16, and the engine works correctly.
- form;
- connector size.
To avoid situations of inconsistency, purchase a mechanism according to the characteristics of the engine
No need to pay attention to the manufacturer's markings. The spare part number according to the VAZ catalog (Granta, Largus, Kalina, Priora) will always be the same:
- engine with eight valves - 21110370604000;
- 16-valve – 21120370604000.
Definition of failure
The device is located close to the cylinder head, on the power unit. It is easy to understand the first signs of poor functioning of the mechanism, especially for an experienced car enthusiast.
Here are the main criteria for recognizing a breakdown:
- a light comes on and goes out, designed to constantly monitor the engine while turning the ignition key in the car;
- “Check engine” lights up on the dashboard after the starter makes three to four revolutions and the engine comes into action. The sensor will be triggered if the electronic control unit does not receive the necessary information and has to use data from the DPKV;
- engine dynamics become worse - the vehicle slowly picks up speed (this is easy to notice when driving downhill). In this case, there are three reasons for the problem. The first - the camshaft sensor is broken, the second - the mass air flow sensor is broken, the third - the compression is reduced;
- high fuel consumption - this “symptom” is not very accurate and has a number of possible causes. You shouldn’t take it as a separate criterion for a problem, but you can use it as one of several.
Device design
The phase sensor of the Priora and any other car is an integral mechanism, the functions of which include obtaining all kinds of information about the engine operating cycle, as well as transmitting a signal to the electronic control unit using special pulses. The sensor design consists of 2 parts.
This is a Hall effect sensing element and a small transducer. The sensitive element responds to changes in the magnetic field. The sensor is located at the end of the cylinder block, not far from the air filter. There is a metal disk on the camshaft that is necessary for the sensor to function properly.
Purpose and functional load
Sensors on Kalina 8 valves are designed to constantly monitor the angular part of the timing belt in the position of the power unit from the crankshaft. The control mechanism receives the necessary information and then processes it. As a result, fuel is injected and the ignition is controlled.
The product is based on the Hall principle - measuring movement (direction), changing charge carriers. Then, during the period of time when the magnetic field is crossed by the semiconductor, the information received is recorded. The field is generated by a magnet located in the device. The shaft wheel has a metal tooth that runs near the device. At this time, a pulse appears, transmitted to the electronic control unit.
The ECU helps receive pulses arriving at different time intervals, analyzes them, recognizes the location of the VIT piston in space, and then issues commands for injection and ignition of the fuel mixture.
The mechanism begins to work from a spark hitting the spark plugs when the exhaust gases are compressed and released. These systems depend on the functions that the crankshaft sensor performs.
Sensor errors
If symptoms of a faulty phase sensor appear and the engine error icon lights up, it is advisable to diagnose the control system. If you have an on-board computer, then on it you will be able to see errors with numbers 0343 or 0340. But do not rush to change the device immediately, it is quite possible that there is damage to the wires with which it is connected to the computer. Very often the sensor simply becomes dirty, which makes it impossible to read information. But if, after checking the sensor, a malfunction is discovered, you need to purchase a new one and install it. The cost of the device is no more than 600 rubles.
How to check sensors on 16-valve engines?
The diagnostic procedure for 16- and 8-valve engines is approximately the same.
In order to check the serviceability, you must perform the following steps:
- Set the multimeter to voltage measurement mode. The threshold can be set at 20 V.
- A 13.5 Volt constant voltage source must be connected to contact “E”.
- In this case, the voltage at terminal “B” should be 0.4 Volts.
- Bring a metal object, such as a screwdriver, to the active part of the phase sensor. If the device is working, then the voltage at output “B” will rise to 0.9 Volts.
- If you remove a metal object from the active element, the voltage at terminal “B” will return to its original position.
Diagnostics on an eight-valve engine
Please note that sensors for 8 and 16 valve engines are not interchangeable. Therefore, when purchasing, pay attention to this nuance. To diagnose phase sensors, you must perform the following manipulations:
- Connect a 13.5 Volt constant voltage source to contact “E”.
- There should be a voltage of 0.9 V at pin “B”.
- After bringing a metal object to the active part of the device, the voltage will decrease to 0.4 V.
- If you remove the metal device, the voltage will return to 0.9 V.
Let's sum it up
It will take no more than 1 hour to complete the entire complex of manipulations. No need to rush! Plastic clamps break easily, so we avoid strong tugging on their frames.
Note that when a camshaft sensor fails, this is an extremely rare occurrence, but in such an unpleasant circumstance, the owner of a Lada Kalina 8 valve must show all his experience and maximum care, and then the replacement will be successful.
Sources
- https://nadouchest.ru/datchik-faz-kalina-8-kl-priznaki-neispravnosti/
- https://zapchasti.expert/datchiki/datchik-raspredvala/datchik-raspredvala-lada-kalina.html
- https://osensorax.ru/posiciya/datchik-faz-kalina-8-klapanov
- https://vaz.today/vybor-ustranenie-nepoladok-i-zamena-datchika-faz-na-kaline
- https://avtozam.com/vaz/lada-kalina/datchiki-raspredvala-i-kolenvala/
- https://FB.ru/article/357432/datchik-faz-kalina-zamena-datchika-faz
- https://Vaz-Lada-Granta.com/kalina/motor-i-korobka/datchik-raspredvala.html
Replacing the device
If the device breaks down, there is no point in repairing it. It is much easier to replace the phase sensor, fortunately you will spend a few minutes on it. To carry out repairs you need a 10 mm socket and a ratchet. The procedure looks like this:
- Disconnect the negative terminal from the battery.
- Unscrew the sensor fixing bolt on the engine block and disconnect the block with which it is connected to the electrics.
- Clean all contacts on the block and install a new sensor.
If the wiring is completely intact and there were no problems during installation, all errors will disappear on the on-board computer. The engine will switch to phased injection mode.
Replacing the device with a new one
This is an easy process that can be handled by a person with little experience in this type of work. If you don’t have time to do such activities yourself, you can always turn to a competent specialist.
To replace you will need:
- key for ten;
- high quality phase sensor.
Stages of the repair event:
- after squeezing the plastic clips, turn off the power;
- the fastening type bolt is unscrewed;
- removing the device itself;
- analogue is inserted;
- connection to the system.
These manipulations will not take more than an hour. It’s better to take your time to do everything well, and also not to break the plastic clips.
Failure of this mechanism is a rare occurrence. But it can happen to anyone, so it’s better to understand the reasons and know how to troubleshoot.
Mounting block VAZ-2110. Location of fuses and relays
Finding the cause of error P0340
Using a diagnostic scanner, you need to make sure that there is an error. After this, you can begin to search for the culprit of its appearance:
- Check the DPRV wiring (between the connector and the sensor) for damage, short circuit or corrosion.
- Check the sensor connector for mechanical damage or corrosion.
- Check the wiring from the connector to the ECU for damage, short circuit or corrosion.
- Eliminate the causes of other errors that are stored in the ECU memory, which may be related to the operation of the DPRV.
- Use a scanner or oscilloscope to check the voltage of the DPRV for compliance with performance indicators (individually for each car).
- If the DPRV voltage readings are incorrect, the sensor must be replaced.
- If the voltage reading is within the normal range, the engine control module may be faulty. It may need to be replaced or reprogrammed.
Common mistakes when diagnosing P0340
Before replacing the DPRV, it is very important to carefully check the wiring and connectors of the sensor to eliminate these causes of malfunction. Very often this is not done, and replacing the sensor does not help solve the problem.
Another common mistake is that the diagnostician does not take into account the problem with the presence of misfires or a malfunction of the crankshaft position sensor (CPS). These factors can cause the P0340 code to appear.
Signs of breakdown
The camshaft sensor on the Lada Kalina determines the position of the gas distribution mechanism in a short period of time. This is necessary to issue a command to the engine control unit and for fuel to enter the system. The valve sensor determines how the first cylinder is positioned and synchronizes the ignition. You can understand that it is faulty by the following points:
- unstable operation of the motor,
- restarting the engine after stopping,
- increased fuel consumption,
- reduction in engine power,
- inactive acceleration dynamics.
It can be argued that the phase position sensor is broken and the phase sensor needs to be replaced if:
- the transmission is locked at one speed,
- indicators on the panel indicate system errors,
- The car moves jerkily and periodically stalls.
A malfunction is also indicated by the car accelerating to 80 kilometers per hour and the lack of engine starting after stopping.
Troubleshooting Methods
In order to remove error 0340, depending on the situation, you must implement one of the following tasks:
- restore or replace the DPRV wiring;
- repair or replace the camshaft sensor wiring connector;
- replace DPRV;
- replace DPKV;
- before replacing the sensor, be sure to solve the problem with misfires, if any;
- replace or reprogram the electronic engine control unit.
Additional Tips
The P0340 code is not always easy to diagnose. Before doing anything, be sure to check the basic wiring components. Also make sure that you are repairing or replacing the camshaft position sensor.
This is a fairly serious problem, as it affects engine starting and power. Damage to other components of the power unit is also possible if nothing is done about this error.
Self check
A common malfunction of an internal combustion engine with electronic injection is a malfunction of the camshaft position sensor. The list of signs indicating problems with the sensor includes:
- difficult starting;
- unstable engine operation;
- the engine shakes and runs intermittently;
- “check” light may light up on the instrument panel;
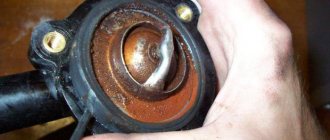
- The first step is to locate the DPRV mounting socket, which is installed in the cylinder head area. You must find a special O-ring at the installation site. This ring must be inspected, since damage to its integrity and other deformations can lead to sensor malfunctions.
- Additionally, you will need to inspect the sensor housing itself, as well as the gear rotor. The presence of damage or the presence of metal shavings also indicates a sensor failure.
- Next you need to examine the connector itself. Such a connector must have contacts: positive contact, negative ground, contact for signal transmission.
- Then you need to turn on the ignition, after which a voltmeter is used to measure the voltage at the positive contact of the camshaft position sensor. The tester ground must be connected to the engine ground. This voltage measurement should be similar to the voltage at the battery terminals. If there are deviations in the voltage readings compared to the power supply, we can conclude that there is a malfunction in the electrical power supply circuit of the camshaft position sensor.
- The voltage at the sensor ground is measured in a similar way. The voltage at the specified contact should be zero.
- Then you need to connect the positive and negative wires of the sensor. The middle contact of the sensor is connected through the tester. It turns out that one voltmeter probe is applied to the signal terminal of the sensor, and the other is powered to the input of the control system. To solve this problem, it is not uncommon for the signal wire to be cut and the multimeter probe to be applied to the exposed wires.
- The engine is then cranked by the starter. The working sensor will show voltage, which can range from 0.4 to 5 volts. Deviations from the specified values indicate the need to replace the DPRV.