Tuning and auto gadgets / From Sergey Vasilenkov
- What can and should be configured in the equipment of this company
- How to setup
Setting up for a subwoofer
- How to set up the radio
- Setting up the equalizer
- Turn on Bluetooth
- How to change language
- Turn off the demo
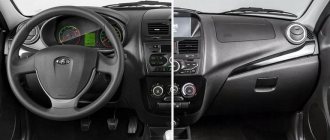
There is probably no car owner who, after purchasing a new car or a new radio, would not be faced with the need to configure it to obtain better and deeper sound. To do this, it is enough to perform a number of simple manipulations, which we will consider using the example of setting up a radio from Pioneer, which is very popular in Russia.
Why is it necessary to set up a Pioneer radio?
Before moving on to the process of setting up your Pioneer audio recorder, it’s worth understanding why you need to do this:
- This is done in order to maximize the audio capabilities of the head unit and the acoustics installed in the car.
- Knowing the settings will allow you to easily connect various external devices, eliminate wheezing and distortion of the audio composition, as well as change the interface language and other everyday characteristics, the correct configuration of which will make using the device more comfortable and understandable.
Incorrect adjustment of the radio can nullify the sound of even the most expensive and high-quality professional-level acoustics.
Installation instructions
DIY car stereo installation guide:
- After disconnecting the battery from the car, use a screwdriver to remove the old head unit. Depending on the design features of the center console, it may be necessary to remove decorative trim elements.
- The central part of the dashboard is being dismantled. On most modern cars it is convenient to do this by moving from right to left, after opening the glove compartment.
- Then the bolts securing the radio in the car and the air duct cover are unscrewed. If there is an alarm button on the central part of the dashboard and it is in the way, then it needs to be removed. The contacts with wires from the key are first disconnected.
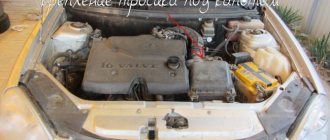
- The head unit is removed and the on-board computer screen is turned off if it is installed in the car.
- Then you can put the radio in the car; you need to install the head unit by connecting all the cables and sockets in accordance with the diagram.
How to connect a car radio?
To properly connect the radio to the speakers, perform the following steps:
- The main jack of the car radio must be connected to the connector for the speakers, subwoofer and amplifier (if the latter will be used).
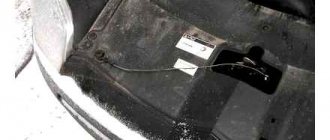
- Then the black cable is connected, which goes to the antenna. If the latter is not installed on the car, then it must be placed on the roof.
- The power cord is being connected. If the vehicle was equipped with an audio system, then the cable is connected to the appropriate socket. If this output is not available, you must run a cable from the battery or ignition switch to the installation site of the radio. Wires are laid under the interior trim.
- After connecting all the components, the head unit is installed in the center console. Before installation, it is recommended to bend the steel plates on the radio frame to fix the system more firmly. It is then covered with a decorative overlay.
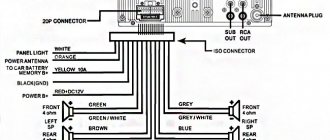
Wire marking
Purpose and description of ISO connector plugs
Pinout of wires on the connector by color:
- A yellow insulated cable is used to connect to the battery. The electrical circuit connecting to the battery must first be protected with a safety element.
- The red wide conductor must be connected to the ignition switch, this is necessary so that the radio plays when the key is turned. Do not connect the red and yellow cables to each other, so as not to discharge the battery.
- The wire in black insulation is “ground” or grounding; this contact must be connected to the body of the car.
- The blue-white cable is designed to control the operation of the subwoofer, amplifier and antenna.
- The gray pins should be connected to the front right speaker (to the positive output). A similar output with a black stripe must be connected to the same speaker, only with a negative terminal.
- The white insulated wire must be connected to the left front speaker, in particular its positive output. The contact with the black stripe must be connected to the negative pin of this column.
- The cable with green insulation goes to the rear left speaker, and the wire with a black stripe must be connected to the negative output of the speaker.
- The purple and purple-black pins are used to connect to the right rear speaker, specifically its positive and negative terminals, respectively.
Speaker connector pinout
Schematic diagram for connecting the Pioneer radio
1 din connection
If it is not possible to use an ISO connector, you will have to use a more complex connection method:
- Use a screwdriver to dismantle the decorative panel on the console.
- The blocks are removed from the cables and connected to the mating ones in the required places in accordance with the color scheme. The connection is made by twisting the contacts.
- Each connection point is insulated to prevent possible short circuits in the future.
- To increase reliability, the cables are additionally connected with special clamps.
- If the audio system is supplied with metal plates with lugs, they must be placed on the sides of the head unit. This will allow you to easily dismantle the radio from its installation location.
2 din connection
In general, this procedure is performed in a similar way, but there are several nuances:
- It is recommended to connect 2 din head units directly to the battery. Such a connection will ensure maximum power of the radio and reduce possible interference when using it. Connection to the ignition switch or cigarette lighter is not recommended.
- If the car does not have standard wiring from the battery, you will need a copper stranded cable with a cross-section of about 4.2 mm2. The wires included with the car radio are not suitable, since their cross-section is insufficient and can only be used for testing. The length of the power line must correspond to the distance from the installation site of the head unit to the battery. It is necessary to additionally install a 20 ampere safety device approximately 50 cm from the battery.
- When performing this task, twisting the wires for the 2 din device is not allowed. This connection method will cause interference and power loss.
- Connecting the cables with the battery is done only at the final stage, when all the acoustics are assembled and insulated.
Connection to multifunction steering wheel
Good to know
To connect the car radio to the steering wheel you will have to use a special adapter. Such devices can be universal or designed to connect certain brands of radios and cars.
Connecting the device is done like this:
- The battery is disconnected from the vehicle's electrical network.
- The standard audio system is removed, as well as the so-called pockets, if provided.
- Then you need to find an ISO output to connect the radio - an additional adapter for the steering wheel must be installed in it.
- The adapter wire is connected to the audio system, and the adapter itself must be connected to the ISO output.
- The steering wheel buttons are being configured.
- The battery is connected to the vehicle's on-board network.
What can and should be configured in the equipment of this company
Depending on the model of the audio recorder, the user has the ability to independently adjust parameters such as:
- equalizer;
- radio stations;
- menu language;
- time;
- enable or disable the Bluetooth wireless protocol (if available) and AUX;
- activation/deactivation of demo mode, etc.
Among all that has been said, special attention should be paid to setting the equalizer, as well as the radio, where the first is useful for those who like to listen to their own music, and the second for car owners who prefer radio stations to music from a disk/flash drive. Special adjustments are also required for the subwoofer.
Front and rear speakers
The next step is setting up the rear speakers. This must be done so that they work synchronously with the front ones.
Considering that the driver sits in the front of the car, the car radio equalizer should be adjusted so that the rear speakers work with a slight delay.
Ideally, this should be done by an audio system installer. If you installed the radio yourself, you can achieve clear sound by adjusting the parameters experimentally.
Setting up the car radio is completed by adjusting the sound distribution between the right and left speakers. Without changing these parameters, you will get the feeling that the right speaker is playing quieter than the left. To fix the problem, you need to adjust the radio so that the right speaker plays 10-15% louder.
Experts in the field of installation of automotive systems, giving advice on how to set up a radio, emphasize that after the process is completed, the listener should not determine the direction from which the sound is coming.
As a summary, it should be noted that new acoustics need time to reach normal operation. On average, this takes a month and a half. During this period, it is not recommended to turn on full volume and make fine adjustments. The rubber suspension of the speaker will soften during operation, after which further adjustments can be made.
A poorly tuned car radio will prevent you from enjoying your music. Therefore, it is necessary to know, for example, how to set up a Pioneer car radio or any other before you make your first trip with this speaker system.
First, let's talk about the most important consequences of incorrect settings. Setting the parameters incorrectly often results in the speakers cracking and wheezing. Also, often the sound from the rear speakers interrupts the front, thereby destroying the feeling of integrity of the entire speaker system. Often the left front speaker is heard much better than the right one, resulting in the 3D effect of sound being lost. It is worth noting that different brands of “Pioneers” have menus that may differ slightly from each other, and some items may not be available. However, the general strategy for tuning any car radio should be as follows.
Video: creating a budget combination of car radio + subwoofer for a car
Next, using the twist wheel or the movement arrows (depending on the model), we look for and go to the SW Kontrol item. After this, we find ourselves in the sub-item EAR SP FUL, which must be changed to SW using the arrow or knob, after which we turn off the radio.
After this, it is necessary to further configure the subwoofer, for which we turn on the radio again and go to the preset menu, where we look for and enter the SW SETTING1 item. Once in this submenu, you need to select one of three types of settings: NORMAL, REV and OFF. As practice shows, most users choose REV.
Next, you need to go back to the preset menu and select the SW SETTING2 sub-item, where we first indicate the frequency (recommended value 50 HZ), and then the power level (ranging from -6 to +6). In this case, you should choose the ranges based on the characteristics of the installed speakers and your hearing perception.
The last action in this paragraph is to regulate the loudness of the radio, for which we go to the menu and look for the LOUDNESS item, where we select the HIGH value.
How to set up the radio
There are three types of radio settings in Pioneer radios:
- Press or look for the FUNC button/menu in the menu, and then look for the BSM sub-item, which is responsible for automatically searching for radio stations. The search is activated by pressing the up or right key, after which the first station found will automatically turn on.
- While in receiver mode, which can be accessed by pressing the BAND button, hold down the right key and hold it for several seconds, then release it, thereby starting the process of scanning radio stations. After the station is found, scanning will be paused, after which the user can remember the radio station by pressing and holding the corresponding key - for example, 1. If the station is not needed, press the button to the right again, and the scanning process will continue.
- While in the radio station menu, briefly press the key/joystick to the right or left until the required wave of the radio station is found, then press the button (1–6) to memorize it.
High pass filter
Next we find the HPF (High-passFilter) item. This is a high-pass filter that cuts the frequency of the sound supplied to the speakers below their specified limit value. This is done because it is very difficult for standard speakers (13–16 cm) to reproduce low frequencies due to their small diaphragm diameter and low power. As a result, the sound is reproduced with distortion even at low volumes. By cutting the low frequencies, you can get clear sound over a larger volume range.
If you do not have a subwoofer, we recommend installing an HPF filter at a frequency of 50 or 63 Hz.
You can then exit the menu using the return button and check the result. It is better to do this at a volume of 30.
If the sound quality is not satisfactory, or if you are outdoors and want to have a loud disco, you can raise the lower limit from 80–120 Hz or more. It is recommended to use the same level of boundary cut if you have a subwoofer. These measures will allow you to increase the purity and volume of the reproduced sound.
There is also an adjustment for the frequency attenuation rate. On Pioneer it comes in two positions - 12 and 24 dB per octave. We advise you to set this indicator to 24 dB.
Video: finding radio stations on Pioneer tape recorders
Setting up the equalizer
To configure the equalizer, go to the EQ SETTING1 menu item, where you can set the signal amplitude level for mid, high and low frequencies. In the EQ SETTING2 item, which is also located in the main settings menu, the user can select the center frequency of the signal correction, as well as the width of the adjusted range. All this is available for HF, MF and LF.
To configure the equalizer, go to the corresponding menu
It is necessary to select settings based on the capabilities of the speakers and the personal preferences of the listener.
How to enable AUX
To activate the AUX mode, which is not active by default, you need to turn off the radio, and then turn it on by long pressing the FUNC button, after which we look for the inscription AUX: OFF and use the up/down buttons to select the AUX: ON item.
Equalizer
An equalizer allows you to make the sound more even - raise or lower the bass, mid and high frequencies. This is a rather fine adjustment of the audio system. It is not the entire sound range that is regulated at once, as in other menu items, but specific frequency bands. Different models have different numbers of them, depending on the class of equipment. There are five of them in Pioneer radios: 80 Hz, 250 Hz, 800 Hz, 2.5 kHz and 8 kHz.
The equalizer is located in the “Audio” section of the settings menu, EQ item. In it you can select one of the preset standard settings. For those who are not satisfied with these options, there are two sets of user settings (Custom). You can switch between them both from the menu and the EQ button next to the joystick.
To make changes to frequency parameters in a custom setting, you need to select it with the wheel and press the joystick. Then turn the wheel to select one of the equalizer frequency bands. Press the joystick again and set the position from -6 (attenuate frequency) to +6 (increase). By doing this you can make some frequencies louder and others quieter.
There is no universal recipe for setting the equalizer on the radio. It is performed by ear depending on the preferences of the consumer. In addition, different adjustment options are selected for a specific genre of music.
We can only give rough recommendations:
- if heavy music is played, it is worth increasing the bass - 80 Hz (but not too much, +2–+3 is enough). Percussion instruments sound around 250 Hz;
- for music with vocals, frequencies of approximately 250-800+ Hz are needed (male voices are lower, female voices are higher);
- for electronic music you will need high frequencies - 2.5-5 kHz.
Setting the equalizer is a very important step. Using this tool, you can improve the sound quality many times over. Even if the acoustics are not very expensive and of high quality.
Video: an easy way to make AUX on any car radio with your own hands
https://youtube.com/watch?v=z5MZmJoJimc
Important: entering the function menu can be done by holding down another button, for example, SRC or SOURCE.
Turn on Bluetooth
In order to activate Bluetooth, you need to go to the main settings menu and find the BT AUDIO sub-item there and select ON. After that, turn on Bluetooth on your smartphone/tablet and look for the radio.
After the radio is found, we connect to it, which may require entering the security key - by default “0000”.
How to set the clock
To set the clock, you need to enter the main settings menu, which can be done by turning on the turned off radio by holding down the SRC button or holding down the center button of the joystick. After which we find the CLOCK SET block, where you can set the format and the time itself. There is also a CLOCK OFF block in the menu, by changing the indicator you can enable or disable the time display on the device.
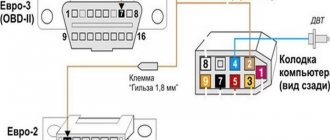
How to disable radio startup at startup and start from USB
rodrigez
Newbie
Good afternoon, colleagues on the iron horse. Last week I bought a Sportage 2013 petrol in pre-maximum. I'm very pleased with the car. One thing.
It is very annoying that when starting with the key the radio turns on.
- First when the key is inserted into the ignition
- When the car is started.
I don't really listen to the radio at all. Please help.
- How to disable the radio from starting when the car starts by default?
- Now I have to do 2 times 2 clicks to switch from radio to usb
- How to configure the system at startup so that it automatically starts from USB and not from the radio. Without pressing any buttons at all. Thank you!
michael2000
KIA club member
hello, please accept congratulations, but pre-maximum start button
hmm, strange, the radio should start from the media on which the ignition was turned off, try this:
started it, if the radio turned on, transfer it to USB, then manually turn off the radio. then turn off the ignition, then turn on the ignition (the radio should not turn on), then manually press USB
kukht
KIA club member
rodrigez
Newbie
rodrigez
Newbie
rodrigez
Newbie
hello, please accept congratulations, but pre-maximum start button
hmm, strange, the radio should start from the media on which the ignition was turned off, try this:
started it, if the radio turned on, transfer it to USB, then manually turn off the radio. then turn off the ignition, then turn on the ignition (the radio should not turn on), then manually press USB
Shamilek
KIA club member
Newbie
Good afternoon, colleagues on the iron horse. Last week I bought a Sportage 2013 petrol in pre-maximum. I'm very pleased with the car. One thing.
It is very annoying that when starting with the key the radio turns on.
- First when the key is inserted into the ignition
- When the car is started.
I don't really listen to the radio at all. Please help.
- How to disable the radio from starting when the car starts by default?
- Now I have to do 2 times 2 clicks to switch from radio to usb
- How to configure the system at startup so that it automatically starts from USB and not from the radio. Without pressing any buttons at all. Thank you!
Video: pioneer 4019 clock setting
Also, in some Pioneer radios, you can call up the clock settings menu by simultaneously pressing the CLOCK + FUNC keys or by going to the SYSTEM item and finding the corresponding sub-items CLOCK SET/CLOCK OFF, which is located in the main settings block.
How to change language
To change the settings language, go to the system settings (SYSTEM), located in the main settings block, which may require holding down the SRC or SOURCE buttons. After this, we find the LANGUAGE sub-item, where we select the language we need.
Direct connection
So, if you properly understand the connectors and wiring, it will be difficult to make a mistake. Everything should be clear here: take the connector and connect it to the answer. But people love complexity and choose a labor-intensive procedure. Disconnect the wiring from the detachable plugs and connect it, guided by the functionality of the wiring.
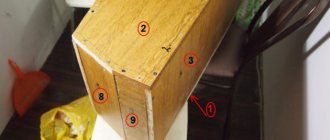
Radio chip diagram
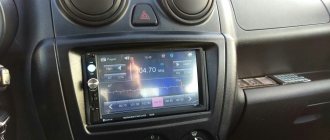
In all interiors, there are places for mounting a radio on the consoles or on the instrument panels. In some cars, such places are hidden under a decorative panel. And, before you begin installing the car radio, the panel should be removed by unscrewing it with a screwdriver.
You will get a compartment. From it you need to remove the mating wires, which are necessary to connect the Pioneer car radio to the system. After this, connect the wires or connectors as shown in the photo of the diagram. And only now should the Pioneer be installed in the lot, in its seat.
Video: “deep” settings menu + disabling DEMO mode + disabling time
Turn off the demo
To disable the demo mode, turn off the car radio, and then turn it on again by long pressing the SRC button (maybe the SOURCE button), after which we get to the start settings menu, where using the joystick or the right-left buttons we find the DEMO ON sub-item, and then change it parameter to OFF.
How to adjust the bass
To adjust the bass level, you need to switch the rear speakers to subwoofer mode, which is described in detail in subparagraph 1. Also, to obtain richer bass, correct adjustment of low frequencies through the equalizer, as well as activation of the BASS BOOST function, which is disabled by default, can help. To do this, turn off and then turn on the radio using the SRC (SOURCE) button, and go to the preset menu, where we look for the BASS BOOST sub-item, after which we activate it.
Depending on the Pioneer audio recorder used in the car, there may be other parameters, which you can familiarize yourself with by carefully reading the instructions for the device, which is included in the kit or can be downloaded via the Internet.
Review of JVC KD-R90BT car radio
Setting up a jvc car radio
Since the very beginning of its existence, JVC has loved to surprise car owners with unusual head units. This rule also applies to the JVC KD-R90BT. So:
- Compared to its analogues, this device looks very unusual. Despite its simple appearance, the radio will be able to surprise even the most biased music lover.
- The main disadvantage of the console remains the plastic buttons, painted to look like aluminum.
- During playback, the radio easily reads file names.
- The display has the ability to change the color scheme, but the screen brightness could be a little higher.
- Operating the radio is, as always, very simple, which applies to all types of JVC car radios.
Despite its modest size, the JVC KD-R90BT car radio has a very powerful amplifier. Built-in and made with MOS-FET technology, its 24-bit digital converter delivers full sound. The output power of the car radio is 200 W (4x50 W), and the sound first passes through a 5-band equalizer. It is worth noting that the sound compensator completely eliminates wave delays from the head unit to the speaker. The amplifier has the following technical characteristics:
- It is equipped with field effect transistors.
- The maximum power is 4x50 W.
- Rated power is 20 W.
- The sound fluctuates around 40-20,000 Hz.
- 5 - band equalizer.
- Ability to save your own sound settings.
- Sound processor with delay equalization capability.
- Volume control is divided into 3 areas.
- Built-in frequency filters.
- Function for activating maximum sound amplification.
- Fader – the ability to adjust the volume level of the front/rear speakers.
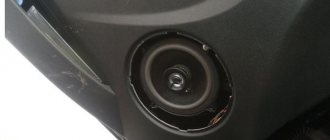
- Additional linear outputs for a subwoofer (see How to connect a subwoofer to a car radio: lessons for amateurs).
Despite the rapidly losing popularity of CDs, manufacturers still decided to install a CD player in the radio. The main feature of the player is reading rewritable discs. The CD player supports MP3 and WMA formats, with sound frequencies ranging from 5-20,000Hz. Playback is carried out both in random order and by repeat method. It is possible to remove the disc even when the power is turned off.
CD player specifications:
- Due to the ADS operating scheme, the player reads both CD-R and CD-RW discs.
- Resistance of the read mechanism to extreme conditions.
- Sound reproduction range 5 – 20,000Hz, noise level 102 dB.
- Play in random and repeat mode.
- Shows the audio file name on the display.
- Eject media even when the power is off.
Additional features
The JVC KD-R90BT car radio has the following features:
- Availability of two linear USB inputs and a Bluetooth adapter.
- Compatible with all mobile device systems.
- Removable front panel with protective plastic case.
- Display a monochrome clock on the main screen.
- Automatically mute the sound if the phone rings.
- Multifunctional remote control.
- The presence of a Passer adapter, with functions for controlling the radio on the steering wheel of the car.
Equipment
The JVC KD-R90BT car radio set comes with the following configuration:
- Directly car radios.
- Microphone.
Microphone for jvc car radio
- Cable set.
- Power wires.
- Remote control.
- Instructions.
- Warranty card.
- Case for the panel.
- Installation tools.
Antenna for car radio jvc
How to turn off
The radio is turned off by pressing the SRC or SOURCE button (but it is worth remembering that another button, for example, FUNC, can be programmed for this function, which directly depends on the model of the radio being used).
Once the radio is fully configured, you can safely enjoy the high-quality and rich sound of the car’s audio system, which will make even long trips more comfortable and enjoyable.
Secrets of automotive alchemy: recipes for creating your own anti-freeze
We independently connect the LED strip in the car
Supra
After pressing the MODE button, select the Radio function, then RADIO and the saved band with the broadcast frequency will be displayed on the screen. Pressing BND selects the desired broadcast band.
Next, you need to press the key with numbers from 1 to 6 to use the already saved radio station in the radio.
Press and hold the >>|| button.
Then click the button >>|| to select the desired station. If these keys are not pressed for up to ten seconds, everything will return to its original operating mode.
Automatic tuning and scanning of selected radio stations
Search for existing radio stations in memory:
Briefly press the AS/PS key to start searching for saved radio channels. Any station can be listened to for about a couple of seconds. To automatically save radio channels, hold down the AS/PS key. The receiver will tune in to six optimal stations, which are the most powerful in this broadcast range. This option can be used in any wavelength range. Once the automatic saving of stations is completed, the receiver will stop scanning them.
To tune into a specific radio station, press the >>|| button, this will scan and select radio channels with the best reception signal. By pressing the >>|| button, you can manually select the station you want. Hold down the key numbered 1 to 6 for about a couple of seconds to memorize the channel under the desired key.
When tuning stations, it is possible to leave 30 FM radio channels and 15 AM channels in the tuner.
Installing stations manually:
- Select a broadcast band by pressing the TUNER BAND key.
- Click on button 4 to set the station.
- Hold down the key with any selected number on the panel to memorize the station in the radio's memory. The selected number will start blinking, after which you will see the station stored under the selected number. For example: To tune to station number 14, press the +10 key, followed by the 4 key for approximately three seconds or more.
- To store other radio stations in the device’s memory, you need to repeat steps one through three. And to change the settings of the entire station, you need to repeat the entire process from the beginning.
Tuning stations in automatic mode:
Stations will be given numbers by increasing the frequency range.
- Select the range by pressing the TUNER BAND key.
- Press and hold the AUTO PRESET button on the panel.
- To set a different range, you need to go through steps one through two again.
To replace selected stations in automatic mode, you must use manual installation.
Kenwood
Kenwood radios offer three types of autoradio settings: automatic (AUTO), local (LO.S.) and manual.
- Press SRC until “TUnE” appears.
- Press FM or AM to select a band.
For automatic setup, click >>| or |.
In case of manual tuning, after all the above steps, ST will light up, indicating the found station.
At the beginning of our article, it makes sense to immediately note that the following method for setting up a radio is designed for an entry-level user, and there is nothing overly complicated in it. Note also that the quality of the reproduced sound usually depends only 33% on the composition and quality of the equipment components. Another third depends on the correct installation of the equipment, and the remaining 33% depends on the correct setup of the audio system.
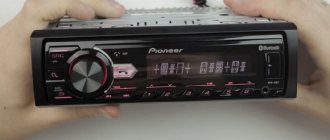
In this article we will look at how to set up a Pioneer radio. Adjustment recommendations are discussed using the example of the Pioneer DEH-1900UB model from the 2022 line. They can also be used to adjust other modern Pioneer car radios, since they all have the same menu. The exception is processor devices, the configuration of which is somewhat more complicated.
Specifications
The device discussed in the review has the following technical characteristics:
- view - car player;
- case format - 1 din;
- front panel color - black;
- TV tuner - absent;
- power supply method - connection to the vehicle’s on-board network with a voltage of 12 V;
- total number of sound channels - 4;
- average output power of 1 channel - 40 W;
- highest output power - 400 W;
- equalizer - present;
- operating frequency range - 20...20000 Hz;
- the ability to read CD/DVD discs is absent;
- playable file formats - FLAC, MP3, WAV;
- GPS navigator - absent;
- Bluetooth module - not provided;
- Wi-Fi module - absent;
- types of front connectors - AUX, USB;
- front panel type - removable;
- screen type - segment;
- the ability to control the device using the touch screen is absent;
- screen backlight color - white;
- analog inputs - none;
- analog output type - RCA;
- frequency ranges of picked up radio waves - AM, FM;
- number of memory cells for recording radio stations - 24;
- making phone calls via the wireless module - absent;
- compatible mobile devices - smartphones based on Android and iOS, iPods;
- the ability to connect a rearview camera is absent;
- equipment - a set of installation cables, a cover for the front panel, an ISO adapter, a remote control, an instruction manual;
- equalizer type - 5-band;
- planting depth - 15.5 cm;
- width - 18 cm;
- height - 5 cm;
- head unit weight - 1.1 kg.
Functions
The Pioneer multimedia system offers the user the following functions:
- playback of music from third-party media;
- search and store in memory radio stations operating in 2 frequency ranges;
- reading files from smartphones, portable players;
- receiving RDS signals used to transmit traffic news;
- control playback of tracks using standard steering wheel buttons;
- control device functions using a wired remote control;
- Several equalizer settings options.
Typical faults
Pioneer car radio error
Before we talk about the car radio connection diagram, let's look at the main malfunctions that can occur during its operation:
- The system does not turn on. If such a problem occurs after installation, then first of all the Pioneer car radio circuit is checked - perhaps errors were made during the connection. Also, the reason may be due to a lack of power - you need to check the quality of the connection of the device to the vehicle’s on-board network. If you are using a remote control for a Pioneer radio, it may be using dead batteries or the remote control may simply be out of order. If the power is activated by pressing a button, then there is a possibility that it is the button that is inoperative.
- From time to time, the sound in the speakers disappears and then appears again; in such cases, the reason may be an error in the amplifier. In this case, a characteristic error message may appear on the device display. Typically, the cause is a short circuit or regular operation of the system at maximum volume. A short circuit can occur not only in the wires of the radio connection circuit, but also on the contacts going to the speakers or on the speakers themselves. It is possible that the short circuit is caused by damaged wiring. In this case, it is necessary to measure the voltage at the output of the amplifier, try to connect the speakers bypassing the amplifier, and diagnose the connectors, as well as the safety elements.
- One or more speakers have stopped working. In this case, the Pioneer car radio circuit is also checked; there is a possibility that errors were made when connecting the radio connector. But most likely, the reason should be sought on the speakers themselves - either the speakers are faulty or there is poor contact on them.
- The system does not respond to the remote control. Most likely, the reason lies in a non-functional remote control; this is a common problem for many audio systems.
- Incorrect configuration of the Pioneer radio can lead to incorrect operation of the audio system as a whole, so before operation the device must be configured correctly (video author - Radioblogful channel. Video blog of a soldering specialist).
Compatibility with other devices
The digital media receiver is designed to be used as a player for music stored on portable mobile devices. It does not have a separate slot for CD memory cards, but the USB and AUX-IN connectors on the front panel allow you to connect devices running Android v2.3 (and earlier versions) or a USB 2.0 mass storage class flash drive.
The source is selected by sequentially pressing the SRC/OFF button on the front panel: TUNER - USB - AUX.
When you press the SRC button, the flash drive is selected as the signal source in the USB position.
At the same time, the backlight of the corresponding stencil lights up.
An additional stereo amplifier or subwoofer can be connected to the preamplifier outputs located on the rear panel of the Pioneer MVH radio.
Connection diagram
You can connect the car radio in your car yourself. On the rear panel of the car radio there are 2 ISO connectors, combined into a single design. Each of them is certified according to the European standard (analogous to the domestic GOST).
This means that a wire of corresponding functionality is connected to each pin of the 8-pin connector. One connector, the pins of which are marked with the letter A, is used to connect to the power circuits of the vehicle's voltage and ground sources, and the display backlight. The second ISO connector (pins marked B) is intended for speaker systems.
When you turn the key in the ignition switch, connection occurs when it is set to the ON position. You need to turn the radio on or off by pressing the SRC/OFF button on the control panel.
Configuration Features
The configuration and other parameters, including activation of the front mode and subwoofers or on all four channels, are set through the start menu item. A passive subwoofer can also be connected to an amplifier.
According to the instructions, it is necessary to connect additional power wires to the Pioneer MVH-280FD radio so that in the end there will be no problems associated with standard wiring and fuse
This is an important caution because the vehicle's standard fuses can handle 7.5 A.
An important point: the Pioneer MVH-280FD radio does not have any elements or features for heat dissipation, whereas in an analogue model with the same power parameters, almost half of the entire structure is located behind a cast-type radiator.