Checking the engine cooling system of VAZ 2108, 2109, 21099
We will check the engine cooling system of VAZ 2108, 2109, 21099 and their modifications independently, without the help of specialists and technicians. The reason for checking may be a constant decrease in the coolant level in the expansion tank, or overheating or not warming up the engine, etc.
Checking the engine cooling system of VAZ 2108, 2109, 21099
Checking the coolant level in the expansion tank
It should be 25-30 mm above the MIN mark printed on its side. The engine must be cold when checking. If the level is lower than required, add a little liquid similar to that poured into the cooling system (antifreeze, antifreeze).
MIN and MAX marks on the expansion tank of the cooling system
If the level in the expansion tank constantly drops, we establish the cause of the malfunction. In most cases, the location of the leak can be determined by visual inspection (see paragraphs below). For example, a loose clamp on a hose.
Checking the cooling system for coolant leaks
Checking for coolant leaks should be carried out both on a cold engine and after starting, during warm-up, since the leak may be periodic and temperature-dependent.
Checking the system drain holes in the radiator and cylinder block
We inspect them for coolant leaks. If necessary, pull it out of the plug (on the radiator by hand, on the block with the key set to “13”).
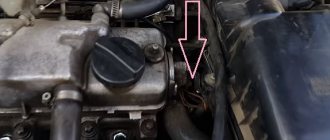
We check the tightness of the coolant temperature sensor and the fan switch sensor
We inspect their installation locations (under the distributor and in the left radiator tank), tighten them if necessary.
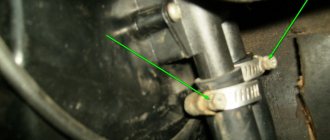
Checking the hoses and tubes of the engine cooling system
It is necessary to inspect the places where they fit on the pipes and fittings of the system elements, and the tightness of the clamps. In addition, the integrity of the hoses is checked by inspection and feeling by hand.
Loose clamps can be tightened with a screwdriver or a wrench (but without much zeal, since you can cut through the hose with the clamp). It is advisable to replace all unreliable clamps with proven, good quality ones.
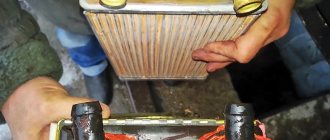
Checking the radiator of the engine cooling system
We carry out a visual inspection of its tanks (they are installed on rubber gaskets, which over time begin to leak coolant) and the pipes on which the hoses are attached. In addition, we pay attention to contamination of the radiator. Heavily contaminated ones will have to be washed, as the engine may overheat.
Checking the expansion tank
There should be no cracks in it, the hoses going to it must be securely fastened and sealed. See “Expansion tank VAZ 2108, 2109, 21099”.
Checking the pump (coolant pump)
A coolant pump malfunction is almost invisible in its early stages. Signs of this may include dampness of the pump body and the front part of the pan. The gasket under the pump body or the oil seal on the axle may not be airtight (if the oil seal fails, coolant begins to ooze through the drainage hole in the bottom of the pump). You can also hear increased noise from the front of the engine when it is running. You can swing the pump axle by hand by its pulley (check the bearing). Strong play indicates wear of its parts.
Checking the heater radiator (“stove”)
Most often, signs of a leaky heater radiator or its tap are the appearance of dampness in the front passenger's feet and the sweetish smell of antifreeze in the cabin.
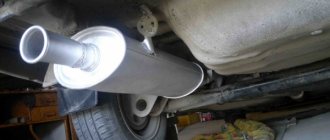
Checking the coolant supply pipe to the pump
A metal pipe is installed behind the engine and attached to the block. We inspect it for loss of tightness.
In addition to the above, coolant can escape through a “punched” head gasket or a crack in it or in the block. It is impossible to visually detect such a leak. There are only indirect signs here. For example, constant bubbling of coolant in the tank, wet spark plugs, white deposits on the oil filler cap and dipstick, antifreeze in the engine oil.
Checking the thermostat
We start the engine and watch the thermostat warm up. If it is working properly, then first its upper part will warm up (the small circle of the cooling system is working), then the lower part of the thermostat will warm up sharply (the large circle is working and liquid flows through the radiator). All this can be understood by touching the thermostat with your hand. If the real picture of what is happening does not correspond to what is described, the valve in the thermostat is stuck, either in the open or closed position.
The upper part of the thermostat begins to heat up immediately after starting the engine, the lower part only after its thermal valve begins to open.
Checking the operation of the fan on the radiator
We continue warming up the engine at idle, which began in the previous paragraph. After 10-15 minutes, the fan on the radiator should automatically turn on. If this does not happen, check its sensor and electric motor. There are check features for cars of different years of manufacture.
Disassembly
Having removed the gearbox, you can proceed directly to the main thing - disassembly. This will allow you to change damaged elements as you work, identify existing faults and solve problems on your own.
- Clean and thoroughly wash all external surfaces of the gearbox.
- Place the box in a vertical position and remove the back cover.
- Remove the clutch cable bracket, then use a rubber hammer to knock the rear cover off the gearbox.
- Remove the old gasket. She will be replaced.
- Engage any of the two gears - 3 or 4.
- Unscrew the bolt that holds 5th gear, then turn it on.
- Simultaneously turning on the indicated speeds will allow you to fix the shaft and prevent it from turning.
- Unscrew the nut on the secondary shaft, and then on the primary one.
- Remove the 5th speed synchronizer along with the fork.
- Remove the fork from the coupling. Remove the synchronizer as carefully as possible. If you allow the clutch to move away from the hub, the spring-loaded balls that secure the synchronizer will simply fall apart.
- Remove the 5th speed synchronizer locking ring.
- Remove the 5th speed driven gear from the output shaft.
- Remove the thrust ring located on the needle bearing.
- Remove the needle bearing itself from the 5th speed gear.
- Remove the drive gear from the drive shaft and remove the bearing plate.
- Now the needle bearing bushings should be removed from the secondary shaft, and the thrust washer should also be removed.
Jewelry work
- Take out the ring that secures the input shaft bearing, and then a similar ring for the secondary shaft.
- Unscrew the locking plug and remove the ball and locking spring. Next you can get a couple more clamps.
- Remove the rear engine mount.
- Unscrew the reverse gear lock plug, tilt the box and thus remove the lock ball and spring.
- Remove the clutch housing and gearbox housing mounting bolts.
- Acting as carefully as possible, separate the two units. To do this, there are grooves in the crankcases into which the ends of a screwdriver are inserted. By shaking, you can disconnect the elements without any problems.
- Remove the gearbox housing.
- Unscrew the bolt securing the 1st and 2nd speed shift fork.
- Remove the fork and stem.
- Unscrew the bolt securing the 3rd and 4th speed forks.
- Separate the rod head from engagement with the lever, remove it along with the fork from your gearbox.
When disassembling the box into parts, be sure to pay attention to the condition of the elements. If you detect faults in time and replace gearbox components, you can get by with inexpensive but very effective self-repair
Disassembled gearbox
What to pay attention to
So, following the instructions, we disassemble the gearbox of your VAZ 2109
Along the way, we pay attention to the following points:
- Bearings. When they wear out, a noise from the box occurs. Plus, worn bearings negatively affect the condition of other gearbox elements;
- Synchronizers and sealing washers. If their condition leaves much to be desired, then the gears shifted poorly precisely because of them. Replace them;
- Clutch system, cotters, coupling hub clamps. All this must be replaced separately if there are signs of wear or defects;
- Blocking rings, synchronizers. If there are chips or nicks, don’t even think about alternative solutions, replace them immediately;
- Bearing tracks. Over time they wear out. If signs of wear are found, perform a complete replacement. In this state, they were only a short time away from breaking;
- Gap between gears and locking rings. Normally it is no less than 0.6 mm. In case of deviations, there is only one solution - replacing the rings;
- Retaining rings. If elasticity is lost, these elements must be changed, since they will no longer be able to perform their functions.
When assembling the gearbox, do not forget to lubricate the new gaskets with a layer of lithol. And when pressing the oil seals, do it with the working edge inward. The metal clip should be located on the outside.
https://youtube.com/watch?v=cgCFhYP17
During the process of reassembling the gearbox, all rubbing components should be treated with oil, and do not forget about the sealant for connecting the clutch housings and gearbox. Doing everything yourself is quite possible.
Loading …
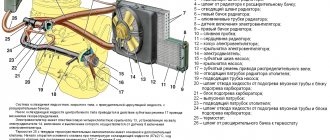
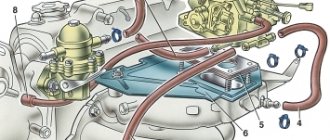
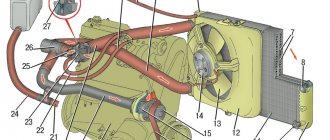
Engine cooling system VAZ-21083
1 – expansion tank; 2 – expansion tank plug; 3 – steam removal hose; 4 – hose from the expansion tank to the thermostat; 5 – radiator supply hose; 6 – radiator outlet hose; 7 – left radiator tank; 8 – aluminum radiator tubes; 9 – sensor for turning on the electric fan; 10 – right radiator tank; 11 – drain plug; 12 – radiator core; 13 – electric fan casing; 14 – electric fan impeller; 15 – electric motor; 16 – pump gear pulley; 17 – pump impeller; 18 – camshaft drive toothed belt; 19 – heater radiator outlet pipe; 20 – pump supply pipe; 21 – tap; 22 – heater radiator; 23 – hose for draining fluid from the heating of the inlet pipe to the carburetor heating block; 24 – carburetor heating block; 25 – exhaust pipe; 26 – heater supply pipe; 27 – hose for draining fluid from the heating of the inlet pipe and the carburetor heating unit; 28 – coolant temperature indicator sensor; 29 – thermostat.
Apply force to the bearing race,
— press the impeller off the shaft and remove the oil seal.
Control
Check the axial clearance in the bearing.
This operation must be done if significant pump noise is noted. The gap should not exceed 0.13 mm with a load of 49 N (5 kgf). If the gap is larger, replace the bearing with the roller with new ones.
It is recommended to replace the pump seal and the gasket between the pump and the cylinder block with new ones during repairs.
Cracks and deformations of the body are not allowed
Features of the VAZ injector cooling system
Cooling in cars 21093,2109,21099 is liquid, but you need to understand that the radiator is cooled by the flow of incoming air and a fan, which increases the cooling intensity. Also, part of the heat is removed by the car's interior heater radiator at low temperatures.
The expansion tank is designed to compensate for the volume of liquid when heating, to top up and control the level of antifreeze.
The thermostat system provides temperature control, preheating of the VAZ engine, initial heating of the interior in winter, and only then ensures the inclusion of a large cooling circuit.
The temperature sensor provides control of the cooling system, allows you to monitor the engine temperature and regulate the operation of the fan.
The entire operating cycle of the cooling system is controlled using a power unit control system that takes into account all temperature parameters. It determines the optimal switching conditions and operating time of the structural elements of the system.
How does the VAZ-2109 cooling system work?
Where does the work of the CO begin?
From the expansion tank, which is the main element in the entire system. It contains all the liquid, as well as its excess (boiled antifreeze, which is transferred to a special tank). After it has cooled down, it immediately continues its work. The volume of CO in a VAZ-2109 car is 7.8 liters. The tank has valves that maintain pressure. When the pressure increases, the exhaust valve begins to operate, and when the pressure decreases, the inlet valve begins to operate. The tank is translucent, so checking the fluid level will not bring you any inconvenience.
Special hoses connect the expansion tank and the thermostat.
The stages that the liquid goes through are:
- A sensor is installed in the cylinder block that monitors the temperature. These readings can be seen on the dashboard.
- When the engine starts running, liquid from the jacket flows into the radiator, where it receives heat, or into the thermostat to warm up the engine.
- After this, the cooling liquid passes into the injector. It circulates using pipes and clamps.
- The VAZ-2109 uses a centrifugal pump. The radiator does not have a filler hole; an expansion tank is used for this. It contains a sensor that turns on the fan. If you want to drain the fluid, unscrew the drain plugs on the radiator, tank and cylinder block.
Parameters of the VAZ 2109 injector cooling system
The cooling system of the VAZ 2109 injector is practically no different from other VAZ cooling systems. The proud prefix “injector” may indicate that the system has a thermostat of a different configuration, but this is not a fact. It can also be a regular number eight. We won’t start spewing letters about how a cooling system is necessary and you can’t go anywhere without it; even a child can understand this. We present only some book parameters for precise control of system performance. Parameters are temperature conditions that the system must maintain and adjust, depending on the condition of the engine.
- The volume of the cooling system of the nine is 7.8 liters. They pour whatever they like into the system, but we would not recommend following the lead of genetic memory and pouring Antifreeze into the expansion tank. Real Antifreeze A40 has not been produced for twenty years, and what is sold under this brand is rare rubbish, not recommended for use. Nine will gladly swallow any coolant recommended by AvtoVAZ or similar in composition.
- 99 degrees is the closing temperature of the fan motor relay. 93 degrees is the contact opening temperature, then the fan turns off. Knowing this, you can find out the approximate coolant temperature without a suspicious thermometer on the panel. The normal operating temperature of antifreeze is 85-95 degrees.
- The thermostat of the cooling system divides it into two circuits - large and small. This is convenient in the cold season, when, in order to quickly warm up the engine, the thermostat valve closes a large circle and the antifreeze circulates in a small circle. When it warms up to operating temperature or so, the valve opens and the antifreeze enters the large complete cooling circuit.
- The nine pump is of a centrifugal type and is driven by a timing belt. It must create a pressure in the cooling system of about 1 atmosphere. The impeller is made of metal-ceramic, the pump shaft rotates on plain bearings, which must be lubricated from the factory with Litol 24 grease. It is not maintained during operation, and in case of failure, in theory, cannot be restored.
CO elements
The cooling system used on the VAZ 2109 operates at low pressure. After studying the components, you will learn about their functions and features.
Peculiarities
It ensures efficient, stable operation of the system. The pump is used to pump cooling liquid, which facilitates its movement along a small or large circuit. The pump consists of a housing, an axle with a pulley located on it connecting to the timing belt, and a plastic impeller. The latter allows the coolant to move. A bearing lubricated with antifreeze is installed between the axle and the housing. Because of this, the presence of water in the system is unacceptable. Otherwise the bearing will collapse
Plays an important role, although in practice the CO can do without it. The system works in such a way that the engine first warms up to operating temperature (about 90 degrees Celsius), after which it is necessary to further cool the liquid. First, the coolant moves along a small circuit - through the jacket into the stove radiator, and then the excess is returned to the expansion tank. But when the operating temperature is reached, the thermostat begins to move the coolant flow into the radiator. A thermostat can be called a mechanical valve that automates the operation of the CO. Hot liquid acting on the bimetallic plate of the thermostat deforms it, which is why the coolant supply valve to the radiator can open or close
Thermostat and its design
Now let's talk about the thermostat, which is used on cars of the eighth series. In essence, the design of these devices is the same on all machines, but there are differences in small details. The essence of the work is to make timely switching and direct fluid from a small circle to a large one and vice versa. In other words, a thermostat is necessary to connect the main radiator to the circuit when the liquid temperature rises.
Consists of a mechanical valve, which is driven by a bimetallic plate.
Repair
Next, you have to check the condition one by one and take appropriate measures to eliminate problems with the following components of the starter:
- Brushes;
- Anchor;
- Overrunning clutch;
- Traction relay;
- Bushings.
Now let's talk about everything one by one.
Brushes
First, assess the current condition of the brushes. In most cases, they are the source of problems with the starter.
- Remove the pair of screws that hold the protective cover in place. The cover is now easy to remove.
- Use a screwdriver to remove the retaining ring from the shaft, and don’t forget about the adjusting washers.
- Unscrew 2 more tie rod nuts. Remove the manifold side cover.
- Use a screwdriver to press out the springs and remove the brushes from the holder.
- Measure the brushes with a caliper or ruler. If the height is less than 12 millimeters, the brushes must be replaced.
- It is also better to replace elements if there are chips, cracks and other defects on the surface.
Brushes
Anchor
If all is well with the brushes, the next suspect is the anchor.
- Remove the housing with the starter.
- At the anchor, look at the condition of the commutator, check whether the winding is intact.
- If there is carbon deposits on the collector or signs of breakdown, clean these areas with fine sandpaper.
- Check the armature and stator windings using a multimeter in ohmmeter mode.
Overrunning clutch
Parallel checking of the overrunning clutch with the armature will allow you to replace the latter at the same time.
To gain access to the clutch you will have to remove the armature from the front cover. At the same time, change it if necessary.
- Remove the retaining ring located near the overrunning clutch.
- Remove the restrictor ring.
- Remove the plastic lever stop, which will allow you to reach the anchor.
- Remove the intermediate support from the shaft.
- Check the condition of the gear teeth. If there are defects, the unit is replaced with a new one.
Bendix or overrunning clutch
Traction relay
Replacing the traction relay is necessary if, when voltage is applied to its terminals, the overrunning clutch does not extend. Sometimes the VAZ 2109 is equipped with collapsible relays. But it’s still better not to repair it, but to replace it with a new relay.
- To remove the relay, unscrew the two screws located on the front;
- Lift the relay, disconnect the armature from the lever;
- Remove the relay from the housing, grabbing the spring and armature. All elements are changed if necessary.
Relay
Malfunctions of the VAZ 21099 cooling system and their causes
Ineffective operation of the heat removal system, which results in overheating of the motor, is caused by:
- deterioration of heat transfer;
- impaired coolant circulation.
Insufficient radiator cooling
Poor heat transfer is associated with a coating of dirt that gradually forms on the inside of the tubes. This happens due to untimely replacement of the coolant, as well as due to its low quality. Dirt in pipelines also reduces their throughput.
Dirt-clogged cells formed by the radiator plates also
The inside of the system can be washed with special means, without dismantling its elements; the cells of the radiator removed from the car are cleaned with a stream of water and compressed air.
Impaired or lack of coolant circulation
The most common failure is a stuck thermostat valve. If this happens, then the path to the radiator is blocked - either completely or partially, as a result of which the liquid circulates mainly in a small circle. A failed thermostat cannot be repaired and must be replaced with a new one.
Sometimes problems arise due to steam-air plugs, which are formed due to air leaks into the pipelines through loose connections while the engine is cooling.
The air is discharged through the highest point - through the carburetor heating hoses or throttle pipe.
And, finally, the lack of circulation may be due to a breakdown of the pump - destruction or rotation of its impeller relative to the shaft. Repairing the pump is a thankless task, so it must be replaced.
Branches of individualization
The process of giving the salon an individual, unique appearance that will fully satisfy the owner’s needs can be divided into three branches:
- Replacement of standard elements with improved ones;
- Installation of additional components for the interior;
- Upholstery of the internal space with various materials.
Modernization is a useful event for the domestic nine. Even owners of cars in the Luxury configuration, where there are soft door panels and velor on the seats, complain about the poor build quality. What can we say about the standard gray interior.
Reasons for replacing the device
If during operation the temperature of the coolant increases and the level does not decrease, then most likely there are problems with the radiator. Since the tubes of the device are aluminum and their diameter is small, they cannot be repaired. Today, auto stores offer various coolant-soluble additives and plugging fistulas. However, it should be remembered that their use is a temporary measure. During the trip, the malfunction may occur again and lead to serious consequences.
Diagnostics
To carry out diagnostics, arm yourself with a conventional tester with voltmeter mode.
- Connect the battery terminals to the poles of your measuring device. You will need an assistant to drive.
- After connecting the terminals to the voltmeter, look at the readings of the device. If the battery is working properly, the data will be 11-13 V.
- Turn the ignition key and at this moment measure the voltage. If the losses are only 1-2 Volts, then the starter works normally and does not show resistance.
- If the voltmeter parameters decrease by 2 times or more, the reason is in the starter. Or rather its bushings or brushes.
- Remove the starter and check the relay. Connect the battery terminals to its terminals on the body and transfer it to 12 V. If the overrunning clutch moves in the front cover, then the relay works perfectly. If not, replace it.
https://youtube.com/watch?v=mZu24DzhXns
Coolant leaks
VAZ 2109 cooling system flushing
There may be several reasons for this problem:
- The hoses through which it circulates are damaged. The clamps may have become loose at their connection points. Therefore, the liquid leaks. To eliminate this defect, all hoses should be replaced.
- The water pump seals have some defects on their surface.
Note: if this is the cause of the fluid leak, then water will flow out through the hole located in the pump housing.
- It can flow directly from the radiator (see VAZ 2109: replacing the cooling radiator yourself) or the tank. You need to take the car to a workshop, where workers will quickly solve this problem.
- Leakage occurs through a thermal switch. It needs to be changed.
- Small cracks in the system through which leakage occurs. Cracks on iron parts can be soldered.
Coolant leaks from inside
Note: To determine if this problem exists, you need to pay attention to the oil. Since coolant has a lower density than oil, it will collect on its surface. The consistency of the butter will feel like a milkshake.
The reasons may be as follows:
- Fluid is leaking through the cylinder gasket. To diagnose this problem, you should remove the cylinder head and look for cracks.
- The cylinder head is not screwed on properly. You should check how well the bolts are tightened and, if necessary, tighten them tighter.
Loss of coolant
This problem may occur due to the following reasons:
- The system is too crowded. Due to the fact that it functions abnormally, it is not able to pump the required amount of fluid. Therefore, it “pushes out” the excess.
- Overheating causes coolant to be pushed out of the system.
- The radiator cap cannot withstand heavy loads.
Note: You should check how it behaves under high pressure.
Brake calipers
The brake calipers are located on the front axle of the wheel and are responsible for tightly pressing the pad and brake disc. These spare parts have a long service life and can remain suitable for use throughout the entire life of the vehicle. This unit is based on an aluminum housing, to which a pipe for supplying brake fluid is connected.
DETAILS: Replacing the backstage of a VAZ 2109 - All about Lada VAZ cars
The front circuit calipers are attached to the hub with two fixing bolts. It is worth noting that if you are repairing or replacing any parts, it is not recommended to press the brake pedal with the pads removed, as this will cause the piston to be squeezed out of the system. It will no longer be possible to insert it back and you will need to completely replace the entire assembly.